Description:
Starting with LCOS version 10.12, the IKEv2 load balancer gives you the option to evenly distribute the load between VPN tunnels for large-scale enterprise scenarios.
In combination with VRRP, this provides for a high-availability cluster of central-site VPN gateways. The load balancer evenly distributes IKEv2 clients to individual grouped central-site VPN gateways.
This document uses an example configuration to describe how to set up and configure an IKEv2 load balancer scenario.
Requirements:
- LCOS as of version 10.12 (download latest version)
- LANtools as of version 10.12 (download latest Version)
- VRRP is required for the automatic selection of the master gateway in the LAN and in the DMZ (see
 ). This feature is currently supported on LAN interfaces only.
 - An upstream LANCOM router is required for WAN access. The data center at the headquarter requires a business (DSL) connection with multiple fixed IP addresses.
- A VPN client must support IKEv2 gateway redirect as per RFC 5685 (currently applies to all LANCOM routers and the LANCOM Advanced VPN Client on Windows).
- All routers belonging to the scenario must be time synchronized by means of NTP (also see
 ).
).
Scenario:
- IKEv2 site-to-site VPN connections are to be configured between the branch offices and the headquarters. Depending on the load at the data center, VPN load balancing distributes the connections between the various VPN gateways (in this example the routers VPN_1 and VPN_2).
- Both ends are equipped with an upstream LANCOM router with a functioning Internet connection (also see Requirements). All of the LANCOM routers in the following scenarios have at least a basic configuration and can be reached in their respective LAN (or via the WAN).
- This example describes how to configure a connection to a branch office with the IKEv2 load balancing for that connection.
Furthermore, at the data center a LANCOM switch is operated in the local network and a LANCOM (unmanaged) switch is operated in the DMZ.
It is also possible to use a single LANCOM managed switch for this scenario by using VLAN to separate the local network and the DMZ.
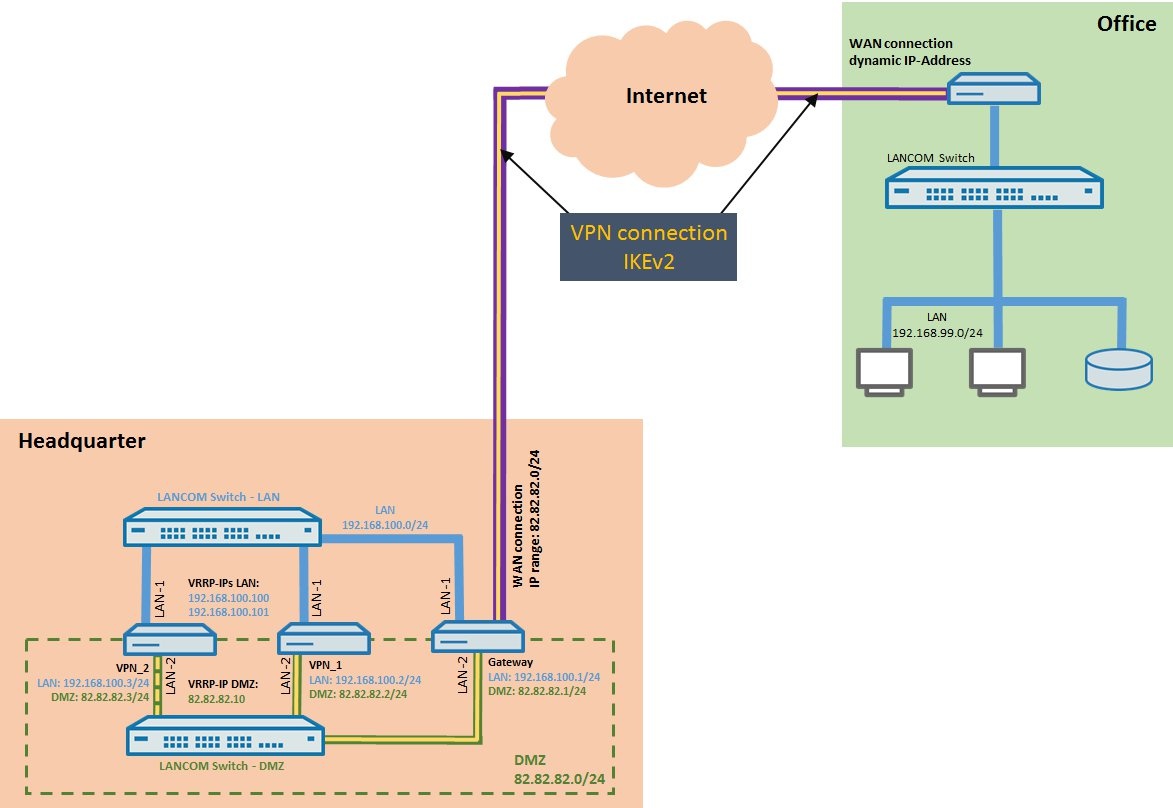
Procedure:
1) Set up the DMZ on the gateway at the headquarters
1.1) Open the configuration of the central gateway router and go to the menu IPv4 -> General -> IP networks. Modify the existing IP network DMZ by entering a public IP address from the IP address pool provided to you, along with the associated netmask.
Further information about setting up a DMZ with public IP addresses is available from the following Knowledge Base document  .
.
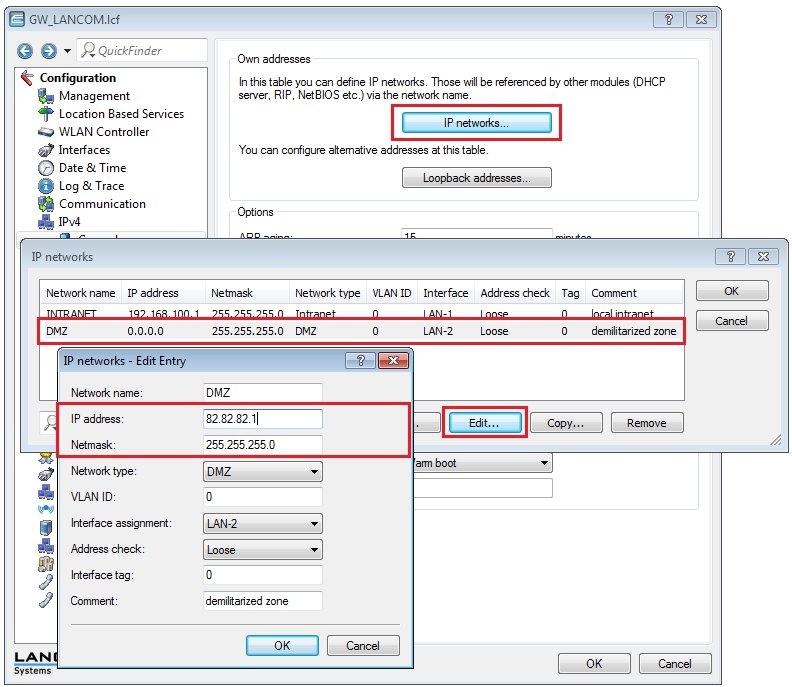
1.2) Change to the menu IP router -> Routing -> IPv4 routing table and, for the available default route, enable the option Masking intranet only.
1.3) In this configuration example, the physical Ethernet port 2 of the router (ETH-2) is connected to the LANCOM switch in the DMZ.
Since the DMZ is connected to the logical interface LAN-2, this setting is required in the menu Interfaces -> LAN -> Ethernet ports for the port ETH-2.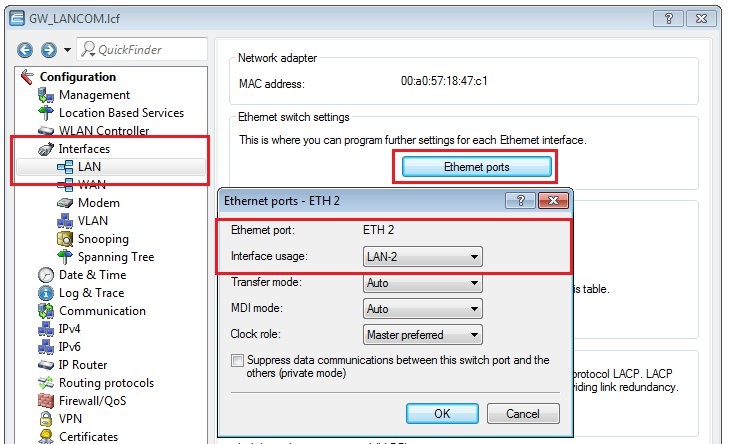
2) Configuring the VPN connection to the branch office on the VPN gateways at the headquarters (in our case VPN_1 and VPN_2)
The VPN connection to the branch office must be set up identically on each of the VPN gateways in order to provide the redundancy required by the IKEv2 load balancer.
2.1) On the VPN gateway VPN_1, start the Setup Wizard from LANconfig and select the option Connect two local area networks (VPN).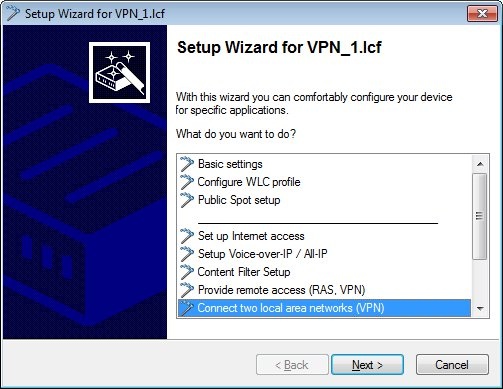
2.2) Select the exchange mode IKEv2.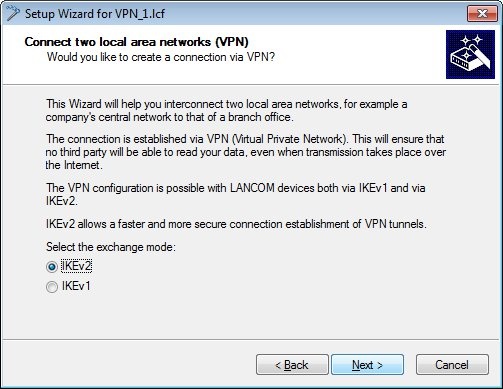
2.3) In this example, we do not use IPSec-over-HTTPS.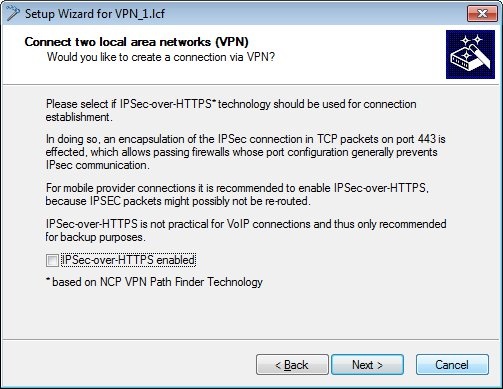
2.4) Set a meaningful name for the LANCOM router at the remote station (the branch office).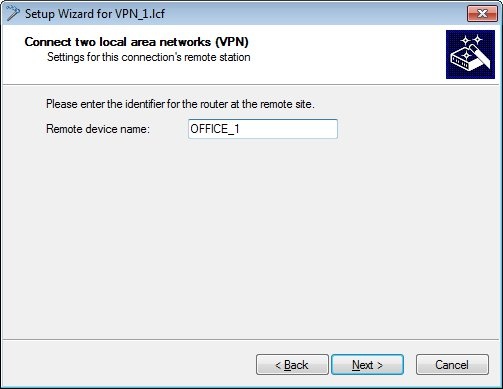
2.5) Enter any e-mail address as the fully qualified username.
You need this e-mail address later when you configure the VPN connection at the branch office (see step 6.5). 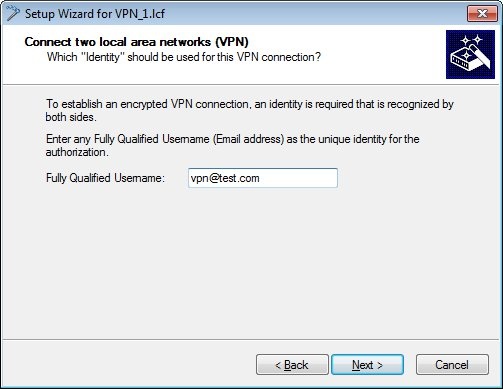
2.6) Create passwords for the local and the remote identity. 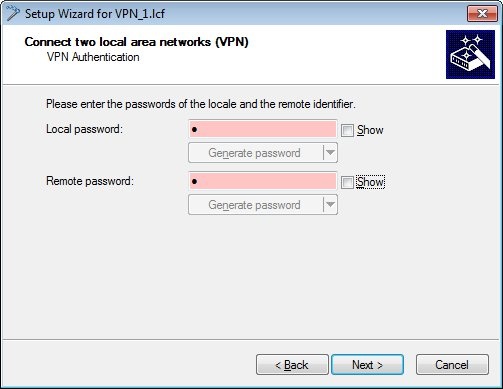
2.7) Since the LANCOM router at the headquarters should receive the VPN connection from the branch office, you need to choose the lower option and set the short hold time to 0.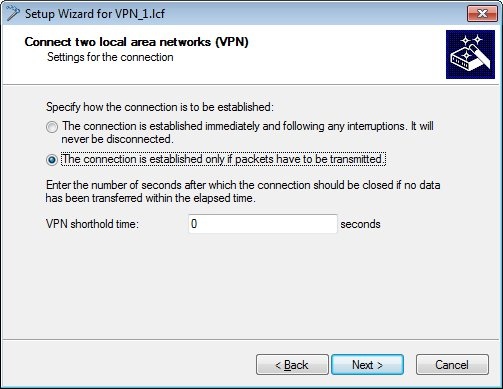
2.8 The gateway in this example cannot be set with an IP address because the WAN connection at the branch office has a dynamic IP address.
Because the local network in the branch office has the address range 192.168.99.0/24, this needs to be entered into the fields Address and Netmask.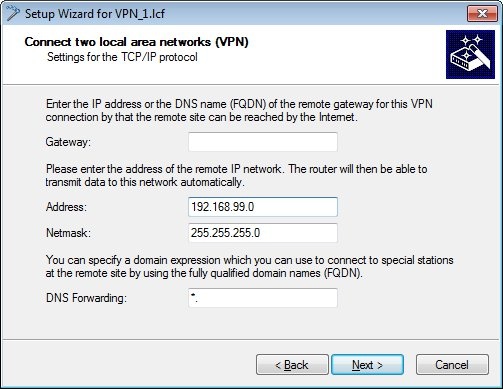
2.9) Click on Finish to close the Wizard and write the configuration back to the LANCOM router VPN_1.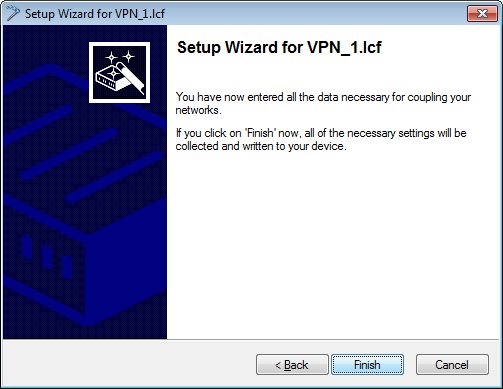
2.10) In LANconfig, open the configuration dialog for the VPN gateway VPN_1 again and switch to the menu item IP router -> Routing -> IPv4 routing table.
2.11) Edit the route for the VPN connection you just created for the branch office and enable the option Route is enabled and propagated via RIP...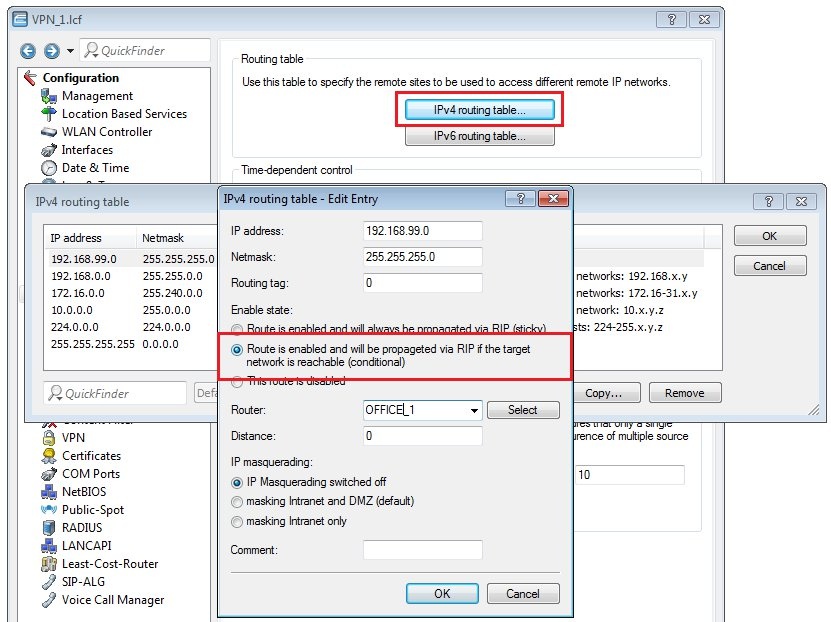
2.12) Perform steps 2.1 to 2.12 using the identical settings and parameters for VPN gateway VPN_2.
3) Configuring the DMZ and DMZ-VRRP on the VPN gateways at the headquarters (in our case VPN_1 and VPN_2)
3.1) Open the configuration of VPN gateway VPN_1, go to the menu IPv4 -> General -> IP networks and modify the existing IP network DMZ by entering another public IP address from the IP address pool provided to you and the associated netmask.
The VPN gateway VPN_1 obtained the public IP address 82.82.82.2.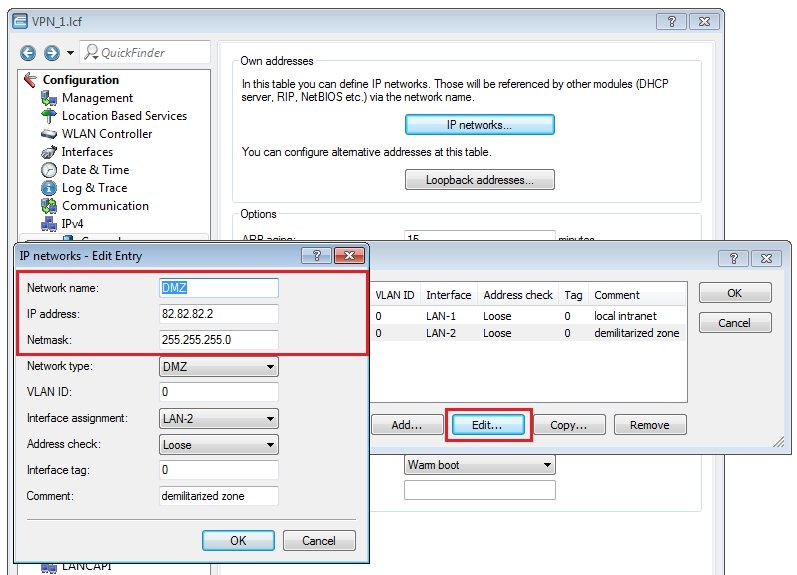
3.2) In this configuration example, the physical Ethernet port 2 of the VPN gateway VPN_1 (ETH-2) is connected to the LANCOM switch in the DMZ.
Since the DMZ is connected to the logical interface LAN-2, this setting is required in the menu Interfaces -> LAN -> Ethernet ports for the port ETH-2.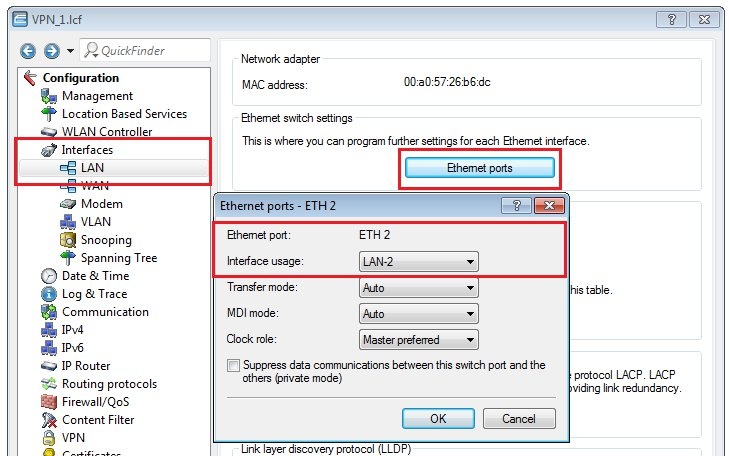
3.3) Navigate to the menu IP router -> VRRP and first enable the VRRP function.
Then click the button VRRP list to create a new entry.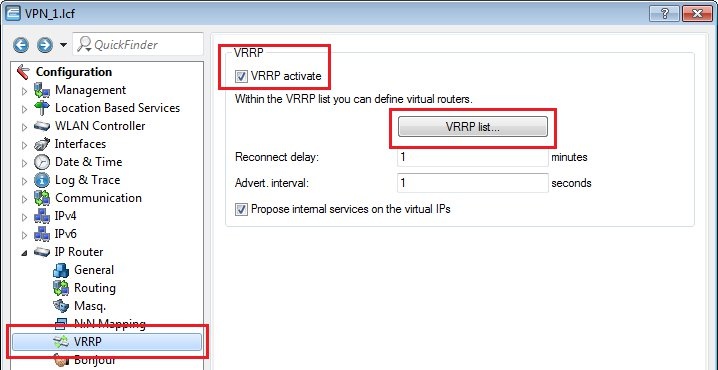
3.4) The Router ID for this device is set to 1. The VRRP IP address needs to be set to another of the public IP addresses from the IP address pool provided to you. In this example it should be 82.82.82.10.
The LANCOM router at the branch office will subsequently use this address as the gateway address for the IKEv2 VPN connection.
The VPN gateway VPN_1 will be the master device in this VRRP group. For this reason it is given the main priority value of 100, for example.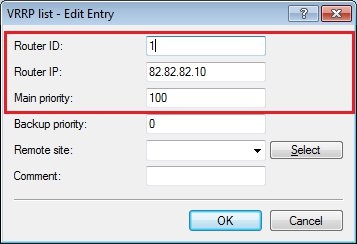
3.5) Switch to the menu IP router -> Routing -> IPv4 routing table and add a default route which specifies the public IP address of the central gateway as the router IP (see step 1.1) and has IP masking switched off.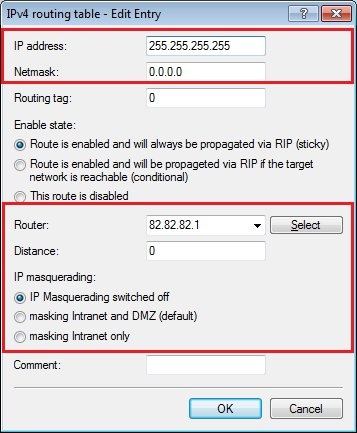
3.6) Write the configuration back to router VPN_1.
3.7) Open the configuration of VPN gateway VPN_2, go to the menu IPv4 -> General -> IP networks and modify the existing IP network DMZ by entering another public IP address from the IP address pool provided to you and the associated netmask.
In this example the VPN gateway VPN_2 should obtain the public IP address 82.82.82.3.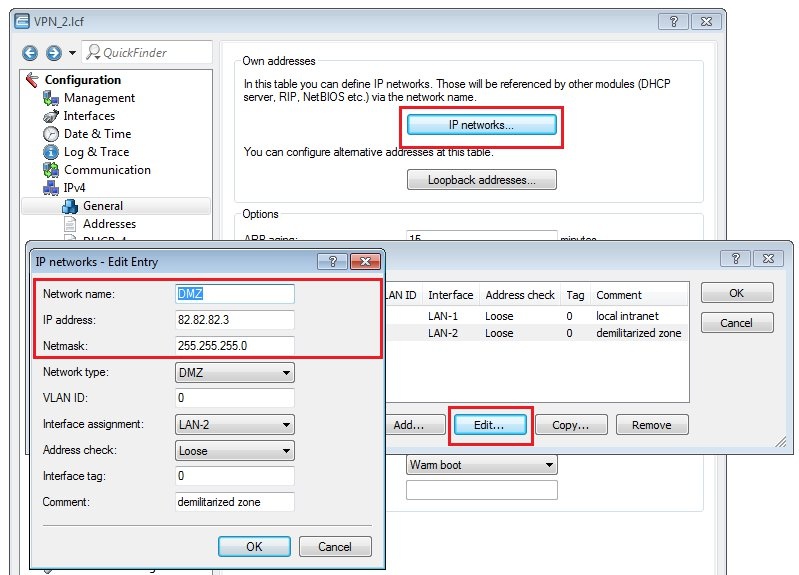
3.8) In this configuration example, the physical Ethernet port 2 of the VPN gateway VPN_2 (ETH-2) is connected to the LANCOM switch in the DMZ.
Since the DMZ is connected to the logical interface LAN-2, this setting is required in the menu Interfaces -> LAN -> Ethernet ports for the port ETH-2.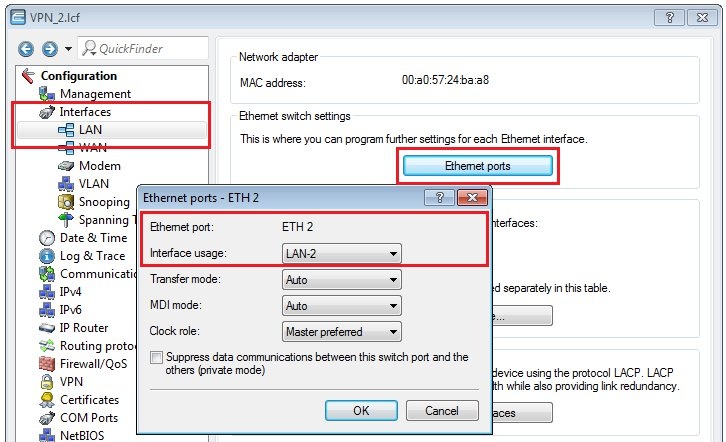
3.9) Navigate to the menu IP router -> VRRP and enable the VRRP function on this device too.
Then click the button VRRP list to create a new entry.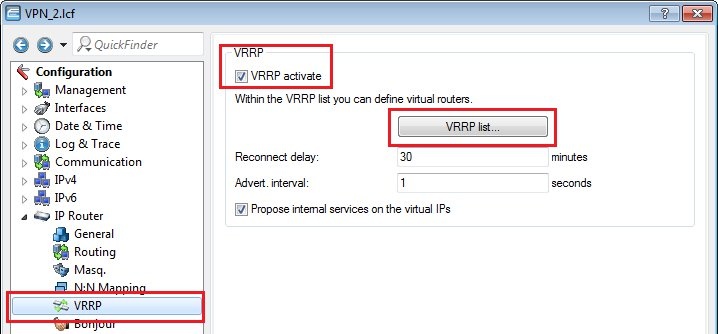
3.10) The Router ID for this device is also set to 1. The VRRP IP address must be the same public IP address from the IP address pool provided to you as that used for the device VPN_1 in step 3.4, i.e. 82.82.82.10.
The VPN gateway VPN_2 will be the slave device in this VRRP group. For this reason it is given the main priority value of 50, for example.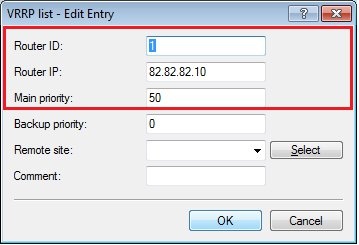
3.11) Switch to the menu IP router -> Routing -> IPv4 routing table and add a default route which specifies the public IP address of the central gateway as the router IP (see step 1.1) and has IP masking switched off.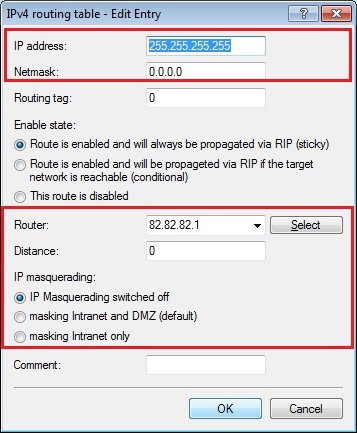
3.12) Write the configuration back to router VPN_2.
4) Configuring the IKEv2 load balancer on the VPN gateways at the headquarters (in our case VPN_1 and VPN_2)
4.1) Open the configuration of the VPN gateway VPN_1 and navigate to the menu VPN -> IKEv2/IPSec -> Load balancer.
4.2) First, enable the load balancer and then click the button Message profiles.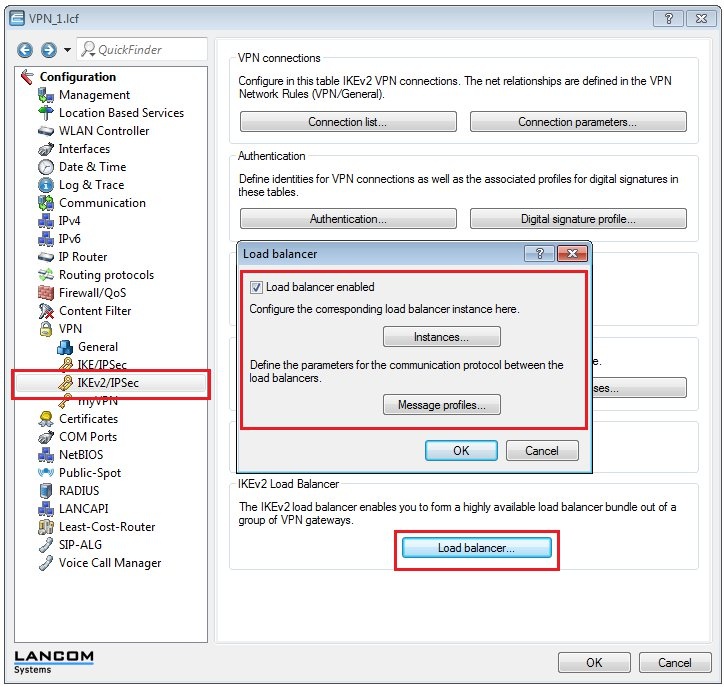
4.3) In this example we modify the existing default profile.
4.4) Select the Interface DMZ.
4.5) In order for the devices operating in the load-balancer group to mutually authenticate one another (in this case VPN_1 and VPN_2), you should set a password in the Secret field.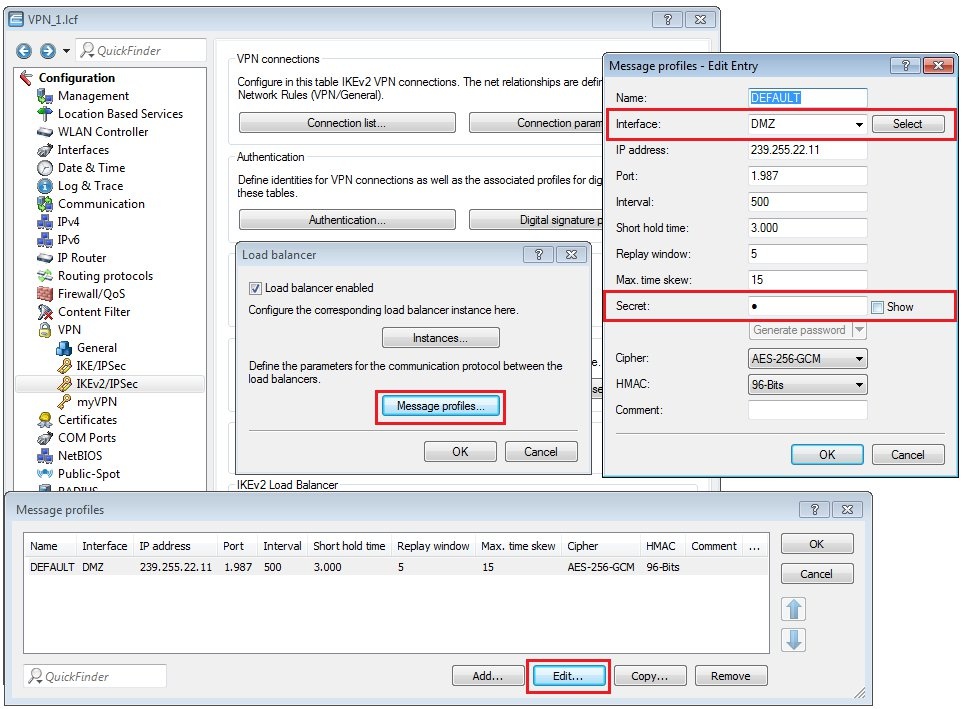
4.6) Save the configuration, and then click the button Instances.
4.7) Add a new instance.
- The VRRP ID has to be set with the same ID as configured in step 3.4 for the device VPN_1 (in this case 1).
- The field Local IPv4 redirect target is filled out with the public IP address of this device (VPN_1). In this example it is 82.82.82.2.

4.8) Write the configuration back to router VPN_1.
4.9) Open the configuration of the VPN gateway VPN_2 and navigate to the menu VPN -> IKEv2/IPSec -> Load balancer.
4.10) First, enable the load balancer and then click the button Message profiles.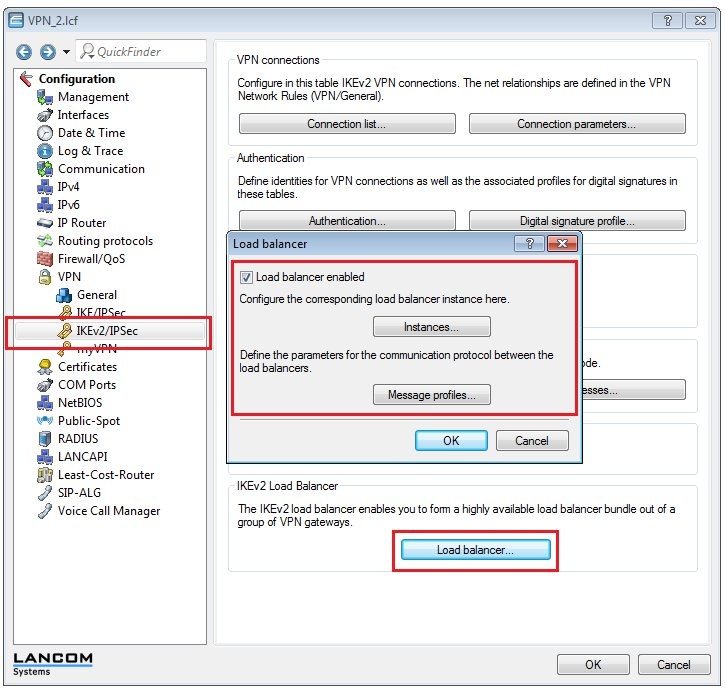
4.11) In this example we modify the existing default profile.
4.12) Select the Interface DMZ.
4.13) In the Secret field you enter the password that you set in step 4.5.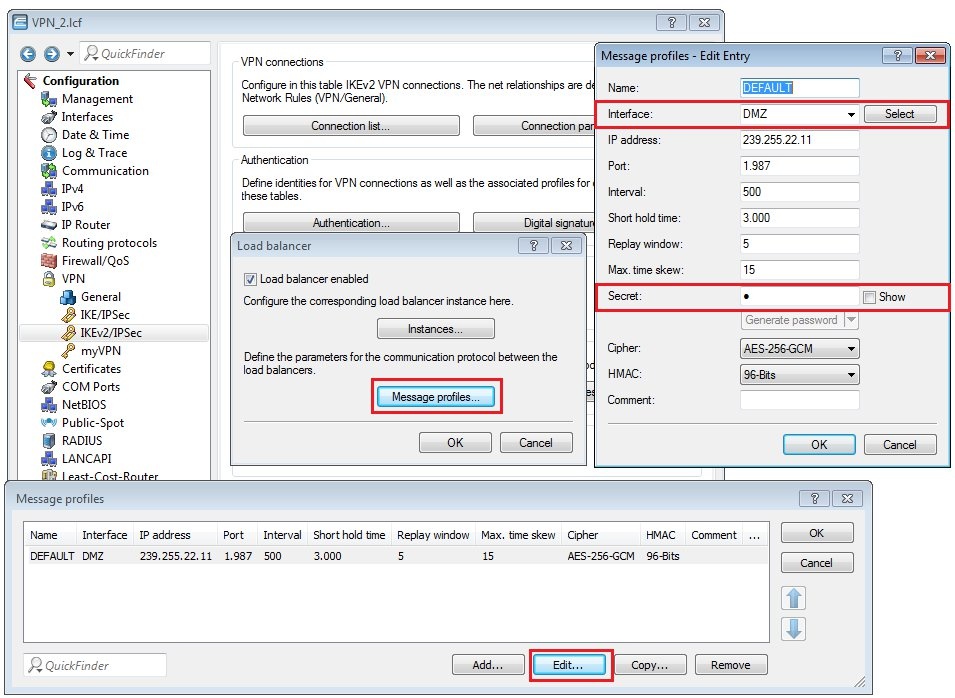
4.14) Save the configuration, and then click the button Instances.
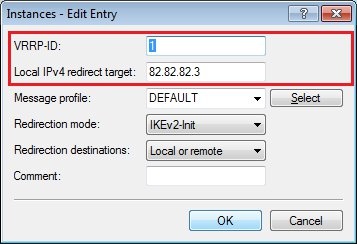
4.15) Add a new instance.
- The VRRP ID has to be set with the same ID as configured in step 3.10 for the device VPN_2 (in this case 1).
- The field Local IPv4 redirect target is filled out with the public IP address of this device (VPN_2). In this example it is 82.82.82.3.
4.16) Write the configuration back to router VPN_2.
5) Configuring the LAN-VRRP and the routing protocol RIP on the VPN gateways at the headquarters (in our case VPN_1 and VPN_2)
Further information on the topic of RIP between two virtual routers in the VRRP group is available in the following Knowledge Base article Notes Link.
5.1) Open the configuration dialog for the VPN gateway VPN_1 and switch to the menu item IP router -> VRRP -> VRRP list.
5.2) On this device, create two new VRRP entries for the LAN side (see illustration).
VRRP 1:
- Router ID: 2
- Router IP: 192.168.100.100
- Main priority: 100
VRRP 2:
- Router ID: 3
- Router IP: 192.168.100.101
- Main priority: 50
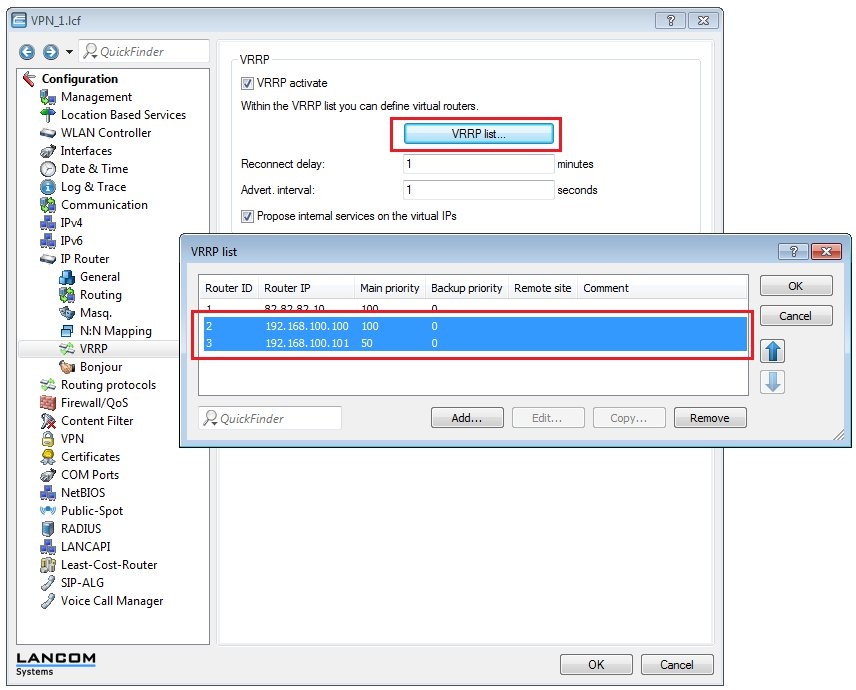
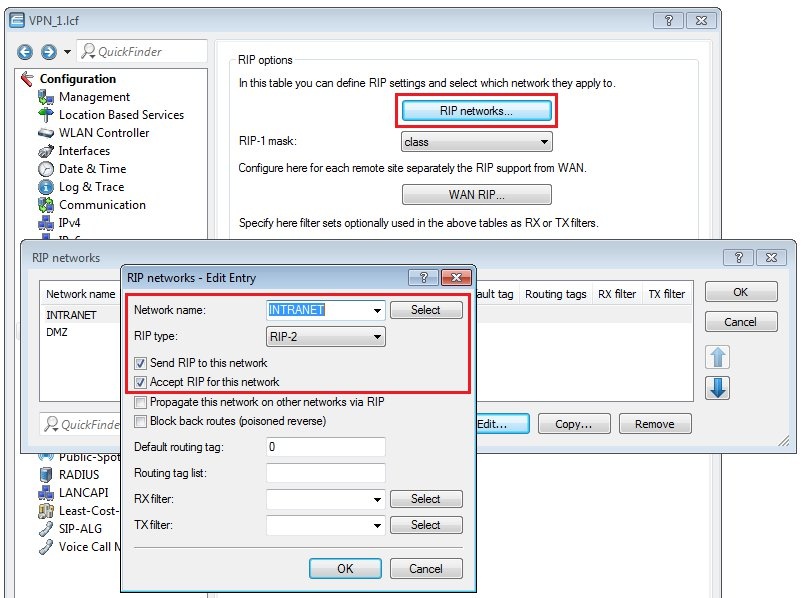
5.3) Navigate to the menu Routing protocols -> RIP -> RIP networks and modify the existing entry for the network INTRANET.
- RIP type: RIP-2
- Enable Send RIP to this network
- Enable Accept RIP for this network
5.4) Write the configuration back to router VPN_1.
5.5) Open the configuration dialog for the VPN gateway VPN_2 and switch to the menu item IP router -> VRRP -> VRRP list.
5.6) On this device, create two new VRRP entries for the LAN side (see illustration).
VRRP 1:
- Router ID: 2
- Router IP: 192.168.100.100
- Main priority: 50
VRRP 2:
- Router ID: 3
- Router IP: 192.168.100.101
- Main priority: 100
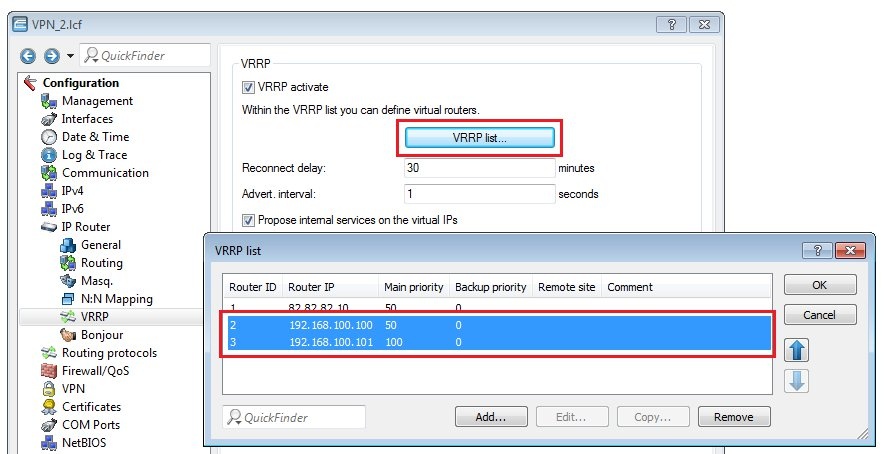
5.7) Navigate to the menu Routing protocols -> RIP -> RIP networks and modify the existing entry for the network INTRANET.
- RIP type: RIP-2
- Enable Send RIP to this network
- Enable Accept RIP for this network
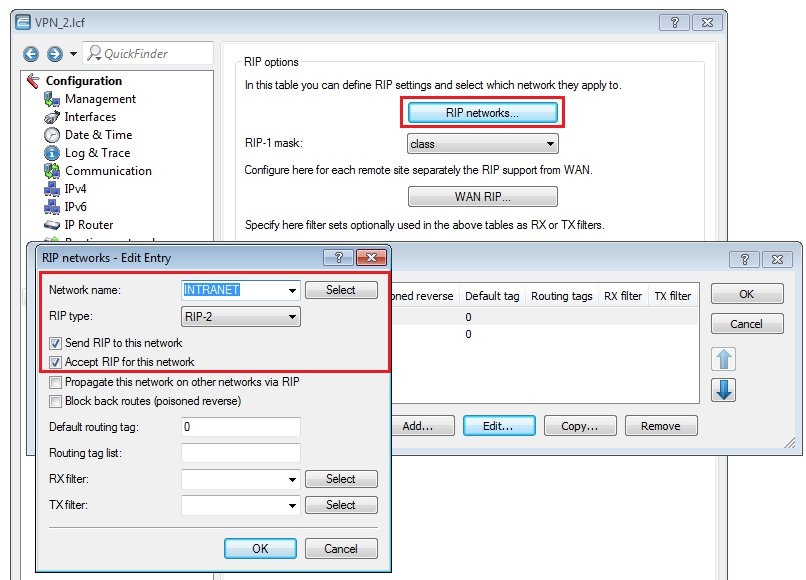
5.8) Write the configuration back to router VPN_2.
6) Configuring the IKEv2 VPN connection on the gateway at the branch:
6.1) On the gateway at the branch office, start the Setup Wizard from LANconfig and select the option Connect two local area networks (VPN).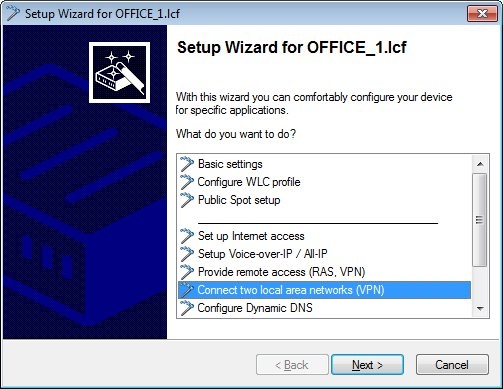
6.2) Select the exchange mode IKEv2.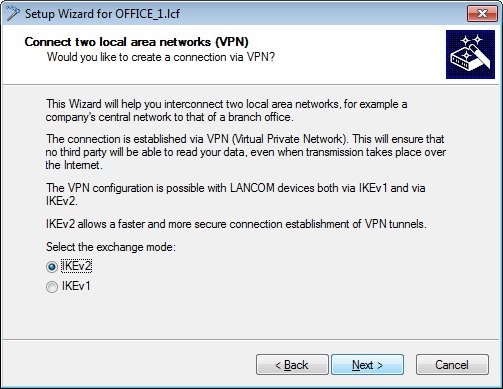
6.3) In this example, we do not use IPSec-over-HTTPS.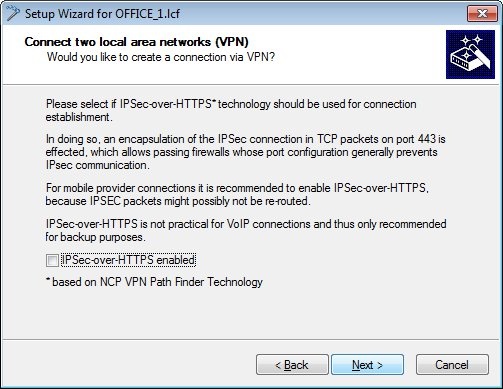
2.4) Set a meaningful name for the LANCOM router at the remote station (headquarters).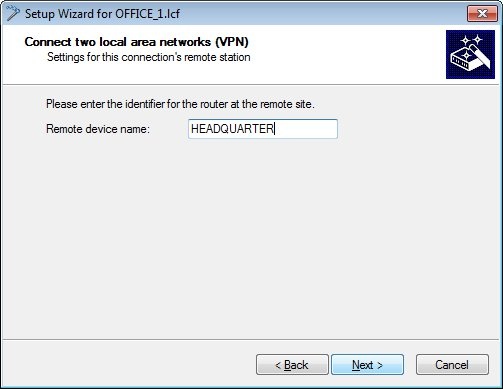
6.5) Set the fully qualified username to the same e-mail address that you used to configure the VPN connection on the VPN gateways VPN_1 and VPN_2 (see step 2.5).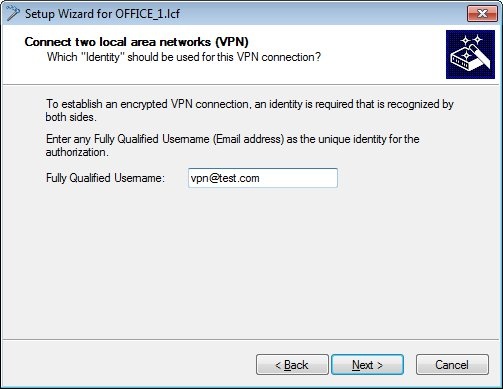
6.6) Create passwords for the local and the remote identity. These must match the passwords set in step 2.6).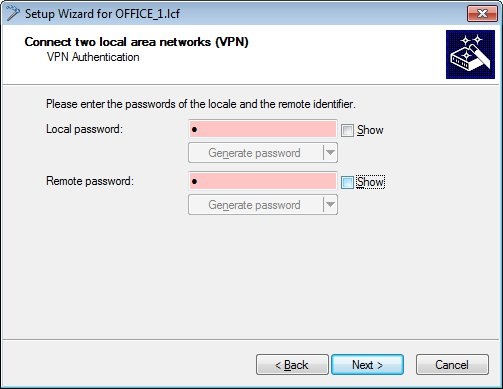
6.7) Since the LANCOM router at the branch office should establish the VPN connection to the headquarters, you need to choose the upper option.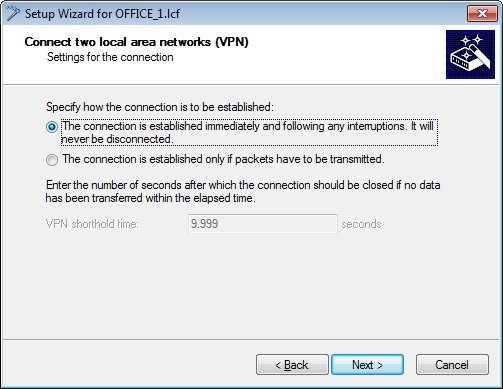
6.8) Set the Gateway with the virtual VRRP-IP address in the DMZ entered in steps 3.4 and 3.10 (in this case 82.82.82.10).
Because the local network in the branch office has the address range 192.168.100.0/24, this needs to be entered into the fields Address and Netmask.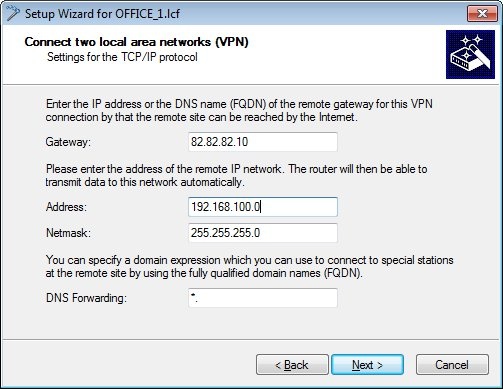
6.9) Click on Finish to close the Wizard and write the configuration back to the device.
6.10) The VPN connection to the headquarters will be established after a short wait.
This concludes the configuration steps to create an IKEv2 load balancer.
Note:
If problems occur during connection establishment, or if the established VPN connection does not work properly, a VPN Status Trace or a VLB Status Trace could help with the diagnosis.