Description:
For compatibility reasons, LCOS handles UDP data traffic in a particular manner. The default configuration handles UDP with the NAT type Full Cone NAT.
Full Cone NAT:
All requests from the same combination of internal IP address and port are always masked behind the same combination of external IP address and port.
As soon as the entry is stored in the NAT table (after the internal host has initiated the connection), any external host can access the internal host via the external IP address and port.
The advantage is the better compatibility with asynchronous protocols such as VoIP applications (no STUN required).
To prevent any external hosts accessing the network user in the local network, the NAT type for UDP data traffic can be changed to Port Restricted Cone NAT.
Port Restricted Cone NAT:
All requests from the same combination of internal IP address and port are always masked behind the same combination of external IP address and port.
As soon as the entry is stored in the NAT table (after the internal host has initiated the connection), only the external host contacted when the connection was initiated is able to communicate with the internal host. Furthermore, communication is only possible via the initiating port.
A disadvantage is the poorer compatibility with asynchronous protocols such as VoIP applications (STUN required).
For TCP, LCOS uses Symmetric NAT. This means that TCP is not affected by the behavior described.
Symmetric NAT:
All requests from a specific combination of internal IP address and port to a specific external IP address and port are masked behind the same IP address and port. For a new request from the same local host but to a different destination, a new entry with a different port is created in the NAT table.
As soon as the entry is stored in the NAT table (after the internal host has initiated the connection), only the external host contacted when the connection was initiated is able to communicate with the internal host. Furthermore, communication is only possible via the initiating port.
Changing the UDP NAT type to “Port Restricted Cone NAT”:
1) Using a “deny-all” strategy:
When using a Deny-All rule, the NAT type for UDP traffic is changed to Port Restricted Cone NAT. However, for a deny-all strategy, any desired data traffic needs to be separately approved by other firewall rules, which takes extra configuration effort.
A description of the deny-all strategy and ready-made scripts for the firewall can be found in the following Knowledge Base article:
Firewall configuration using available scripts
2) Using a separate firewall rule:
If using a deny-all strategy is too complex, an alternative option is to create a firewall rule that prohibits incoming UDP traffic.
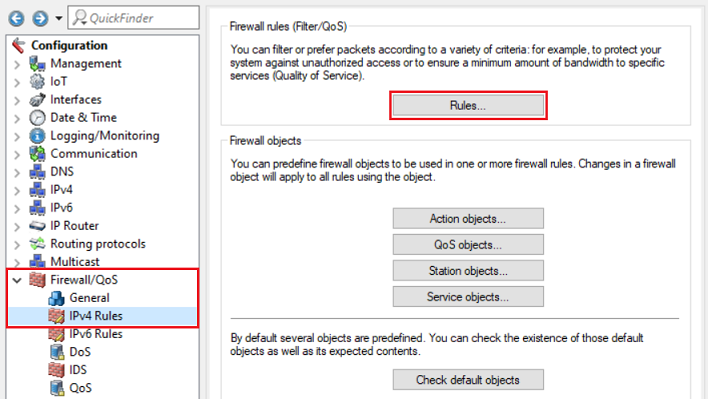
2.1) In LANconfig, open the configuration dialog for the router and go to the menu item Firewall/QoS → IPv4 rules → Rules.
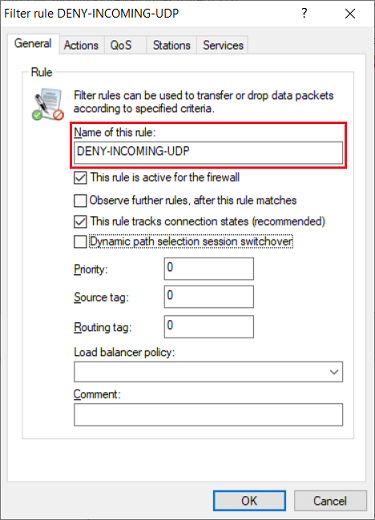
2.2) Create a new firewall rule and give the rule a descriptive name (in this example DENY-INCOMING-UDP).
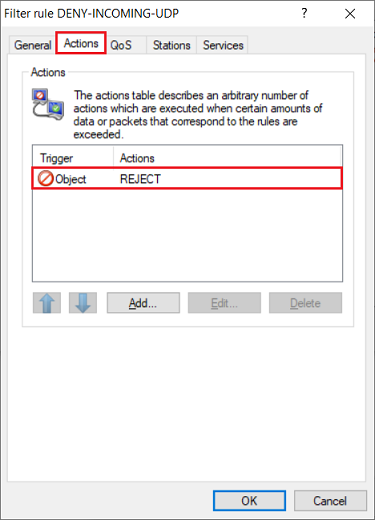
2.3) Go to the Actions tab and check that the action object REJECT is selected.
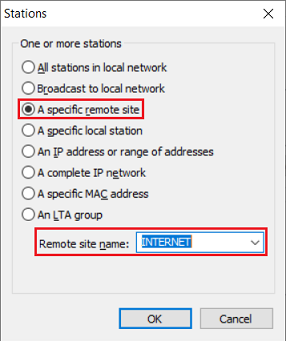
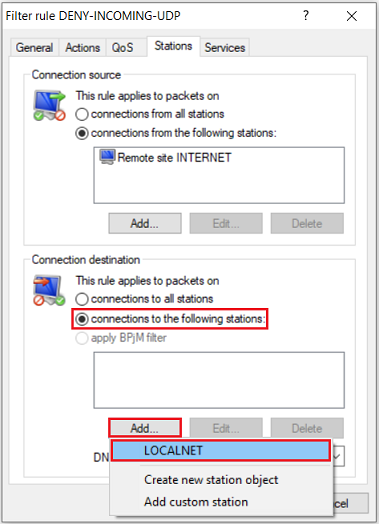
2.4) Go to the Stations tab, under Connection source select the option Connections from the following stations and click Add → Add custom station.

2.5) First select the option A specific remote site and, from the drop-down menu for the Remote site name, select the Internet remote site (in this example INTERNET).
2.6) For the Connection destination, select the option Connections to the following stations and click Add → LOCALNET.
The object LOCALNET includes all of the local networks configured on the router.
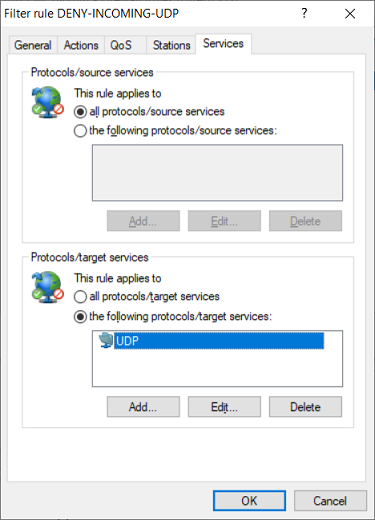
2.7) Navigate to the Services tab. Under Protocols/target services select the option the following protocols/target services and click Add.
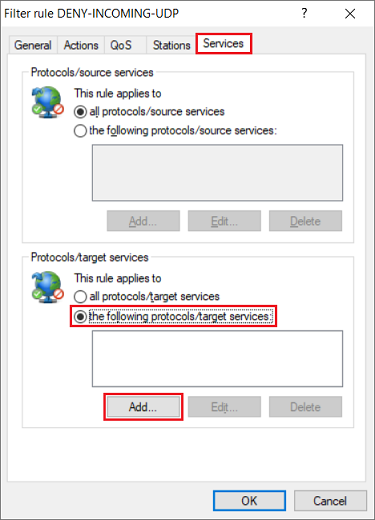
2.8) Select the protocol UDP.

2.9) This concludes the configuration of the firewall rule. Write the configuration back to the router.