
Description:
This article describes how the Advanced VPN Client is used to establish an IKEv2 connection to a LANCOM router with an IPv6 address.
Requirements:
- LCOS as of version 10.32 (download latest version)
- LANtools as of version 10.32 (download latest version)
- Advanced VPN Client as of version 5.20 (download latest version)
- Existing and functional Internet connection to the router with an IPv6 address at the headquarters
- Existing and functional Internet connection with an IPv6 address at the location where the user operates the Advanced VPN Client
Scenario:
Establish the IKEv2 connection via an IPv6 gateway and communicate via IPv4:
- The VPN connection should be established to a VPN gateway with an IPv6 address
- Communication on the target network operates with IPv4
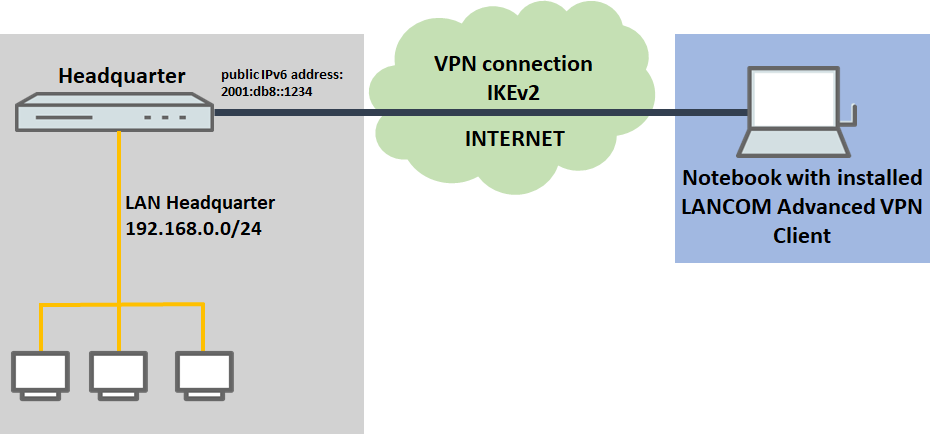
Establish the IKEv2 connection via an IPv6 gateway and communicate via IPv6:
- The VPN connection should be established to a VPN gateway with an IPv6 address
- Communication on the target network operates with IPv6

Procedure:
Establish the IKEv2 connection via an IPv6 gateway and communicate via IPv4:
Establish the IKEv2 connection via an IPv6 gateway and communicate via IPv6:
1) Set up the IKEv2 connection on the LANCOM router:
1.1) Set up the VPN connection using the setup wizard:
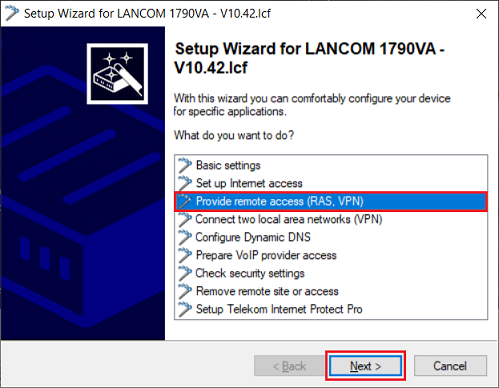
1.1.1) Open the setup wizard for the router, select the option Provide remote access (RAS, VPN) and click Next.
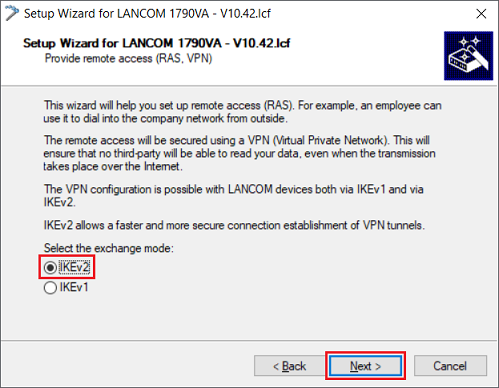
1.1.2) Make sure that IKEv2 is selected and click Next.
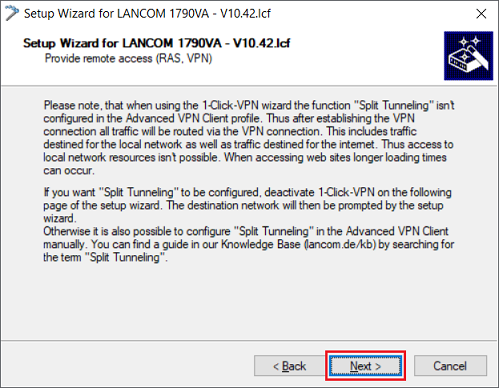
1.1.3) Click Next.
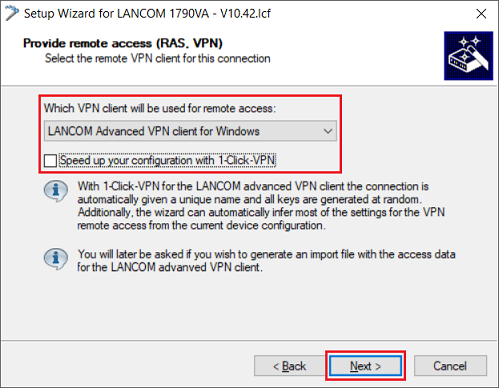
1.1.4) Make sure that the option LANCOM Advanced VPN Client for Windows is selected and deactivate the option Speed up your configuration with 1-Click-VPN. Then click on Next.
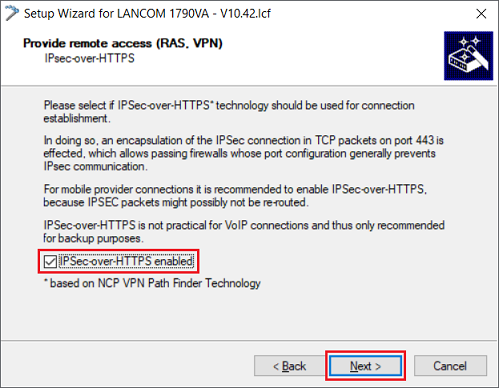
1.1.5) Activate the option IPSec-over-HTTPS enabled so that in the event of communication problems via IPsec, the fallback option IPSec-over-HTTPS can be used instead. Then click on Next.
Do not activate this option if the TCP port 443 (HTTPS) is already being used (e.g. for port forwarding), as this will prevent IPsec-over-HTTPS from working.
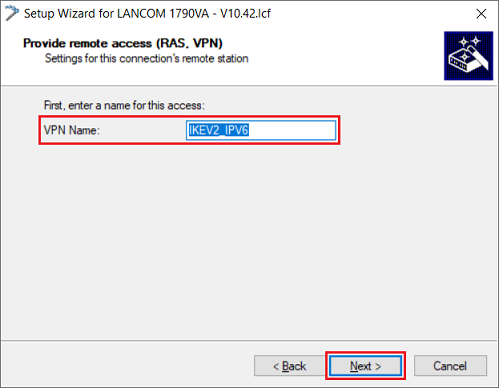
1.1.6) Enter a descriptive name for the VPN connection and then click on Next.
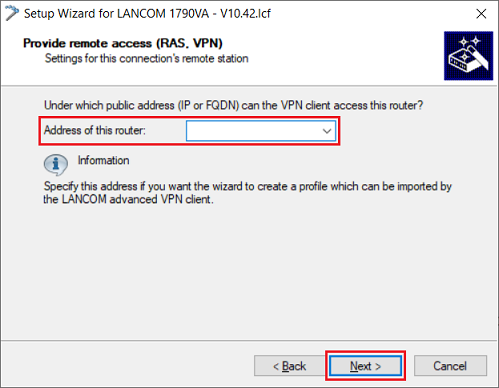
1.1.7) Leave the field Address of this router empty. The connection in the Advanced VPN Client is created via the setup wizard, so no profile file is required. Then click on Next.
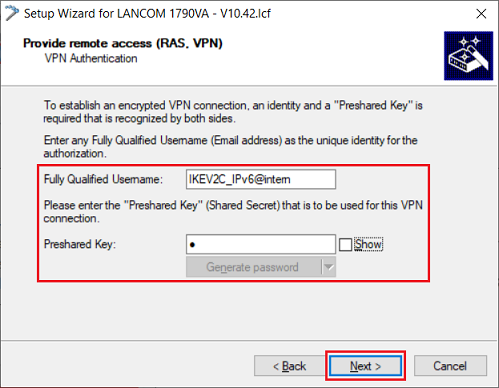
1.1.8) Modify the following parameters and click Next:
- Fully Qualified Username: Assign a descriptive FQUN (Fully Qualified Username).
- Preshared Key: Enter a PSK (pre-shared key) that is as secure as possible.
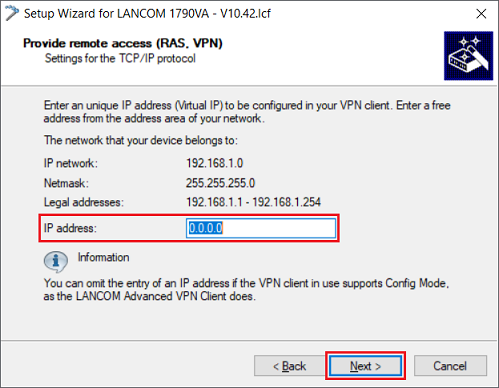
1.1.9) Leave the entry at the default value 0.0.0.0. Since the IKE Config mode is used, there is no need to enter a fixed IP address here. Then click on Next.
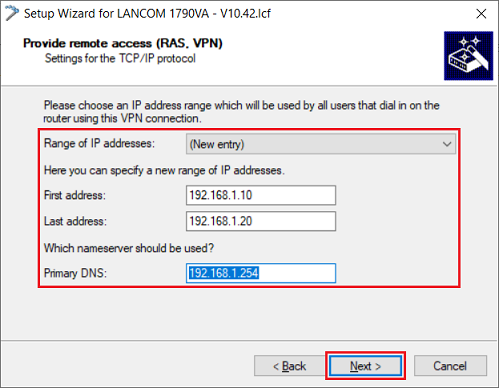
1.1.10) Create a new IP address pool if none is available already. Otherwise, select an available pool. Then click on Next.
- First address: Enter the first IP address of the address pool.
- Last address: Enter the last IP address of the address pool.
- Primary DNS: Enter the IP address of a DNS server in the target network (in this example the IP address of the router).
The IP addresses specified in the address pool are reserved for VPN dial-in connections and are no longer available for assignment by the DHCP server integrated in the router. Be certain that there are enough IP addresses available for the DHCP server to use.
Although the IPv4 address pool is not required for IPv6 communication (see step 1.2.5), the setup wizard asks for it so it has to be created.
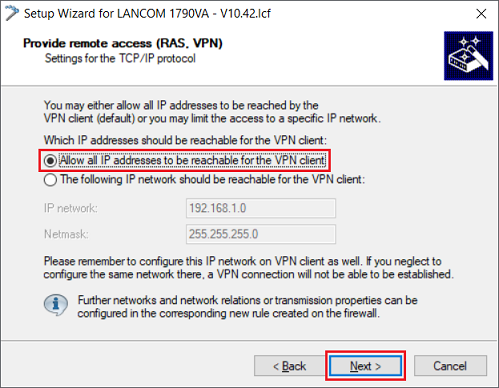
1.1.11) Leave the setting as the option Allow all IP addresses to be reachable for the VPN client and click on Next.
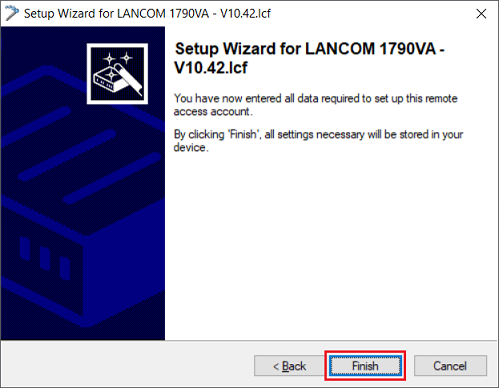
1.1.12) Click on Finish to write the configuration back to the router.
1.2) Manual configuration steps in the router:
1.2.1) Open the configuration of the router in LANconfig and navigate to VPN → IKEv2/IPsec → IPv6 addresses.
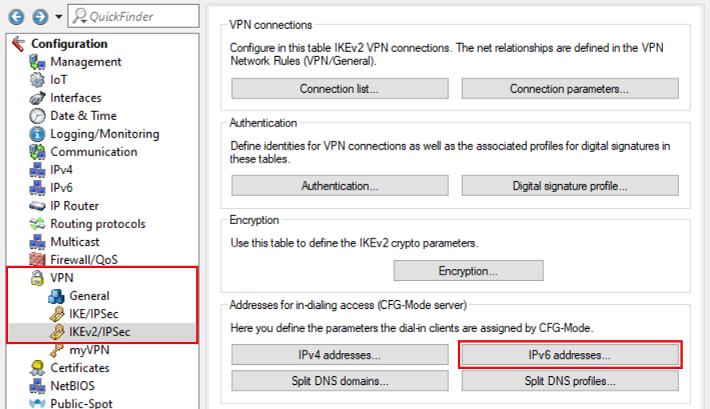
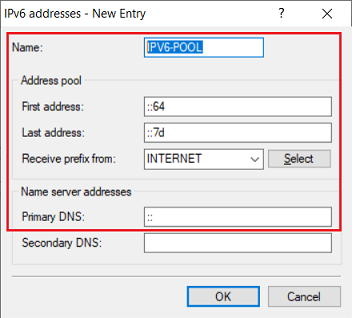
1.2.2) Create a new entry and modify the following parameters:
- Name: Enter a descriptive name for the IPv6 address pool.
- First address: Enter the first IPv6 address of the address range that should be available for VPN dial-ins.
- Last address: Enter the last IPv6 address of the address range that should be available for VPN dial-ins.
- Receive prefix from: From the drop-down menu, select the Internet connection that has an IPv6 address (in this example the connection INTERNET).
- Primary DNS: Leave the entry as the default value ::. This causes the router to transmit its own IPv6 address as a DNS server.
Please note that IPv6 is based on a hexadecimal system and not a decimal system. This example has 25 addresses available for VPN dial-in.
1.2.3) Navigate to the menu VPN → IKEv2/IPsec → Connection list.
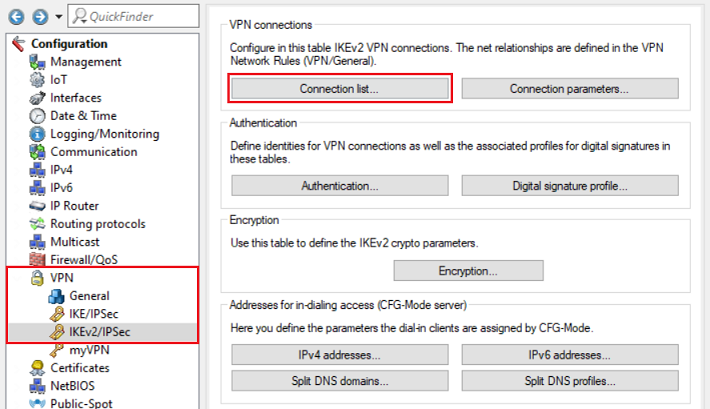
1.2.4) Mark the VPN connection created in step 1.1 and click on Edit.

1.2.5) Modify the following parameters:
- IPv6 rules: Select the predefined IPv6 rule RAS-WITH-CONFIG-PAYLOAD from the drop-down menu.
- IPv4 address pool: Delete the entry for the IPv4 address pool. Otherwise an IPv4 address will be reserved even though communication via IPv4 is unused.
- IPv6 address pool: From the drop-down menu, select the IPv6 address pool created in step 1.2.2.
- IPv6 profile: From the drop-down menu, select the Internet connection that has an IPv6 address (in this example the connection INTERNET).
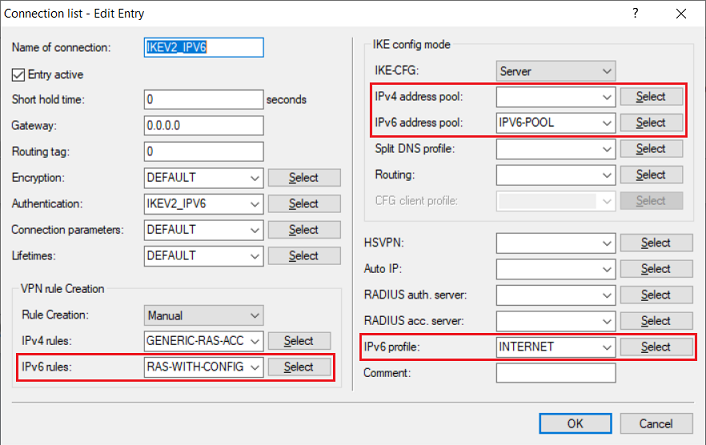
1.2.6) This concludes the configuration of the VPN connection on the router. Write the configuration back to the router.
2) Set up the IKEv2 connection in the Advanced VPN Client:
2.1) Set up the VPN connection using the setup wizard:
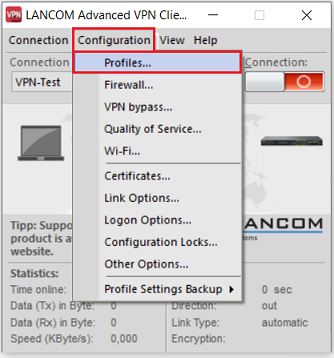
2.1.1) Start the Advanced VPN Client and navigate to the menu Configuration → Profiles.
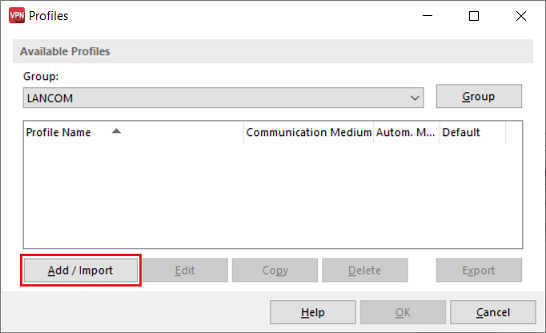
2.1.2) Click on Add/Import to create a new VPN connection.
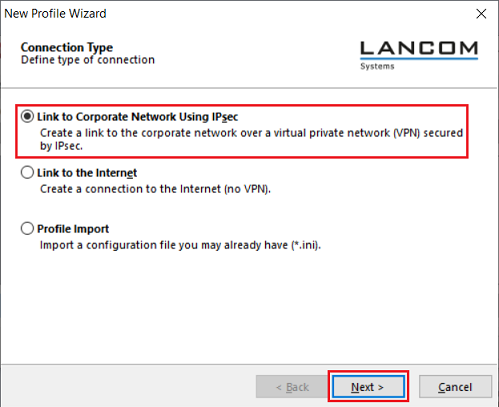
2.1.3) Leave the setting for the option Link to Corporate Network Using IPsec unchanged and click on Next.
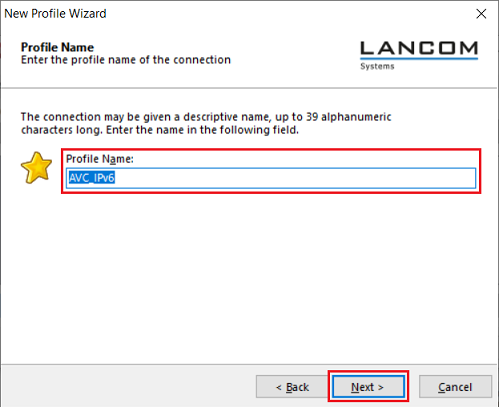
2.1.4) Enter a descriptive profile name and then click on Next.
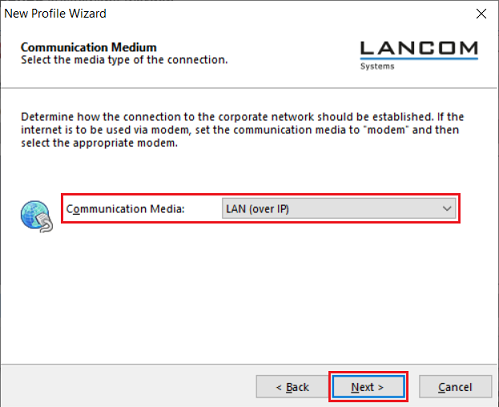
2.1.5) From the drop-down menu, select the communication media being used and click Next.
If various media are used for the connection, select the option automatic media detection.
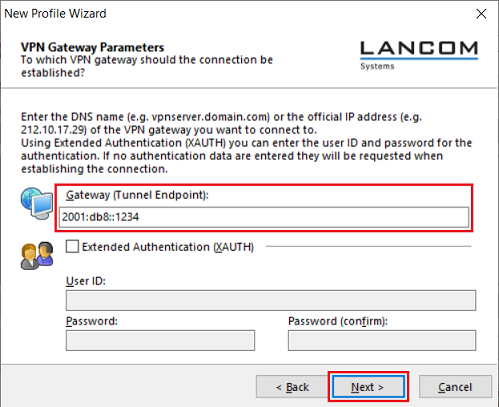
2.1.6) Set the Gateway as the IPv6 address or the corresponding DNS address of the router and click Next.
2.1.7) Modify the following parameters and click Next:
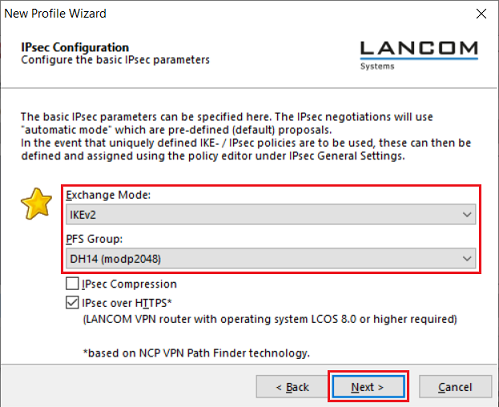
- Exchange mode: From the drop-down menu, select the option IKEv2.
- PFS Group: From the drop-down menu, select the option DH14 (modp2048).
2.1.8) Modify the following parameters and click Next:
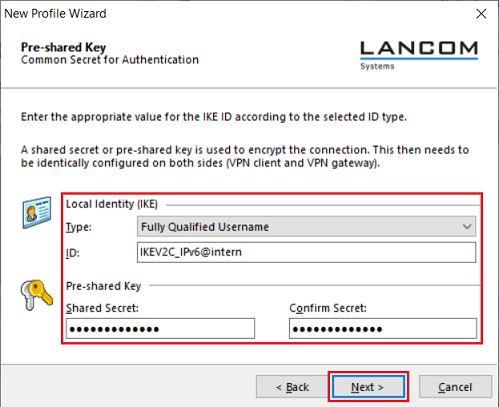
- Type: From the drop-down menu, select the option Fully Qualified Username.
- ID: Enter the Fully Qualified Username as specified in step 1.1.8.
- Shared secret: Enter the pre-shared key name as specified in step 1.1.8.
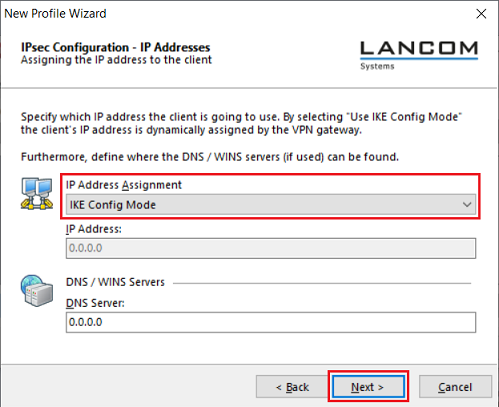
2.1.9) From the drop-down menu, set IP address assignment to the option IKE Config Mode and click Next.
2.1.10) Click Finish to close the Setup Wizard.
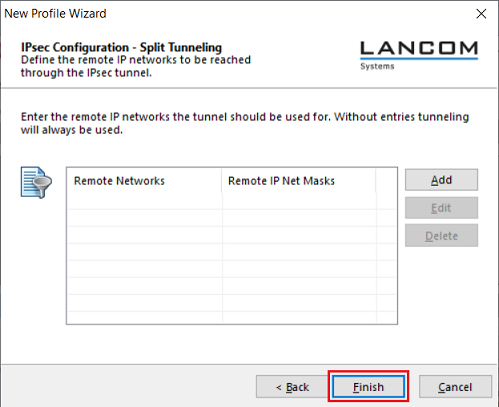
For IPv6 communications, do not enter anything for split tunneling!
2.2) Manual configuration steps in the Advanced VPN Client:
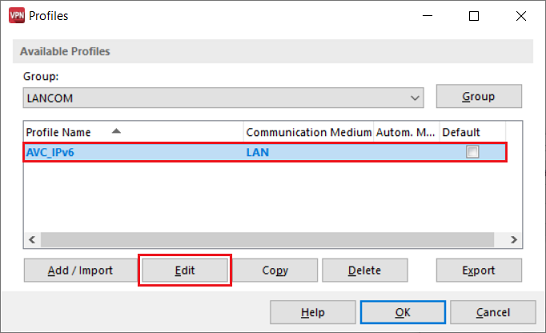
2.2.1) Mark the profile created in steps 2.1 and click Edit.
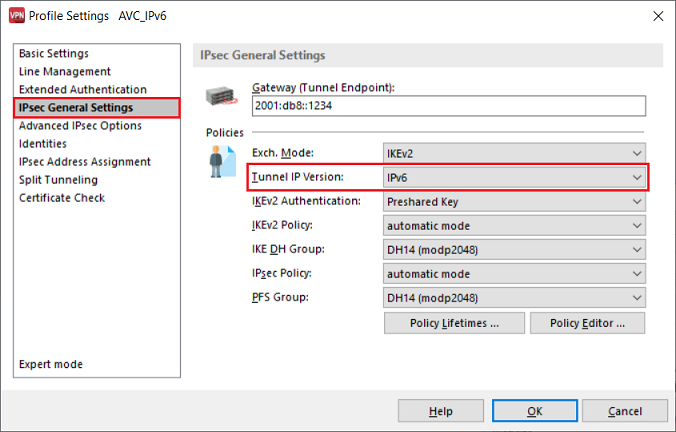
2.2.2) Change to the tab IPSec General Settings and use the drop-down menu to set the Tunnel IP version to the option IPv6.
2.2.3) This concludes the configuration of the VPN connection. Confirm your changes by clicking OK.