
Description:
This article describes how to configure a hunt group for incoming calls.
Requirements:
- LCOS as of version 9.24 (download latest version)
- LANtools as of version 9.24 (download latest version)
- LANCOM VoIP router or router with active All-IP Option
- Configured and functional telephony on the router (Single account or SIP trunk)
Procedure:
1) Configuring a hunt group for a Single account:
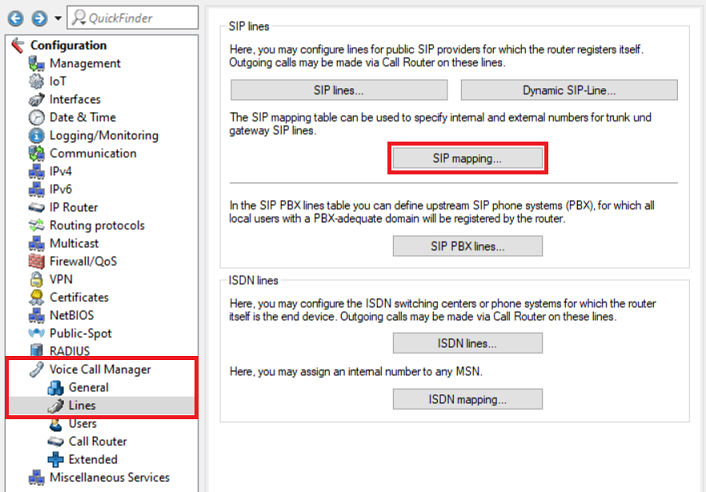
1.1) Open the configuration of the LANCOM router in LANconfig and go to the menu Voice Call Manager → Lines → SIP lines.
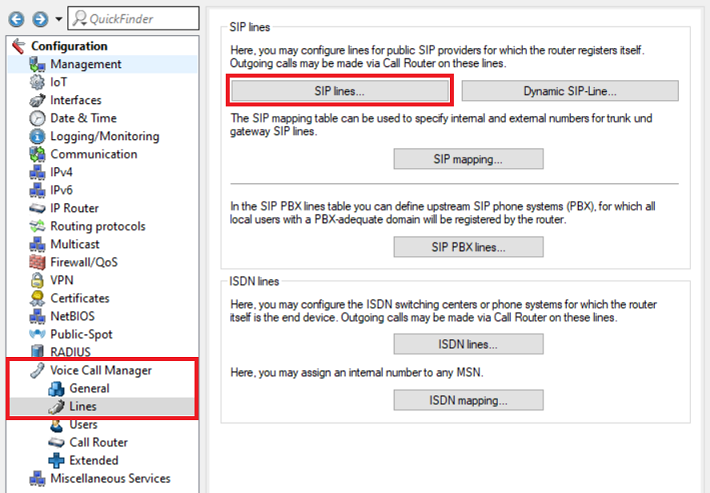
1.2) Select the SIP line, for which the hunt group should be configured and click Edit.

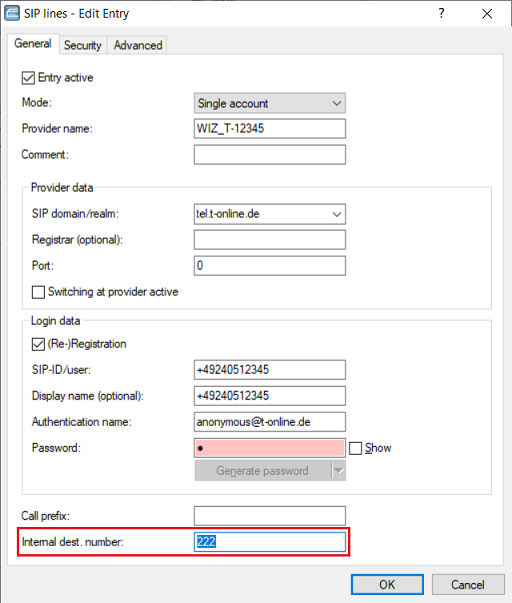
1.3) Change the Internal dest. number to a number which isn't already in use (in this example the number 222).
The number must not be a prefix of a dial number which is already in use in order not to cause a conflict. In this example the number 123 must not be used as the number 12345 is already assigned to a Single account.
1.4) Go to the menu Voice Call Manager → Call Router → Hunt groups.
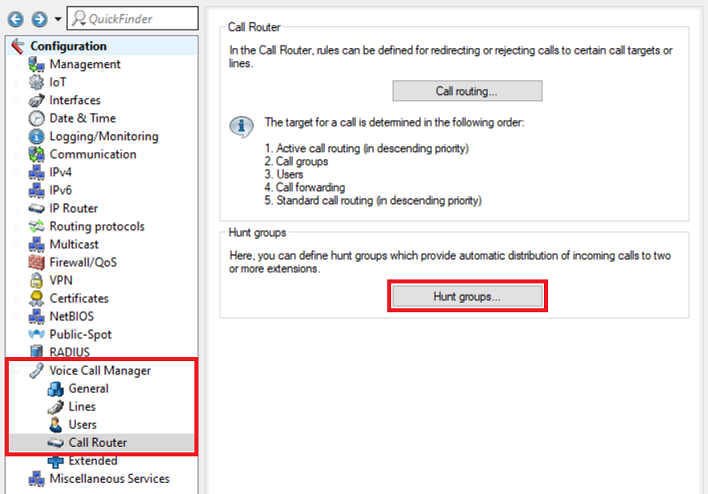
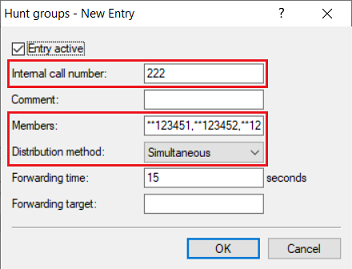
1.5) Create a new entry and change the following parameters:
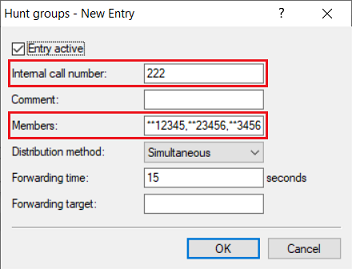
- Internal call number: Enter the Internal dest. number you canged in step 1.3).
- Members: Enter the internal dial numbers of ISDN, Analog or SIP users with prefixed string ** (e.g. **12345) to be addressed via the hunt group for an incoming call.
- Distribution method: In the dropdown-menu choose whether the members are addressed at the same time (Simultaneous) or one after the other (Sequential).
The prefixed string ** before a Member signals to the router that this number represents an internal user. This makes sure, that the call is not routed via the SIP provider.
1.6) The configuration of the hunt group is thereby complete. Write the configuration back into the router.
2) Configuration of a hunt group for a SIP trunk:
2.1) Beforehand ask your provider about the number format (e.g. +49<dial number> or 0049<dial number>).
As an alternative you can also create a SIP Packet trace of an incoming call and filter it to Invite sip. The dial number is shown in the Request line in the first row of the SIP packet.
If you have a SIP trunk and the option Trunk-Inc-Cld-In-ToHeader is active, the dial number is transfered via the To field.
2.2) Open the configuration of the LANCOM router in LANconfig and go to the menu Voice Call Manager → Lines → SIP mapping.
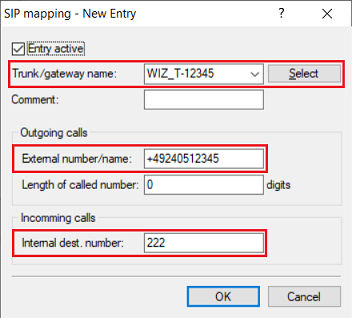
2.3) Create a new entry and change the following parameters:
- Trunk/gateway name: In the dropdown-menu select the SIP trunk to be used for the hunt group.
- External number/name: Enter the dial number in the correct number format (see step 2.1)). When this number is callled, the call is transfered to the hunt group. In this example the the root number 12345 is used.
- Internal dest. number: Change the Internal dest. number to a number which isn't yet in use (in this example the number 222).
In order not to cause a conflict with other numbers, the Internal dest. number must not be a prefix of an existing dial number. In this example the number 123 must not be used, as the dial number 12345 is already assigned to the SIP trunk.
2.4) Go to the menu Voice Call Manager → Call Router → Hunt groups.
2.5) Create a new entry and change the following parameters:
- Internal call number: Enter the Internal dest. number assigned in step 2.3).
- Members: Enter the internal dial numbers of ISDN, Analog or SIP users with prefixed string ** (e.g. **123451) to be addressed via the hunt group for an incoming call.
- Distribution method: In the dropdown-menu choose whether the members are addressed at the same time (Simultaneous) or one after the other (Sequential).
The prefixed string ** before a Member signals to the router that this number represents an internal user. This makes sure, that the call is not routed via the SIP provider.
2.6) The configuration of the hunt group is thereby complete. Write the configuration back into the router.