| Seiteneigenschaften |
|---|
Description:
Um im lokalen Netzwerk Angriffe per ARP-Poisoning zu verhindern, kann auf einem managed Switch die Funktion ARP-Inspection eingerichtet werden. ARP-Inspection durchsucht alle ARP-Pakete und prüft, ob die Adressen in den Tabellen DHCP Snooping Dynamic Bindings oder With the aim of preventing attacks on the local network via ARP poisoning, a managed switch can be set up to run the ARP Inspection feature. ARP Inspection scans all ARP packets and checks whether the addresses are stored in the tables DHCP Snooping Dynamic Bindings or DHCP Snooping Static Bindings (durch DHCP-Snooping gelernt) hinterlegt sind. Ist dies der Fall, werden die ARP-Pakete weitergeleitet, alle anderen ARP-Pakete werden verworfen.
Da ARP-Inspection die Funktion DHCP-Snooping voraussetzt, ist diese Funktion nur für Geräte geeignet, welche ihre IP-Adresse per DHCP beziehen. Für Ports, an denen ein Router oder Switch angebunden ist, muss daher eine Ausnahme erstellt werden, da ansonsten die Kommunikation zu diesen Geräten eingeschränkt sein kann. Dazu müssen diese Ports in der ARP-Inspection auf "Trusted" gesetzt werden. Ports, an denen Endgeräte angeschlossen sind, welche ihre IP-Adresse per DHCP beziehen, müssen auf "Untrusted" gesetzt werden (dies betrifft auch Ports, an denen ein Access Point angebunden ist).
In diesem Artikel wird beschrieben, wie ARP-Inspection auf einem Switch der XS- und GS-45xx Serie eingerichtet wird.
| Hinweis |
|---|
Bei der Konfiguration von ARP-Inspection ist es leicht möglich, dass die Kommunikation im lokalen Netzwerk oder auch zum Internet nicht mehr möglich ist. Daher ist es wichtig, im Vorfeld zu planen, wie die Einstellungen für die einzelnen Switch-Ports gesetzt werden müssen. Durch die Verwendung von ARP-Inspection muss der Switch alle ARP-Pakete überprüfen. Dies führt zu einer erhöhten CPU-Auslastung des Gerätes. |
Requirements:
- LCOS SX ab Version 5.20 (download aktuelle Version)
- Beliebiger Web-Browser für den Zugriff auf das Webinterface
- Bereits konfiguriertes und funktionsfähiges DHCP-Snooping
Procedure:
1. Konfiguration der ARP Inspection:
learned through DHCP snooping). ARP packets are forwarded in this case, and all other ARP packets are discarded.
Since ARP Inspection relates to DHCP snooping, this function is only suitable for devices that obtain their IP address via DHCP. An exception is therefore required for ports that are connected to a router or switch, otherwise communication with these devices may be restricted. To this end, these ports must be set to "Trusted" in the ARP inspection. Ports connected to end devices that obtain their IP address via DHCP must be set to "Untrusted" (which also applies for ports connected to an access point).
This article describes how to set up ARP Inspection on an XS- or GS-45xx series switch.
| Hinweis |
|---|
When configuring ARP Inspection, communication in the local network or to the Internet may no longer be possible. For this reason it is important to plan in advance how the settings for the individual switch ports must be set. Using ARP Inspection requires the switch to inspect all ARP packets. This increases the CPU load on the device. |
Requirements:
- LCOS SX as of version 5.20 (download latest version)
- Any web browser for access to the web interface
- Configured and functional DHCP Snooping.
Procedure:
1) Configuring ARP Inspection:
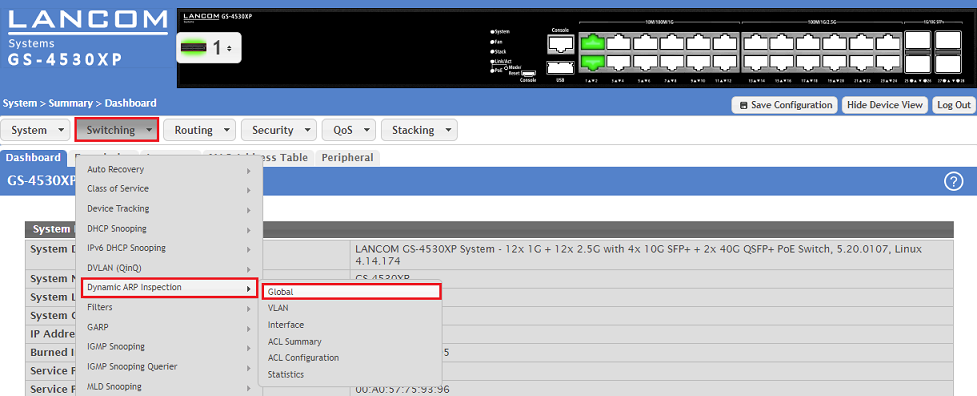
1.1) Connect to the web interface of the switch and navigate to the menu 1.1 Verbinden Sie sich per Webinterface mit dem Switch und wechseln in das Menü Switching → Dynamic ARP Inspection → Global.
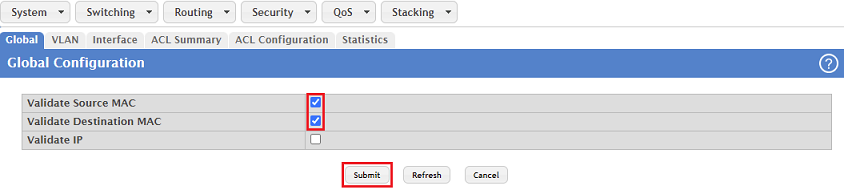
1.2 Aktivieren Sie die folgenden Optionen und klicken auf ) Enable the following parameters and then click Submit:
- Validate Source MAC: Der Switch prüft, ob in dem ARP-Paket die MAC-Adresse des Absenders mit der Quell-MAC-Adresse im Ethernet Header übereinstimmt. Ist dies nicht der Fall, wird das Paket verworfenThe switch checks whether the MAC address of the sender in the ARP packet matches the source MAC address in the Ethernet header. If this is not the case, the packet is dropped.
- Validate Destination MAC: Der Switch prüft, ob in dem ARP-Paket die MAC-Adresse des Ziels mit der Ziel-MAC-Adresse im Ethernet Header übereinstimmt (nur ARP-Antworten). Ist dies nicht der Fall, wird das Paket verworfen.The switch checks whether the MAC address of the destination in the ARP packet matches the destination MAC address in the Ethernet header (ARP responses only). If this is not the case, the packet is dropped.
| Info |
|---|
The option Validate IP should not be activated, otherwise packets with the following IP addresses will be discarded (e.g. no multicast data traffic possible in this VLAN |
| Info |
Die Option Validate IP sollte nicht aktiviert werden, da sonst Pakete mit den folgenden IP-Adressen verworfen werden (z.B. kein Multicast-Datenverkehr in diesem VLAN möglich):
|
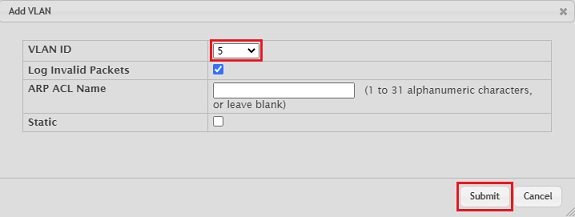
1.3 Wechseln Sie in den Reiter VLAN und klicken auf ) Change to the VLAN tab and click Add.
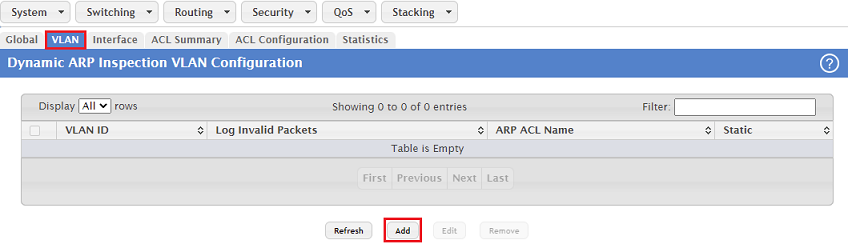
1.4 Wählen Sie die ) Select the VLAN ID aus, in dem die ARP-Inspection verwendet werden soll. Klicken Sie anschließend auf where ARP inspection should be used. Then click Submit.
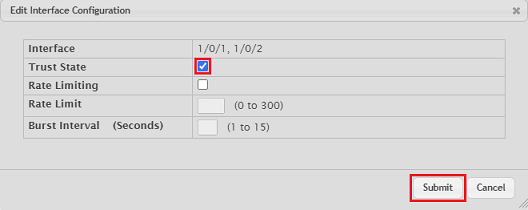
1.5 Wechseln Sie in den Reiter Interface und markieren die Interfaces zum Router und zu einem weiteren Switch (in diesem Beispiel ) Go to the Interface tab and mark the interfaces to the router and to another switch (in this example 1/0/1 und and 1/0/2). Klicken Sie anschließend auf Then click Edit.
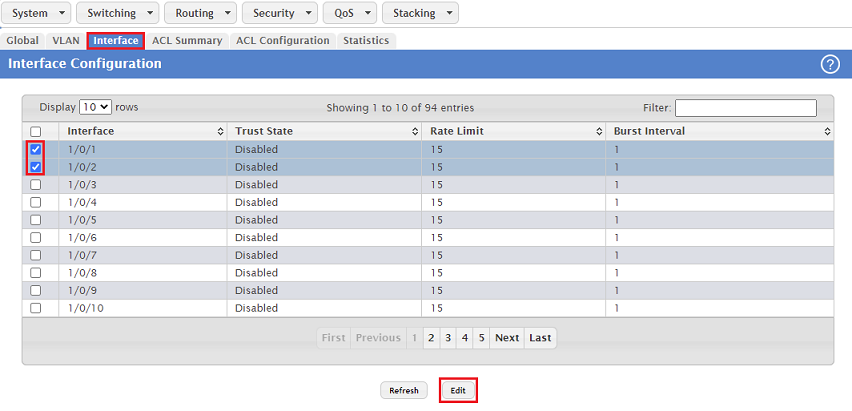
1.6 Aktivieren Sie den ) Enable the Trust State und klicken auf Submit. Dadurch wird auf diesen Ports die ARP-Inspection deaktiviert. and then click Submit. This disables ARP inspection on these ports.
| Info |
|---|
For the remaining ports, the parameter Trust State is left at Disabled so that ARP inspection is operated there |
| Info |
Für die restlichen Ports muss der Parameter Trust State auf Disabled verbleiben, damit die ARP-Inspection dort verwendet wird. |
2. Konfiguration der ARP Inspection ) Configuring the ARP inspection ACL (optional):
Um die Kommunikation zu direkt mit dem Switch verbundenen Geräten mit fester IP-Adresse zu erlauben (abgesehen vom Router und weiteren Switches), muss die IP- und die MAC-Adresse dieses Gerätes in der To allow communication with devices with a static IP address that are directly connected to the switch (except for the router and other switches), the IP and MAC address of this device must be stored in the ACL (Access Control List) hinterlegt werden. Dies ist auch erforderlich, wenn ein Zugriff von einem Gerät hinter einem weiteren Switch auf das Gerät mit der festen IP-Adresse erfolgen soll.
| Info |
|---|
Über die ACL ist es ebenso möglich die Kommunikation zu unterbinden. |
. This is also necessary if a device behind another switch is to access the device with the static IP address.
| Info |
|---|
It is also possible able to stop communication via the ACL. |
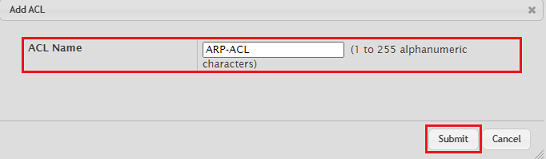
2.1) Go to the ACL Summary tab and click 2.1 Wechseln Sie in den Reiter ACL Summary und klicken auf Add.
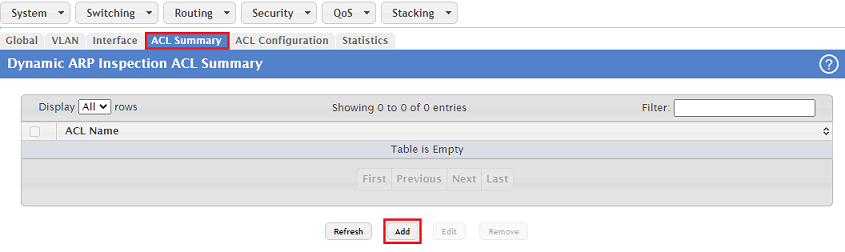
2.2 Vergeben Sie einen aussagekräftigen ACL Name und klicken auf ) Enter a descriptive ACL name and then click Submit.
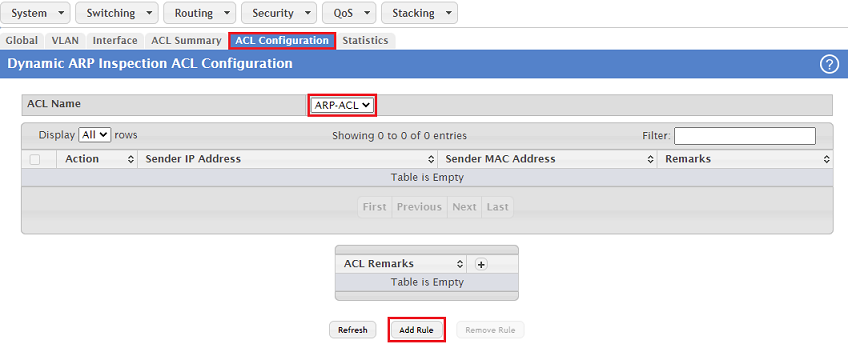
2.3 Wechseln Sie in den Reiter ) Go to the ACL Configuration, stellen sicher, dass bei ACL Name die korrekte ACL ausgewählt ist und klicken auf tab, make sure the ACL Name is set to the correct ACL and click Add Rule.
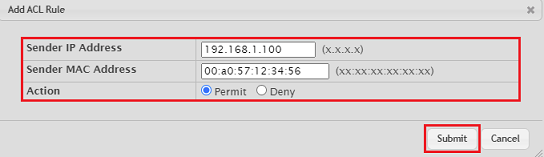
2.4 Passen Sie die folgenden Parameter an und klicken auf ) Modify the following parameters and then click Submit:
- Sender IP Address: Tragen Sie die IP-Adresse des Gerätes ein, für welches die Kommunikation erlaubt werden sollEnter the IP address of the device for which communication should be allowed.
- Sender MAC Address: Tragen Sie die MAC-Adresse des Gerätes ein, für welches die Kommunikation erlaubt werden soll Enter the MAC address of the device for which communication should be allowed.
- Action: Wählen Sie die Option Permit aus, damit die Kommunikation erlaubt wird. Alternativ kann mit der Option Deny die Kommunikation für das entsprechende Gerät auch unterbunden werdenChoose the option Permit to allow communication. Alternatively, with the option Deny can be used to prevent communication for the corresponding device.
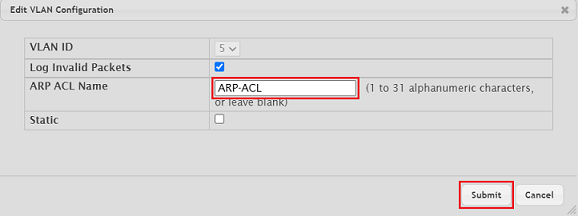
2.5 Wechseln Sie in den Reiter VLAN und bearbeiten den in Schritt 5) Go to the VLAN tab and edit the entry created in steps 1.3 und and 1.4 erstellten Eintrag. Tragen Sie den Namen der in Schritt . Enter the name of the ACL created in step 2.2 erstellten ACL ein (in diesem Beispiel this example ARP-ACL) und klicken auf and click Submit.
3. Speichern der Konfiguration als Start-Konfiguration) Save the configuration as the startup configuration:
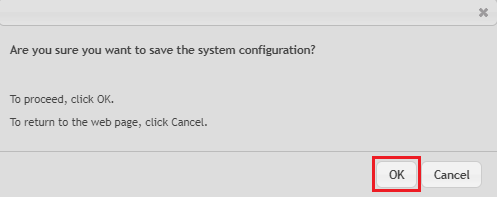
3.1 Klicken Sie nach erfolgter Konfiguration in der rechten oberen Ecke auf Save Configuration, damit die Konfiguration als Start-Konfiguration gespeichert wird.) With the configuration complete, click Save Configuration in the top right-hand corner to save the configuration as the start configuration.
| Info |
|---|
The start configuration is retained even if the device restarted or there is a power failure |
| Info |
Die Start-Konfiguration bleibt auch nach einem Neustart des Gerätes oder einem Stromausfall erhalten. |

3.2 Bestätigen Sie den Speichervorgang mit einem Klick auf ) Acknowledge the save process by clicking OK.