
| Seiteneigenschaften |
|---|
Description:
In diesem Artikel wird beschrieben, wie auf einem LANCOM Router oder Access Point mit LCOS eine Zugriffs-Verwaltung per This article describes how access management via RADIUS (802.1x) realisiert werden kann. Dadurch ist es möglich Zugangs-Daten für Benutzer zentral zu administrierencan be implemented on a LANCOM router or access point with LCOS. This makes it possible to centrally manage user access data.
Requirements:
- LANCOM Router / Access Point mit LCOS als RADIUS-Client
- LANCOM Router / Access Point mit LCOS als RADIUS Server
- router / access point with LCOS as the RADIUS client
- LANCOM router / access point with LCOS as the RADIUS server
- LCOS as of version LCOS ab Version 9.24 (download aktuelle Versionlatest version)
- LANtools ab Version from version 9.24 (download aktuelle Versionlatest version)
Procedure:
1. Konfiguration der RADIUS-Authentifizierung auf dem Router oder Access Point) Configuring RADIUS authentication on the router or access point:
1.1 Verbinden Sie sich per LANconfig mit dem Router / Access Point, für den die zentrale Zugriffs-Verwaltung eingerichtet werden soll, wechseln in das Menü Management → Authentication und passen die folgenden Parameter an:) Use LANconfig to connect to the router/access point that is to provide central access management, switch to the menu Management → Authentication and modify the following parameters:
- Authentication via: From the drop-down menu, select the option RADIUSAuthentication via: Wählen Sie im Dropdownmenü die Option RADIUS aus.
- Access rights via: Wählen Sie im Dropdownmenü die Option From the drop-down menu, select the option Shell privilege attributeaus.
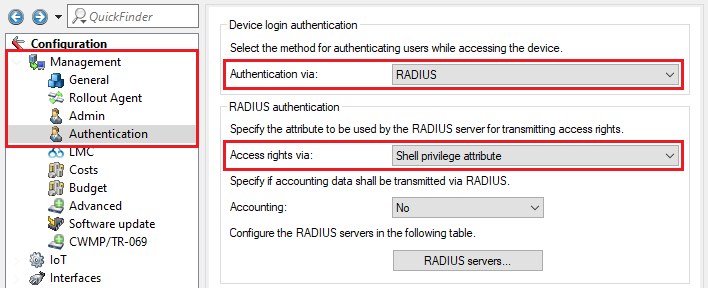
1.2 Wechseln Sie in das Menü ) Go to the menu RADIUS servers.
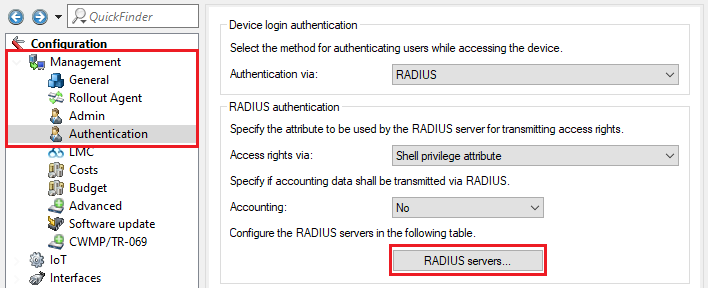
1.3 Erstellen Sie einen neuen Eintrag und passen die folgenden Parameter an) Create a new entry and adjust the following parameters:
- Profile name: Vergeben Sie einen aussagekräftigen Namen Enter a descriptive name (in diesem Beispiel this example RADIUS).
- Server address: Tragen Sie die IP-Adresse des RADIUS-Servers ein (in diesem Beispiel ein LANCOM Router mit der IP-Adresse Enter the IP address of the RADIUS server (in this example a LANCOM router with the IP address 192.168.1.254).
- Secret: Tragen Sie ein Passwort ein, welches der Router / Access Point zur Authentifizierung am RADIUS-Server verwendet (siehe Schritt Enter a password that the router / access point uses for authentication on the RADIUS server (see step 2.5).

1.4 Die Konfigurationsschritte auf dem Router / Access Point sind damit abgeschlossen. Schreiben Sie die Konfiguration in das Gerät zurück.
2. Konfiguration des RADIUS-Servers auf einem LANCOM Router oder Access Point:
) This concludes the configuration of the LANCOM router / access point. You can now write the configuration back to the device.
2) Configuring the RADIUS server on a LANCOM router or access point:
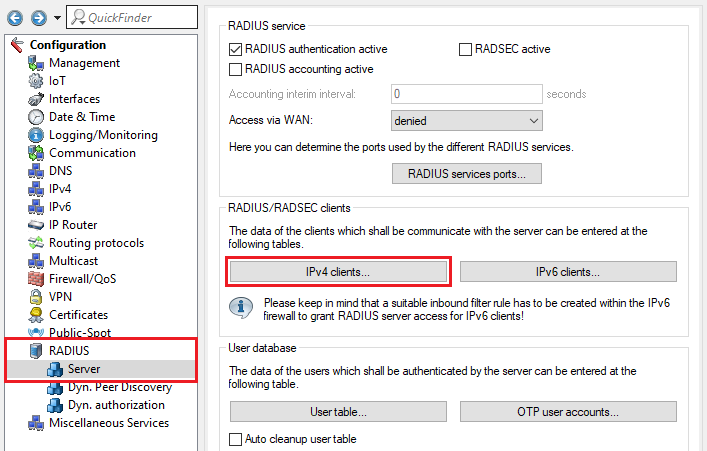
2.1) In LANconfig, open the configuration of the router / access point that acts as a RADIUS server. Go to the menu RADIUS → Server and set a checkmark for 2.1 Öffnen Sie die Konfiguration des Routers / Access Points, welcher als RADIUS-Server fungiert, in LANconfig. Wechseln Sie anschließend in das Menü RADIUS → Server und setzen den Haken bei RADIUS authentication active.
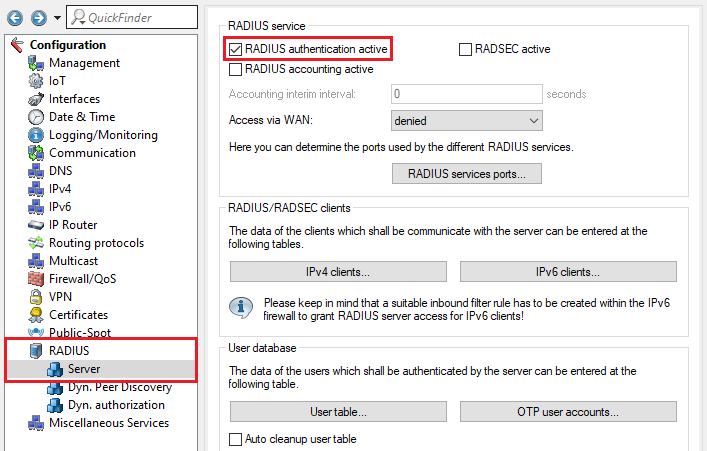
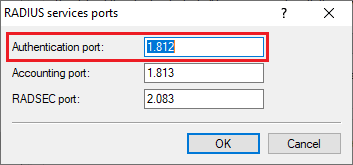
2.2 Wechseln Sie in das Menü ) Navigate to the menu RADIUS services ports.
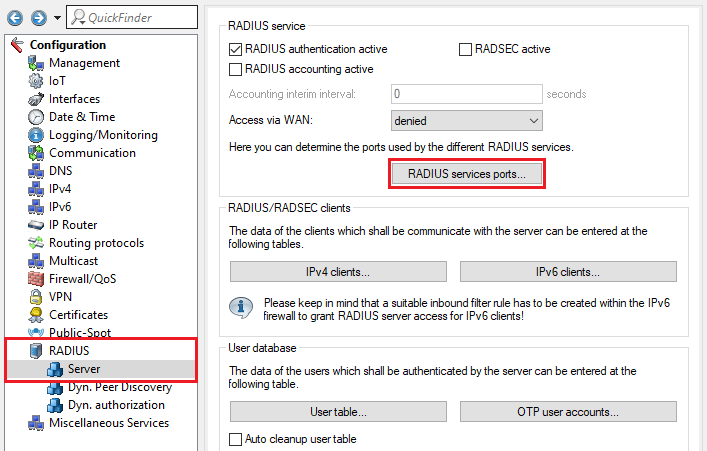
2.3 Stellen Sie sicher, dass bei Authentication port der Port 1812 hinterlegt) Make sure that the authentication port is set to the port 1812.
2.4 Wechseln Sie in das Menü ) Go to the menu IPv4 clients.
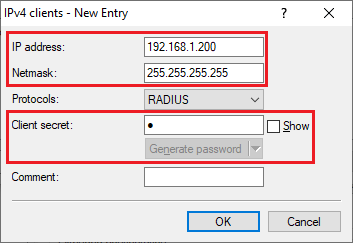
2.5 Erstellen Sie einen neuen Eintrag und passen die folgenden Parameter an) Create a new entry and adjust the following parameters:
- IP address: Tragen Sie die IP-Adresse des zu authentifizierenden Routers / Access Points einEnter the IP address of the authenticating router / access point.
- Netmask: Tragen Sie die Netzmaske Enter the netmask 255.255.255.255 ein. Diese steht für eine einzelne IP-Adresse. This stands for a single IP address.
- Client secret: Tragen Sie den in Schritt Enter the password specified in step 1.3 vergebenen Schlüssel ein. Dieses wird für die Authentifizierung des Routers / Access Points am RADIUS-Server verwendet. This is used for authentication at the RADIUS server on the router / access point.
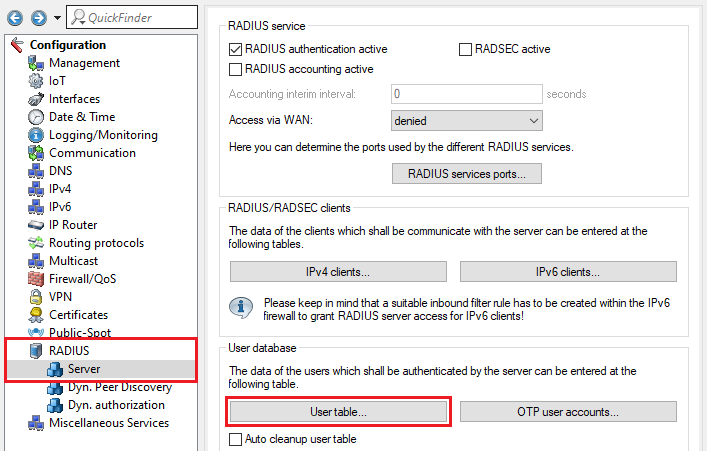
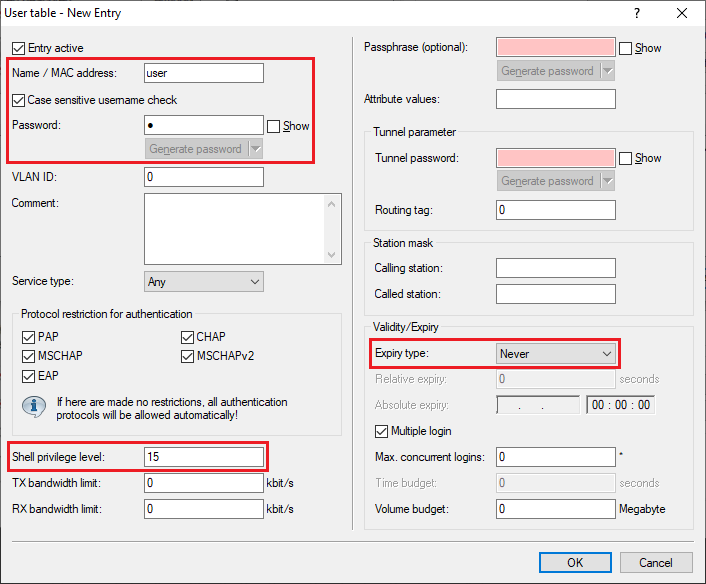
2.6 Wechseln Sie in das Menü ) Go to the menu User table.
2.7 Erstellen Sie einen neuen Eintrag und passen die folgenden Parameter an) Create a new entry and adjust the following parameters:
- Name / MAC address: Geben Sie einen Benutzer-Namen an, mit dem der Benutzer auf den Router / Access Point zugreifen soll. Password: Geben Sie ein Passwort an, mit dem der Benutzer auf den Router / Access Point zugreifen sollEnter a username to be used by the user to access the router / access point.
- Password: Enter a password that the user should use to access the router / access point.
- Shell privilege level: Setzen Sie den Wert auf 15, damit der Benutzer Schreibrechte für alle Funktions-Gruppen erhältSet the value to 15 so that the user receives write permissions for all function groups.
- Expiry type: Wählen Sie im Dropdown-Menü Never aus, damit der Eintrag dauerhaft gültig bleibtFrom the drop-down menu, select Never so that the entry remains valid permanently.
| Info | |||||||||||||||||||||||||||
|---|---|---|---|---|---|---|---|---|---|---|---|---|---|---|---|---|---|---|---|---|---|---|---|---|---|---|---|
Das The LCOS unterstützt supports 7 verschiedene Berechtigungen, welche als Shell-Privileg-Stufe gesetzt werden können.different authorizations, which are set as the Shell privilege level.
|
2.8 Die Konfigurationsschritte auf dem Router / Access Point, welcher als RADIUS-Server fungiert, sind damit abgeschlossen. Schreiben Sie die Konfiguration in das Gerät zurück) This concludes the configuration of the LANCOM router / access point that acts as the RADIUS server. You can now write the configuration back to the device.