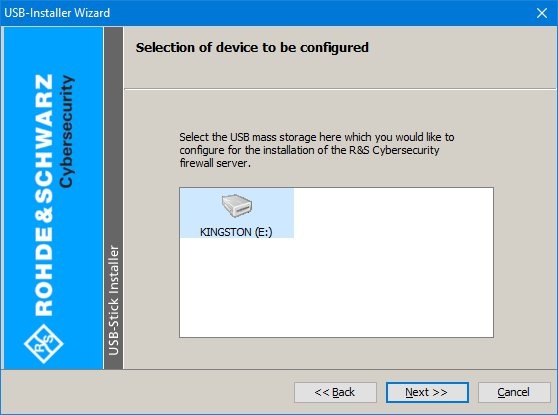
Versionen im Vergleich

Schlüssel

  • Diese Zeile wurde hinzugefügt.
  • Diese Zeile wurde entfernt.
  • Formatierung wurde geändert.


Seiteneigenschaften


Description:

This document describes how to perform a manual update of the LCOS-FX firmware on a LANCOM R&S®Unified Firewall by means of an “*.iso” firmware file.


Requirements:
  • USB 2.0 stick with max. 32GB storage capacity. USB 3.0 sticks and very large sticks (>32GB) sometimes cause problems for the BIOS in Unified Firewalls.
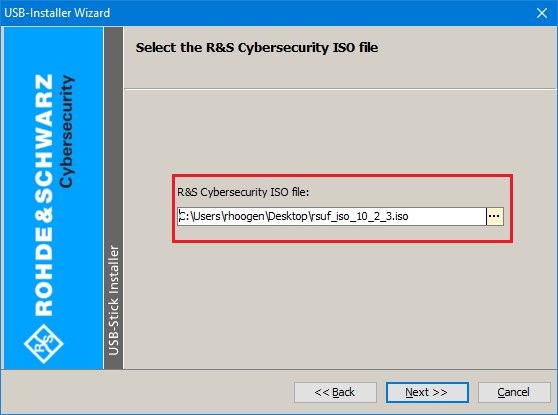
  • ISO image file (*.iso) of the firewall operating system LCOS-FX (available in the LANcommunity portal)
  • License file that you received when you registered your device

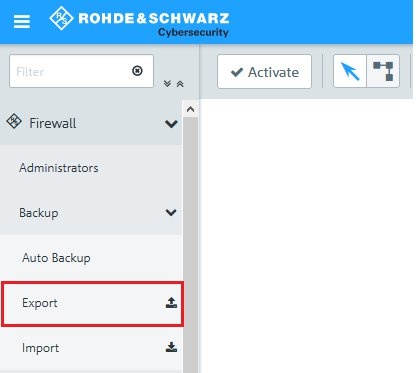
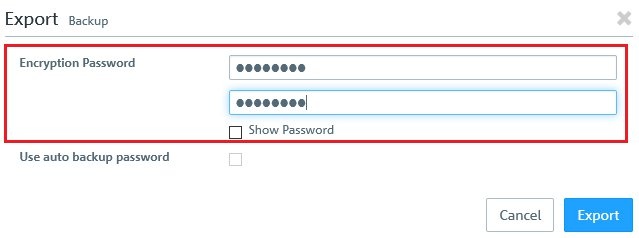
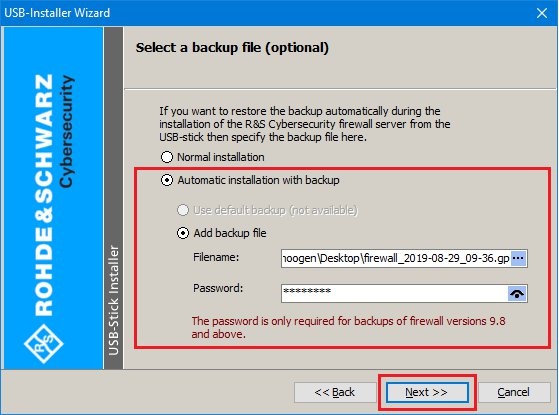
To be able to download the USB installer and the ISO image file, you must be a LANCOM partner and have access to the LANcommunity portal.

As an end customer, you must contact one of our LANCOM partners so that they can provide you with the files.


Procedure:

1) Manually create a backup file from the Unified Firewall:

1.1) In the menu Firewall -> Backup, select the option Export.
Image Removed

Image Added

1.2) In the following dialog, set a password for the backup file and click Export.
Image Removed

Image Added

1.3) Save the backup file on your local computer.

1.4) Change the file extension of the backup file from *.bak to *.gp (e.g. firewall_2019-08-29_09-36.gp)
Note:
      If you use the
auto-backup feature
      (see
Image Removed
      Image Added
          ), use
      the backup file that was saved most recently. In this case too, you change the file extension.


      2) Creating a bootable USB stick:

      2.1) Download the file of the USB installer. The software does not have to be installed.

      2.2) Download the ISO image file of the firewall operating system.

      2.3) Insert a USB stick into your PC.

      2.4) Start the USB installer software (rsuf_stick_10_2.exe) with administrator rights.

      2.5) Select the desired language.
    Image Removed

    Image Added

    2.6) Click Next to start the wizard.
    Image Removed

    Image Added

    2.7) Accept the license agreement and click Next.
    Image Removed

    Image Added

    2.8) Select the path to the downloaded ISO image file.
    Image Removed

    Image Added

    2.9) Select the USB mass storage device where the image is to be installed.
    Image Removed

    Image Added

    2.10) Any data on the USB storage device will be irretrievably deleted during this process!

    Confirm the process by activating the option.
    Image Removed

    Image Added

    2.11) Select Automatic installation with backup and Add backup file.

    2.12) In the field Filename, enter the Path to the backup file created in step 1 and enter the password for the backup file.
    Image Removed

    Image Added

    2.13) Select the recommended option Format as a USB hard drive.
    Image Removed

    Image Added

    2.14) Click Next to start the process.
    Image Removed

    Image Added

    2.15) The process log is shown in the dialog.
    Image Removed

    Image Added

    2.16) Once the process is completed successfully, the wizard reports “Configuration successfully completed”.

    2.17) Leave the option Remove USB stick safely enabled and click Close.
    Image Removed

    Image Added

    2.18) Remove the USB stick from your PC.
    Please note:
      Make sure that the bootable USB stick is never connected to a computer which is booting up. Otherwise, the USB stick triggers an automatic installation of the LANCOM R&S ® Unified Firewall software and reformats the hard disks.


    3) Transfer the new firmware and backup file to the Unified Firewall:

    Please note that the license for your Unified Firewall will be deleted after this procedure. The device is then returned to its 30-day trial period!

    In order to re-license the device, you must import the license file that you received when you registered your device (see
    Image Removed
    Image Added).

    3.1) Turn the Unified Firewall off.

    3.2) Plug the bootable USB stick created in step 1 into any USB port of the device.

    3.3) Turn the Unified Firewall on to start the automatic installation of the new image.
      • Once the installation process has successfully completed, the device shuts off automatically.

    3.4) Once the Unified Firewall has switched itself off, you can remove the USB stick.
    Please note:
      We recommend that you format the USB stick after successfully installing the current version of the Unified Firewall software. This prevents you from unintentionally installing the image on other devices. This would cause hard drives to be formatted and data lost.

    2.5) Turn the Unified Firewall on again. This concludes the manual firmware update.