...
| Seiteneigenschaften |
|---|
Description:
In diesem Artikel wird beschrieben, welche Besonderheiten bei der Verwendung einer RADIUS-Authentifizierung mit dynamischer VLAN-Zuweisung auf LCOS LX Access Points beachtet werden müssen.
This article describes specific issues to be observed when using RADIUS authentication with dynamic VLAN assignment on LCOS LX access points.
| Info |
|---|
This applies to any form of dynamic VLAN assignment, as a RADIUS server is required |
| Info |
Dies gilt für jegliche Form der dynamischen VLAN Zuweisung, da immer ein RADIUS-Server verwendet wird. |
Requirements:
- LCOS LX ab Version as of version 5.32 Rel (download latest version)
- LANconfig ab Version as of version 5.32 Rel Rel (download latest version)
- Beliebiger Web-Browser für den Zugriff per Any browser for access via WEBconfig
- SSH -Client für den Zugriff per Konsole auf den Access Point (z.Bclient for command-line access to the access point (e.g. PuTTY)
BesonderheitenSpecific issues:
...
Exclusive dynamic VLAN ID:
Die per Dynamic-VLAN zugewiesene ID darf nicht bereits einer anderen SSID zugewiesen sein. Diese darf also nur exklusiv für die dynamische Zuweisung verwendet werden.
Verwendung eines "untagged VLAN" für das WLAN-Profil des Dynamic-VLAN:
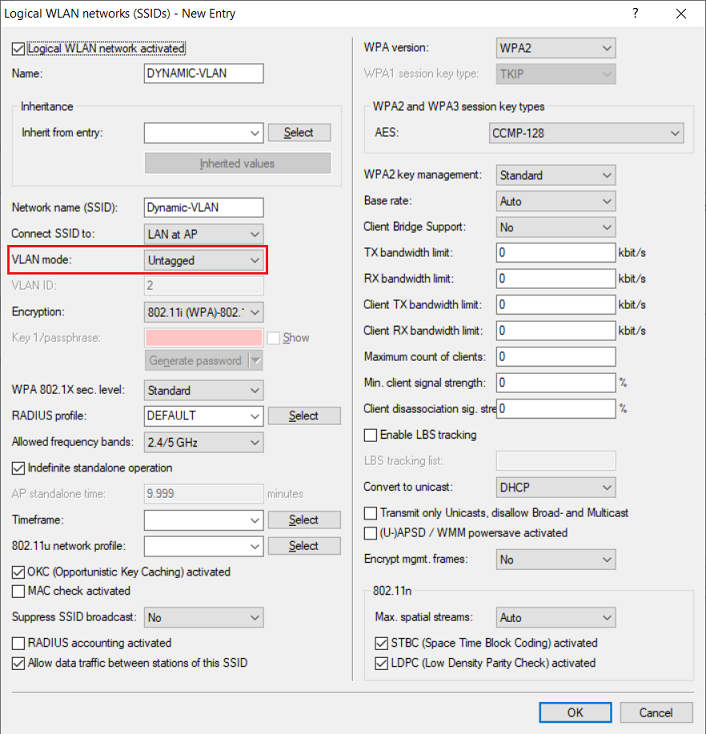
Dem WLAN-Profil, welches für die dynamische VLAN-Zuweisung verwendet wird, darf bei Verwendung von LCOS LX Access Points kein VLAN zugewiesen werden. Das WLAN-Profil muss also untagged betrieben werden.
| Info |
|---|
In Szenarien mit einem Misch-Betrieb müssen daher unterschiedliche WLAN-Profile für LCOS und LCOS LX Access Points verwendet werden. |
1. Standalone Access Point:
The ID assigned by dynamic VLAN must not already be assigned to another SSID. It must be used exclusively for dynamic assignment only.
Use an “untagged VLAN” for the WLAN profile of the dynamic VLAN:
When operating LCOS LX access points, no VLAN may be assigned to the WLAN profile used for dynamic VLAN assignment. In other words, the WLAN profile must operate untagged.
| Info |
|---|
Consequently in scenarios with a mix of devices, different WLAN profiles must be used for LCOS and LCOS LX access points. |
1) Standalone access point:
1.1) 1.1 LANconfig:
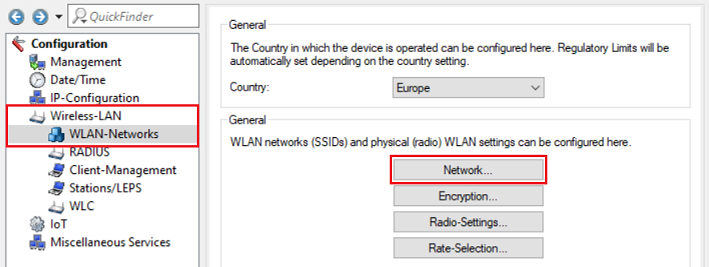
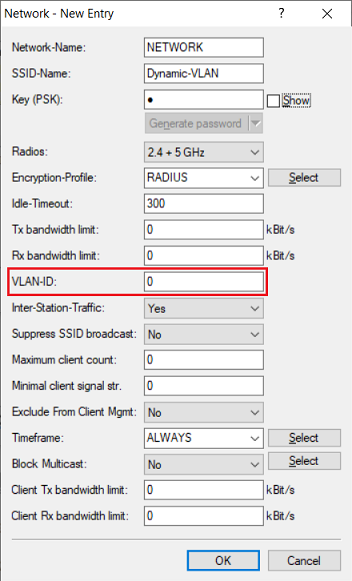
1.1.1 Verbinden Sie sich per LANconfig mit dem Access Point und wechseln in das Menü ) Connect to the access point via LANconfig and switch to the menu Wireless-LAN → WLAN-Networks → Network.
1.1.2 Stellen Sie sicher, dass bei dem verwendeten Profil als VLAN-ID der Wert 0 hinterlegt ist) Make sure that the profile used has a VLAN ID set to the value 0.
1.2) WEBconfig:
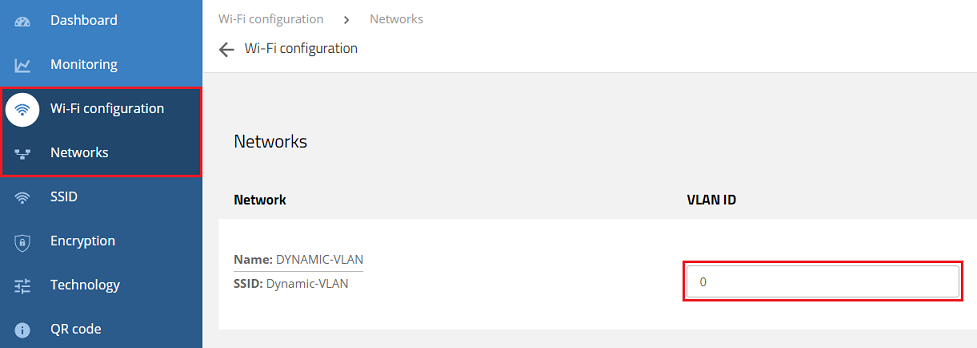
Verbinden Sie sich per WEBconfig mit dem Access Point, wechseln in das Menü Using WEBconfig, connect to the access point, navigate to the menu Wi-Fi configuration → Networks und stellen sicher, dass als VLAN ID der Wert 0 hinterlegt ist and check that the VLAN ID is set to the value 0.
2. WLAN-Controller Szenario) WLAN controller scenario:
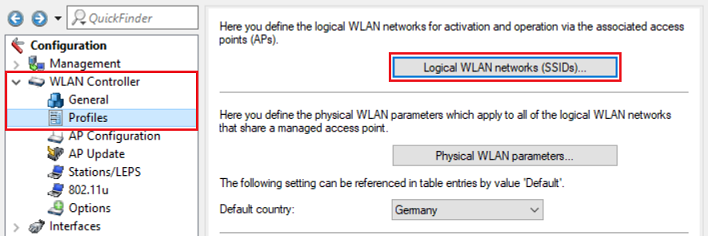
2.1 Verbinden Sie sich per LANconfig mit dem WLAN-Controller und wechseln in das Menü ) Using LANconfig, connect to the WLAN controller and navigate to the menu WLAN Controller → Profiles → Logical WLAN networks (SSIDs).
2.2 Stellen Sie sicher, dass bei dem verwendeten Profil als VLAN mode die Option Untagged ausgewählt ist) Make sure that the profile used has the VLAN mode set to the option Untagged.
Zuweisen einer Fallback-Dynamic-VLAN-ID:
Assigning a fallback dynamic VLAN ID:
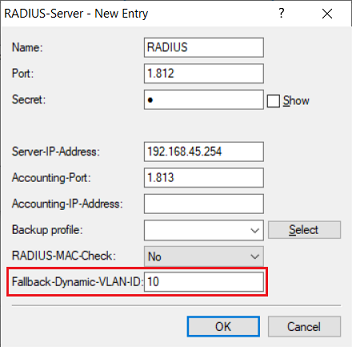
If a network user cannot be authenticated, a common requirement is for this user to be assigned a certain VLAN ID in order for them to access a default network Kann ein Netzwerk-Teilnehmer nicht authentifiziert werden, ist es häufig gewünscht, dass diesem eine bestimmte VLAN-ID zugewiesen wird, damit dieser Zugriff auf ein Standard-Netzwerk hat (Fallback-Dynamic-VLAN-ID).
| Hinweis |
|---|
When operating LCOS LX access points, a fallback dynamic VLAN ID can only be set on the access point itself; it cannot be rolled out by a WLAN controller. Similarly, this parameter cannot be rolled-out by script. For this reason, the fallback dynamic VLAN ID has to be manually stored on each access point individually Eine Fallback-Dynamic-VLAN-ID kann bei Verwendung von LCOS LX Access Points nur auf dem Access Point selber hinterlegt, nicht aber per WLAN-Controller ausgerollt werden. Ein Ausrollen des Parameters per Skript ist ebenso nicht möglich. Die Fallback-Dynamic-VLAN-ID muss daher händisch auf jedem Access Point einzeln hinterlegt werden. |
| Info |
|---|
In einem a WLAN -Controller Szenario werden die ausgerollten Einstellungen in der Konfiguration von LCOS LX Access Points hinterlegt und können daher eingesehen und angepasst werden. controller scenario, the rolled-out settings are stored in the configuration of the LCOS LX access points and can be inspected and adjusted in this way. |
1) Configuration by 1. Konfiguration per LANconfig:
1.1 Verbinden Sie sich per LANconfig mit dem Access Point und wechseln in das Menü ) Connect to the access point via LANconfig and switch to the menu Wireless-LAN → RADIUS → RADIUS-Server.
1.2 Hinterlegen Sie in dem verwendeten RADIUS-Profil die ) In the relevant RADIUS profile, enter the parameter Fallback-Dynamic-VLAN-ID.
2. Konfiguration per ) Configuration by WEBconfig:
2.1 Verbinden Sie sich per WEBconfig mit dem Access Point, wechseln in das Menü ) Using WEBconfig, connect to the access point, navigate to the menu Wi-Fi configuration → Encryption und klicken bei dem verwendeten Netzwerk auf and click Edit RADIUS profiles for the relevant network.
2.2 Tragen Sie die ) Enter the Fallback-Dynamic-VLAN-ID ein und klicken auf and click Save.
3. Konfiguration per Konsole) Configuration by command line:
3.1 Verbinden Sie sich per Konsole mit dem Access Point und geben den Befehl im folgenden Format ein) Use the command line to connect to the access point and enter the command in the following format:
set setup/radius/radius-server <Name des RADIUS-Server-Profils> <name of the RADIUS server profile> {Fallback-Dynamic-VLAN-ID} <VLAN-ID>
3.2 Geben Sie den Befehl flash ein, damit die vorgenommene Änderung bootpersistent gespeichert wird. ) Enter the command flash so that the changes are boot persistent.
