...
- Local networks: Use the “+” icon to store the network address of the local network at the headquarters in CIDR notation (in this example 192.168.1.0/24).
- Remote Networks: Use the “+” icon to store the network address of the local network of the branch office in CIDR notation (in this example 192.168.2.0/24).
...
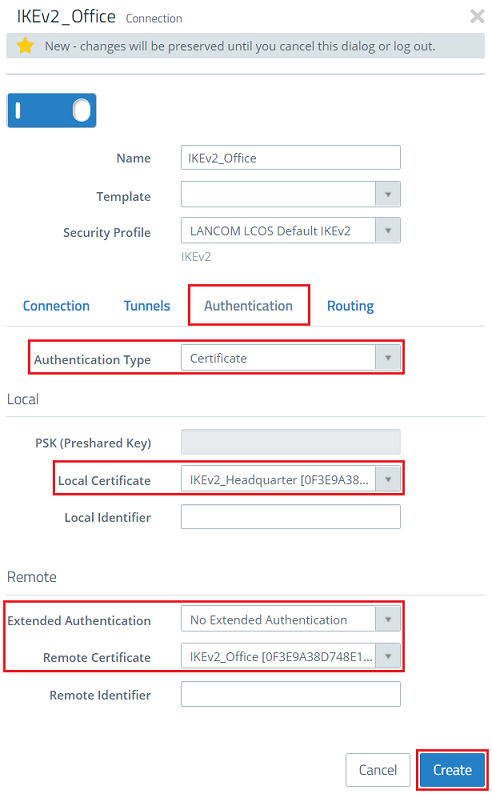
- Authentication Type: Make sure that the drop-down menu is set to the option Certificate.
- Local certificate: From the drop-down menu, select the certificate for the headquarters created in step 1.1.3.
- Extended Authentication: Make sure that the option No Extended Authentication is selected.
- Remote Certificate: From the drop-down menu, select the certificate for the branch office created in step 1.1.4.
1.2.7) Click the button Click to create a VPN network.
1.2.8) Modify the following parameters and click Create:
...
- Name: Set a descriptive name for the VPN connection (in this example IKEv2_Headquarter).
- Security Profile: From the drop-down menu, select the security profile LANCOM LCOS Default IKEv2. If necessary, you can at both ends use a different profile at both ends.
- Connection: Use the drop-down menu to select the Internet connection (in this example Internet)
- Remote Gateway: Enter the IP address or the DNS name of the Unified Firewall at the headquarters (in this example the IP address 81.81.81.81).
- Set the checkmark next to Initiate Connection, so that the Unified Firewall at the branch office establishes the VPN connection.
...
- Local networks: Use the “+” icon to store the network address of the local network at the headquarters in CIDR notation (in this example 192.168.2.0/24).
- Remote Networks: Use the “+” icon to store the network address of the local network of the branch office in CIDR notation (in this example 192.168.1.0/24).
...

