...
This article describes how to configure an SNMP user on a GS-3xxx series switch and monitor the switch with the LANmonitor via SNMPv3. Of course It is also possible to use any other monitoring tool which supports SNMPv3.
| Info |
|---|
Bei Verwendung anderer Monitoring-Tools kann es sein, dass einige Einstellungen leicht anders vorgenommen werden müssen (etwa die Verschlüsselung). Erfragen Sie die notwendigen Einstellungen bitte bei dem jeweiligen Hersteller.If another monitoring tool than LANmonitor is used, it is possible, that some parameters have to be configured dfifferently (e.g. the encryption). Please contact the respective manufacturer regarding the necessary settings. |
Requirements:
- LCOS SX as of version 4.00 Rel (download aktuelle Version)
- LANmonitor as of version 10.50 Rel (download aktuelle Version)
- Any web browser for accessing the webinterface
Procedure:
1. Einrichtung des SNMP-Benutzers auf dem ) Configuring the SNMP user on the Switch:
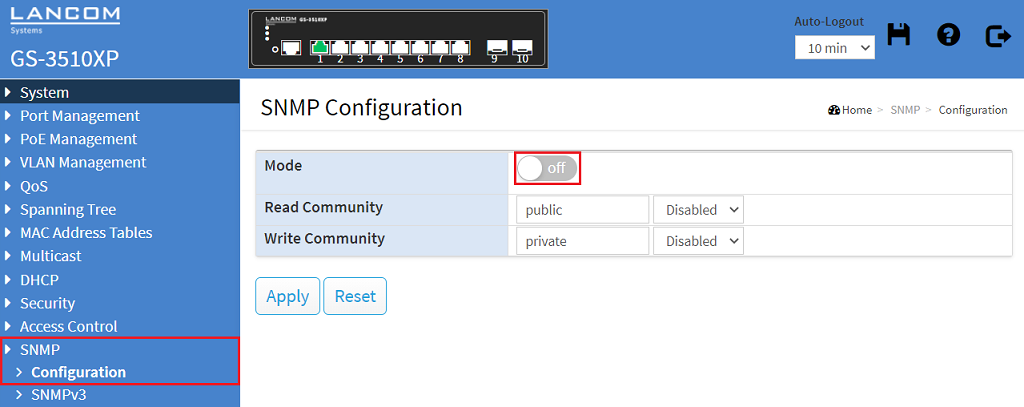
1.1 Verbinden Sie sich mit dem Webinterface des Gerätes und klicken in dem Menü SNMP → Configuration auf den Schalter off, um SNMP zu aktivieren) Open the webinterface of the device, go to the menu SNMP → Configuration and for the Mode click on the silder off to activate SNMP.
1.2 Klicken Sie anschließend auf Apply) Click Apply afterwards.
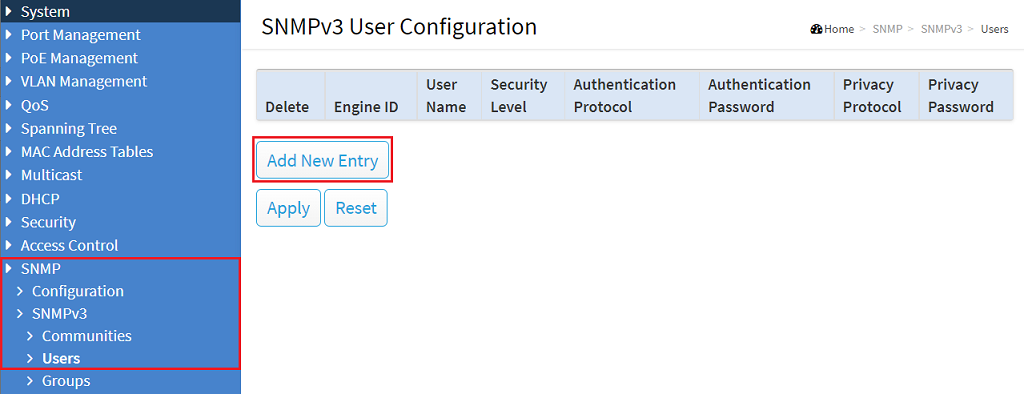
1.3 Wechseln Sie in das Menü ) Go to the menu SNMP → SNMPv3 → Users und klicken auf and click Add New Entry , um einen SNMP-Benutzer anzulegento create an SNMP user.
1.4 Passen Sie die folgenden Parameter an und klicken auf ) Modify the following parameters and click Apply:
- User Name: Vergeben Sie einen aussagekräftigen Benutzer-Namen (in diesem Beispiel Enter a descriptive user name (in this example SNMP-User).
- Security Level: Wählen Sie im Dropdownmenü die Option In the dropdown menu select the option Auth, Priv aus. Dadurch ist eine Anmeldung erforderlich . This makes authentication necessary (Auth) und die Daten werden verschlüsselt übertragen and the data transfer is encrypted (Priv).
- Authentication Protocol: Stellen Sie sicher, dass die Option Make sure, that the option SHA-256 ausgewählt ist is selected.
- Authentication Password: Tragen Sie ein Passwort für die Authentifizierung ein. Dieses wird neben dem Benutzer-Namen für die Anmeldung benötigtEnter a password for the authentication. In conjunction with the user name it is used for the login.
- Privacy Protocol: Wählen Sie im Dropdownmenü die Option In the dropdown menu select the option AES-256 aus.
- Privacy Password: Tragen Sie ein Passwort ein. Dieses wird für die Verschlüsselung verwendetEnter a Password. It is used for the encryption.
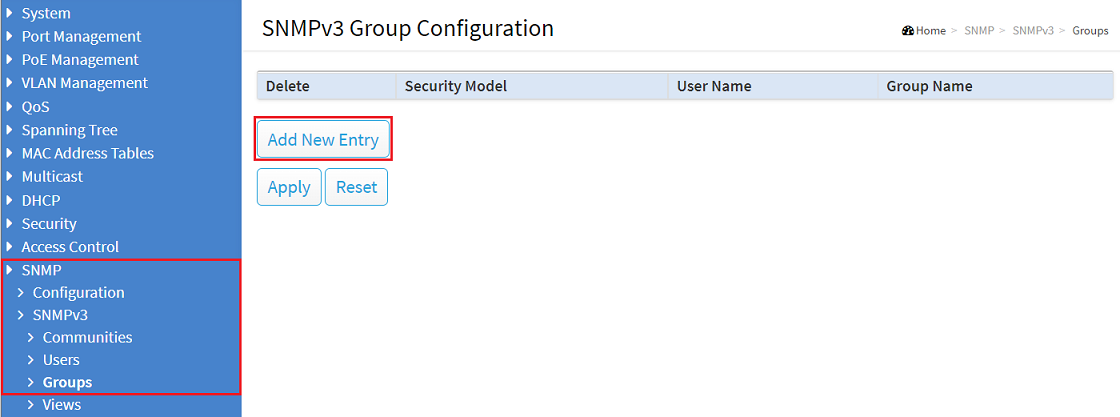
1.5 Wechseln Sie in das Menü ) Go to the menu SNMP → SNMPv3 → Groups und klicken auf and click on Add New Entry , um eine SNMP-Gruppe anzulegento create an SNMP group.
1.6 Passen Sie die folgenden Parameter an und klicken auf ) Modify the following parameters and click Apply:
- Security Model: Wählen Sie im Dropdown-Menü die Option usm ausIn the dropdown menu select the option usm. USM (User-based Security Model) wird nur in Verbindung mit SNMPv3 verwendetis only used for SNMPv3.
- User Name: Stellen Sie sicher, dass der in Schritt 1.4 erstellte SNMP-Benutzer ausgewählt istMake sure, that the SNMP user created in step 1.4) is selected.
- Group Name: Vergeben Sie einen aussagekräftigen Namen für die SNMP-GruppeEnter a descriptive name for the SNMP group.
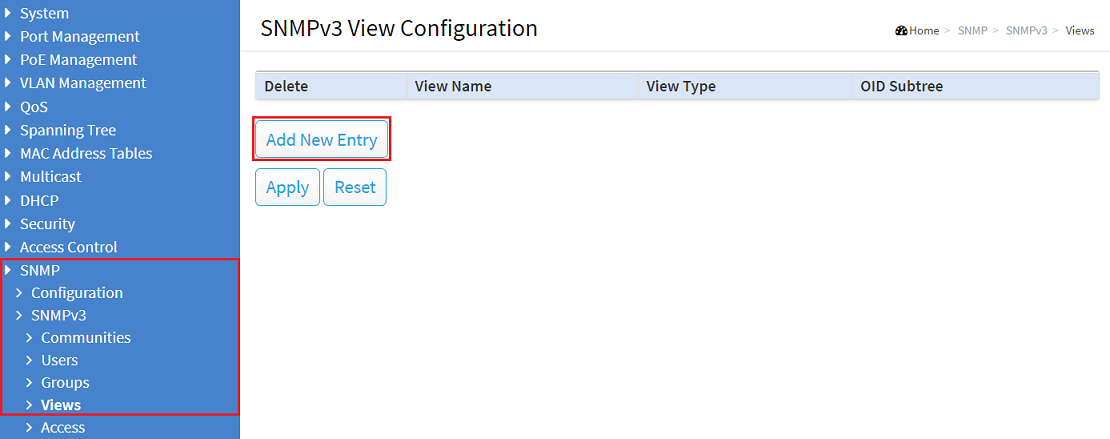
1.7 Wechseln Sie in das Menü ) Go to the menu SNMP → SNMPv3 → View und klicken auf and click on Add New Entry , um eine SNMP-Ansicht anzulegento create an SNMP view.
1.8 Passen Sie die folgenden Parameter an und klicken auf ) Modify the following parameters and click Apply:
- View Name: Vergeben Sie einen aussagekräftigen Namen für die SNMP-AnsichtEnter a descriptive name for the SNMP view.
- View Type: Wählen Sie im Dropdownmenü die Option included ausIn the dropdown menu select the option included.
- OID Subtree: Tragen Sie die Zeichenkette Enter the string .1.3 ein. Damit beginnt der OID-Pfad von LANCOM GerätenThe OID path of LANCOM devices begins with this string.
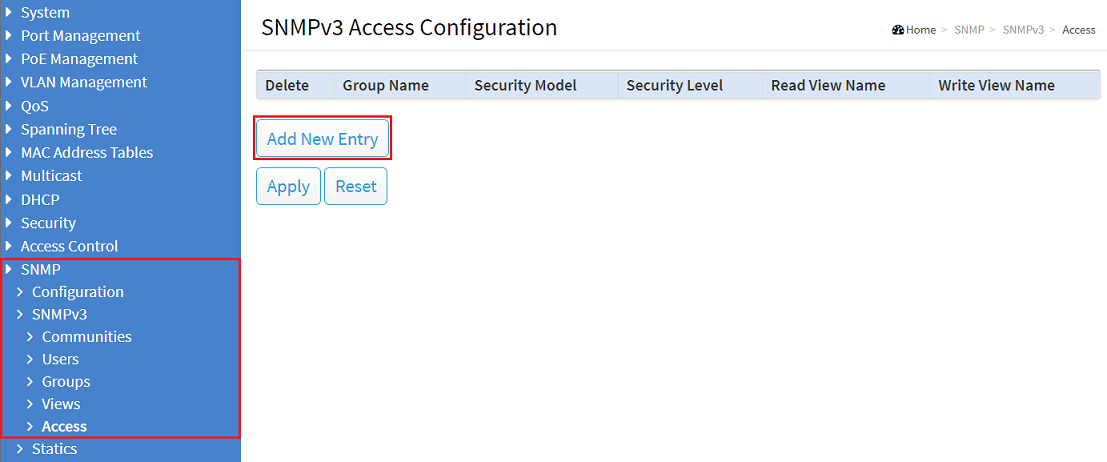
1.9 Wechseln Sie in das Menü ) Got to the menu SNMP → SNMPv3 → Access und klicken auf and click on Add New Entry , um die SNMP-Zugriffsrechte anzulegento create the SNMP access.
1.10 Passen Sie die folgenden Parameter an und klicken auf ) Modify the following parameters and click Apply:
- Group Name: Stellen Sie sicher, dass die in Schritt 1.6 erstellte SNMP-Gruppe ausgewählt istMake sure, that the SNMP group created in step 1.6) is selected.
- Security Model: Wählen Sie im Dropdown-Menü die Option usm ausIn the dropdown menu select the option usm.
- Security Level: Wählen Sie im Dropdown-Menü die Option In the dopdown menu select the option Auth, Priv aus.
- Read View Name: Stellen Sie sicher, dass die in Schritt 1.8 erstellte SNMP-Ansicht ausgewählt istMake sure, that the SNMP view created in step 1.8) is selected.
- Write View Name: Stellen Sie sicher, dass die in Schritt 1.8 erstellte SNMP-Ansicht ausgewählt ist Make sure, that the SNMP view created in step 1.8) is selected.
1.11 Klicken Sie in der rechten oberen Ecke auf dasDisketten-Symbol, damit die Konfiguration als Start-Konfiguration gespeichert wird) Click on the disk symbol in the upper right corner to save the configuration as the start configuration.
| Info |
|---|
Die Start-Konfiguration bleibt auch nach einem Neustart des Gerätes oder einem Stromausfall erhaltenThe start configuration is retained even if the device is restarted or there is a power failure. |
1.12 Bestätigen Sie den Speichervorgang mit einem Klick auf ) Acknowledge the save process by clicking OK.
