
| Deutsch | ||||||||||
|---|---|---|---|---|---|---|---|---|---|---|
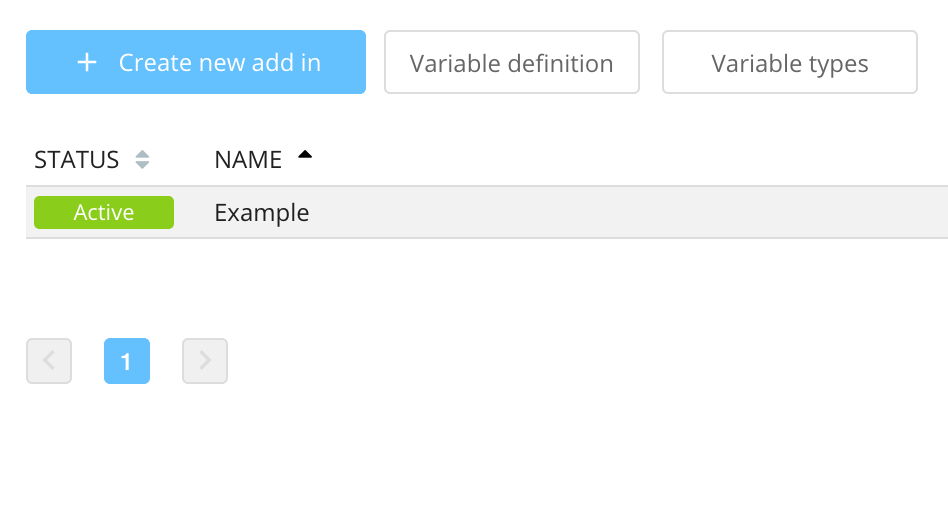
VariablenUm die Nutzung der Add-ins weiter auszubauen, besteht die Möglichkeit Variablen zu verwenden. Diese können als schreibgeschützte Werte in Add-ins verwendet werden. Eine Variable besteht aus den folgenden Parametern:
Variables können in dem Menü Add-ins → Variablen erstellt und bearbeitet werden.
Variablen hinzufügen:Eine Variable kann an verschiedenen Stellen verwendet werden. Bei Verwendung der gleichen Variable an mehreren Stellen überschreibt die letzte Variable die vorherigen Einträge.
Global: Wird einer Variable ein Wert zugewiesen, gilt diese global. Diese kann dann in einem Add-in verwendet werden. Netze: 1. Wechseln Sie in das Menü Netze, wählen ein Netzwerk aus und klicken auf Variablen → Variablen hinzufügen.
2. Wählen Sie die gewünschte Variable aus und weisen dieser gegebenenfalls einen Wert zu bzw. wählen die Aktion aus. Klicken Sie anschließend auf Hinzufügen.
Standorte: 1. Wechseln Sie in das Menü Standorte, wählen einen Standort aus und klicken auf Variablen → Variablen hinzufügen.
2. Wählen Sie die gewünschte Variable aus und weisen dieser gegebenenfalls einen Wert zu bzw. wählen die Aktion aus. Klicken Sie anschließend auf Hinzufügen.
Geräte: 1. Wechseln Sie in das Menü Geräte, wählen ein Gerät aus und klicken auf Variablen → Variablen hinzufügen.
2. Wählen Sie die gewünschte Variable aus und weisen dieser gegebenenfalls einen Wert zu bzw. wählen die Aktion aus. Klicken Sie anschließend auf Hinzufügen.
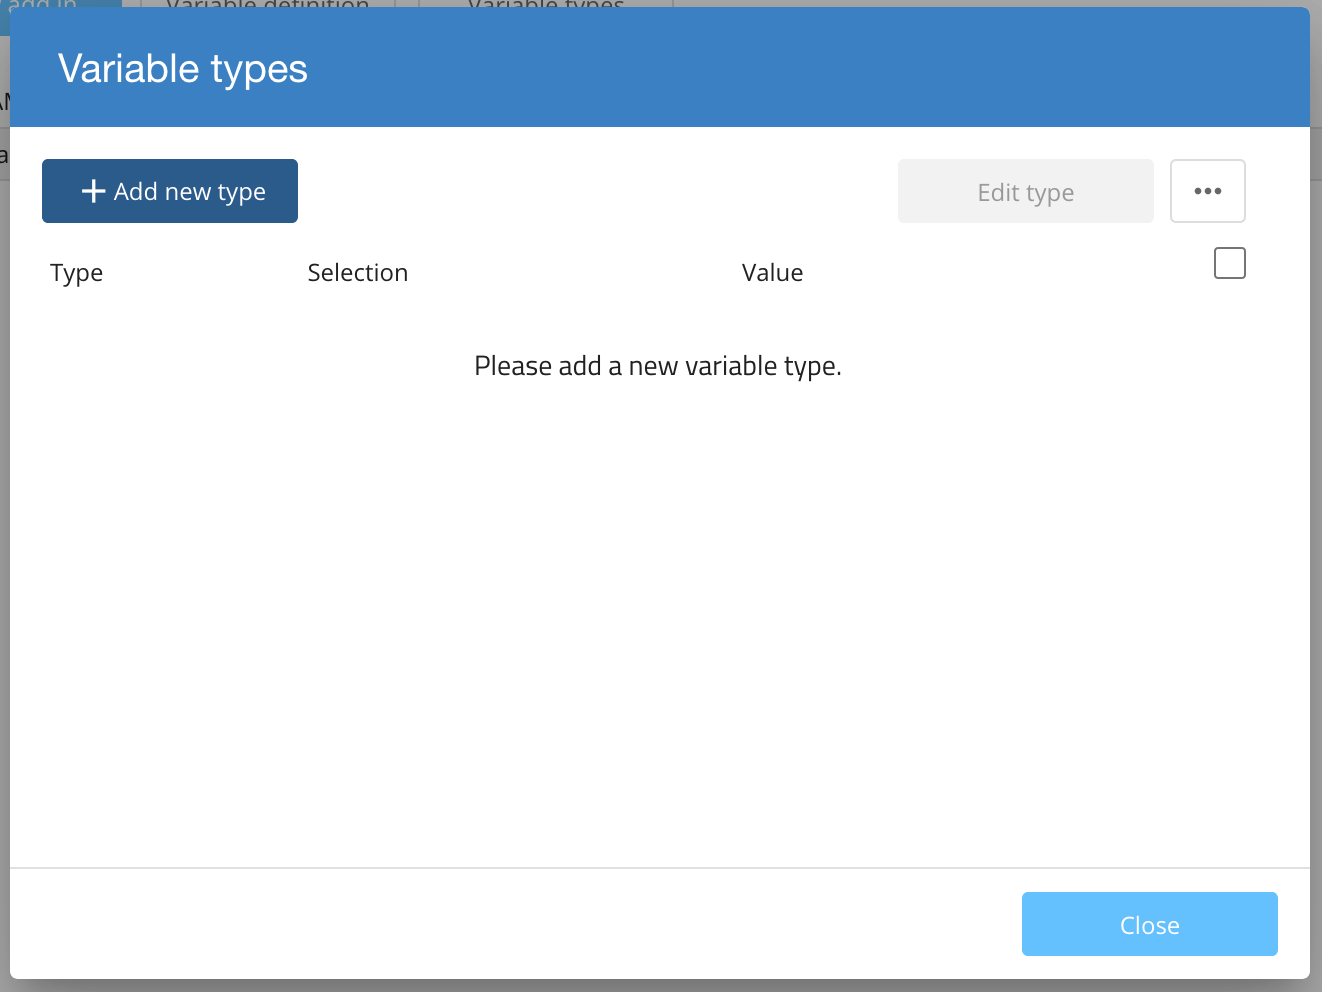
Neuen Variablen-Typ definieren:1. Wechseln Sie in das Menü Add-ins und klicken auf Variablen.
2. Klicken Sie auf Variablen-Typen.
3. Klicken Sie anschließend auf Neuen Typ hinzufügen.
4. Es gibt zwei mögliche Variablen-Typen (String selection und Regulärer Ausdruck). String selection: Passen Sie die folgenden Parameter an und klicken auf Speichern:
Regulärer Ausdruck: Um die Eingabe-Möglichkeiten für Variablen zu limitieren, wird auch die Möglichkeit zur Verwendung regulärer Ausdrücke (regular expressions - Regex) unterstützt. Für die regulären Ausdrücke stehen die folgenden Optionen zur Verfügung:
Passen Sie die folgenden Parameter an und klicken auf Speichern:
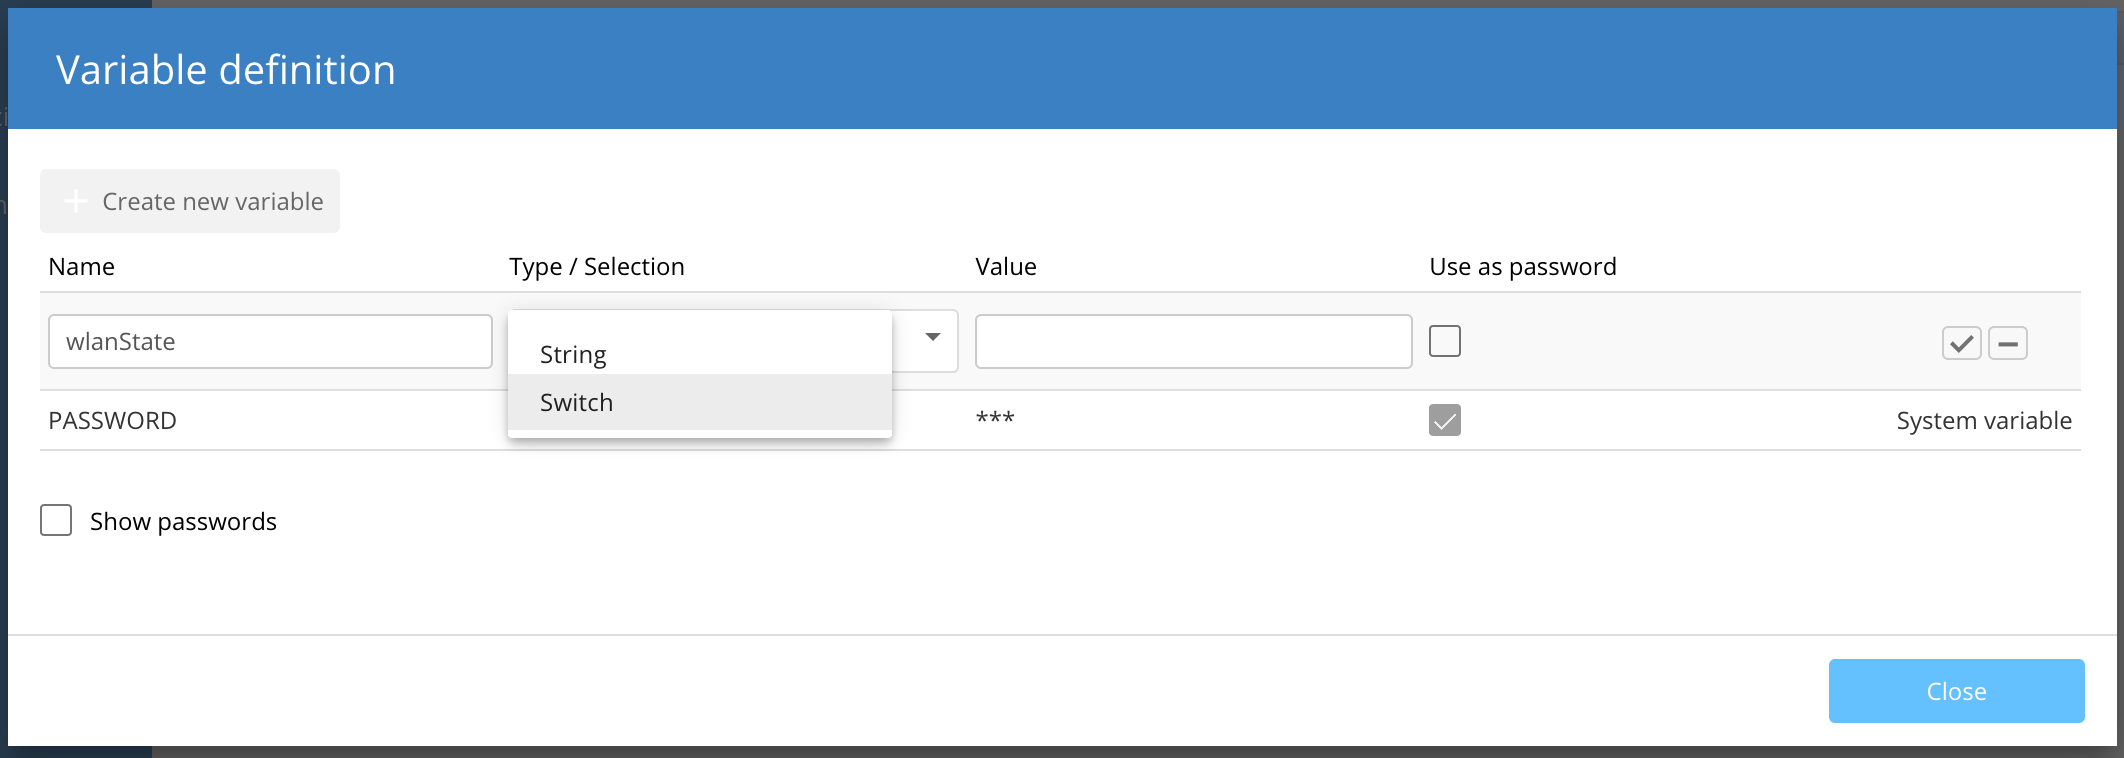
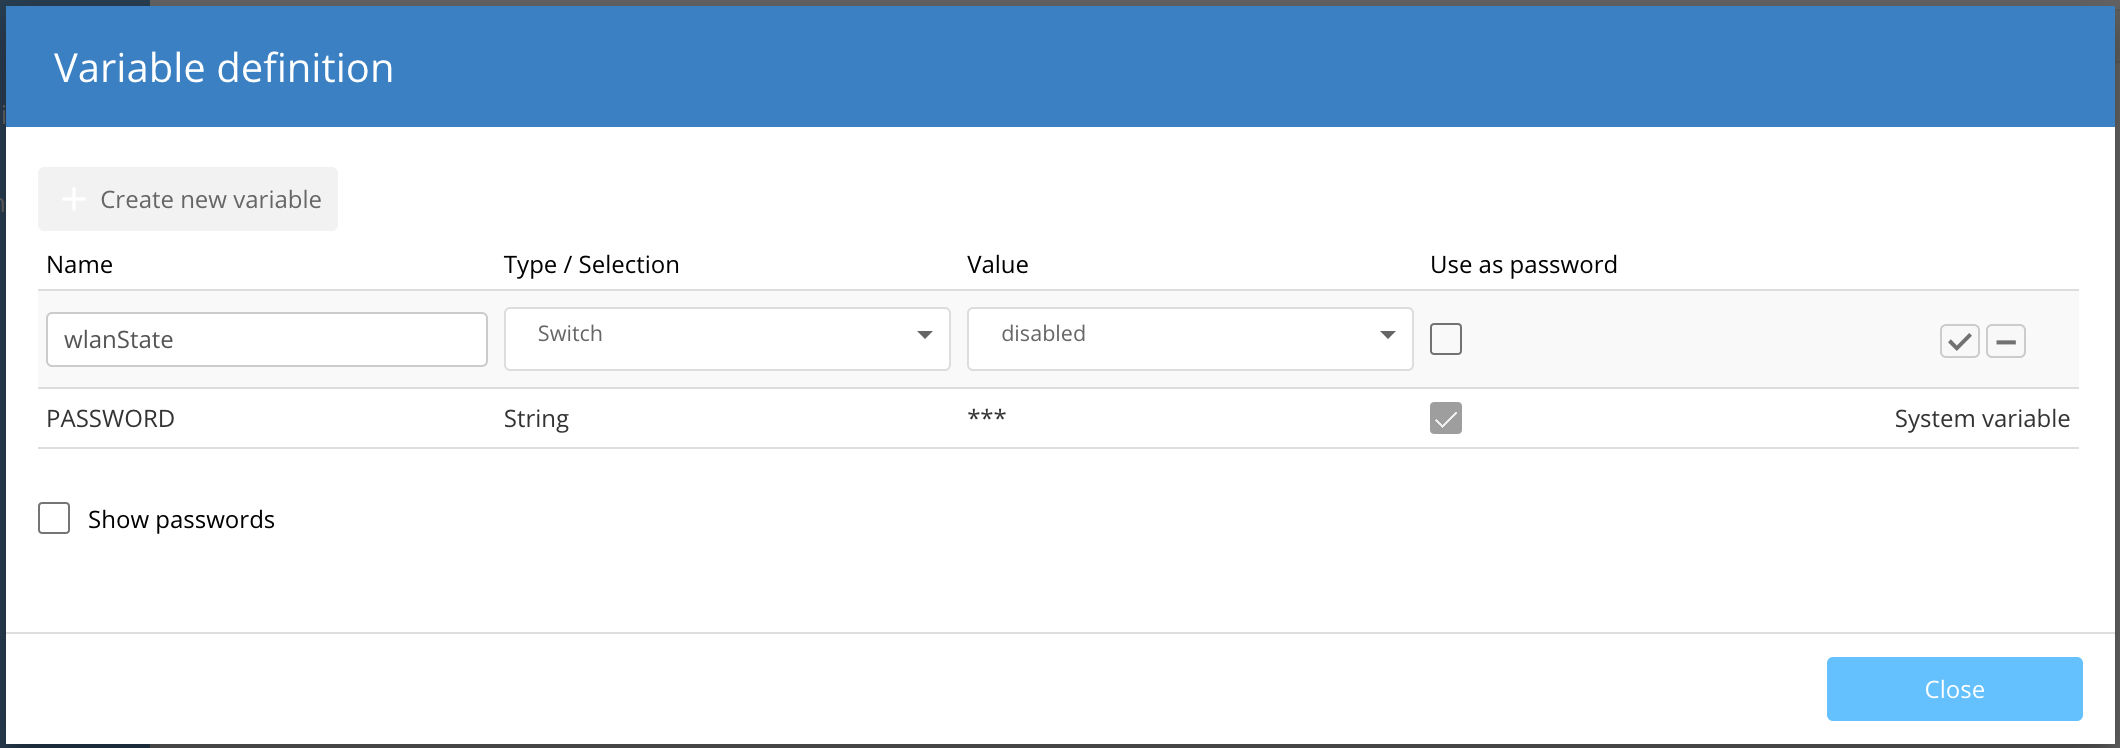
Neue Variable anlegen: 1. Wechseln Sie in das Menü Add-ins → Variablen und klicken auf Neue Variable.
2. Passen Sie die folgenden Parameter an und klicken auf Speichern:
Verwenden von Variablen:Werte von Variablen können in dem Objekt System-Variablen:System-Variablen verwalten spezifische Aspekte der Smart-Konfiguration.
Beispiel für eine Status-Anfrage: Der folgende Code-Auszug zeigt die generelle Herangehensweise für eine Status-Anfrage. Tauschen Sie die Variablen “Systemvariable” und “Value” je nach Bedarf aus. Der Add-in Code muss unter der auskommentierten Zeile “Code will be executed, if variable is met.” eingefügt werden. Verfügbare System-Variablen:
WerteSchreibenSie können die Konfiguration, welche an ein Gerät gesendet werden soll, per Konfigurations-Änderungen, welche per Dies kann auch per Konfigurations-Änderungen, die per LesenInformationen können von einem Gerät über die Funktion Es gibt kein Äquivalent für |


| Englisch |
|---|
...
| Deutsch |
|---|
Hier wird sämtlicher Inhalt des Dokuments in Deutsch eingefügt! |
| Englisch | ||||||||||
|---|---|---|---|---|---|---|---|---|---|---|
Variables | ||||||||||
To further extend the use of Add- Insins we have the possibility to use variables. These can be used as read-only values within Add- Inin scripts. A variable consists of
You can create and edit Add-ins in the menu Add-ins → Variables.
Adding Variables:A variable can be set /overwritten on the following levels, with ascending order:
For this, open the respective Variables view, and add the defined variables. Defining a Variable TypeA variable is either of type To define a new type click on the Variable Types button. Next, click on Add new type.
Give the type a name (e.g. Switch), and add a number of selectable variable values, for example:
Click on Save to save your variable type.
Review your types, then close the dialog to return to the variables page.
Defining a VariableTo define a new variable click on the Variable definition button. Provide a variable name and select the variable type from the drop down list.
Select the default value of the variable from the previously defined selections of the variable type. Select the checkbox Use as password if you want to hide the contents within the UI with asterisks (
Click on the checkbox to save your variable definition.
Using variablesthe following places and follows a hierarchy where the last one overrides the previous ones.
Global: If a value is assigned to a variable, the variable is valid globally. The variable can then be used in an Add-in. Networks: 1) Go to the menu Networks, select a network and click on Variables → Add Variables.
2) Select the desired variable and assign it a value or select an action. Click Add afterwards.
Sites: 1) Go to the menu Sites, select a site and click on Variables → Add variables.
2) Select the desired variable and assign it a value or select an action. Click Add afterwards.
Devices: 1) Go to the menu Devices, select a device and click on Variables → Add variables.
2) Select the desired variable and assign it a value or select an action. Click Add afterwards.
Defining a Variable Type1) Go to the meu Add-ins and click on Variables.
2) Click on Variable types.
3) Click Add new type afterwards.
4) There are two possible variable types (String selection and Regular expression). String selection: Modify the follwing parameters and click Save:
Regular expression: To limit the input for variables, also regular expressions are supported (Regex). The following options can be used for regular expressions:
Modify the follwing parameters and click Save:
Create a new Variable1) Go to the menu Add-ins → Variables and click on New variable.
2) Modify the following parameters and click Save:
Using variablesVariable values can be used using the object Now, you can use your variable in the following way: System variablesSystem variables manage specific aspects of the smart configuration.
Example for a status query: The following code snippet shows the general approach for a status query. Change the variables “Systemvariable” and “Value” according to your needs. Enter the actual Addin code under the commented line “Code will be executed, if variable is met.”. Available System variables:
ValuesWritingTo modify the configuration that is sent to a device you can use Changes made by The same can be achieved by using Changes made by ReadingThere is no equivalent |


| Seiteneigenschaften |
|---|