| Seiteneigenschaften |
|---|
Description:In
diesem Artikel wird beschrieben, wie auf einem Switch der XS-51xx Serie ein Firmware-Update durchgeführt werden kannThis article describes how to perform a firmware update on an XS or GS-45xx series switch.
Requirements:
- LCOS SX as of version 5.00 Rel (download latest firmware)
- Any web browser for accessing the webinterface
- Switch der XS-51xx Serie
- Beliebiger Web-Browser für den Zugriff auf das Webinterface
Procedure:
1. Firmware-Update auf einem einzelnen Switch ausführen) Performing a firmware update on a standalone switch:
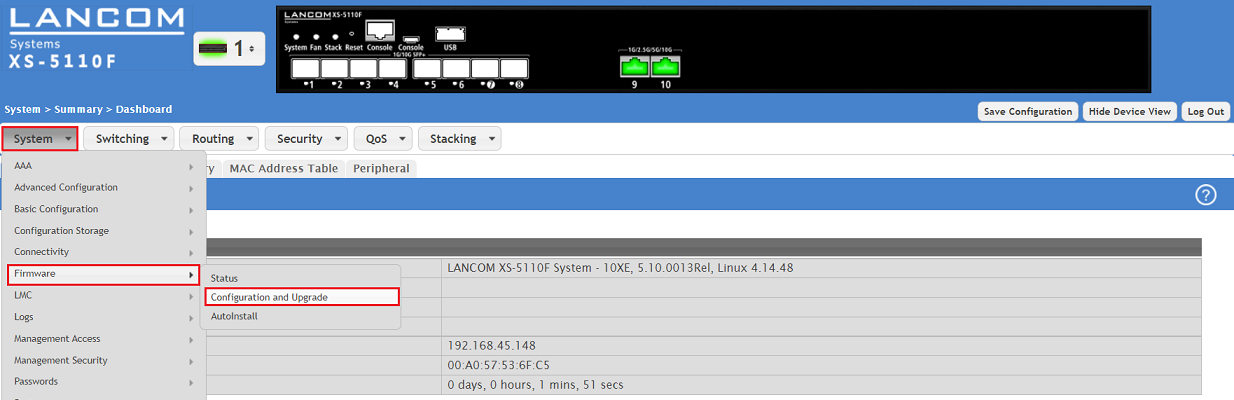
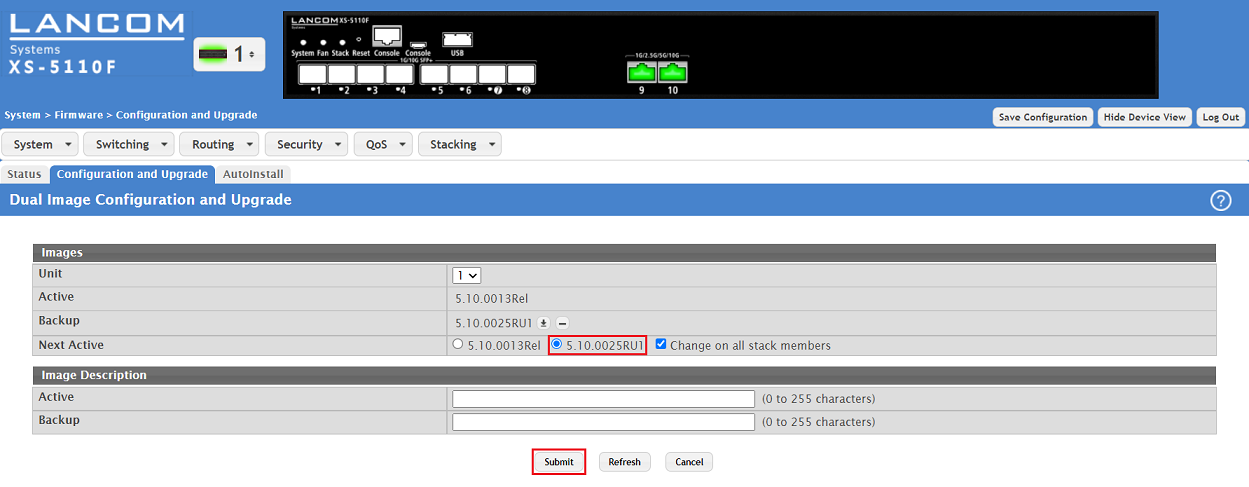
1.1 Verbinden Sie sich mit dem Webinterface des Switch und wechseln in das Menü ) Connect to the webinterface of the switch and go to the menu System → Firmware → Configuration and Upgrade.
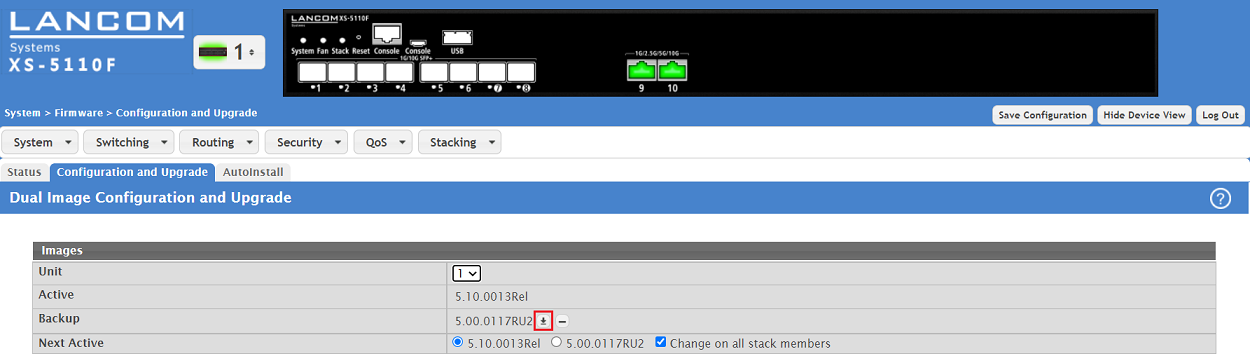
1.2 Klicken Sie bei Active auf das "Pfeil-Symbol", um das Auswahl-Fenster für die Firmware zu öffnen.
| Info |
|---|
Im Stacking-Modus kann bei Unit der Switch ausgewählt werden, auf dem das Firmware-Update ausgeführt werden soll. Active bezeichnet die aktive Firmware und Backup die inaktive Firmware im zweiten Firmware-Slot. |

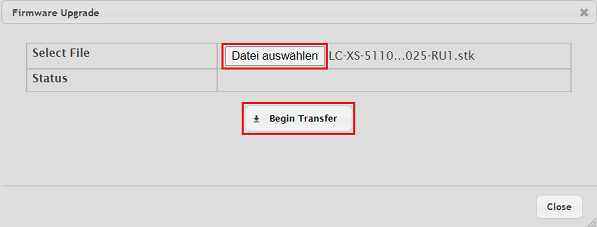
1.3 Klicken Sie bei Select File auf die Schaltfläche Datei auswählen und wählen die Firmware-Datei aus. Klicken Sie anschließend auf Begin Transfer, um die Firmware in das Gerät zu laden.
| Info |
|---|
Die alte Firmware wird nach dem Update nicht in den Backup Slot verschoben, sondern diese steht anschließend nicht mehr zur Verfügung. Die Firmware im Backup Slot bleibt erhalten. |

| Info |
|---|
Statt in den Active Slot kann die Firmware auch in den Backup Slot hochgeladen werden. Die hochgeladene Firmware bleibt zunächst inaktiv. Nach einem Neustart wird die Firmware im Backup Slot in den Active Slot geschrieben und aktiviert. Die Firmware im Active Slot wird in den Backup Slot geschrieben. |
2. Firmware-Update in einem Stacking-Verbund durchführen:
) Click on the "arrow symbol" at the Backup slot to open the firmware update menu.
| Info |
|---|
You can perform a firmware update on any switch in stacking mode by selecting the switch in the dropdown-menu Unit. Active indicates the active firmware and Backup indicates the inactive firmware in the second firmware slot. |
1.3) Click on Choose File and select the firmware file. Click Begin Transfer afterwards to upload the firmware into the device.
1.4) After the upload process select the new firmware next to Next Active and click Submit. It will be activated after a reboot and transfered to the Active slot.
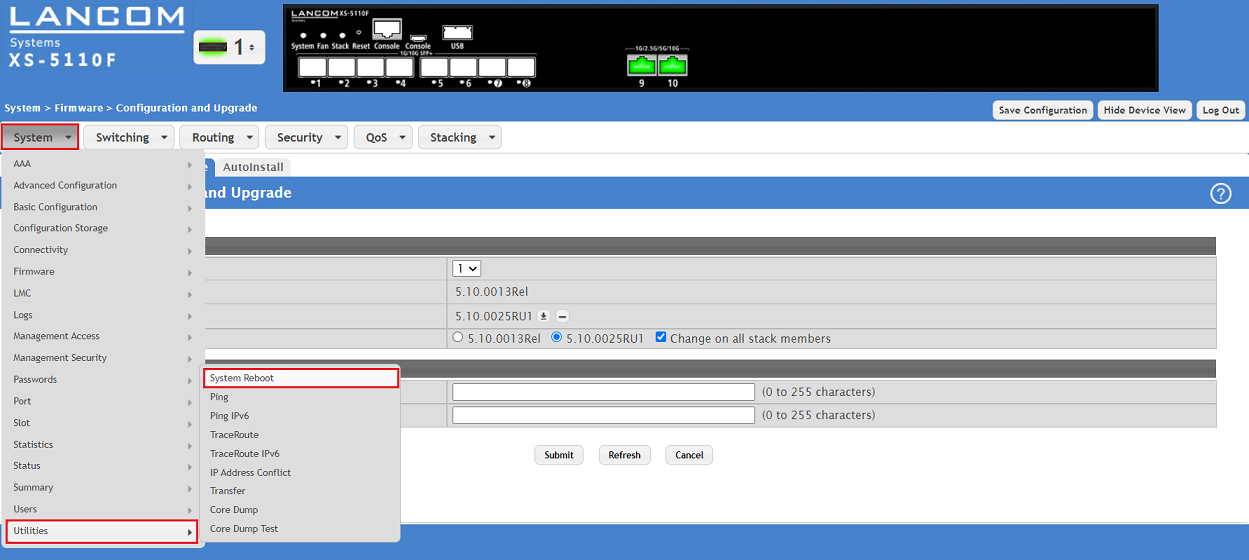
1.5) Go to the menu System → Utilities → System Reboot.
1.6) Click Reboot for the switch to perform a reboot.
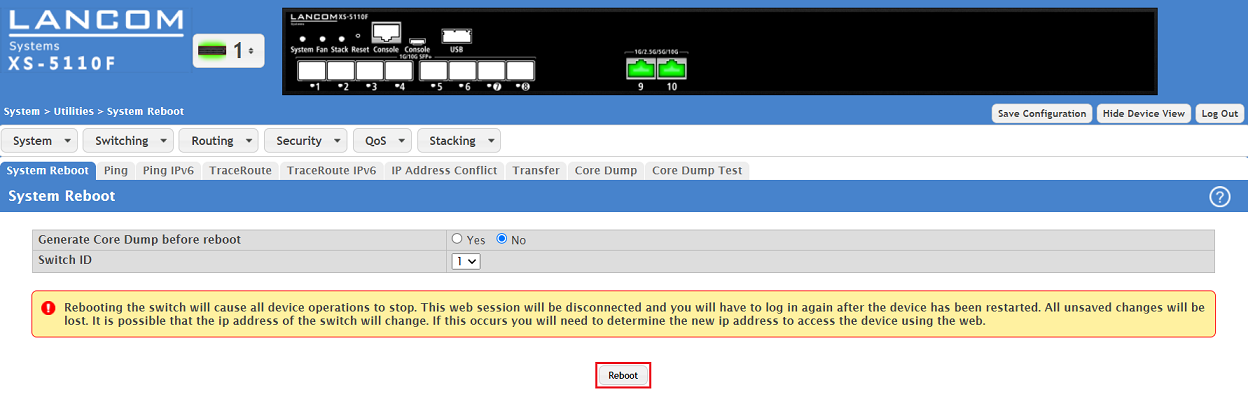
1.7) Acknowledge the reboot process by clicking OK.

2) Performing a firmware update in Stacking group:
Settings reagding the firmware update in a stacking group can be changed in the menu Stacking → Base → Firmware SynchronizationIn dem Menü Stacking → Base → Firmware Synchronization können Sie bei Bedarf Einstellungen zum Firmware-Update im Stack anpassen:
- Stack Firmware Auto Upgrade (Standard-Einstellung default setting Enable):
- Enable: The firmware is rolled out to all Stack members automatically when updating the Stack Manager. Thus the firmware update only has to be performed on the Stack Manager.
- Disable: No automatic update of the Stack members is performed when updating the Wird bei einem Firmware-Update des Stack Manager die Firmware automatisch auf alle Stack-Member ausgerollt. Das Firmware-Update muss also lediglich auf dem Stack Manager ausgeführt werden.Disable: Es erfolgt kein automatisches Update der Stack-Member bei einem Update des Stack Manager.
- Traps (Standard-Einstellung default setting Enable):
- Enable: If an SNMP server is present in the network and its IP address has been entered in the switch, the switch sends SNMP traps regarding the firmware update start, the ending and errors which might arise during the update.
- Disable: The switch doesn't send SNMP traps regarding the firmware update Wird ein SNMP-Server im Netzwerk betrieben und ist dieser auf dem Switch eingetragen, meldet der Switch den Beginn, den Abschluss und etwaig auftretende Fehler per SNMP-Trap.Disable: Der Switch sendet keine SNMP-Traps zum Firmware-Update.
- Allow Downgrade (Standard-Einstellung default setting Enable):
- Enable: Wird auf einem Stack-Member eine aktuellere Firmware als auf dem Stack Manager eingesetzt, erfolgt ein Downgrade auf die Version des Stack Manager.If a newer firmware is used on a Stack member than on the Stack Manager, an automatic downgrade to the version of the Stack Manager is performed.
- Disable: No downgrade of a Stack member is performedDisable: Es erfolgt kein Downgrade eines Stack-Member.

2.1 Automatisches Firmware-Update der Stacking-Member:
Ab Werk ist es ausreichend das Firmware-Update auf dem Stack Manager durchzuführen. Die Firmware wird dann automatisch an die Stack-Member ausgerollt (Stack Firmware Auto Upgrade aktiv).
Gehen Sie zum Firmware-Update auf dem Stack Manager wie in Schritt 1. beschrieben vor.
2.2 Manuelles Firmware-Update der Stack-Member:
Ist die Funktion Stack Firmware Auto Upgrade deaktiviert, kann das Firmware-Update der Stack-Member auch manuell angestoßen werden.
2.2.1 Gehen Sie zum Firmware-Update auf dem Stack Manager wie in Schritt 1. beschrieben vor.
) Automatic firmware update of the Stack members:
Ex factory it is sufficient to perform the firmware update on the Stack Manager. The firmware is then rolled out automatically to all stack members (Stack Firmware Auto Upgrade active). With the exception of the XS-6128QF (stacking only possible between multiple XS-6128QF) this also applies to different switch models (e.g. XS-5110F and GS-4530X) as the firmware is the same.
Perform the firmware update on the Stack Manager as described in step 1.
2.2) Manual firmware update of the Stack members:
If the function Stack Firmware Auto Upgrade is deactivated, the firmware update of the Stack members can also be started manually.
2.2.1) Perform the firmware update on the Stack Manager as described in step 1.
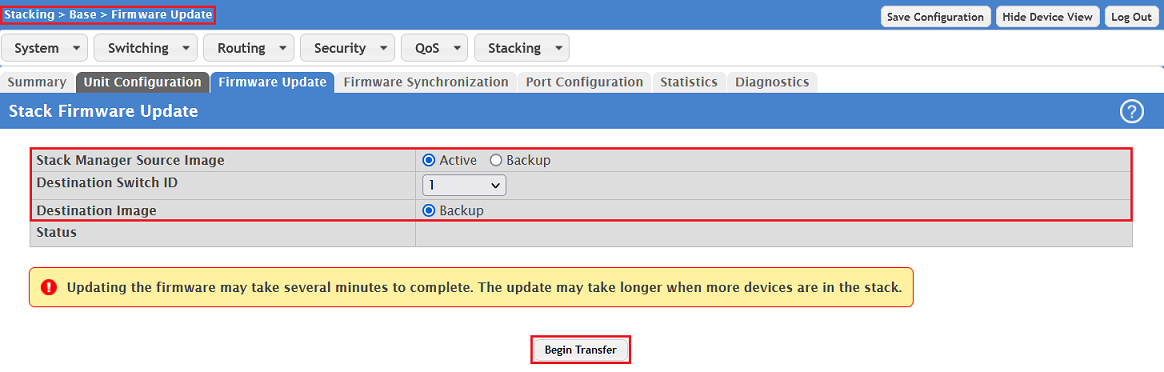
2.2.2) Go to the menu Stacking → Base → Firmware and click Begin Transfer after changing the parameters2.2.2 Wechseln Sie in das Menü Stacking → Base → Firmware und klicken nach Anpassen der Parameter auf Begin Transfer:
- Stack Manager Source Image:
Wählen Sie den Quell-Firmware Slot im Select the source firmware slot in the Stack Manager aus.- Active: The firmware in the Active slot of the Stack Manager is always transfered to the Backup slot of the Stack members. This is the recommended procedure.
- Backup: The firmware in the Backup slot of the Stack Manager is always transfered to the Backup slot of the Stack members Die Firmware im Active Slot des Stack Managers kann nur in den Backup Slot der Stack-Member übertragen werden. Hierbei handelt es sich um die empfohlene Vorgehensweise.Backup: Die Firmware im Active Slot des Stack Managers kann nur in den Backup Slot der Stack-Member übertragen werden.
- Destination Switch ID:
Wählen Sie den Switch im Stack-Verbund aus, dessen Firmware aktualisiert werden sollSelect the switch in the Stacking group whose firmware should be updated. - Destination Image:
Der Ziel-Firmware Slot auf dem Stack-Member ergibt sich durch Auswahl des Stack Manager Source Image auf dem Stack Manager.- Active: Der Active Slot des Stack-Member wird bei Auswahl des Backup Slot auf dem Stack Manager angesprochen.
- Backup: Der Backup Slot des Stack-Member wird bei Auswahl des Active Slot auf dem Stack Manager angesprochen. Hierbei handelt es sich um die empfohlene Vorgehensweise.
| Info |
|---|
Wird die Firmware in den Backup Slot der Stack-Member übertragen, müssen diese anschließend neugestartet werden, damit die Firmware aktiv geschaltet wird. |
- The firmware of the Stack Manager is always transfered to Backup slot of the Stack members.
| Info |
|---|
After transfering the firmware to the Backup slot of the Stack members, these have to be rebooted afterwards in order for the firmware to be activated. |