...
| Seiteneigenschaften |
|---|
Description:
In diesem Artikel wird beschrieben, wie ein Routing zwischen einem Switch der GS-3xxx Serie und einem LANCOM Router eingerichtet wirdThis article describes how to set up routing between a switch of the GS-3xxx series and a LANCOM router.
Requirements:
- LANCOM Switch der switch of the GS-3xxx Serieseries
- LANCOM Routerrouter
- LCOS ab Version as of version 8.50 (download aktuelle Versionlatest version)
- LANtools ab Version as of version 8.50 50 (download aktuelle Versionlatest version)
- LCOS SX ab Version as of version 4.00 RU2 RU2 (download aktuelle Versionlatest version)
- Bereits konfigurierte Netzwerke 192.Functioning networks 168.45.0/24 und and 192.168.0.0/24 auf dem on the LANCOM Routerrouter
- Bereits konfigurierte Previously configured VLANs 1 - 3 auf dem on the GS-3xxxBeliebiger Web-Browser für den Zugriff auf das Webinterface des
- Any web browser for accessing the web interface of the GS-3xxx
Scenario:
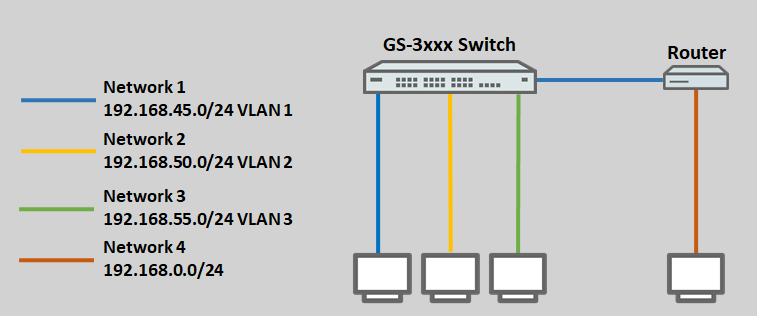
- Auf einem Switch der A switch of the GS-3xxx Serie sind die series is configured with the VLANs 1 - – 3 konfiguriert.
- Auf dem On the GS-3xxx sollen den the VLANs 1 - 3 folgende Netzwerke und IP-Adressen zugewiesen werden, damit der Switch zwischen den Netzwerken routen kann3 should be assigned the following networks and IP addresses so that the switch can route between the networks:
- VLAN 1: Netzwerk Network 192.168.45.0/24, IP -Adresse address 192.168.45.100
- VLAN 2: Netzwerk Network 192.168.50.0/24, IP -Adresse address 192.168.50.100
- VLAN 3: Netzwerk Network 192.168.55.0/24, IP -Adresse address 192.168.55.100
- The following networks are configured on a LANCOM router:
- Network
- Netzwerk 192.168.45.0/24, IP -Adresse address 192.168.45.254
- Netzwerk Network 192.168.0.0/24, IP -Adresse address 192.168.0.254
- Die am Switch und am Router anliegenden Netzwerke sollen untereinander kommunizieren können.
- The networks connected to the switch and the router should be able to communicate with one another.
Procedure:
1. Konfiguration der Routing-Funktion auf dem ) Configuring the routing features of the GS-3xxx Switchseries switch:
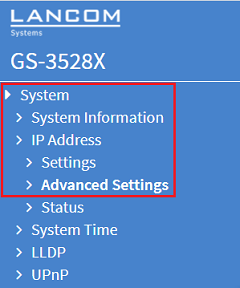
1.1 Öffnen Sie die Konfiguration des GS-3xxx im Browser und wechseln in das Menü ) In your browser, open the configuration for the GS-3xxx and navigate to the menu item System → IP Address → Advanced Settings.
1.2 Passen Sie bei Advanced Settings folgende Parameter an) In the Advanced Settings, modify the following parameters:
- Mode: Wählen Sie im Dropdownmenü die Option Router ausFrom the drop-down menu, select the option Router.
- DNS Server 1: Wählen Sie im Dropdownmenü die Option server 1: From the drop-down menu, select the option Configured IPv4 or IPv6 aus und tragen die IP-Adresse eines DNS-Servers ein, den der Switch erreichen kann (in diesem Beispiel die IP-Adresse eines Routers im gleichen Netzwerk and enter the IP address of a DNS server that the switch can reach (in this example the IP address of a router on the same network).
| Info |
|---|
Bei Bedarf können Sie weitere DNS-Server hinterlegenYou can add additional DNS servers if required. |
1.3 Passen Sie bei IP Interfaces folgende Parameter an:) For the IP Interfaces, modify the following parameters:
- For the first entry Entfernen Sie bei dem ersten Eintrag (VLAN 1) unter IPv4 DHCP den Haken bei Enable und tragen unter IPv4 bei Address eine IP-Adresse und bei Mask Length die Subnetzmaske ein.
- Erstellen Sie einen zweiten Eintrag mit dem VLAN 2 und tragen unter IPv4 bei Address eine IP-Adresse und bei Mask Length die Subnetzmaske ein.
- remove the Enable checkmark for IPv4 DHCP, and under IPv4 set the Address to an IP address and set the Mask Length as the subnet mask.
- Create a second entry for VLAN 2, and under IPv4 set the Address to an IP address and set the Mask Length as the subnet mask.
- Create a third entry for the VLAN 3, and under IPv4 set the Address to an IP address and set the Mask Length as the subnet maskErstellen Sie einen dritten Eintrag mit dem VLAN 3 und tragen unter IPv4 bei Address eine IP-Adresse und bei Mask Length die Subnetzmaske ein.
1.4 Ist der DHCP-Client aktiv (dies ist ab Werk der Fall), erstellt der Switch automatisch eine Default-Route (Network) If the DHCP client is enabled (the default ex-factory setting), the switch automatically creates a default route (network 0.0.0.0, Mask Length mask length 0) auf das Standard-Gateway to the standard gateway (in diesem Beispiel this example 192.168.45.254). Der Eintrag bleibt bei einem Wechsel auf eine feste IP-Adresse erhalten.The entry is retained when changing to a fixed IP address.
This scenario does not require a separate routing entry to be created for the network In diesem Szenario muss daher kein separater Routing-Eintrag für das Netzwerk 192.168.0.0/24 erstellt werden, da die Pakete über die Default-Route an den LANCOM Router geleitet werden. because the packets are sent to the LANCOM router via the default route.
| Info |
|---|
If there is no default route, it has to be created manually |
| Info |
Sollte die Default-Route nicht vorhanden sein, muss diese manuell erstellt werden. |
| Info |
|---|
Sollte das Ziel-Netzwerk If the destination network 192.168.0.0/24 hinter einem anderen Router als dem Standard-Gateway erreichbar sein, muss ein separater Routing-Eintrag über die Schaltfläche Add Route erstellt werden. is reached behind a router that is not the standard gateway, a separate routing entry needs to be created using the button Add Route.
|
1.5 Klicken Sie auf Apply, damit der Switch die vorgenommenen Änderungen übernimmt. ) Click on Apply so that the switch activates your changes.
The switch will now change its IP address and can be reached at the IP addresses stored in step 1.3Der Switch wird nun seine IP-Adresse ändern und ist anschließend unter den in Schritt 1.3 hinterlegten IP-Adressen ansprechbar.
1.6 Klicken Sie auf der rechten oberen Seite auf das rote Disketten-Symbol, um die Konfiguration als Start-Konfiguration zu speichern.
Alternativ können Sie die Konfiguration auch in dem Menü Maintenance → Configuration → Save Startup-config als Start-Konfiguration speichern, indem Sie bei File Name den Punkt startup-config markieren und anschließend auf Save Configuration klicken.
) Save the configuration as the startup configuration by clicking the red floppy disk icon at top-right.
Alternatively, you can save the configuration as the startup configuration in the menu Maintenance → Configuration → Save Startup-config under File name by marking the item startup-config and then clicking Save Configuration.
| Hinweis |
|---|
When the switch is started, it will load the startup configuration. If none is available, the default configuration will be loaded and the switch starts in its factory state |
| Hinweis |
Nach einem Neustart des Switches wird immer die Start-Konfiguration geladen. Liegt diese nicht vor, wird die Standard-Konfiguration geladen und der Switch befindet sich wieder im Werkszustand. |
1.7 Die Konfiguration des ) The GS-3xxx Switch ist damit abgeschlossenhas now been configured.
2. Konfiguration der Routing-Einträge auf dem LANCOM Router:) Configuring the routing entries on the LANCOM router:
The LANCOM router needs to be able to send packets to the networks Damit der LANCOM Router Pakete an die Netzwerke 192.168.50.0/24 und and 192.168.55.0/24 auf dem on the GS-3xxx Switch senden kann, müssen diese über Routing-Einträge bekanntgegeben werdenswitch, and these are made known by means of routing entries.
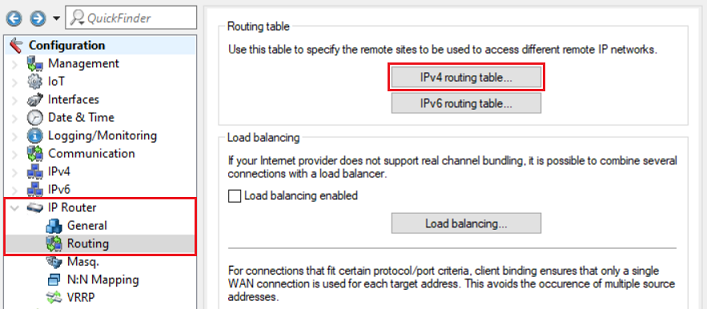
2.1 Öffnen Sie die Konfiguration des Routers in LANconfig und wechseln in das Menü IP-Router → Routing → IPv4-Routing-Tabelle.
) Open the configuration of the router in LANconfig and switch to the menu item IP router → Routing → IPv4 routing table.
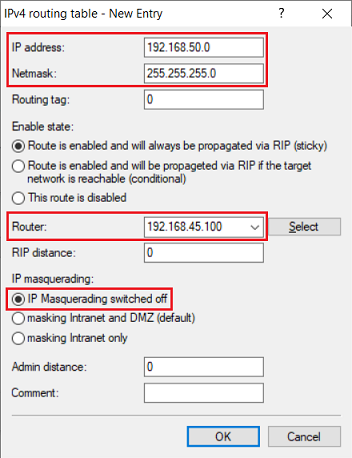
2.2) Click on Add to create a new routing entry for the destination network 2.2 Klicken Sie auf Hinzufügen, um einen neuen Routing-Eintrag für das Ziel-Netzwerk 192.168.50.0/24 zu erstellen24.
2.3 Passen Sie die folgenden Parameter an) Change the following parameters:
- IP -Adresse: Tragen Sie die Netzadresse des Ziel-Netzwerkes ein (in diesem Beispiel address: Enter the network address of the destination network (in this example 192.168.50.0).Netzmaske: Tragen Sie die Subnetzmaske des Ziel-Netzwerkes ein (in diesem Beispiel
- Netmask: Enter the subnet mask of the destination network (in this example 255.255.255.0).
- Router: Tragen Sie die in Schritt 1.3 vergebene IP-Adresse des Enter the IP address of the GS-3xxx im in VLAN 1 ein as specified in step 1.3 (in diesem Beispiel this example 192.168.45.100).
- Wählen Sie die Option IP-Maskierung abgeschaltet aus.
- Select the option IP masquerading switched off .
2.4) Create another routing entry for the network 2.4 Erstellen Sie einen weiteren Routing-Eintrag für das Netzwerk 192.168.55.0/24.
2.5 Die erstellten Routing-Einträge müssen anschließend wie folgt aussehen.
2.6 Die Konfiguration der Routing-Einträge auf dem Router ist damit abgeschlossen. Schreiben Sie die Konfiguration in den Router zurück.
3. Unterbinden der Kommunikation zwischen verschiedenen Netzwerken auf Switches der GS-3xxx Serie (Optional):
) The routing entries should then look like this.
2.6) This concludes the configuration of the RADIUS server on the router. Write the configuration back to the router.
3) Preventing communications between the different networks on GS-3xxx series switches (optional):
If necessary, you can prevent communication between the different networks on the GS-3xxxBei Bedarf können Sie die Kommunikation zwischen verschiedenen Netzwerken auf dem GS-3xxx unterbinden.


