...
This article describes how to set up a VPN connection from the Advanced VPN Client to a LANCOM router with two-factor authentication (IKEv2-EAP-OTP).
| Info | ||||||||||||||||||||||||
|---|---|---|---|---|---|---|---|---|---|---|---|---|---|---|---|---|---|---|---|---|---|---|---|---|
The following authenticator apps have been tested for interoperability in the context of this article (as of october 2023). Apple iOS 16/17:
Android 13:
|
Requirements:
- LANCOM central-site gateway, router of the 19xx series, WLAN controller, router with at least 25 VPN licenses (Central-Site gateway, 19xx series router or LANCOM router with the VPN 25 Option)
- Advanced VPN Client for Windows as of version 5.0
- LCOS as of version 10.70 RC2 REL (download latest version)
- LANtools as of version 10.70 RC2 REL (download latest version)
- Authenticator app for Android or iOS (e.g. Google Authenticator or Microsoft Authenticator)
| Info |
|---|
All involved devices (LANCOM router, computer with Advanced VPN Client and smartphone with authenticator app) must have up-to-date time settings. Information on configuring time synchronization on a LANCOM router can be found in this article. |
Scenario:
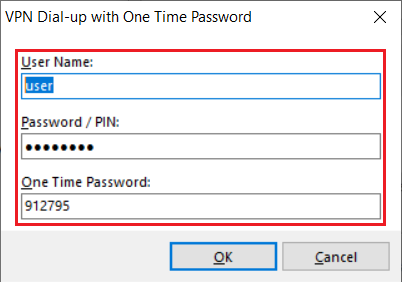
To establish an Advanced VPN Client connection to a router, a one-time password (OTP) should be generated, which is displayed in an authenticator app and must be entered when starting the VPN connection.
Procedure:
1. Aktivieren der CA und Erstellen der Zertifikate auf dem Router per ) Activate the CA and create the certificates on the router using Smart Certificate:
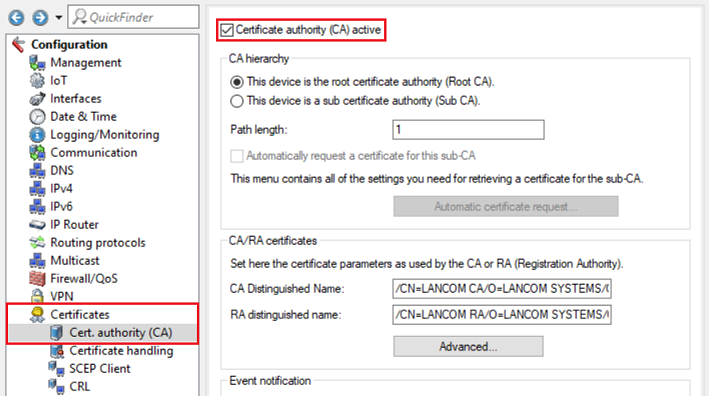
1.1 Öffnen Sie die Konfiguration des Routers in LANconfig, wechseln in das Menü Certificates → Certificate authority (CA) und setzen den Haken bei ) In LANconfig, open the configuration for the router, navigate to the menu Certificates → Cert. authority (CA) and set a checkmark next to Certificate authority (CA) active.Schreiben Sie die Konfiguration anschließend in den Router zurück
Then write the configuration back to the router.
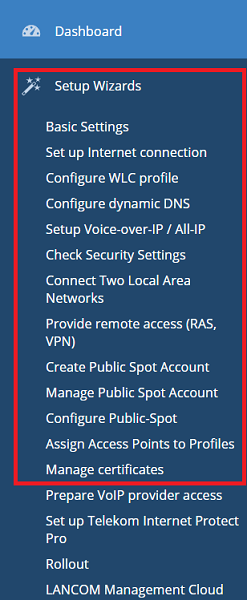
1.2 Öffnen Sie das Webinterface des Routers und wechseln in das Menü Setup Wizards → ) Open the web interface of the router and switch to the menu item Setup Wizards → Manage certificates.
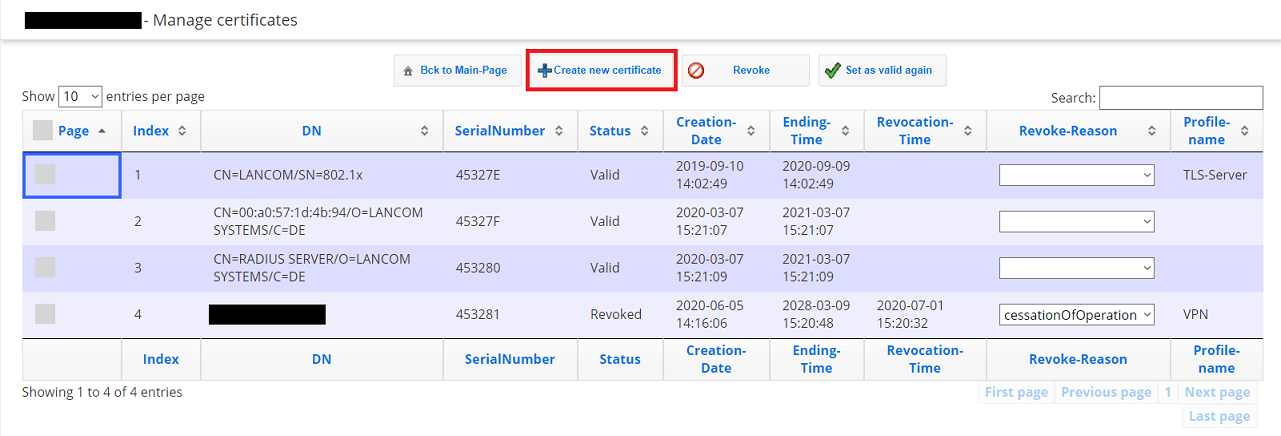
1.3 Klicken Sie auf ) Click on Create new certificate.
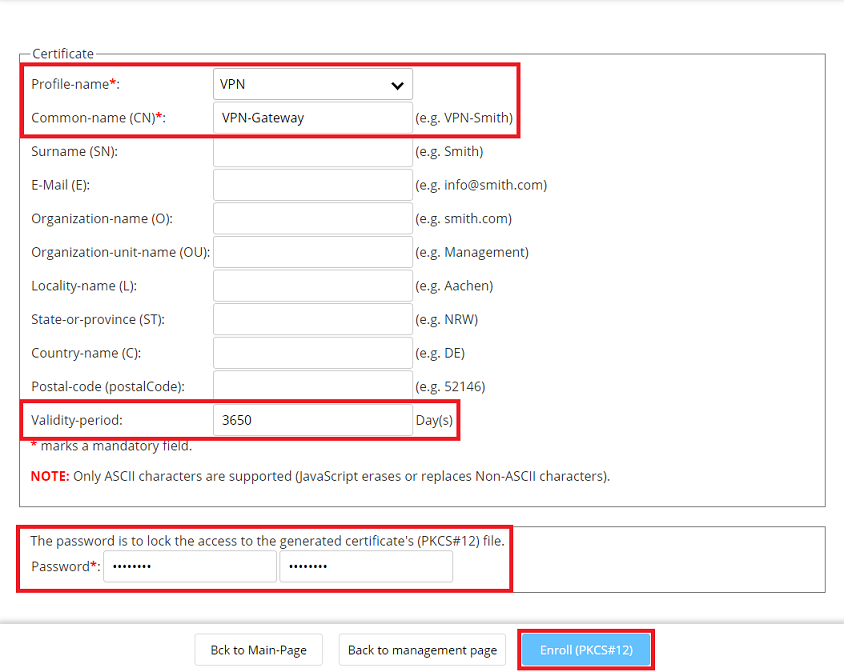
1.4 Passen Sie folgende Parameter an, klicken auf Enroll (PKCS#12) und speichern das Zertifikat ab) Adjust the following parameters, click on Enroll (PKCS # 12) and save the certificate:
- Profile - name: Wählen Sie im Dropdownmenü VPN ausFrom the drop-down menu, select VPN.
- Common - name (CN): Geben Sie einen aussagekräftigen Common Name an (in diesem Beispiel Enter a descriptive common name (in this example VPN-Gateway).
- Validity - period: Hinterlegen Sie eine möglichst lange Gültigkeitsdauer (in diesem Beispiel 10 JahreEnter a validity period that is as long as possible (in this example 10 years).
- Password: Geben Sie ein Passwort an, mit welchem das Zertifikat verschlüsselt wirdEnter a password used to encrypt the certificate.
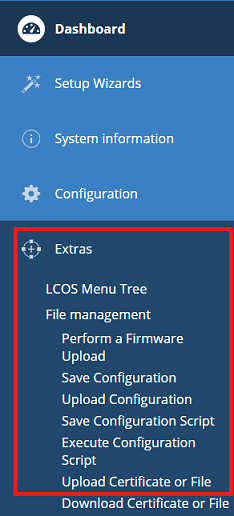
1.5 Wechseln Sie im Webinterface in das Menü Extras → ) In the web interface, change to the menu Extras → File management → Upload Certificate or File.
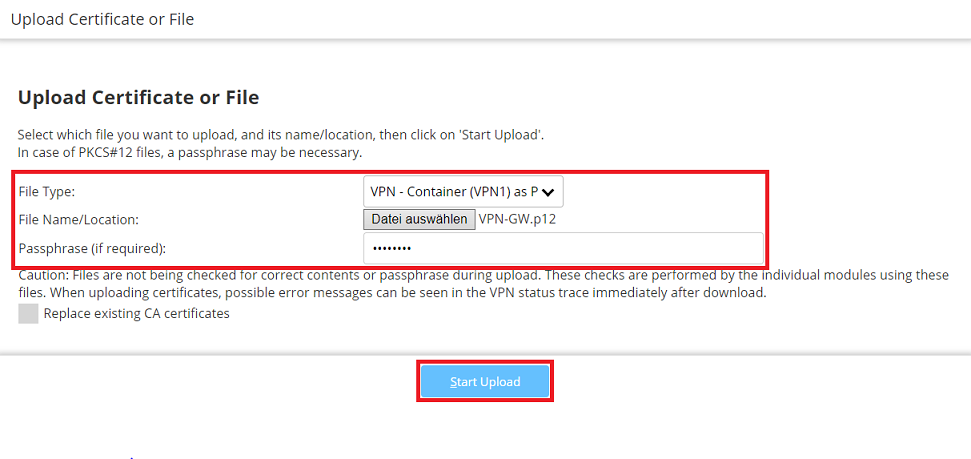
1.6 Passen Sie folgende Parameter an und klicken auf Start Upload) Modify the following parameters and then click Start upload:
- File Type: Wählen Sie im Dropdownmenü einen bisher nicht verwendeten VPN-Container aus (in diesem Beispiel wird der Select an unused VPN container from the drop-down menu (in this example the VPN - Container (VPN1) verwendet).
- File Name/Location: Wählen Sie das in Schritt Select the certificate created in step 1.4 erstellte Zertifikat aus.
- Passphrase: Geben Sie das in Schritt Enter the password set in step 1.4 hinterlegte Passwort an.
2. Einrichtung der ) Set up the IKEv2-EAP Verbindung auf dem Routerconnection on the LANCOM router:
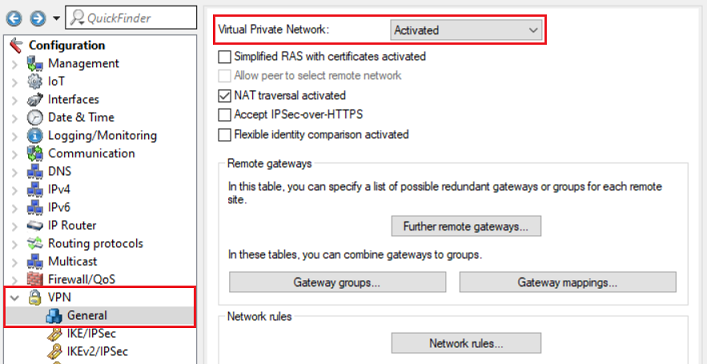
2.1 Öffnen Sie die Konfiguration des Routers ) Open the configuration of the router in LANconfig, wechseln in das Menü switch to the menu VPN → Generalund wählen bei and set the drop-down menu for Virtual Private Network im Dropdownmenü to Activatedaus.
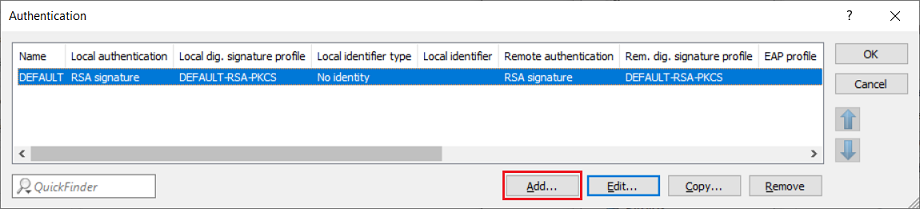
2.2 Wechseln Sie in das Menü ) Switch to the menu VPN → IKEv2/IPSec IPsec → Authentication.
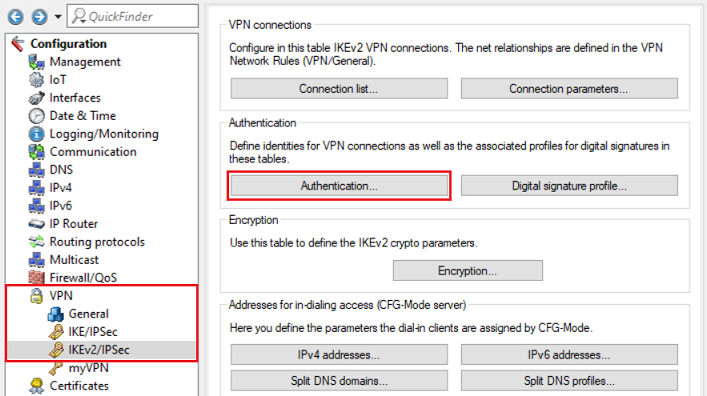
2.3 Erstellen Sie ein neues ) Add a new Authentication profile.
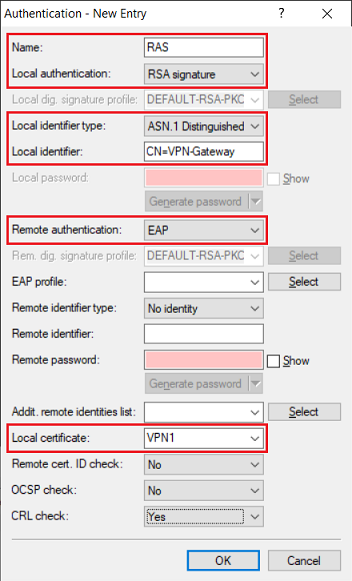
2.4 Passen Sie folgende Parameter an) Enter the following parameters:
- Name: Vergeben Sie einen aussagekräftigen NamenEnter a descriptive name.
- Local authentication: Wählen Sie im Dropdownmenü From the drop-down menu, select RSA signature aus.
- Local identifier type: Wählen Sie im Dropdownmenü From the drop-down menu, select ASN.1 Distinguished Name aus.
- Local identifier: Hinterlegen Sie den in Schritt Enter the common name set in step 1.4 vergebenen Common Name (in diesem Beispiel this example CN=VPN-Gateway).
- Remote authentication: Wählen Sie im Dropdownmenü EAP aus From the drop-down menu, select EAP.
- Local certificate: Wählen Sie im Dropdownmenü den in Schritt From the drop-down menu, select the VPN container assigned in step 1.6 verwendeten VPN-Container aus.
2.5 Wechseln Sie in das Menü ) Switch to the menu VPN → IKEv2/IPSec IPsec → IPv4 addresses.
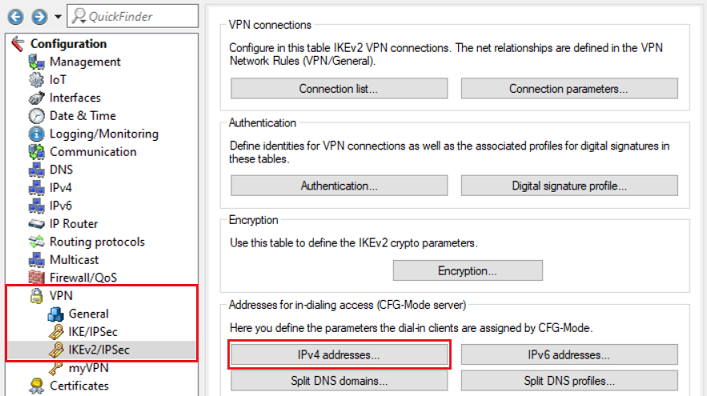
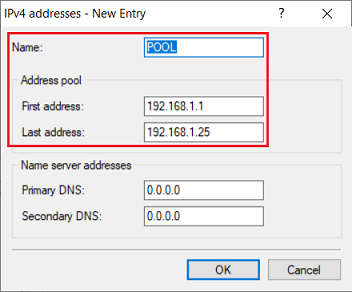
2.6 Passen Sie folgende Parameter an, um einen neuen IPv4-Adress-Pool zu erstellen) Adjust the following parameters to create a new IPv4 address pool:
- Name: Vergeben Sie einen aussagekräftigen NamenEnter a descriptive name.
- First address: Geben Sie die erste IP-Adresse aus einem Adress-Pool an, aus dem die VPN-Clients bei der Einwahl eine IP-Adresse beziehenEnter the first IP address from an address pool. An IP address from this pool will be assigned to the VPN client when it dials in.
- Last address: Geben Sie die letzte IP-Adresse aus einem Adress-Pool an, aus dem die VPN-Clients bei der Einwahl eine IP-Adresse beziehen Enter the last IP address from an address pool. An IP address from this pool will be assigned to the VPN client when it dials in.
2.7 Wechseln Sie in das Menü ) Switch to the menu VPN → IKEv2/IPSec IPsec → Extended settings.
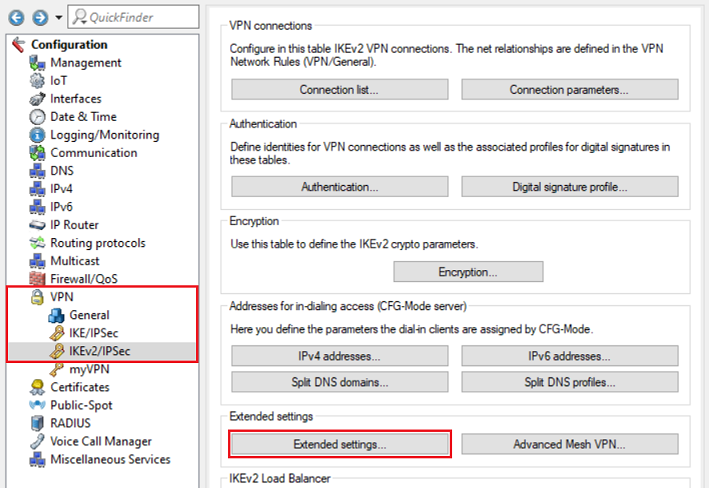
2.8 Wechseln Sie in das Menü ) Go to the menu RADIUS server.
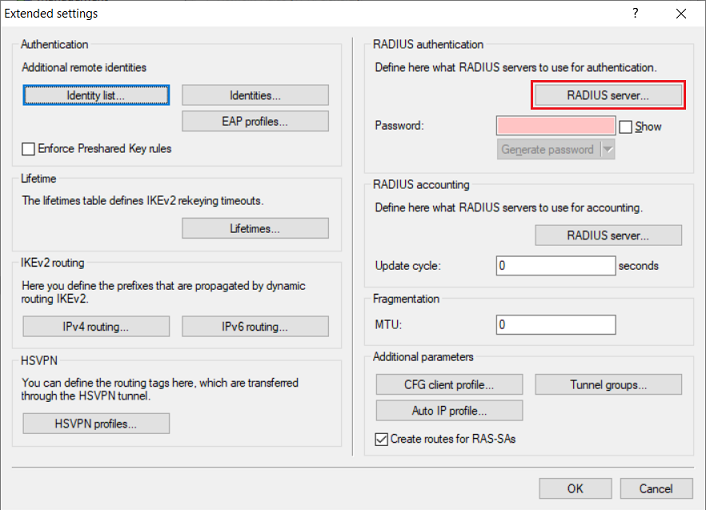
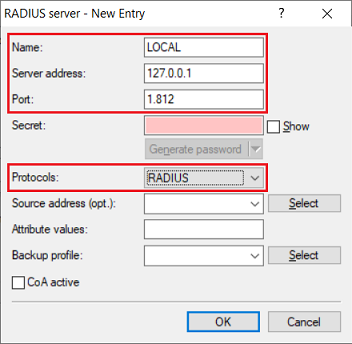
2.9 Erstellen Sie einen neuen Eintrag und passen folgende Parameter an) Create a new entry and adjust the following parameters:
- Name: Vergeben Sie einen aussagekräftigen NamenEnter a descriptive name.
- Server address: Hinterlegen Sie die Loopback-Adresse Enter the loopback address 127.0.0.1.
- Port: Stellen Sie sicher, dass der Port 1812 hinterlegt istCheck that the port is set to 1812.
- Protocols: Stellen Sie sicher, dass das Protokoll RADIUS hinterlegt istCheck that the protocol is set to RADIUS.
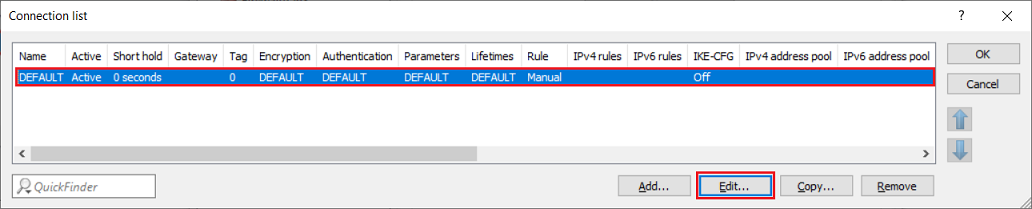
2.10 Wechseln Sie in das Menü ) Navigate to the menu VPN → IKEv2/IPSec IPsec → Connection list.
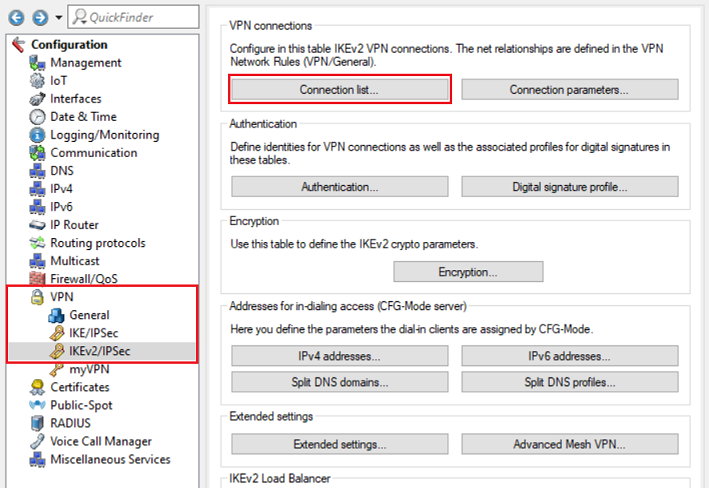
2.11 Bearbeiten Sie den vorhandenen DEFAULT-Eintrag) Edit the existing DEFAULT entry.
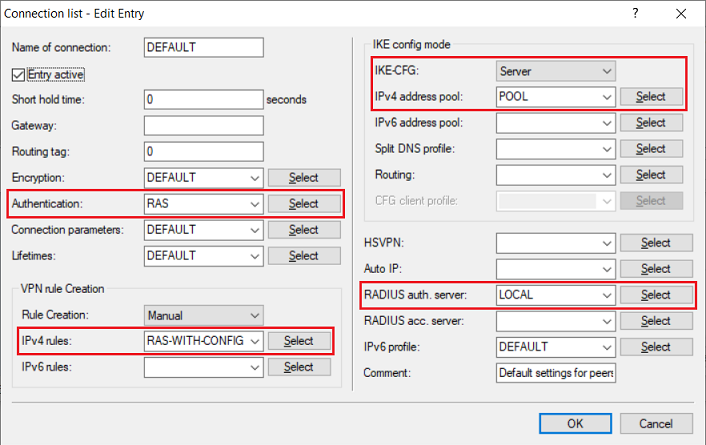
2.12 Passen Sie folgende Parameter an) Enter the following parameters:
- Authentication: Wählen Sie im Dropdownmenü das in Schritt From the drop-down menu, select the authentication profile created in step 2.4 erstellte Authentifizierungs-Profil aus.
- IPv4 rules: Wählen Sie im Dropdownmenü das ab Werk vorhandene Objekt From the drop-down menu, select the predefined object RAS-WITH-CONFIG-PAYLOAD aus.
- IKE-CFG: Wählen Sie im Dropdownmenü Server ausFrom the drop-down menu, select Server.
- IPv4 adress pool: Wählen Sie im Dropdownmenü den in Schritt 2.6 erstellten IP-Adress-Pool ausaddress pool: From the drop-down menu, select the IP address pool created in step 2.6.
- RADIUS auth. server: Wählen Sie im Dropdownmenü das in Schritt 2.9 erstellte RADIUS-Objekt aus From the drop-down menu, select the RADIUS object created in step 2.9.
| Info |
|---|
After the modification, existing VPN connections with preshared-key still work as usual. |
2.13 Die Konfiguration der VPN-Verbindung ist damit abgeschlossen) This concludes the configuration of the VPN connection.
3. Konfiguration der RADIUS- und OTP-Einstellungen auf dem Router) Configuring the RADIUS and OTP settings on the router:
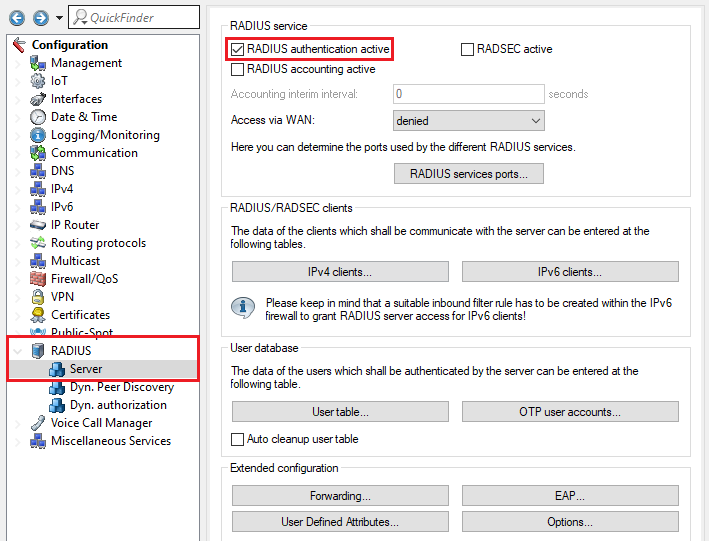
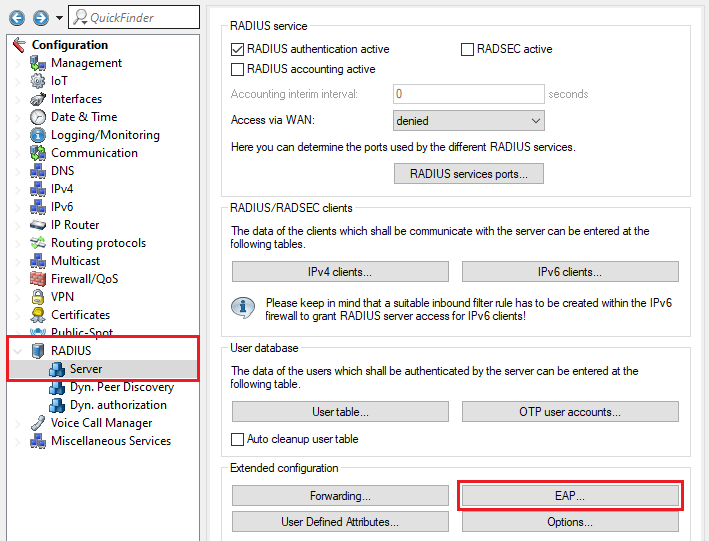
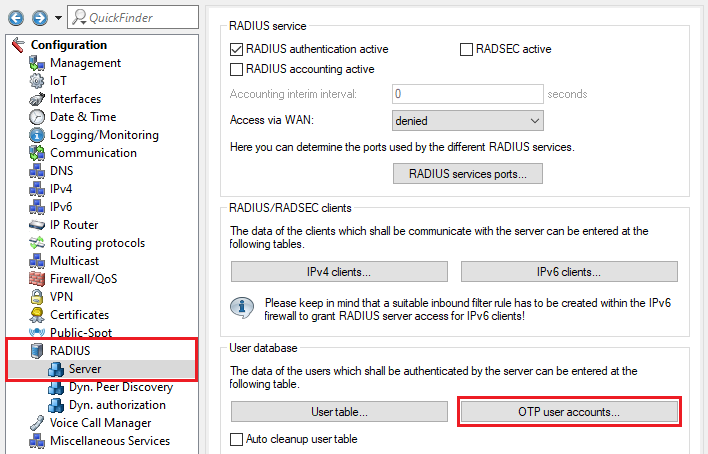
3.1 Wechseln Sie in das Menü ) Go to the menu RADIUS → Server und aktivieren die Option and enable the option RADIUS authentication active, um den RADIUS-Server zu aktivieren. Make sure that RADIUS ports 1.812 and 1.813 are entered in the RADIUS services sorts menu (default setting).
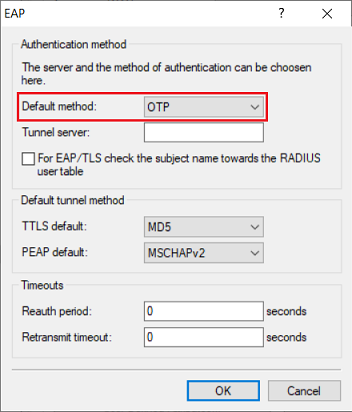
3.2 Wechseln Sie in das Menü ) Go to the menu RADIUS → Server → EAP.
3.3 Wählen Sie im Dropdownmenü bei Default method die Option OTP aus) In the drop-down menu Default method select the option OTP.
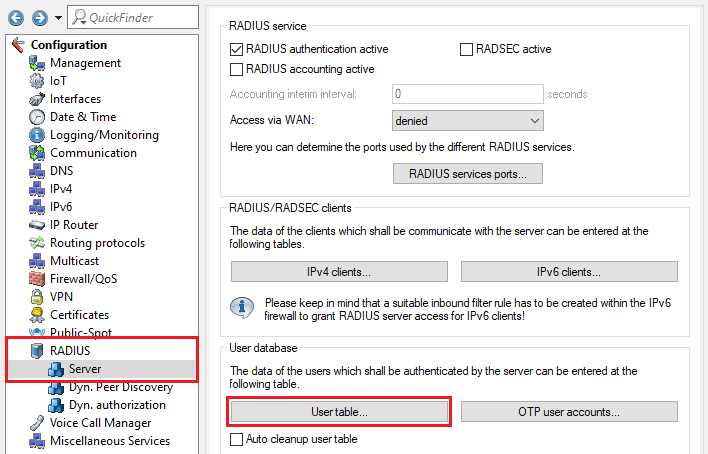
3.4 Wechseln Sie in das Menü ) Go to the menu RADIUS → Server → User table.
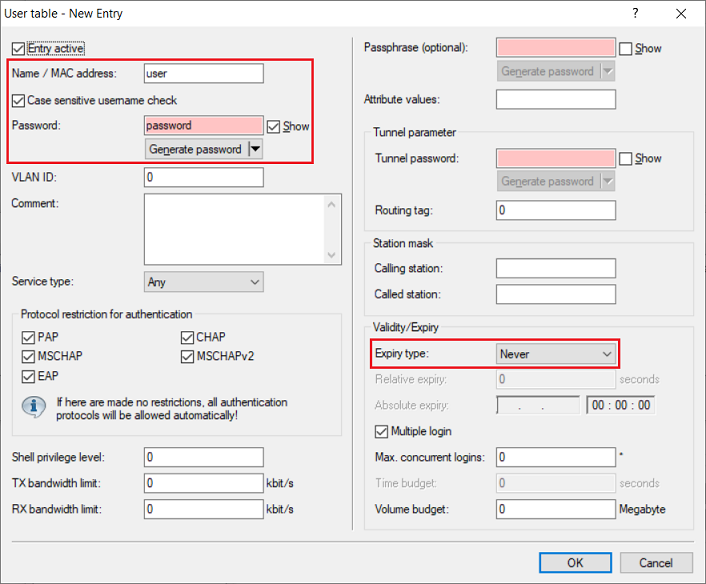
3.5 Erstellen Sie einen neuen Benutzer und passen die folgenden Parameter an) Create a new entry and adjust the following parameters:
- Name / MAC address: Tragen Sie den Benutzernamen für den VPN-Benutzer einEnter the user name for the VPN user.
- Password: Tragen Sie ein Passwort für den VPN-Benutzer einEnter the password for the VPN user.
- Expiry type: Wählen Sie im Dropdownmenü die Option Never aus, damit der VPN-Benutzer dauerhaft gültig bleibtFrom the drop-down menu, select the option Never so that the VPN user remains valid permanently.
| Info |
|---|
Repeat this step for each VPN user. Optionally you can assign a fixed IP address to the VPN client by entering the parameter Framed-IP-Address in the field Attribute values. It has to be entered in the syntax Framed-IP-Address=<IP address> (e.g. Framed-IP-Address=192.168.1.10). The IP address must be within the dial-in address range created in step 2.6. By assigning a fixed IP address, it is possible to assign individual rights to a user via the firewall. |
3.6 Wechseln Sie in das Menü ) Go to the menu RADIUS → Server → OTP user accounts.
3.7 Erstellen Sie ein neues OTP-Benutzerkonto und passen die folgenden Parameter an:) Create a new OTP user account and modify the following parameters:
- Username: From the drop-down menu, select the name of the user account created in step 3.5.
Hash algorithm: From the drop-down menu, select the option SHA-256. If your authenticator app does not support the hash algorithm SHA256, you can use SHA1.
- Time step: This parameter is the interval after which a new OTP token is generated. Leave the setting at the default value of 30 seconds.
- Network delay: This parameter specifies the number of time steps by which the clock of the end device with the authenticator app may deviate from the time of the router. The router then also checks the OTPs before and after. Leave this setting at the default value of 1 (i.e. OTPs are checked 30 seconds before and after).
- Secret: Enter a 16-digit password. This should contain capital letters and numbers between 2 - 7 only (see RFC3548). The password is encoded in Base32 and shared with the authenticator.
- Issuer: Enter a descriptive name for the issuer (in this example
- Username: Wählen Sie im Dropdownmenü den Namen des in Schritt 3.5 erstellten Benutzerkontos aus.
- Hash algorithm: Wählen Sie im Dropdownmenü die Option SHA-256 aus. Wenn die verwendete Authenticator App den Hash-Algorithmus SHA256 nicht unterstützt, können Sie stattdessen auch SHA1 verwenden.
- Time step: Dieser Parameter stellt das Intervall dar, in dem ein neuer OTP-Token erzeugt wird. Belassen Sie die Einstellung auf dem Standard-Wert 30 Sekunden.
- Network delay: Dieser Parameter definiert, um wieviele Zeitschritte die Uhr des Endgerätes mit der Authenticator App von der Uhrzeit des Routers abweichen darf. Der Router prüft dann zusätzlich die OTPs davor und danach. Belassen Sie die Einstellung auf dem Standard-Wert von 1 (in diesem Fall werden OTPs also 30 Sekunden davor und danach geprüft).
- Secret: Vergeben Sie ein 16-stelliges Kennwort. Dieses darf nur Großbuchstaben und Zahlen enthalten. Das Passwort wird in Base32 codiert und mit dem Authenticator geteilt.
- Issuer: Tragen Sie einen aussagekräftigen Namen für den Aussteller ein (in diesem Beispiel LANCOM-OTP).
- Number digits: Belassen Sie die Einstellung auf dem Standard-Wert von 6 Zeichen.
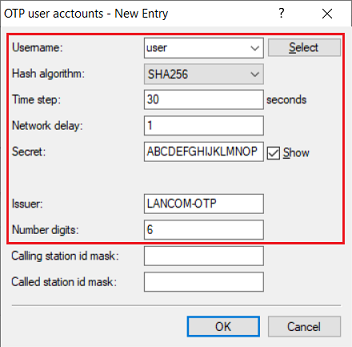
- Leave the setting at the default value of 6 characters.
| Info |
|---|
Repeat this step for each VPN user. |
| Hinweis |
|---|
The Hash algorithm SHA256 is currently not supported by some older Android devices and the Microsoft Authenticator. In this case please use SHA1. If the Google Authenticator is used, the Secret must have at least 16-digits, as otherwise the scan of the QR code will fail. |
4) Exporting the CA certificate from the LANCOM router and importing it into the 4. Export des CA-Zertifikats vom LANCOM Router und Import im Advanced VPN Client:
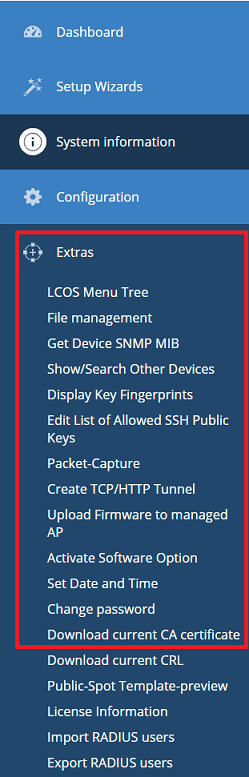
4.1 Verbinden Sie sich mit dem Webinterface des LANCOM Routers, wechseln in das Menü ) Connect to the web interface of the LANCOM router, switch to the menu Extras → Download current CA certificate und speichern das Zertifikat abcertificate and save the certificate.
4.2 Kopieren Sie das Zertifikat auf dem Computer, der die VPN-Verbindung aufbauen soll, in den Ordner ) Copy the certificate to the computer that is to establish the VPN connection and save it to the directory C:\ProgramData\LANCOM\Advanced VPN Client\cacerts.
| Info |
|---|
When using client version 6.21, the directory can also be C:\ProgramData\LANCOM\Trusted Access Client\cacerts. This depends on whether you have initially reinstalled version 6.21 or updated from an older version. |
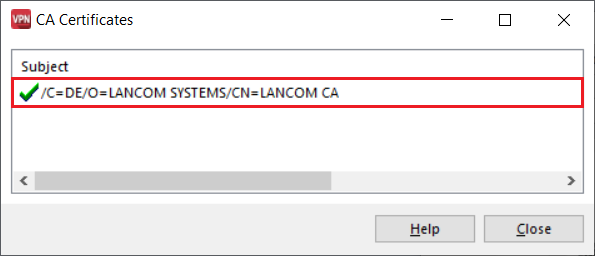
4.3) Start the Advanced VPN Client and navigate to the menu 4.3 Starten Sie den Advanced VPN Client und wechseln in das Menü Connection → Certificates → Display CA Certificatescertificates.
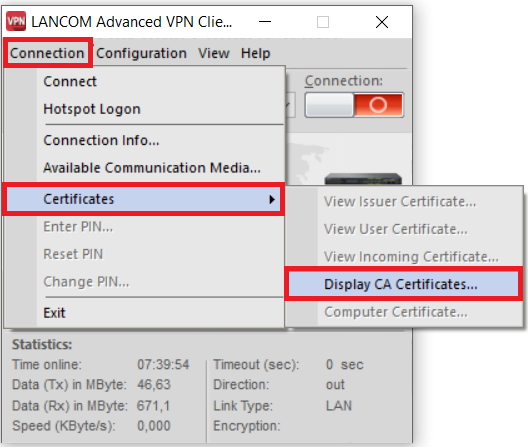
4.4 Prüfen Sie, ob das Zertifikat vom ) Check whether the Advanced VPN Client erkannt wirdrecognized the certificate.
5. Einrichtung einer ) Setting up an IKEv2-EAP-OTP Verbindung mit dem connection with the Advanced VPN Client:
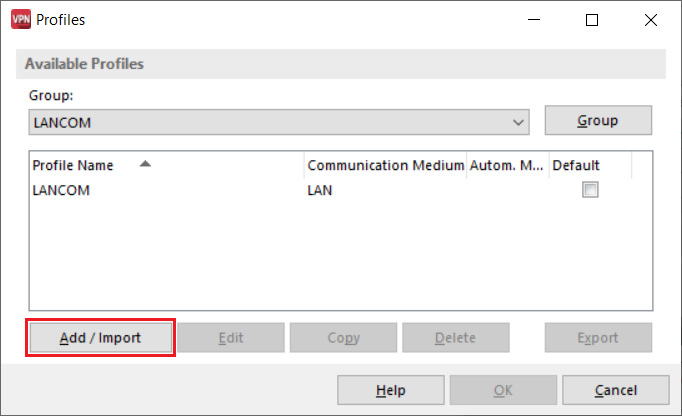
5.1 Wechseln Sie im ) In the Advanced VPN Client in das Menü , navigate to the menu Configuration → Profiles.

5.2 Klicken Sie auf ) Click on Add / Import, um eine neue VPN-Verbindung zu erstellen to create a new VPN connection.
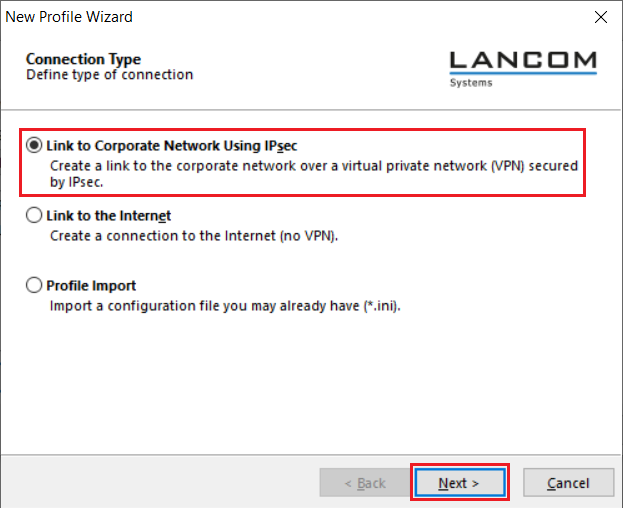
5.3 Wählen Sie ) Select Link to Corporate Network Using IPSec aus und klicken auf IPsec and click on Next.
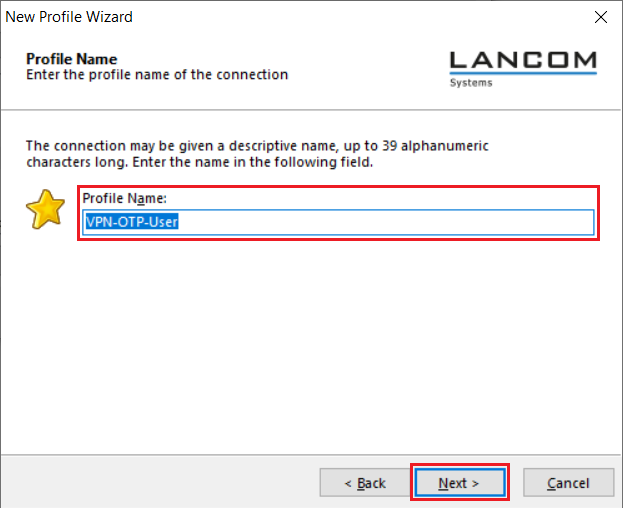
5.4 Vergeben Sie einen aussagekräftigen ) Enter a descriptive Profile Name.
5.5 Wählen Sie im Dropdownmenü das verwendete Communication Media aus, mit dem die VPN-Verbindung aufgebaut werden soll) From the drop-down menu, select the Communication Media to be used for establishing the VPN connection.
| Info |
|---|
Soll die VPN-Verbindung mit unterschiedlichen Verbindungsmedien aufgebaut werden können (etwa LAN und WLAN), wählen Sie automatic media detection ausIf you wish to establish the VPN connection with different connection media (e.g. LAN and Wi-Fi), select automatic media detection. |

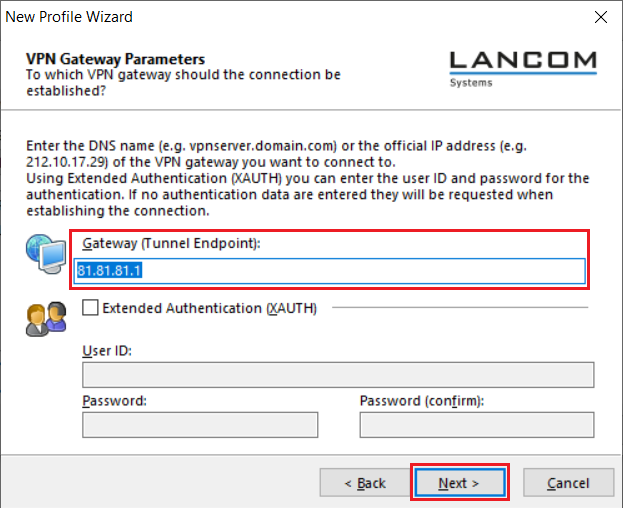
5.6 Tragen Sie bei ) Under Gateway (Tunnel Endpoint) die öffentliche IP-Adresse oder den DNS-Namen des Routers ein enter the public IP address or the DNS name of the router.
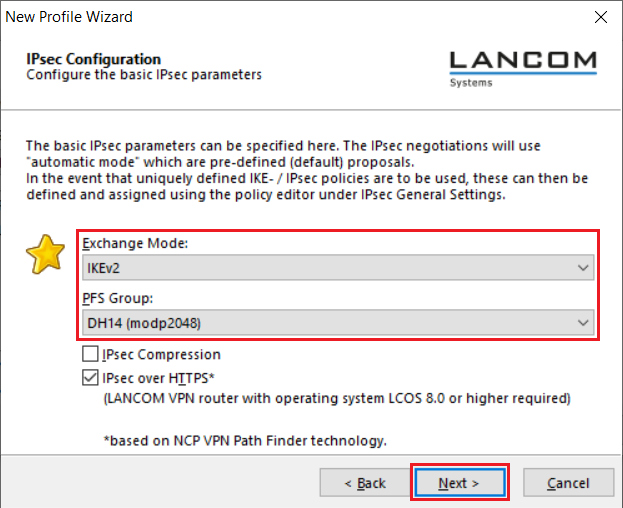
5.7 Passen sie folgende Parameter an) Enter the following parameters:
- Exchange Mode: Wählen Sie im Dropdownmenü IKEv2 ausFrom the drop-down menu, select IKEv2.
- PFS Group: Wählen Sie im Dropdownmenü From the drop-down menu, select DH14 (modp2048) aus.
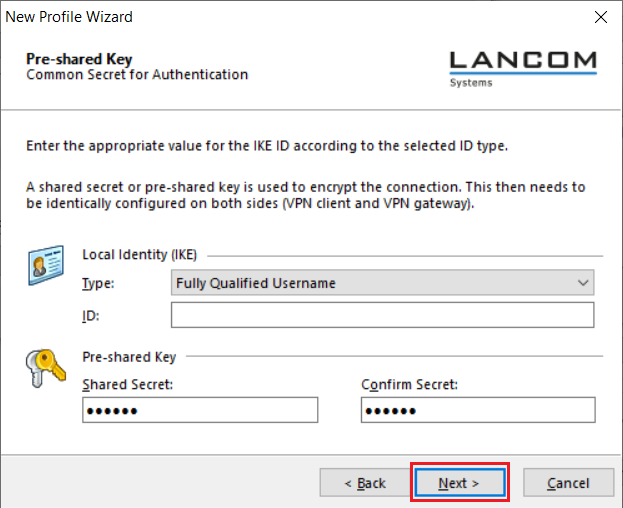
5.8 Da die Authentifizierung per ) Authentication via EAP-OTP nicht im Assistenten konfiguriert werden kann, muss dies im Nachgang manuell vorgenommen werden (siehe Schritte cannot be configured in the wizard, so this must be done manually at a later stage (see steps 5.12 - 5.13). Klicken Sie daher auf Next ohne Änderungen vorzunehmenClick Next without making changes.
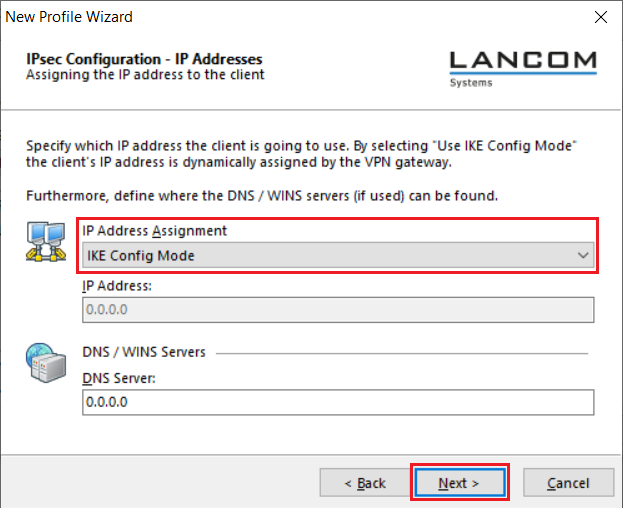
5.9 Wählen Sie bei IP Adress Assignment im Dropdownmenü IKE Config Mode aus, damit der Advanced VPN Client bei der VPN-Einwahl eine IP-Adresse vom Router bezieht) For the IP address assignment select the drop-down menu entry IKE Config Mode. This allows the Advanced VPN Client to obtain an IP address from the router when dialing in via VPN.
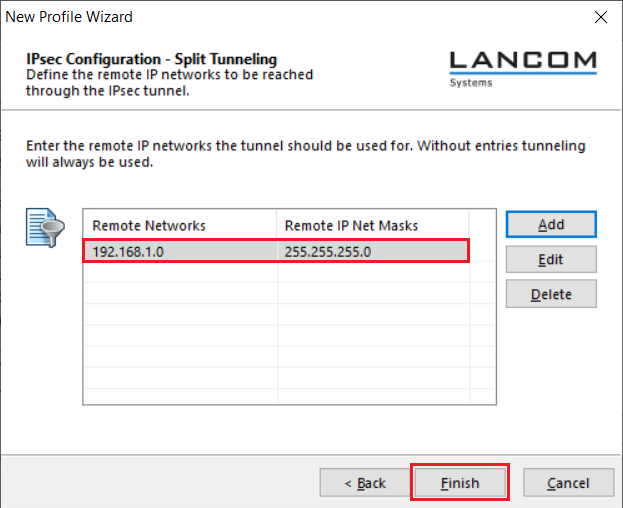
5.10 Tragen Sie das Zielnetzwerk ein, zu dem die VPN-Verbindung aufgebaut werden soll. Dadurch wird nur der für das Zielnetzwerk bestimmte Datenverkehr über den VPN-Tunnel geroutet.
Klicken Sie anschließend auf Finish.
) Enter the target network to which the VPN connection is to be established. This means that only the data traffic destined for the target network is routed via the VPN tunnel.
Then click Finish.
| Info |
|---|
For more information on split tunneling, see this Knowledge Base article |
| Info |
Weitere Informationen zum Split Tunneling finden Sie in diesem Knowledge Base Artikel. |
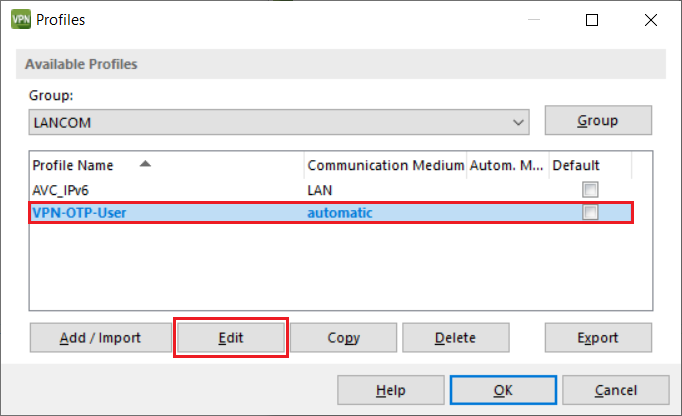
5.11 Markieren Sie das in Schritt ) Mark the VPN profile created in the steps 5.1 - – 5.10 erstellte VPN-Profil und klicken auf and click Edit.
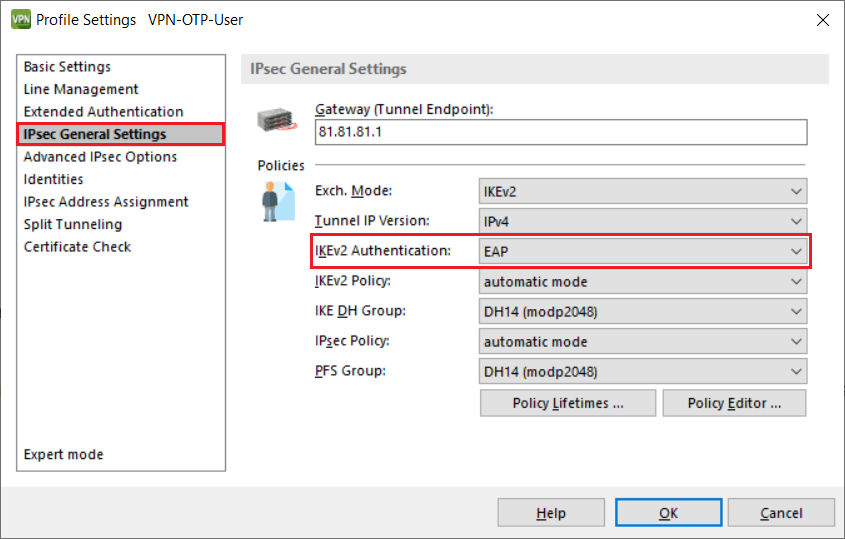
5.12 Wechseln Sie in den Reiter IPSec-Einstellungen und setzen die IKEv2-Authentisierung auf ) Go to the tab IPsec General Settings and set the IKEv2 Authentication to EAP.
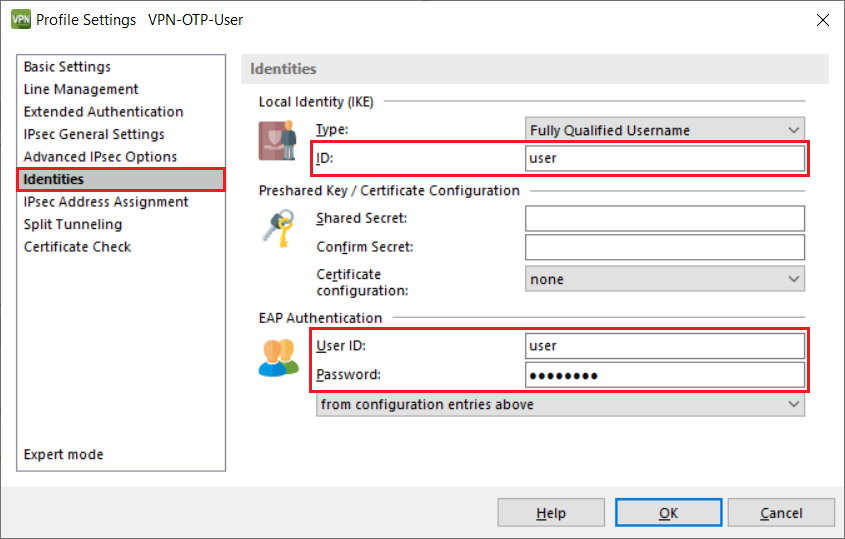
5.13 Wechseln Sie in den Reiter Identities und tragen den Benutzer-Namen des RADIUS-Benutzers als Local Identity sowie den Namen des OTP-Benutzers als Benutzername für die EAP Authentication ein. Zusätzlich muss für die EAP Authentication ein beliebiges Passwort hinterlegt werden, da das Feld nicht leer bleiben darf) Switch to the Identities tab and enter the user name of the RADIUS user as the Local Identity and also the OTP user name as the user ID for the EAP Authentication. You must also enter any password under EAP Authentication as the field may not be left empty.
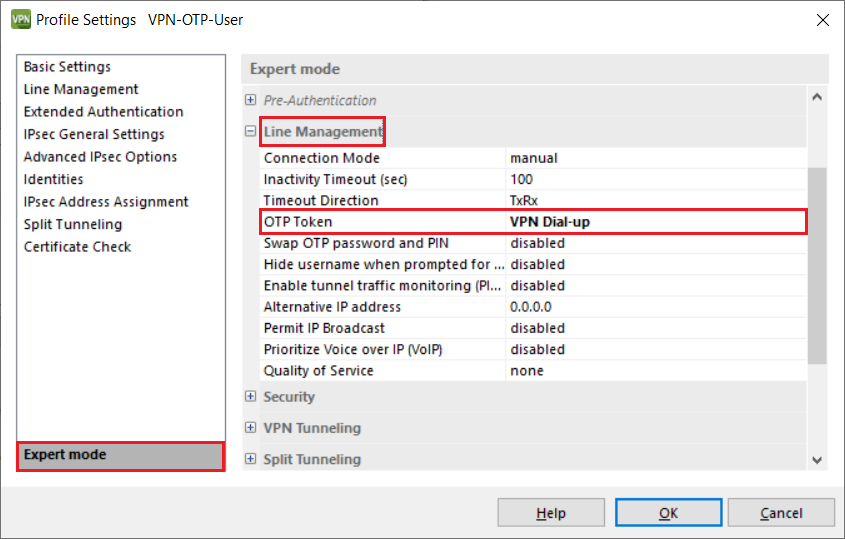
5.14 Wechseln Sie in den ) Switch to the Expert mode, klicken auf click on Line Management und wählen bei and, under OTP Token die Option , select the option VPN Dial-upaus.
5.15 Die Einrichtung der VPN-Verbindung im ) This concludes the configuration of the VPN connection in the Advanced VPN Client ist damit abgeschlossen. Bestätigen Sie die manuell vorgenommenen Änderungen mit einem Klick auf . Confirm the manually entered changes by clicking on OK.
6. Hinzufügen des VPN-OTP-Benutzers in der Authenticator-App) Add the VPN OTP user in the authenticator app:
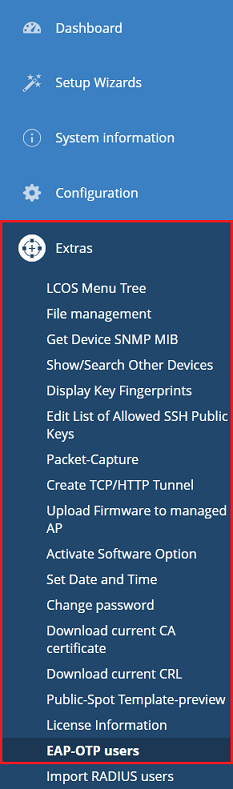
6.1 Verbinden Sie sich per WEBconfig mit dem Router und wechseln in das Menü ) Use WEBconfig to connect to the router and navigate to the menu Extras → EAP-OTP users.
6.2 Klicken Sie bei dem Benutzer auf das "Augen-Symbol", um den QR-Code anzuzeigen) Next to the user, click the “eye” icon to view the QR code.
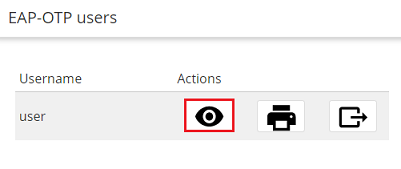
6.3 Scannen Sie den QR-Code mit einer Authenticator-App ein. Es werden nun OTP-Codes generiert und in der App angezeigt) Scan the QR code with an authenticator app. OTP codes are now generated and displayed in the app.

6.4 Beim Aufbau der VPN-Verbindung wird nun das in Schritt 3.5 vergebene Passwort des RADIUS-Benutzers als auch das von der Authenticator-App angezeigte Einmalpasswort (OTP) abgefragt) Two passwords are requested when the VPN connection is established: the password of the RADIUS user set in step 3.5 along with the one-time password (OTP) displayed in the authenticator app.