...
- LCOS SX as of version 3.32 (download latest version)
- Beliebiger Web-Browser für den Zugriff auf das Webinterface des GerätesAny web browser for accessing the webinterface of the device
Procedure:
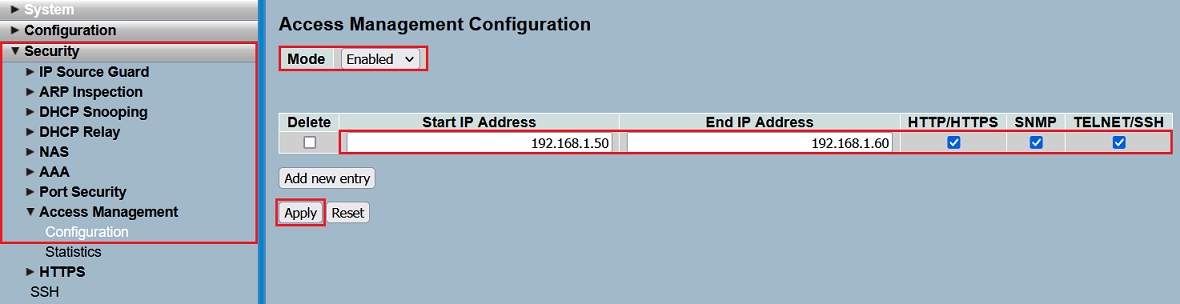
Möglichkeit Possibility 1: Einschränken des Management-Zugriffs auf bestimmte IP-Adressen oder IP-Adressbereiche
Soll der Zugriff auf den Switch nur von bestimmten IP-Adressen oder aus bestimmten IP-Adressbereichen erfolgen, ist es sinnvoll den Zugriff entsprechend einzuschränken. Das Webinterface kann dann nur von einem Gerät mit dieser IP-Adresse bzw. aus diesem IP-Adressbereich aufgerufen werden.
Limiting management access to specific IP addresses or IP address ranges
If the switch is only accessed by devices with a specific IP address or from devices within a specific IP address range, it is practical to limit access accordingly. In doing so, the webinterface can only be invoked by a device with this IP address or from this IP address range.
For this purpose, adjust the following parameters in the menu Passen Sie dazu in dem Menü Security → Access Management → Configuration die folgenden Parameter an und klicken auf and click Apply:
- Setzen Sie den Mode auf Set the Mode to Enabled.Tragen Sie bei
- Specify an IP address range for Start IP Adress und Address and End IP Address einen IP-Adressbereich ein, aus dem der Zugriff auf den Switch erlaubt sein soll. Es ist auch möglich lediglich den Zugriff auf eine einzelne IP-Adresse zu erlauben, indem in beiden Feldern die gleiche IP-Adresse eingetragen wird. from which access to the switch should be allowed. It is also possible to only allow access from a single IP address by entering the same IP address in both fields.
- Choose, which management protocols should be allowed for the IP address or IP address range Wählen Sie aus, welche Management-Protokolle für die IP-Adresse oder den IP-Adressbereich erlaubt sein sollen (HTTP/HTTPS, SNMP, Telnet/SSH).
| Info |
|---|
Es können maximal 16 Einträge erstellt werdenA maximum number of 16 entries can be created. |
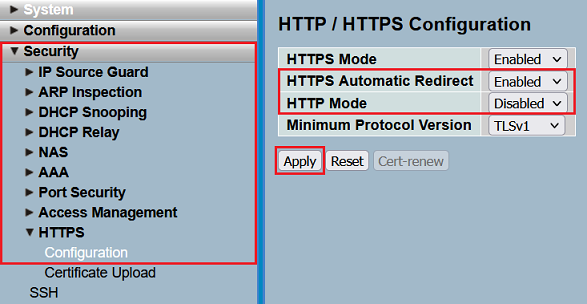
Möglichkeit Possibility 2: Protokoll HTTP deaktivieren und HTTPS Redirect aktivieren
LANCOM Systems empfiehlt das unsichere Protokoll HTTP zu deaktivieren. Weiterhin ist es sinnvoll, den automatischen Redirect auf HTTPS zu aktivieren, damit Geräte, welche das Webinterface per HTTP aufrufen, auf die verschlüsselte Variante mit HTTPS weitergeleitet werden.
Deactivate the protocol HTTP and activate the HTTPS redirect
LANCOM Systems recommends to deactivate the insecure protocol HTTP. Additionally it is practical to activate the automatic redirect to HTTPS, so that devices, which invoke the webinterface via HTTP, are redirected to the encrypted variant with HTTPS.
For this purpose, adjust the following parameters in the menu Security → HTTPS → Configuration and click Passen Sie dazu in dem Menü Security → HTTPS → Configuration die folgenden Parameter an und klicken auf Apply:
- HTTPS Automatic Redirect: Wählen Sie im Dropdownmenü die Option Enabled aus. Damit erfolgt bei einem Aufruf des Webinterfaces per HTTP eine Weiterleitung auf die verschlüsselte Variante mit HTTPSIn the dropdown menu select the option Enabled. In doing so a redirect to HTTPS takes place, when the webinterface is invoked via HTTP.
- HTTP Mode: Wählen Sie im Dropdownmenü die Option Disabled aus, um das Protokoll HTTP zu deaktivierenIn the dropdown menu select the option Disabled to deactivate the protocol HTTP.
Möglichkeit Possibility 3: Login für unsichere Management-Protokolle unterbinden
LANCOM Systems empfiehlt den Login für die unsicheren Protokolle TFTP und HTTP zu unterbinden. Für das Protokoll Telnet ist der Login bereits in den Werkseinstellungen deaktiviert.
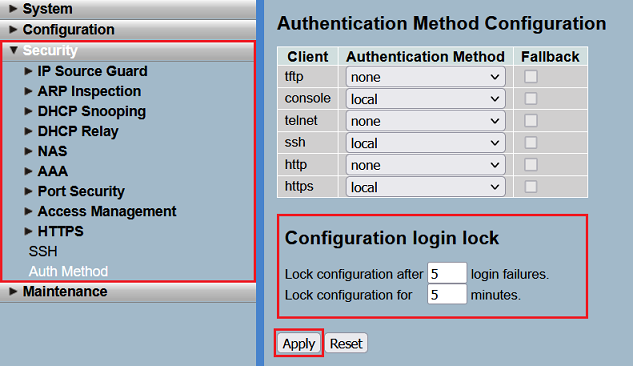
Setzen Sie in dem Menü Security → Auth Method die beiden Protokolle TFTP und HTTP auf none, um den Login für diese zu deaktivieren und klicken anschließend auf Apply.
| Info |
|---|
Mit dieser Methode wird nicht das Protokoll selber deaktiviert, sondern lediglich der Login unterbunden. So wird z.B. mit der Einstellung HTTP auf none, das Webinterface noch angezeigt, der Login ist aber nicht möglich. |
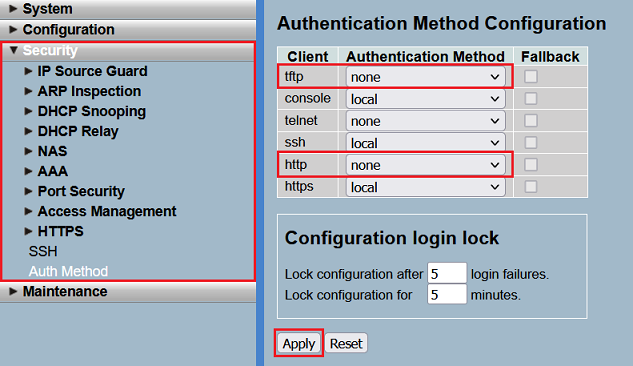
Möglichkeit 4: Konfigurations-Login-Sperre
Um das Erraten der Zugangsdaten durch mehrfache Login-Versuche zu erschweren, gibt es einen Brute-Force-Schutz.
Passen Sie bei Bedarf in dem Menü Security → Auth Method die Werte für den Configuration login lock an und klicken auf Apply.
| Info |
|---|
In den Standardeinstellungen wird der Login nach 5 Fehllogins für 5 Minuten für das verwendete Protokoll gesperrt. |
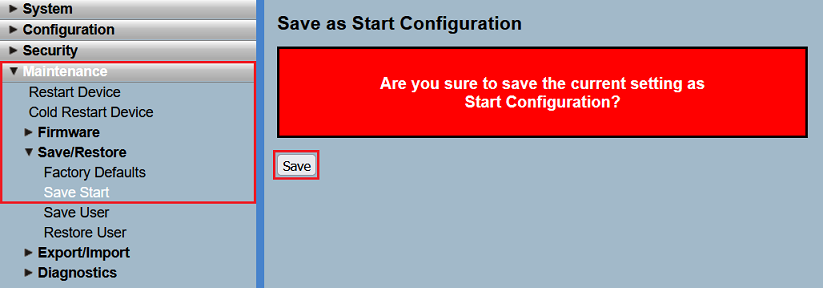
Abschließender Schritt: Speichern der Start-Konfiguration:
Damit Konfigurations-Änderungen bootpersistent gespeichert werden, muss die Konfigration als Start-Konfiguration gespeichert werden.
Deactivate login for insecure management protocols
LANCOM Systems recommends to deactivate the login for the insecure protocols TFTP and HTTP. The login for the protocol Telnet is already deactivated in the factory defaults.
In the menu Security → Auth Method set the Authentication Method for the protocols TFTP and HTTP to none to deactivate the login. Click Apply afterwards.
| Info |
|---|
This method does not deactivate the protocol itself, but only the login. For instance, when setting HTTP to none, the webinterface can still be invoked via HTTP, but the login is not possible. |
Possibility 4: Configuration login lock
To make it more difficult to guess the login credentials through multiple login-attempts, there is a brute force protection in the switch.
Modify the values for the Configuration login lock in the menu Security → Auth Method, if necessary. Click Apply afterwards.
| Info |
|---|
With factory defaults, after 5 login failures, the login is locked for 5 minutes for the used protocol. |
Concluding step: Saving the start configuration
In order for configuration changes to be saved boot persistent, the configuration has to be saved as the start configuration.
Wechseln Sie in das Menü Navigate to the menu Maintenance → Save/Restore → Save Start und klicken auf Save, um die Konfiguration als Start-Konfiguration zu speichern. and click on Save so that the configuration is saved as a Start configuration.
| Info |
|---|
The start configuration is retained even if the device is restarted or there is a power failure |
| Info |
Die Start-Konfiguration bleibt auch nach einem Neustart des Gerätes oder einem Stromausfall erhalten. |