
| Seiteneigenschaften |
|---|
Description:
In diesem Artikel wird beschrieben, wie auf einem LANCOM Router oder Access Point mit LCOS eine Zugriffs-Verwaltung per This article describes how access management via RADIUS (802.1x) realisiert werden kann. Dadurch ist es möglich Zugangs-Daten für Benutzer zentral zu administrierencan be implemented on a LANCOM router or access point with LCOS. This makes it possible to centrally manage user access data.
Requirements:
- LANCOM Router / Access Point mit LCOS als RADIUS-Client
- LANCOM Router / Access Point mit LCOS als RADIUS Server
- router / access point with LCOS as the RADIUS client
- LANCOM router / access point with LCOS as the RADIUS server
- LCOS as of version LCOS ab Version 9.24 (download aktuelle Versionlatest version)
- LANtools ab Version as of version 9.24 (download aktuelle Versionlatest version)
Procedure:
1. Konfiguration der RADIUS-Authentifizierung auf dem Router oder Access Point) Configuring RADIUS authentication on the router or access point:
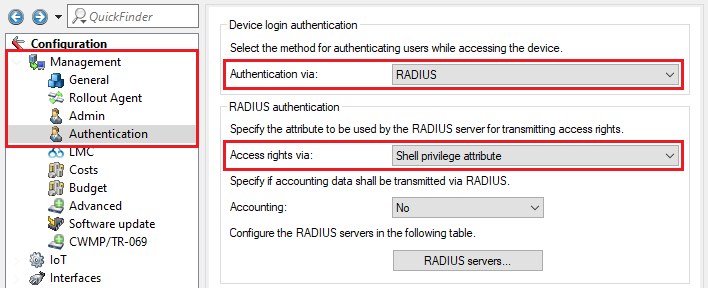
1.1 Verbinden Sie sich per LANconfig mit dem Router / Access Point, für den die zentrale Zugriffs-Verwaltung eingerichtet werden soll, wechseln in das Menü Management → Authentifizierung und passen die folgenden Parameter an:) Use LANconfig to connect to the router / access point for which the central access management is to be set up, switch to the menu Management → Authentication and modify the following parameters:
- Authentication via: From the drop-down menu, select the option RADIUS.
- Access rights via: From the drop-down menu, select the option Shell privilege attribute
- Authentifizierung via: Wählen Sie im Dropdownmenü die Option RADIUS aus.
- Zugriffsrechte via: Wählen Sie im Dropdownmenü die Option Shell-Privilege Attribut aus.
1.2 Wechseln Sie in das Menü RADIUS-Server) Go to the menu RADIUS servers.
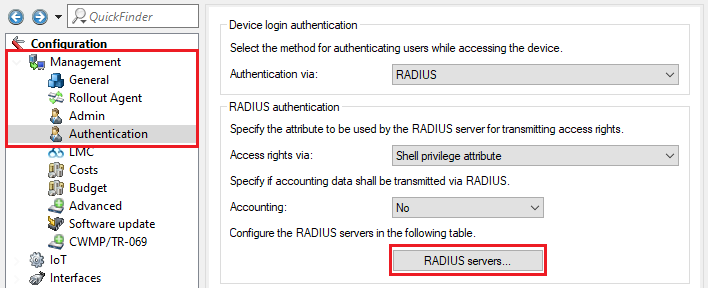
1.3 Erstellen Sie einen neuen Eintrag und passen die folgenden Parameter an:) Create a new entry and adjust the following parameters:
- Profile name: Enter a descriptive name (in this example Profil-Name: Vergeben Sie einen aussagekräftigen Namen (in diesem Beispiel RADIUS).
- Server -Adresse: Tragen Sie die IP-Adresse des RADIUS-Servers ein (in diesem Beispiel ein LANCOM Router mit der IP-Adresse address: Enter the IP address of the RADIUS server (in this example a LANCOM router with the IP address 192.168.1.254).
- Schlüssel (Secret): Tragen Sie ein Passwort ein, welches der Router / Access Point zur Authentifizierung am RADIUS-Server verwendet (siehe Schritt : Enter a password that the router / access point uses for authentication with the RADIUS server (see step 2.5).

1.4 Die Konfigurationsschritte auf dem Router / Access Point sind damit abgeschlossen. Schreiben Sie die Konfiguration in das Gerät zurück.
2. Konfiguration des RADIUS-Servers auf einem LANCOM Router oder Access Point:
) This concludes the configuration of the LANCOM router / access point. You can now write the configuration back to the device.
2) Configuring the RADIUS server on a LANCOM router or access point:
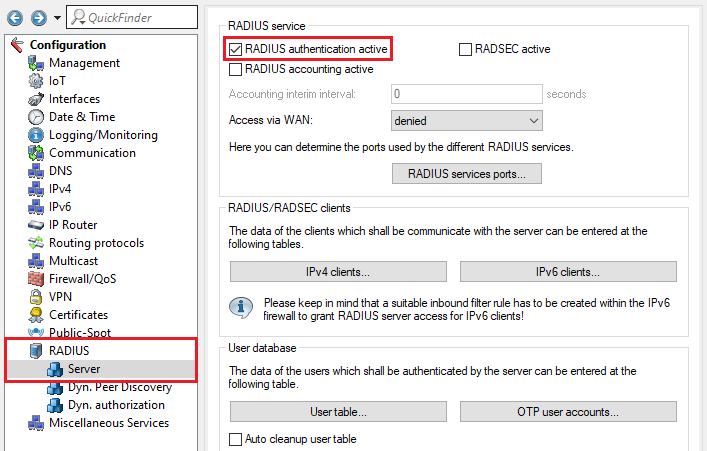
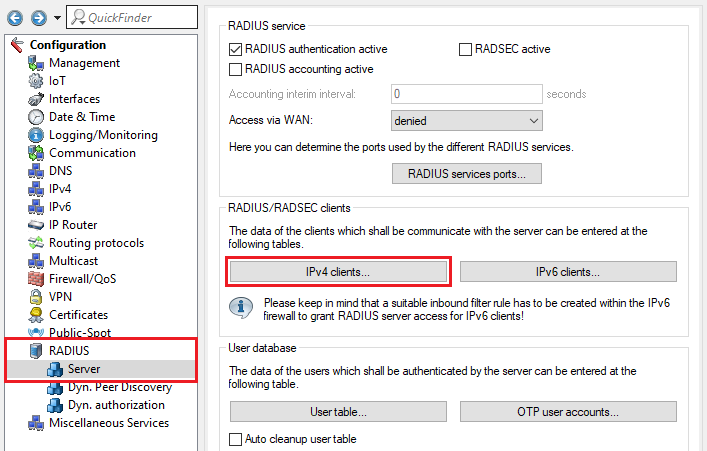
2.1) In LANconfig, open the configuration of the router / access point that acts as a RADIUS server. Go to the menu RADIUS → Server and set a checkmark for RADIUS authentication active2.1 Öffnen Sie die Konfiguration des Routers / Access Points, welcher als RADIUS-Server fungiert, in LANconfig. Wechseln Sie anschließend in das Menü RADIUS → Server und setzen den Haken bei RADIUS-Authentisierung aktiv.
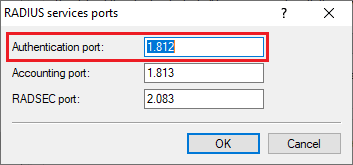
2.2 Wechseln Sie in das Menü RADIUS-Dienste Ports) Navigate to the menu RADIUS services ports.
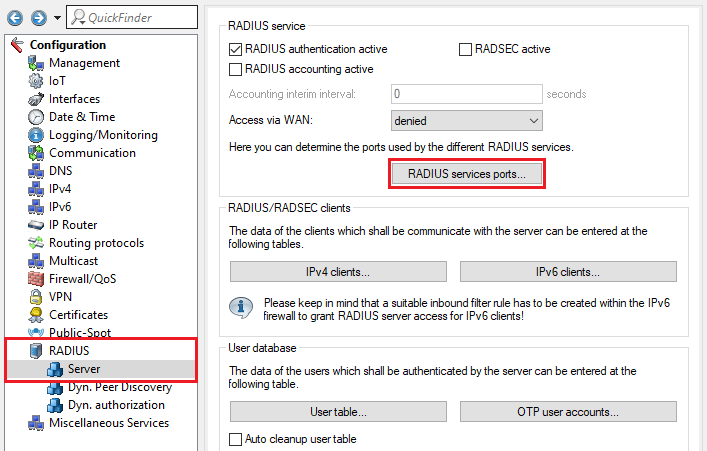
2.3 Stellen Sie sicher, dass bei Authentifizierungs-Port der Port 1812 hinterlegt) Make sure that the authentication port is set to the port 1812.
2.4 Wechseln Sie in das Menü IPv4-Clients) Go to the menu IPv4 clients.
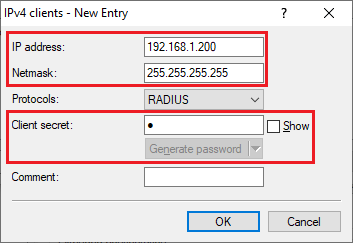
2.5 Erstellen Sie einen neuen Eintrag und passen die folgenden Parameter an) Create a new entry and adjust the following parameters:
- IP -Adresse: Tragen Sie die IP-Adresse des zu authentifizierenden Routers / Access Points ein.address: Enter the IP address of the authenticating router / access point.
- Netmask: Enter the netmask Netzmaske: Tragen Sie die Netzmaske 255.255.255.255 ein. Diese steht für eine einzelne IP-Adresse. This stands for a single IP address.
- Client -Secret: Tragen Sie den in Schritt secret: Enter the password specified in step 1.3 vergebenen Schlüssel ein. Dieses wird für die Authentifizierung des Routers / Access Points am RADIUS-Server verwendet. This is used for authentication with the RADIUS server on the router / access point.
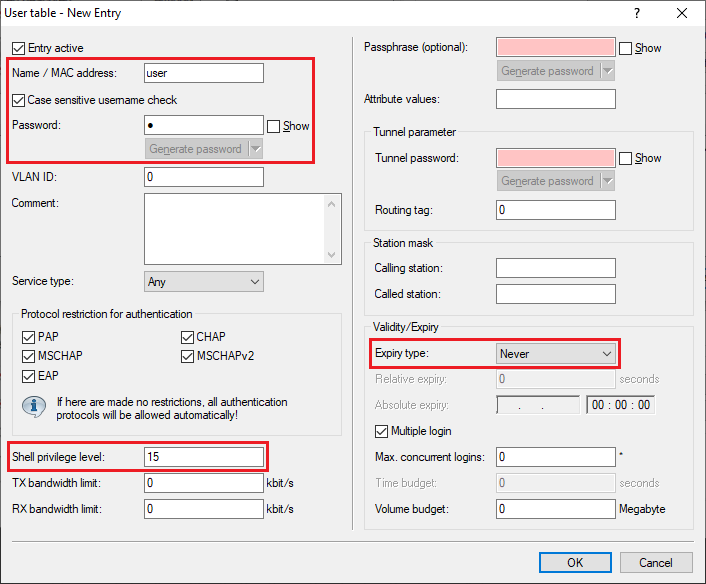
2.6 Wechseln Sie in das Menü Benutzerkonten) Go to the menu User table.
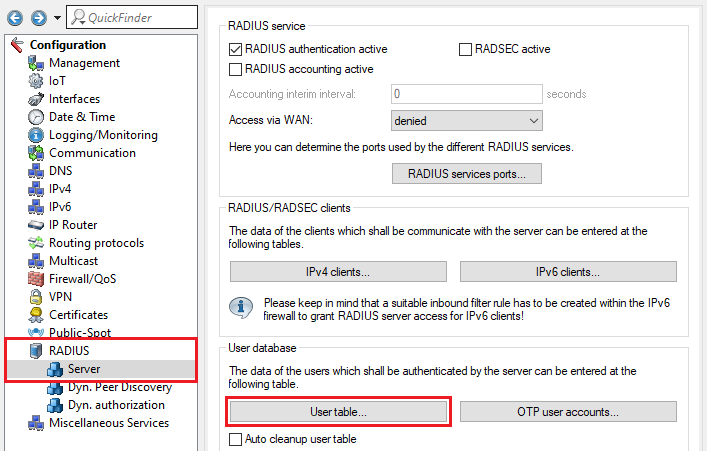
2.7 Erstellen Sie einen neuen Eintrag und passen die folgenden Parameter an) Create a new entry and adjust the following parameters:
- Name / MAC -Adresse: Geben Sie einen Benutzer-Namen an, mit dem der Benutzer auf den Router / Access Point zugreifen soll.
- Passwort: Geben Sie ein Passwort an, mit dem der Benutzer auf den Router / Access Point zugreifen soll.
- Shell-Privileg-Stufe: Setzen Sie den Wert auf 15, damit der Benutzer Schreibrechte für alle Funktions-Gruppen erhält.
- Ablauf-Art: Wählen Sie im Dropdown-Menü Niemals aus, damit der Eintrag dauerhaft gültig bleibt.
...
Das LCOS unterstützt 7 verschiedene Berechtigungen, welche als Shell-Privileg-Stufe gesetzt werden können.
- address: Enter a username to be used by the user to access the router / access point.
- Password: Enter a password that the user should use to access the router / access point.
- Shell privilege level: Set the value to 15 so that the user receives write permissions for all function groups.
- Expiry type: From the drop-down menu, select Never so that the entry remains valid permanently.
| Info | ||||||||||||||||||||||||
|---|---|---|---|---|---|---|---|---|---|---|---|---|---|---|---|---|---|---|---|---|---|---|---|---|
The LCOS supports 7 different authorizations, which are set as the Shell privilege level.
|
2.8) This concludes the configuration of the LANCOM router / access point that acts as the RADIUS server. You can now write the configuration back to the device
...
2.8 Die Konfigurationsschritte auf dem Router / Access Point, welcher als RADIUS-Server fungiert, sind damit abgeschlossen. Schreiben Sie die Konfiguration in den Router zurück.