Versionen im Vergleich

Schlüssel

  • Diese Zeile wurde hinzugefügt.
  • Diese Zeile wurde entfernt.
  • Formatierung wurde geändert.


Seiteneigenschaften


Description:
This article describes how to set up an Internet connection with a static IP address on a Unified Firewall (e.g. cable Internet or SDSL) and assign it to an Internet object on the desktop.


Requirements:
  • Web browser for configuring the Unified Firewall.

    The following browsers are supported:
    • Google Chrome
    • Chromium
    • Mozilla Firefox
  • Internet access via upstream provider router


Procedure:
1) Setting up the network connection for Internet access:
1.1) Open the configuration interface of the Unified Firewall in your browser, change to the menu Network
-> Connections -> Network
→ Connections → Network Connections and click on the chevron icon to enter the advanced view.
Image Removed
Image Added
1.2) Delete the entry for the interface eth0.
Info:


Info

By default the interface eth0 is set to DHCP.

Image Removed


Image Added
1.3) Click on the “+” icon to create a new connection.
Image Removed
Image Added
1.4) Modify the following parameters:
  • Name: Enter a descriptive name.
  • Interface: From the drop-down menu, select the interface eth0.
  • Type: Select Static from the drop-down menu.
  • IP Addresses: Enter the IP
address
  • addresses assigned by the provider along with the subnet mask.
This has
  • These have to be entered in CIDR notation (Classless Inter-Domain Routing) (e.g. 81.81.81.2/29).
Info

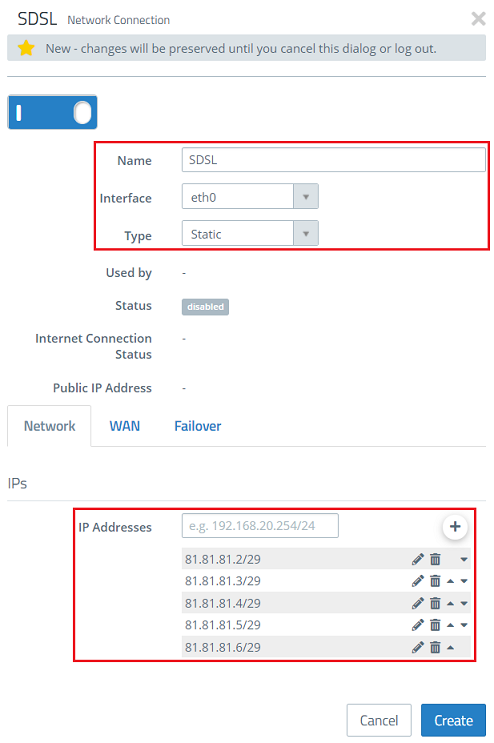
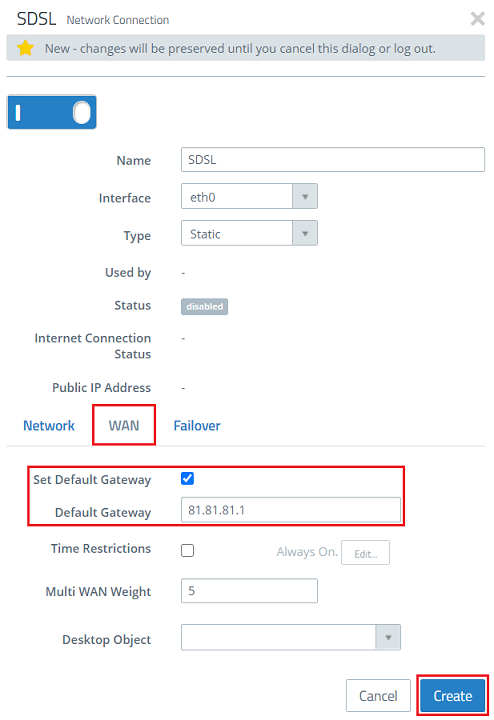
The first IP address is always used for general communication. If necessary, change the order of the IP addresses via the arrow symbols.

In this example the IP address range 81.81.81.1/29 is used with a total of 8 IP addresses. Of these 5 IP addresses are usable.

  • 81.81.81.0: This is the network address and therefore it cannot be used.
  • 81.81.81.1: In this example this IP address is used by the Gateway (Provider router) and therefore it cannot be used.
  • 81.81.81.2 - 81.81.81.6: These IP addresses aren't reserved otherwise and therefore can be assigned to the Unified Firewall and used freely.
  • 81.81.81.7: This is the Broadcast address and therefore it cannot be used.

Image Added

Image Removed

1.5) Change to the WAN tab and modify the following parameters:
  • Set a checkmark next to Set default gateway.
  • Default Gateway: Enter the provider router’s IP address, which you have received from your provider.
Image Removed
Image Added


2) Create a desktop object for the Internet connection:
2.1) Click the button to Create an Internet object.
Image Removed
Image Added
2.2) Enter the following parameters:
  • Object Name: Enter a descriptive name.
  • Connections: From the drop-down menu, select the WAN Object created in steps 1.4 – 1.5 and click on the “+” icon to add the object.
Image Removed
Image Added


3) Saving and activating the configuration steps:
3.1) Click on the Activate button to accept the changes and enable filtering.
Image Removed
Image Added