| Seiteneigenschaften |
|---|
Description:
Im folgenden Dokument wird beschrieben, wie Sie mit This article describes how to configure separate access keys for every member in a WiFi network on a LANCOM access point with LCOS LX by means of LEPS-MAC (LANCOM Enhanced Passphrase Security) die Konfiguration von separaten Zugangsschlüsseln für jeden Teilnehmer eines WLAN-Netzwerkes auf einem LANCOM Access Point mit LCOS LX einrichten können.
| Info |
|---|
What is LEPS-MAC? This combination makes the spoofing of the MAC addresses futile—andfutile — and LEPS-MAC thus shuts out a potential attack on the ACL. If WPA2 is used for encryption, the MAC address can indeed be intercepted—butintercepted — but this method never transmits the passphrase over wireless. This greatly increases the difficulty of attacking the WLAN as the combination of MAC address and passphrase requires both to be known before an encryption can be negotiated. LEPS-MAC can be used both locally in the device and centrally managed by a RADIUS server. LEPS-MAC works with all WLAN client adapters available on the market without any modification. Full compatibility to third-party products is assured as LEPS-MAC only involves configuration in the access point. Compared to LEPS-U, the administrative overhead is slightly higher because the MAC address has to be entered for eacheach device. |
| Hinweis |
|---|
On LANCOM Access Points with LCOS LX LEPS-MAC can only be used with WPA2. |
...
- LCOS LX as of version 5.34 RU2 (download latest version)
- LANtools as of version 10.50 (download latest version)
- Configured and functional WiFi network with WPA2 encryption
Procedure:
1) Configuring LEPS-MAC on a standalone access point:
1.1) Configuring LEPS-MAC on a standlone access point via the LEPS user table:
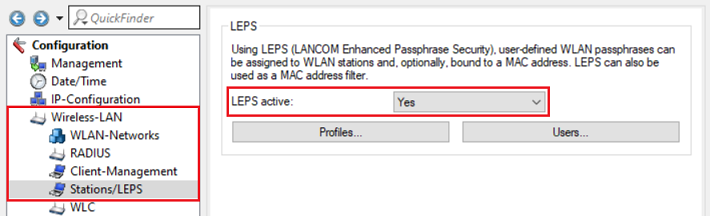
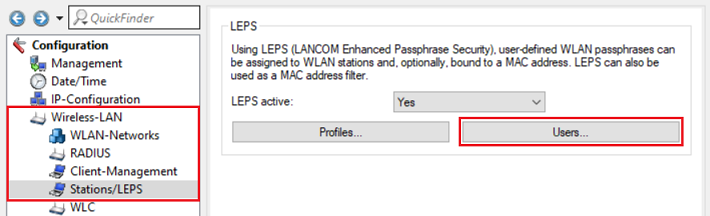
1. Öffnen Sie die Konfiguration des Access Points in LANconfig, wechseln in das Menüs 1.1) Open the configuration of the access point in LANconfig, go to the menu Wireless-LAN → StationenStations/LEPS und wählen bei LEPS aktiviert die Option Ja aus and set LEPS active to Yes.
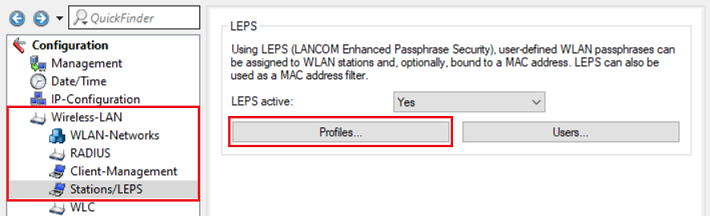
1.1.2. Wechseln Sie in das Menü Profile.) Go to the menu Profiles.
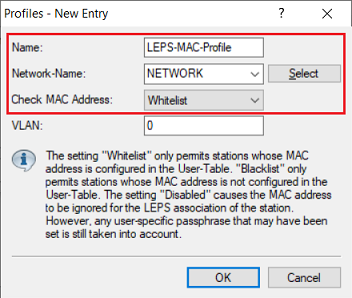
 3. Erstellen Sie ein neues Profil und passen folgende Parameter an
1.1.3) Create a new profile and modify the following parameters:
- Name: Vergeben Sie einen aussagekräftigen Namen für das Enter a descriptive name for the LEPS-MAC Profilprofile.
- Netzwerkname: Wählen Sie im Dropdownmenü das bereits bestehende WLAN-Netzwerk aus.
- MAC-Adresse prüfen: Wählen Sie im Dropdownmenü die Option Whitelist aus. Dadurch wird der WLAN-Zugriff nur für die hinterlegten Teilnehmer erlaubt und für alle anderen Teilnehmer unterbunden.
4. Wechseln Sie in das Menü Benutzer.
5. Erstellen Sie einen neuen Benutzer und passen folgende Parameter an:
- Network-Name: In the dropdownmenu select the existing WiFi network.
- Check MAC Address: In the dropdown menu select the option Whitelist. Thereby WiFi access is only allowed for all members in the whitelist and access for all other devices is denied.
1.1.4) Go to the menu Users.
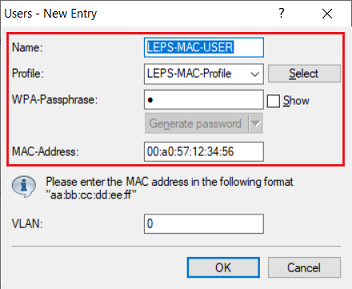
1.1.5) Create a new user and modify the following parameters:
- Name: Enter a descriptive name for the LEPS user.
- Profile: In the dropdown menu select the LEPS profile created in step 3.
- WPA-Passphrase: Optionally you can enter a WPA key (8 to 64 characters), which has to be entered on the WiFi device instead of the key entered in the configured WiFI network. Thus a separate WPA key can be assigned to each WiFi device. If the entry is left empty, the WPA key of the WiFi network is used.
- MAC-Address: Enter the MAC address of the WiFi device in the format
- Name: Vergeben Sie einen aussagekräftigen Namen für den LEPS-Benutzer.
- Profil: Wählen Sie im Dropdownmenü das in Schritt 3. erstellte LEPS-Profil aus.
- WPA-Passphrase: Tragen Sie optional einen WPA-Key (8 bis 64 Zeichen) ein, der auf dem WLAN-Endgerät anstelle des in dem WLAN-Netzwerk hinterlegten Keys eingegeben werden muss. So kann für jeden Benutzer ein eigener WPA-Key hinterlegt werden. Bleibt der Eintrag leer, so wird der WPA-Key des WLAN-Netzwerks verwendet.
- MAC-Adresse: Tragen Sie die MAC-Adresse des WLAN-Endgerätes im Format 00:a0:57:12:34:56 ein.
| Info |
|---|
Repeat this step for additional WiFi devices if needed. |
1.1.6) This concludes the configuration of LEPS-MAC. Write back the configuration into the access point.
1.2) Configuring LEPS-MAC on a standalone access point via an external RADIUS server:
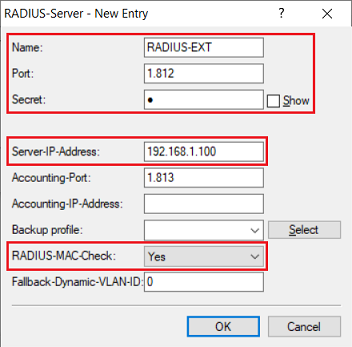
1.2.1) In the access point configuration switch to the menu item Wireless LAN → RADIUS → RADIUS-Server.

1.2.2) Create a new entry and modify the following parameters:
- Name: Enter a descriptive name for the RADIUS profile (in this example RADIUS-EXT).
- Port: Make sure, that the port 1812 is stored.
- Secret: Enter a password, the access point uses for authentication with the RADIUS server.
- Server-IP-Adress: Enter the IP address of the RADIUS server.
- RADIUS-MAC-Check: In the dropdown menu select the option Yes.
| Info |
|---|
By activating the option RADIUS-MAC-Check the access point uses the MAC address as the RADIUS-Server Password-Source. In this case, the MAC address must be entered as the user name and the password for the user on the external RADIUS server. Under normal circumstances the WiFi users use the WPA key from the WLAN network. As in this scneario every WiFi user should use a separate WPA key, this key has to be transmitted via the RADIUS parameter LCS-WPA-Passphrase. This parameter also has to be supported by the RADIUS server. If necessary, this parameter has to be implemented by importing a suitable dictionary into the RADIUS server. |
1.2.3) Switch to the menu Wireless-LAN → WLAN networks → Encryption.
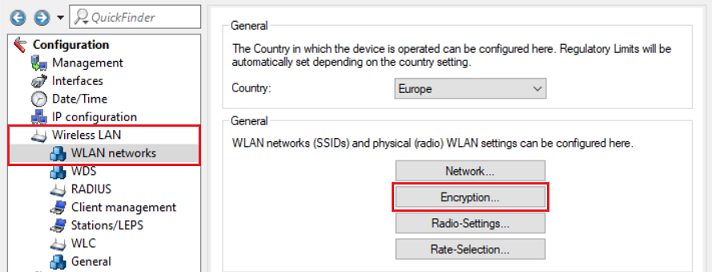
1.2.4) Click Add to add a new encryption profile.

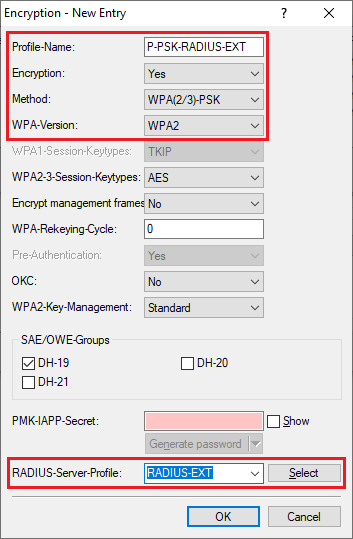
1.2.5) Modify the following parameters:
- Profile-Name: Enter a descriptive name for the encryption profile (in this example P-PSK-RADIUS-EXT).
- Encryption: Make sure, that the option Yes is selected.
- Method: In the dropdown menu select the option WPA(2/3)-PSK.
- WPA-Version: In the dropdown menu select the desired WPA version (in this example WPA2).
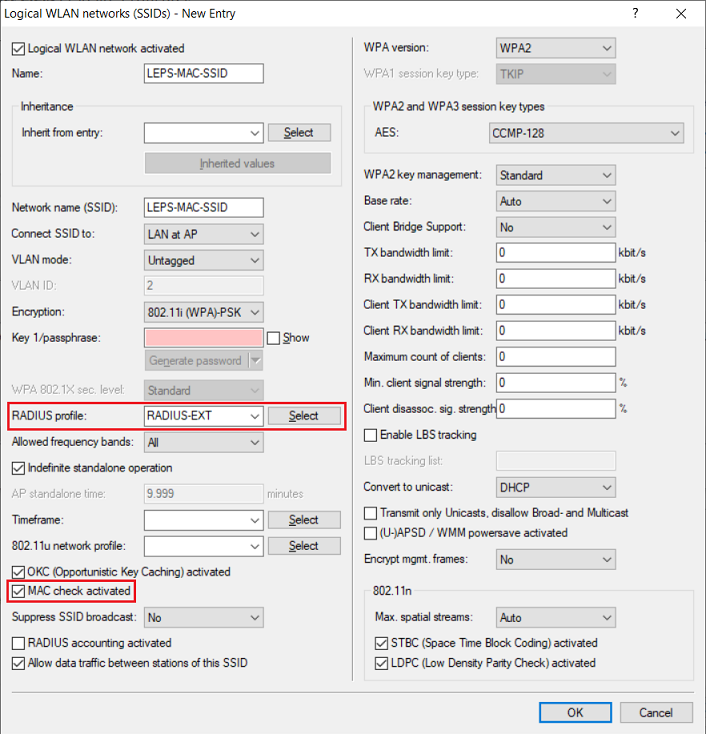
- RADIUS-Server-Profile: In the dropdown menu select the RADIUS profile created in step 1.2.2.
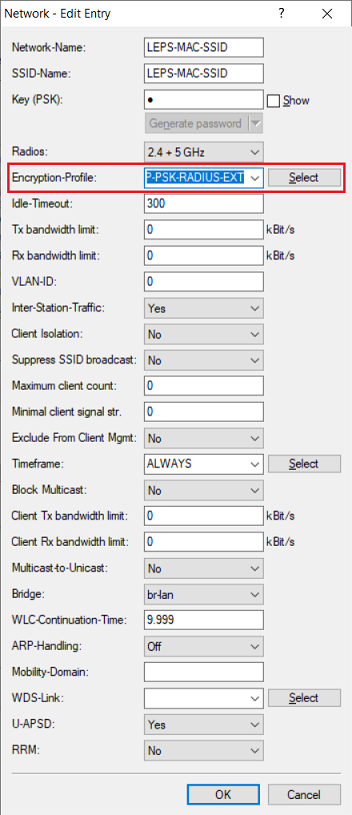
1.2.6) Go to the menu Wireless LAN → WLAN networks → Network.
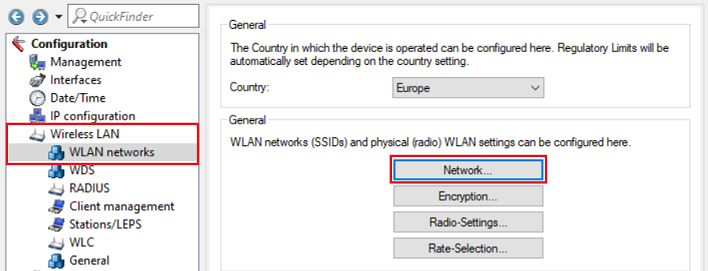
1.2.7) Modify the existing SSID and assign the encryption profile created in step 1.2.5 to it via the dropdown menu.
1.2.8) This concludes the configuration of LEPS-MAC on a standalone access point via an external RADIUS server. Write the configuration back to the device.
2) Configuring LEPS-MAC on a WLAN-Controller:
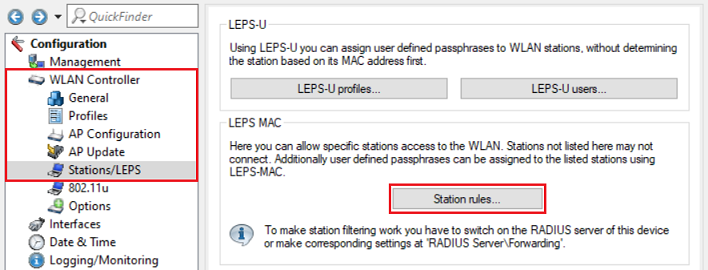
2.1) Configuring LEPS-MAC on a WLAN-Controller via the station rules:
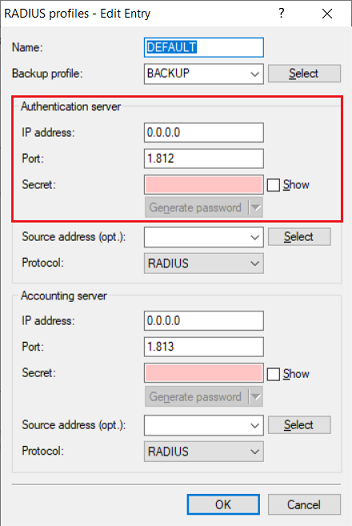
2.1.1) Switch to the menu item WLAN Controller → Profiles → RADIUS profiles in the WLAN Controller.
2.1.2) Make sure, that the default settings are set in the profile DEFAULT under Authentication server:
- IP address: 0.0.0.0
- Port: 1812
- Secret: No Secret
2.1.3) Go to the menu WLAN Controller → Profiles → Logical WLAN networks (SSIDs).
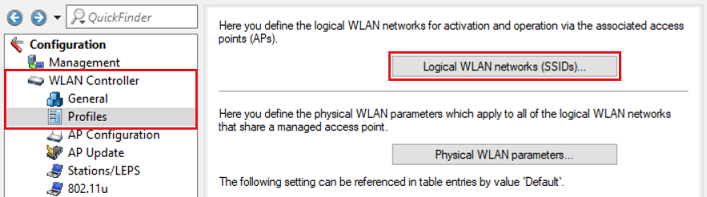
2.1.4) Select the WLAN network you want to use with LEPS-MAC and click Edit.

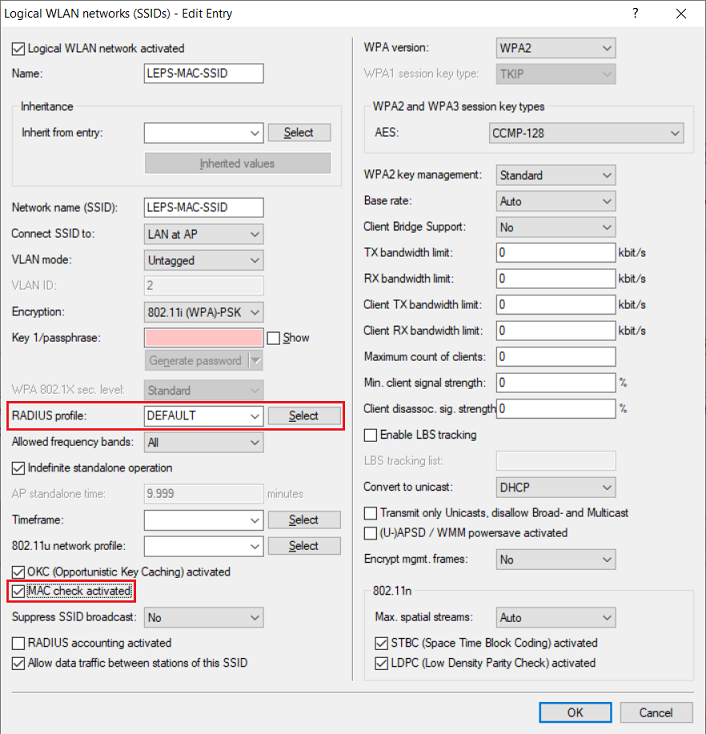
2.1.5) Modify the following parameters:
- Make sure, that the RADIUS profile DEFAULT is selected.
- Activate the option MAC check activated.
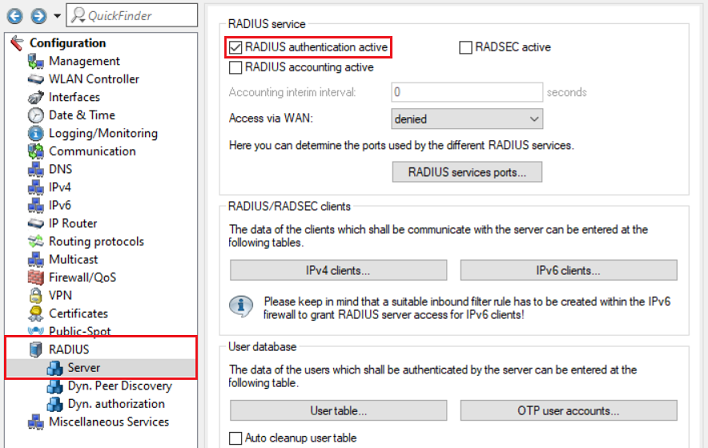
2.1.6) Go to the menu RADIUS → Server and activate the option RADIUS authentication active to activate the RADIUS server.
| Info |
|---|
| In contrast to the configuration on a standalone access point the RADIUS server on a WLAN Controller has to be activated, as the MAC filter works via RADIUS. |
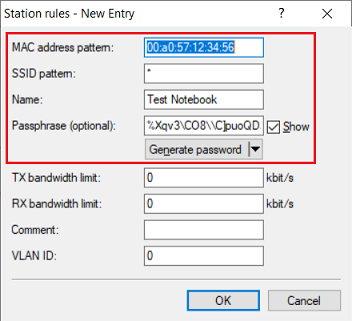
- MAC address pattern: Enter the MAC address of a WiFi end device.
- SSID pattern: Enter the wildcard * so that the WiFi end device has access to all SSIDs.
- Name: Enter a descriptive name for the WiFi end device.
- Passphrase: Enter the WiFi password, which should be used for this specific WiFi end device.
| Info |
|---|
Please observe that the passphrase can contain a maximum of 63 characters. No special characters may be used (accents, umlauts, etc.). The following characters can be used for the passphrase: #ABCDEFGHIJKLMNOPQRSTUVWXYZ@{|}~!$%&'()*+-,/:;<=>?[\]^_.0123456789abcdefghijklmnopqrstuvwxyz Regarding the parameters MAC address pattern and SSID pattern also see the following Knowledge Base article: |
2.2) Configuring LEPS-MAC on a WLAN Controller via an external RADIUS server:
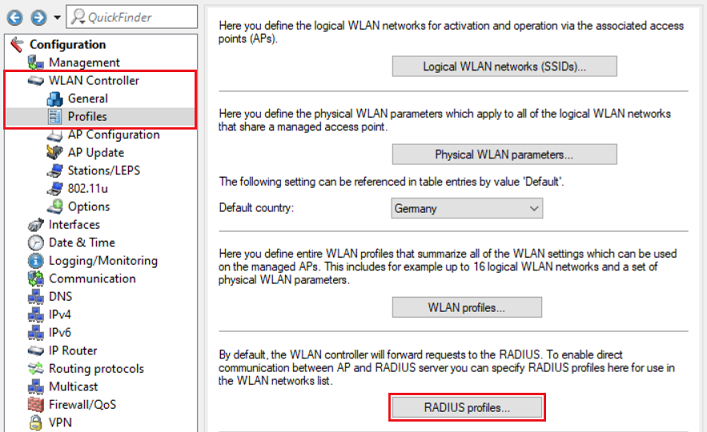
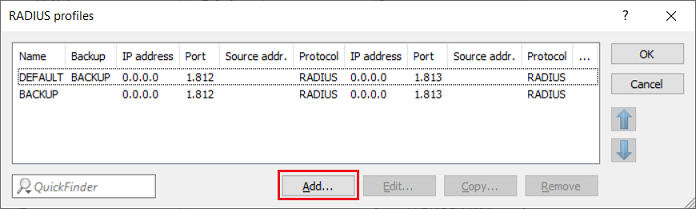
2.2.1) Connect to the WLAN Controller via LANconfig and go to the menu WLAN Controller → Profiles → RADIUS profiles.
2.2.2) Click Add, to create a new RADIUS profile.
| Info |
|---|
The existing default profiles DEFAULT and BACKUP must not be modified. As the profile DEFAULT is assigned to every logical WLAN network, this could otherwiese have an impact on existing WLAN networks. |
2.2.3) Modify the following parameters:
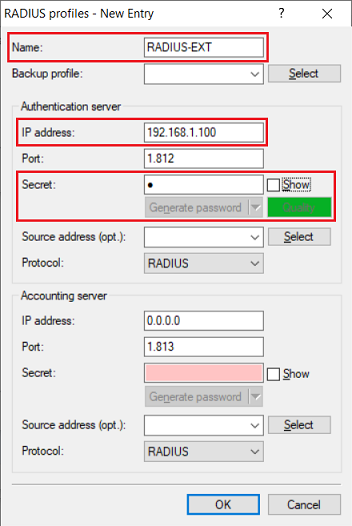
- Name: Enter a descriptive name for the profile (in this example RADIUS-EXT).
- IP address: Enter the IP address of the RADIUS server.
- Secret: Enter a password, which the access points use for authentication with the RADIUS server.
| Info |
|---|
The RADIUS profile is rolled out to the access points together with the WLAN profile. As a result, the access points will communicate with the RADIUS server directly. Therefore requests from the access points have to be allowed in the RADIUS server. Access points with LCOS LX always use the MAC address as the RADIUS-Server Password-Source. In this case, the MAC address has to be entered as the user name and password for the user on the external RADIUS server. The RADIUS server also must support the RADIUS parameter LCS-WPA-Passphrase. If necessary, this parameter has to be implemented by importing a suitable dictionary into the RADIUS server. |
2.2.4) Go to the menu WLAN Controller → Profiles → Logical WLAN networks (SSIDs).
2.2.5) Edit the logical WLAN network to be used with LEPS-MAC and modify the following parameters:
- In the dropdown menu for the RADIUS profile select the profile created in step 2.2.3.
- Activate the option MAC check activated.