Image Added
DHCP option 17 - Rootpath:
- Option number: Enter the number 17.
- Network name: In the dropdown menu select the DHCP network, where the DHCP option should be assigned (in this example the network INTRANET).
- Type: In the dropdown menu select the type String.
- Value: Enter the URL for the path to the root disk.
 Image Added
DHC option 42 - Network Time Protocol Servers Option:
- Option number: Enter the number 42.
- Network name: In the dropdown menu select the DHCP network, where the DHCP option should be assigned (in this example the network INTRANET).
- Typd: In the dropdown menu select the type IP address or String.
- Value: Enter the IP address of a time server or the DNS name of a time server.
 Image Added
  Image Added
DHCP option 44 - NetBIOS over TCP/IP Name Server Option:
- Option number: Enter the number 44.
- Network name: In the dropdown menu select the DHCP network, where the DHCP option should be assigned (in this example the network INTRANET).
- Type: In the dropdown menu select the type IP address.
- Value: Enter the IP address of a NetBIOS server.
 Image Added
DHCP option 66 - TFTP server name:
- Option number: Enter the number 66.
- Network name: In the dropdown menu select the DHCP network, where the DHCP option should be assigned (in this example the network INTRANET).
- Type: In the dropdown menu select the type IP address or String.
- Value: Enter the IP address of a TFTP server or the DNS name of a TFTP server.
 Image Added
 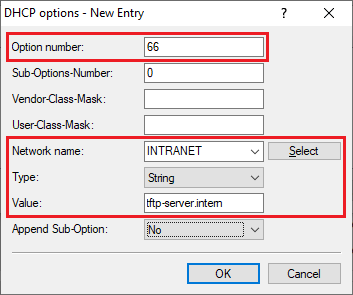 Image Added
DHCP option 121 - Classless Static Route:
The procedure is described in the following Knowledge Base article:
DHCP option 252 - Web Proxy Auto-Discovery Protocol:
- Option number: Enter the number 252.
- Network name: In the dropdown menu select the DHCP network, where the DHCP option should be assigned (in this example the network INTRANET).
- Type: In the dropdown menu select the type String.
- Value: Enter the URL of the web server with the proxy configuration (in this example http://server.intern/proxyconfig.pac).
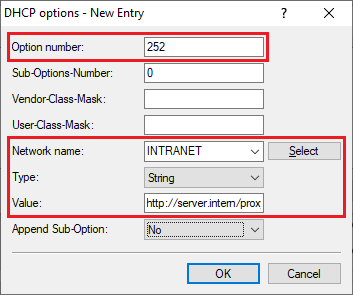 Image Added
Specify an image file for a PXE boot server:
1) Go to the menu IPv4 → BootP → Boot images.
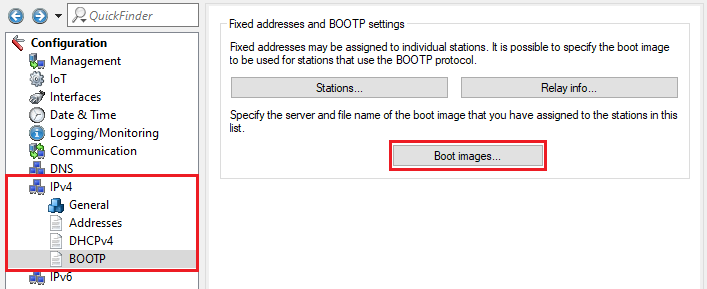 Image Added
2) Create a new entry and modify the following parameters:
- Designation: Enter a descriptive name for the boot image.
- Server address: Enter the IP address of the server, which provides the boot image.
- File name: Enter the name of the file on the server, which contains the boot image.
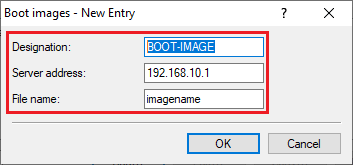 Image Added
3) Go to the menu IPv4 → BootP → Stations.
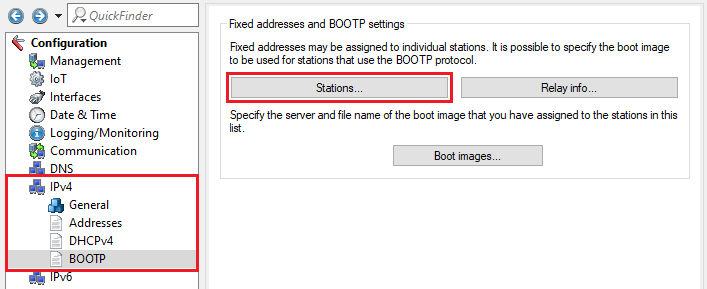 Image Added
4) Create a new entry and modify the following parameters:
- Station MAC address: Enter the MAC address of the PXE client in the format 00:a0:57:12:34:56.
- Network name: In the dropdown menu select the Network, from which an IP address should be assigned to the network device.
- IP address: Enter the IP address, which should be assigned to the network device.
- Station name: Optionally you can enter a descriptive name for the station.
- Boot image: In the dropdown menu select the boot image created in step 2.
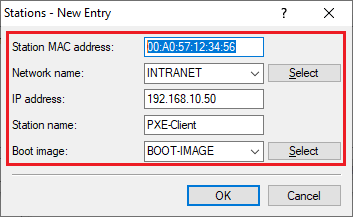 Image Added