Description: To make it easy to manually transmit information to a LANCOM Wireless ePaper Display, LANCOM Systems has provided Excel macros and display templates for the following scenarios: - Visitor badges
- Room signs
- Scheduling information for conference rooms
This document describes how to use the Excel macros to manually update information on the LANCOM Wireless ePaper Displays. | Info |
|---|
The ePaper server was discontinued in January 2024 (End of Sale).Therefore LANCOM Systems will not provide support for new installations of the ePaper server. LANCOM Systems will provide support for existing ePaper server installations up to and including January 2026. |
Requirements: - Installed and registered LANCOM Wireless ePaper Server as of version 1.40 (download latest version)
- Registered and ready-to-operate ePaper displays
- Excel macro files and display templates
- (Microsoft Excel as of version 2007)
 Image Removed Image Removed | Excel Makro - Visitors_EN.zip |
|
 Image Removed Image Removed | View file |
|---|
| name | Excel Makro - Meeting_EN.zip |
|---|
|
Microsoft Excel as of version 2007
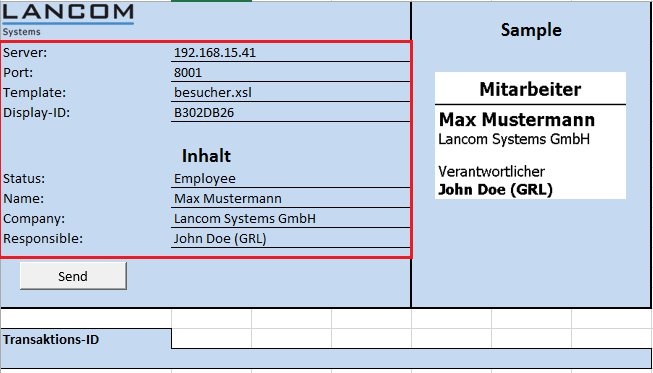
Procedure:1) Unpack the ZIP archive to any directory on your PC. Each folder contains an Excel macro file and one or more display templates (* .xsl). You can tell which size of display the templates can be used for from the file name of the respective template (e.g. the. 2) Copy the template files that you want to use to the directory directory \data\template located in the installation directory of the LANCOM Wireless ePaper Server. In this example, a 2.7” display is to be used as a badge for a visitor or employee. 3) Start the Excel macro file. A security warning will be displayed if the the use of macros in Excel has been disabled. Click on Activate content to use the macro file. 4) Fill in the form with the data of your Wireless ePaper Server. - In the Server field you enter the local IP address where the ePaper server can be reached.
- There is usually no need to change the value for the port unless the configuration of your ePaper server differs from the default settings.
- In this example we retain the default setting used in the template. Enter the name of the template here if it is different to the standard name.
- In the drop-down field Display ID you select the ID of the display where the contents should be displayed.
- The Excel file contains a second sheet named 2.7” Displays. Here, you enter the IDs of all of the displays that you have registered in the Wireless ePaper Server.
 Image Removed Image Removed  Image Added Image Added
5) In the lower area you enter the contents to be shown on the 2.7” display. This example creates an employee badge. The fields have the following sizes: - Status 30x254 Px Recommended number of characters: 11
- Name 25x254 Px Recommended number of characters: 11
- Company 25x254 Px Recommended number of characters: 17
- Responsible 25x254 Px Recommended number of characters: 14
In the text fields fields Name, Company and Responsible, the font is automatically adjusted if you use more than the recommended number of characters. Depending on the number of extra characters, the text can appear rather cramped. 6) Click on on Send to transfer the content to the 2.7” display. 7) If the content was successfully transferred to the display, the the Transaction ID field displays a message, which includes the transaction ID for the transfer that was just performed. The content appears on the display. |