| Seiteneigenschaften |
|---|
Description:In diesem Dokument wird beschrieben welche Konfigurations-Punkte überprüft und welche Traces erstellt werden können, wenn Portforwarding nicht funktioniert
This document describes which parts of the configuration should be checked and which traces can be performed if port forwarding is not working.
Requirements:
- LCOS ab Version as of version 8.50 (download aktuelle Versionlatest version)
- LANtools ab Version as of version 8.50 (download aktuelle Versionlatest version)
- SSH -Client für den Zugriff auf die Konsole (z.Bclient for command-line access (e.g. PuTTY)
- Bereits eingerichtetes PortforwardingPreconfigured port forwarding
Scenario:
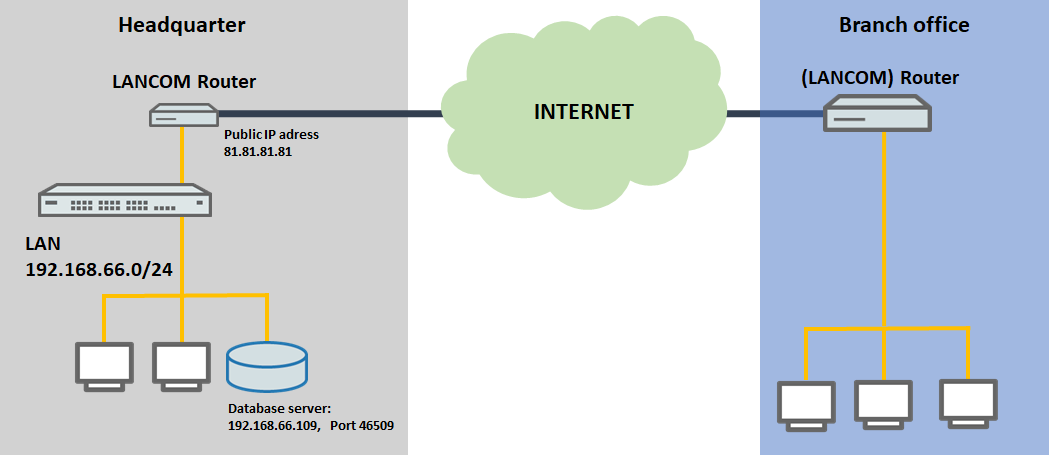
1. Der LANCOM Router stellt die Internet-Verbindung direkt her:
) The LANCOM router establishes the Internet connection directly:
- The database server at the headquarters should be accessible via the public IP address or the public DNS name of the headquarters and the TCP port 46509.
- For this purpose, a port forwarding was set up in the LANCOM router at the headquarters to the local IP address of the database server
- Der Datenbank-Server im Zentralgebäude soll über die öffentliche IP-Adresse bzw. den öffentlichen DNS-Namen der Zentrale und dem TCP-Port 46509 angesprochen werden können.
- Dazu wurde im LANCOM Router in der Zentrale ein Port-Forwarding auf die lokale IP-Adresse des Datenbank-Servers (192.168.66.109) und den TCP-Port 46509 eingerichtet. and the TCP port 46509.
- However, after being set up, the database server cannot be reached at the public IP address Nach der Einrichtung kann der Datenbank-Server aber nicht unter der öffentlichen IP-Adresse (81.81.81.81:46509) bzw. dem öffentlichen DNS-Namen (z.B. zentraleor at the public DNS name (e.g. headquarters.test.decom:46509) erreicht werden.
2. Die Internet-Verbindung wird von einem weiteren Router vor dem LANCOM Router hergestellt:
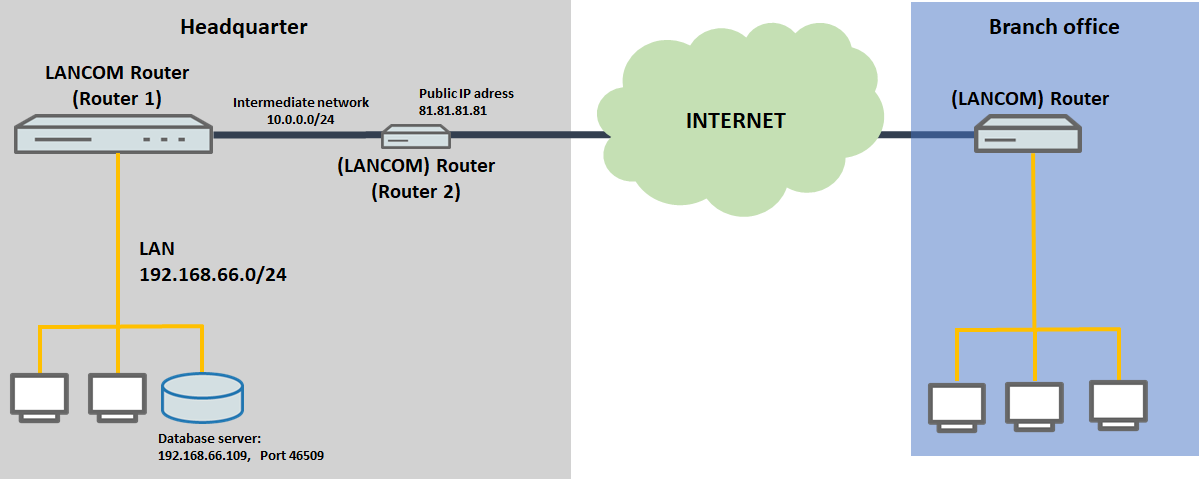
) The Internet connection is established by another router upstream of the LANCOM router:
- Upstream from the main router at the headquarters (router 1), another router (router 2) is used to provide the Internet connection.
- The database server at the headquarters should be accessible via the public IP address or the public DNS name of the headquarters and the TCP port 46509.
- For this purpose, a port forwarding was set up in router 1 at the headquarters to the local IP address of the database server
- Vor dem Haupt-Router in der Zentrale (Router 1) wird ein weiterer Router (Router 2) zur Bereitstellung der Internet-Verbindung eingesetzt.
- Der Datenbank-Server im Zentralgebäude soll über die öffentliche IP-Adresse bzw. den öffentlichen DNS-Namen der Zentrale und dem TCP-Port 46509 angesprochen werden können.
- Dazu wurde im Router 1 ein Port-Forwarding auf die lokale IP-Adresse des Datenbank-Servers (192.168.66.109) und den TCP-Port 46509 eingerichtet. and the TCP port 46509.
- However, after being set up, the database server cannot be reached at the public IP address Nach der Einrichtung kann der Datenbank-Server aber nicht unter der öffentlichen IP-Adresse (81.81.81.81:46509) bzw. dem öffentlichen DNS-Namen (z.B. zentraleor at the public DNS name (e.g. headquarters.test.decom:46509) erreicht werden.
VorgehensweiseProcedure:
1. Allgemeine Punkte (Szenario 1 und ) Common items (scenario 1 and 2):
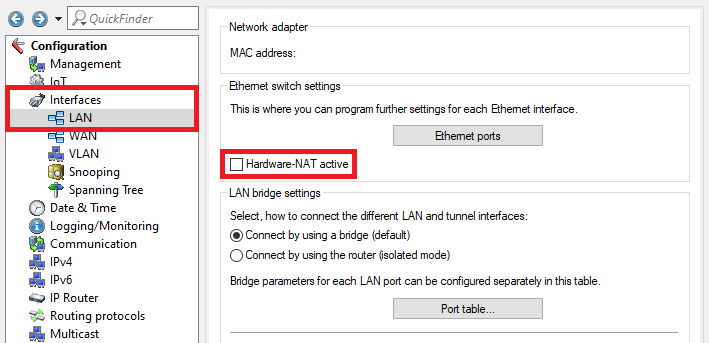
1.1 Hardware-) Deactivate hardware NAT deaktivieren:
Auf einigen Routern steht das Feature Hardware-NAT zur Verfügung. Dadurch ist es theoretisch möglich Daten über eine maskierte Internet-Verbindung (NAT) mit der ausgehandelten Port-Geschwindigkeit zu übertragen.
Da Hardware-NAT nicht korrekt arbeitet und im aktiven Zustand u.A. Portforwarding nicht funktioniert, empfiehlt LANCOM Systems Hardware-NAT grundsätzlich zu deaktivieren.
Some routers feature hardware NAT. This makes it theoretically possible to use a masked internet connection (NAT) at the negotiated port speed.
Because hardware NAT does not work correctly and can be problematic when enabled, LANCOM Systems recommends that hardware NAT should always be deactivated.
The following devices support the hardware NAT featureFolgende Geräte unterstützen die Funktion Hardware-NAT:
- 1781EF+
- 1781EW+
- 1781VA
- 1781VAW
- 1781VA-4G
- WLC-4006+
Sie finden das Feature unter This feature is located under Interfaces → LAN.
1.2 Prüfen des Default-Gateways auf dem Weiterleitungsziel:
Prüfen Sie auf dem Weiterleitungsziel im Netzwerk, ob das korrekte Default Gateway hinterlegt ist. Bei dem Default Gateway muss es sich um den LANCOM Router in der Zentrale (Szenario 1) bzw. den Router 1 (Szenario 2) handeln.
1.3 Überprüfen der Übereinstimmung des per DNS-Name aufgelösten IP-Adresse mit der tatsächlichen öffentlichen IP-Adresse:
Erfolgt der Zugriff über einen DNS-Namen, muss sichergestellt sein, dass die über den DNS-Namen aufgelöste IP-Adresse mit der tatsächlichen öffentlichen IP-Adresse übereinstimmt. Sollte dies nicht der Fall sein, prüfen Sie, ob das Portforwarding bei Eingabe der öffentlichen IP-Adresse funktioniert.
2. Portforwarding auf vorgeschaltetem LANCOM Router einrichten (Szenario 2):
Wird ein weiterer vorgeschalteter Router verwendet, müssen die gewünschten Ports auf diesem an den Haupt-Router weitergeleitet werden.
Info:
Sollte ein Router eines anderen Herstellers verwendet werden, erfragen Sie die Vorgehensweise bei dem jeweiligen Hersteller.
) Check the default gateway on the forwarding destination:
Check on the forwarding destination device in the network to see whether the correct default gateway has been entered. The default gateway must be set as the LANCOM router at the headquarters (scenario 1) or as router 1 (scenario 2).
1.3) Check that the IP address resolved by the DNS name matches the actual public IP address:
With access based on a DNS name, you should check that the IP address resolved via the DNS name matches the actual public IP address. If this is not the case, check that port forwarding works at all by entering the public IP address.
2) Set up port forwarding on an upstream LANCOM router (scenario 2):
If a further, upstream router is used, the required ports on this device must be forwarded to the main router.
| Info |
|---|
If you are using a router from another manufacturer, approach them for information about the appropriate procedure. |
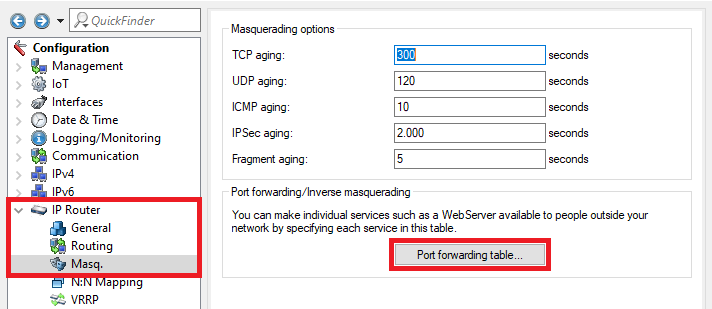
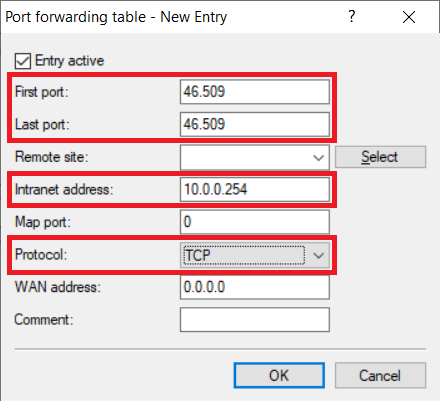
2.1) Open the configuration for router 2 in LANconfig and switch to the menu item IP router → Masq. → Port 2.1 Öffnen Sie die Konfiguration des Router 2 in LANconfig und wechseln in das Menü IP Router → Masq. → Port forwarding table.
2.2 Erstellen Sie einen neuen Eintrag und passen folgende Parameter an (hier am Beispiel HTTPS) Create a new entry and adjust the following parameters (this example being the TCP port 46509):
- First port: Tragen Sie den Port ein, welcher weitergeleitet werden sollEnter the port that should be forwarded.
- Last port: Tragen Sie den Port ein, welcher weitergeleitet werden soll. Sollen mehrere Ports weitergeleitet werden, können Sie auch einen höheren Port angeben. Dann wird die gesamte Port-Range weitergeleitet. Enter the port that should be forwarded. If several ports are to be forwarded, you can specify a higher port number here. All of the ports in this range will be forwarded.
- Intranet address: Specify the WAN address of router 1 (in this example the 10.0.Intranet adress: Geben Sie die WAN-Adresse des Router 1 an (in diesem Beispiel die 10.0.0.254).
- Protocol: Wählen Sie im Dropdownmenü das Protokoll aus Select the protocol (TCP, UDP oder or TCP + UDP) from the drop-down menu.
3. Erstellen einer Firewall-Regel zum Erlauben der eingehenden Kommunikation:
Sofern eine Firewall-Regel vorhanden ist, welche den eingehenden Datenverkehr des im Portforwarding verwendeten Ports blockt, muss eine Ausnahme-Regel erstellt werden, welche die Kommunikation erlaubt.
) Create a firewall rule to allow incoming communication:
If there is a firewall rule blocking the incoming data traffic on the port used for port forwarding, an exception rule must be created that permits communication.
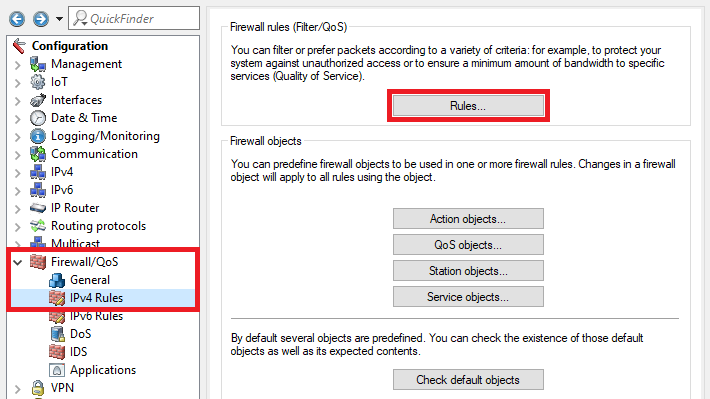
3.1) Navigate to the menu Firewall/QoS → IPv4 rules → Rules3.1 Wechseln Sie in das Menü Firewall/QoS → IPv4-Regeln → Regeln.
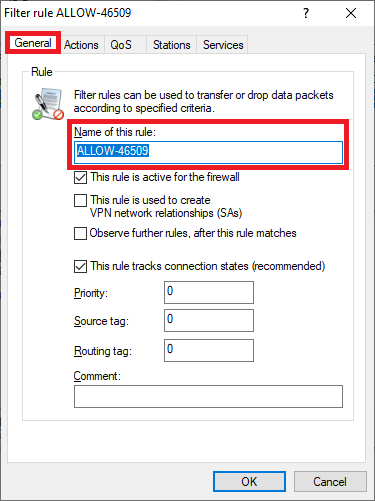
3.2 Erstellen Sie eine neue Firewall-Regel und vergeben einen aussagekräftigen Namen) Create a new firewall rule and give it a descriptive name.
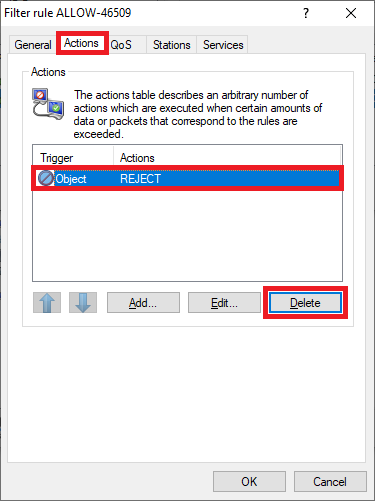
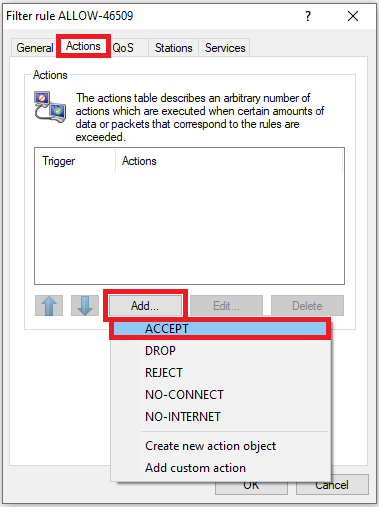
3.3 Wechseln Sie in den Reiter Aktionen, markieren das Objekt REJECT und löschen dieses mit einem Klick auf Entfernen) Go to the Actions tab, mark the object REJECT and click on Delete.
3.4 Klicken Sie auf Hinzufügen und wählen das Objekt ACCEPT aus) Click on Add and choose the object ACCEPT.
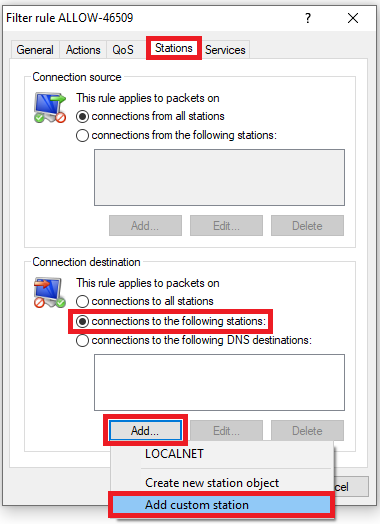
3.5 Wechseln Sie in den Reiter Stationen, wählen die Option Verbindungen an folgende Stationen und klicken auf Hinzufügen → Benutzerdefinierte Station hinzufügen) Go to the Stations tab, select the option Connections from the following stations and click on Add → Add custom station.
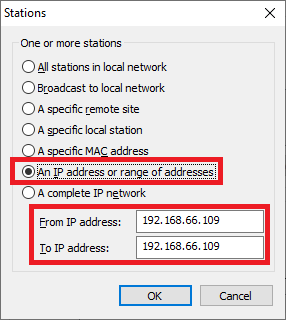
3.6 Wählen Sie die Option Eine IP-Adresse oder ein Bereich von IP-Adressen und hinterlegen bei Von IP-Adresse und Bis IP-Adresse die IP-Adresse des Weiterleitungsziels (in diesem Beispiel die ) Select the option An IP address or range of addresses and use From IP address and To IP address to specify the IP address of the forwarding destination (in this example 192.168.66.109).
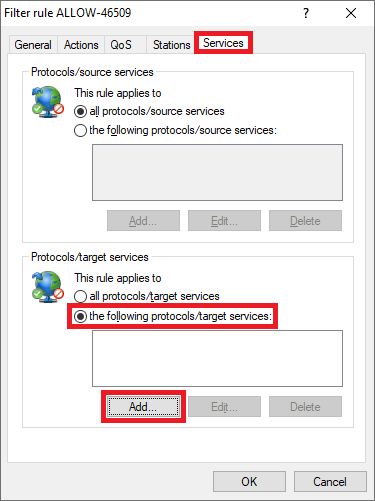
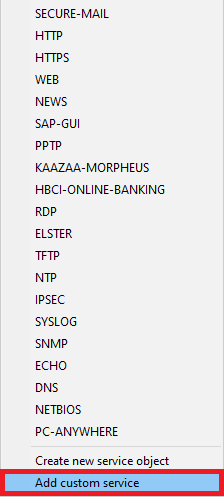
3.7 Wechseln Sie in den Reiter Dienste, wählen die Option folgende Protokolle/Ziel-Dienste und klicken auf Hinzufügen → Benutzerdefinierten Dienst hinzufügen.
3.8 Passen Sie folgende Parameter an:
) Go to the Services tab, choose the option the following protocols/target services and click Add → Add custom service.
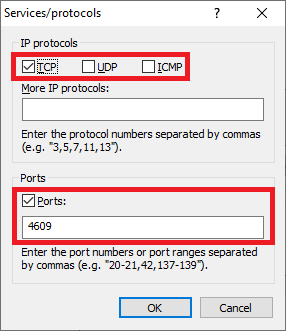
3.8) Enter the following parameters:
- Select the IP protocol(in this example TCP).
- Enter the Port(s) to be used (in this example the port
- Wählen Sie das IP-Protokoll aus (in diesem Beispiel TCP).
- Tragen Sie den/die verwendeten Port(s) ein (in diesem Beispiel der Port 46509).
3.9 Die Konfiguration der Firewall-Regel ist damit abgeschlossen. Schreiben Sie die Konfiguration in den Router zurück.
4. Erstellen von Traces zur weiteren Analyse (Szenario 1 und 2):
Info:
Bei Szenario 2 und Verwendung zweier LANCOM Router muss der Trace auf beiden Routern erstellt werden.
) This concludes the configuration of the firewall rule. Write the configuration back to the router.
4) Disconnect and re-establish the Internet connection:
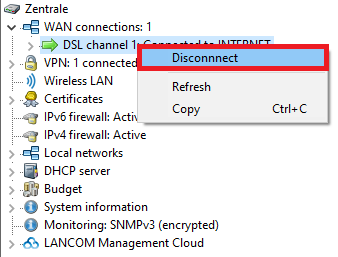
After setting up port forwarding, it may be necessary to disconnect from the Internet so that the connection is re-established. This may be necessary if a port forwarding through a VPN tunnel is operated.
Proceed as follows to disconnect from the Internet:
Connect to the router with LANmonitor, mark the Internet connection, right-click to open the context menu and click Disconnect.
| Info |
|---|
Alternatively, you can do this from the command-line interface with the command do Other/Manual-Dialing/Disconnect <name of the Internet connection> (e.g. do Other/Manual-Dialing/Disconnect INTERNET). |
5) Creating traces for further analysis (scenarios 1 and 2):
| Info |
|---|
For scenario 2 with two LANCOM routers, traces must be created on both devices. |
Using the LANtracer (in LANconfig) or from the command line, perform an IP router trace that filters for the local IP address (in this example Mit dem LANtracer (in LANconfig) oder per Konsole können Sie einen IP-Router Trace durchführen, welcher auf die zu erreichende lokale IP-Adresse (in diesem Beispiel 192.168.66.109) und den Port and the port (in diesem Beispiel this example 46509) gefiltert werden kann:
Trace -Konfiguration für den configuration for LANtracer:
Die Trace-Konfiguration enthält den IP-Router und den Firewall Trace. Diese sind bereits mit dem Filter-Parameter View file name Port-Forwarding.lcg height 250 150
The trace configuration contains the IP router and the firewall trace. The filter parameter "port: 46509" auf den Port 46509 gefiltert. Ändern Sie diesen mit einem Texteditor entsprechend im Vorfeld ab.
Im Folgenden wird die Erstellung der Traces über die Konsole beschrieben:
filters the results for the port 46509. Use a text editor to make these changes in advance.
The following describes how to create the traces using the CLI:
5.1) Use the CLI to connect and enter the command 4.1 Verbinden Sie sich mit der Konsole und geben den Befehl tr # ip-router @ <IP-Adresse> address> +"port: <Port><port>" ein (ze.Bg. tr # ip-router @ 192.168.66.109 +"port: 46509").
...
| Info |
|---|
In |
...
scenario 2, the IP router trace on router 2 has to be filtered for the IP address of router 1 in the intermediate network. |
| Hinweis |
|---|
Search parameters separated by a space must be grouped inside quotation marks (e.g. "port: 46509"), |
...
otherwise an "OR" operator takes effect and the trace line is output if just one of the parameters is included. |
5.2) Using the Internet, access the public IP address
...
4.2 Führen Sie über das Internet einen Zugriff auf die öffentliche IP-Adresse (81.81.81.81:46509) bzw. den öffentlichen DNS-Namen (z.B. zentraleor the public DNS name (e.g. headquarters.test.decom:46509) durch.
Wenn das Port-Forwarding nicht greift, bleibt der Trace leer (siehe AbbildungIf the port forwarding is not working, the trace remains empty (see figure).
4.3 Eine weitere Fehlerquelle ist, dass das Port-Forwarding zwar greift, die Pakete auch im Router vom WAN ins LAN transportiert werden, diese aber vom Empfänger (z.B. dem Server) unbeantwortet bleiben.
Ein Grund hierfür könnte z.B. sein, dass beim Port-Forwarding die falsche lokale IP-Adresse angegeben wurde, oder ein Fehler in Ihrer internen LAN-Struktur vorliegt.
5.3) Another error may be that although port forwarding takes effect and the router transports packets from the WAN into the LAN, the receiver (e.g. the server) does not respond.
One reason could be that port forwarding was set with the wrong local IP address, or there is an error in the internal structure of your LAN.
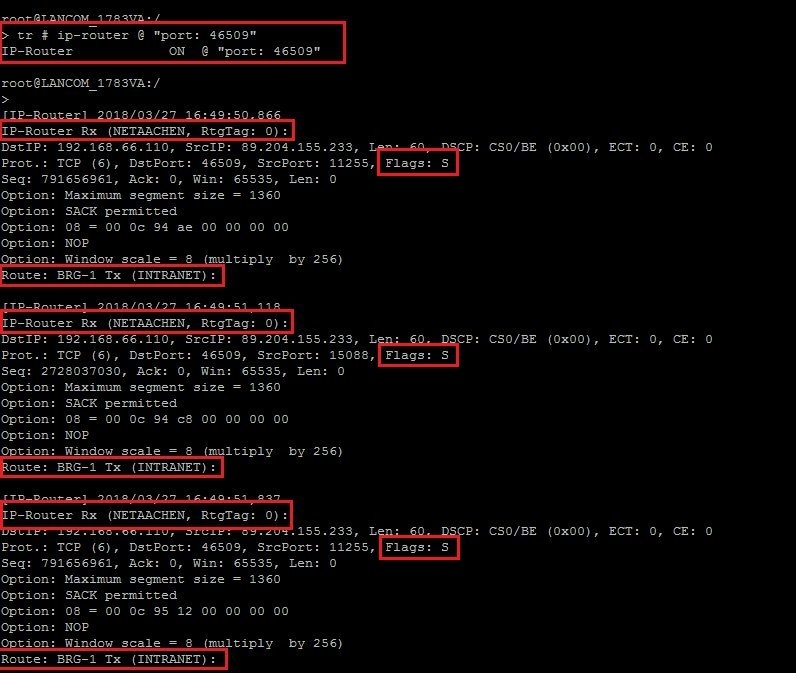
In this case, perform an IP router trace with the command In diesem Fall kann ein IP-Router Trace mit dem Befehl tr # ip-router @ "port: <port>" (ze.Bg. tr # ip-router @ "port: 46509") durchgeführt werden, der folgendes Ergebnis liefern würde (siehe Abbildung).
Es sind nur SYN-Pakete zu sehen (zu erkennen am Flags: S), die vom WAN (Gegenstelle NETAACHEN) ins LAN (INTRANET) transportiert, jedoch nicht vom Empfänger mit einem SYN/ACK-Paket beantwortet werden.
4.4 Wird die Kommunikation durch eine Firewall-Regel geblockt, wird im IP-Router Trace die Meldung Filter (Port) ausgegeben.
In diesem Fall muss ein Firewall Trace erstellt werden, um zu prüfen, welche Firewall-Regel die Kommunikation blockt.
, which would give the following result (see figure).
All we see are SYN packets (as shown by the flag: S), which are being transported from the WAN (remote station NETAACHEN) to the LAN (INTRANET) but are not being answered with a SYN/ACK packet from the receiver.
5.4) If communication is being blocked by a firewall rule, the IP router trace will output the message Filter (port).
In this case, a Firewall trace has to be created to check which firewall rule is blocking the communication.
To do this, execute the command Führen Sie dazu den Befehl tr # firewall @ "port: <port>" aus (ze.Bg. tr # firewall @ "port: 46509").
In diesem Fall wird die Kommunikation durch die Firewall-Regel this example, communication is being blocked by the DENY-ALL geblockt firewall rule.
...
| Info |
|---|
In this case, the incoming communication must be allowed by means of an exception rule in the firewall (see step 3). |
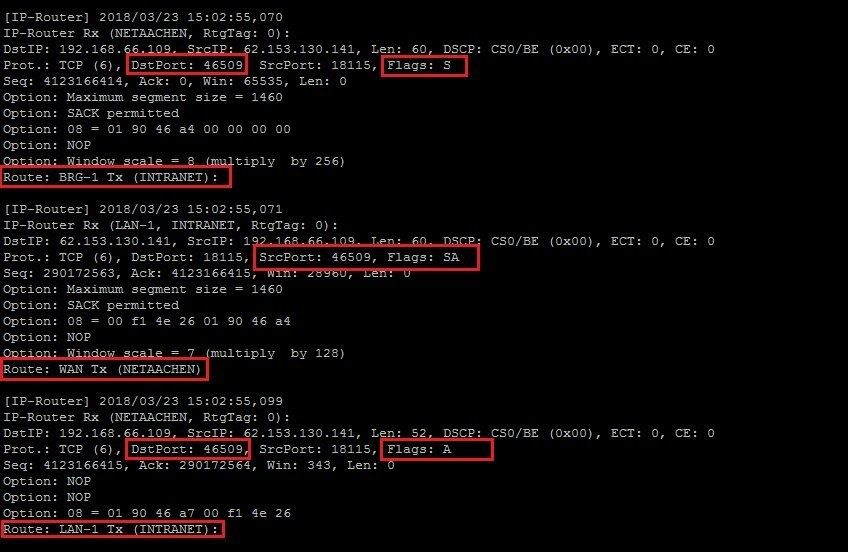
4.5 Wenn das Port-Forwarding vollständig funktionsfähig ist, sehen Sie im IP-Router Trace u.A. den stattfindenden TCP-Handshake:
...
5.5) If port forwarding is functioning properly, the IP router trace shows the TCP handshake taking place, among other things:
- The requesting client sends a SYN packet (as shown by the flag: S) with a sequence number to the destination port (here: 46509).
- If the port is open, the server acknowledges receipt of the first SYN packet and approves the connection by responding with a SYN/ACK packet (as shown by the flag: SA).
- Finally, the client confirms that it received the SYN/ACK packet by returning an ACK packet of its own (as shown by the flag: A) with the sequence number
...
- .
