...
| Info |
|---|
TCP connections are tracked via Connection Tracking and are synchronized to the Slave Firewall. However UTM functions such as IDS/IPS cannot be synchronized. Thus after a roll change all existing connections, which are scanned by a UTM function, are interrupted. |
| Hinweis |
|---|
The IP address range used for the "Cluster Interconnect" must not be used elsewhere (e.g. for the local network). Otherwise this will lead to routing problems! |
Requirements:
- LANCOM R&S®Unified Firewall with LCOS FX as of version 10.3
- Two Unified Firewalls of the same model as of UF-200 (except UF-50 and UF-100)
- The same firmware version has to be installed on both Unified Firewalls
- One Unified Firewall license
- Vollständig abgeschlossene Konfiguration auf der Firewall, welche als Master fungiert
- Mindestens ein freier Ethernet-Port auf beiden Geräten
- Der Switch im lokalen Netzwerk muss das Gratuitous ARP der Slave Firewall übertragen
- on the Master firewall
- The configuration on the Master Firewall has to be complete
- At least one free Ethernet port on both devices
- The Gratuitous ARP of the Slave Firewall has to be transmitted by the switch in the local network
- Web browser for configuring the Unified Firewall.
The following browsers are supportedWeb-Browser zur Konfiguration der beiden Unified Firewalls
Es werden folgende Browser unterstützt:- Google Chrome
- Chromium
- Mozilla Firefox
| Info |
|---|
An HA cluster can only be used in a scenario with a series connection or stand-alone operation. |
Scenario:
- The configuration and the cabling for the Ethernet ports has to be the same on both Unified Firewalls
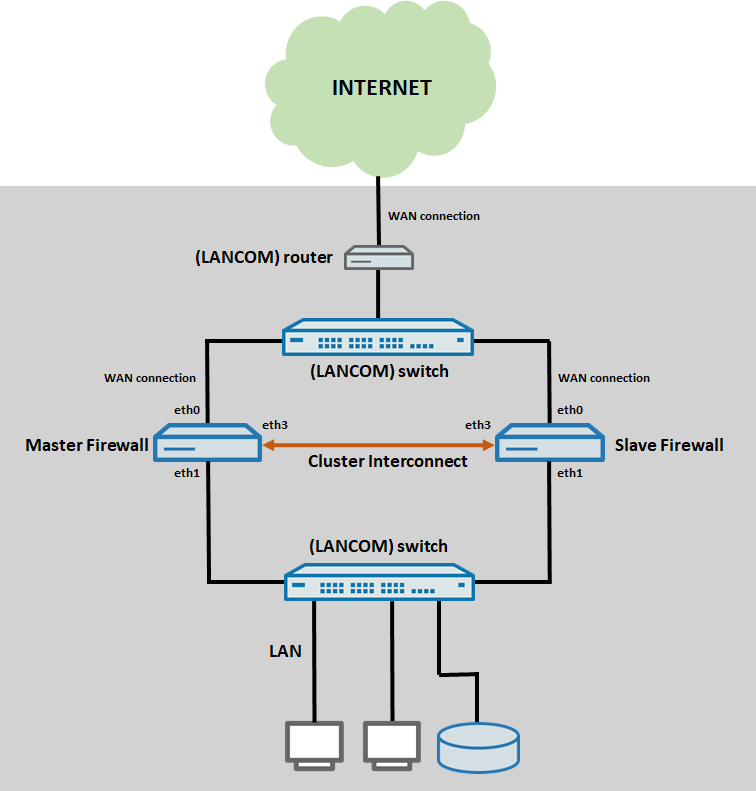
- eth0 is used for the internet connection to an upstream router and is connected to an intermediary switch
- eth1 is used for the local network and is connected to a switch
- eth3 is used for the connection between the two Unified Firewalls for the cluster synchronization
- eth0 wird für die Internet-Verbindung zum vorgeschalteten Router verwendet und geht zu einem zwischengeschalteten Switch
- eth1 wird für das lokale Netzwerk verwendet und geht zu einem Switch
- eth3 wird für die Verbindung der beiden Unified Firewalls zur Cluster-Synchronisation verwendet (Cluster Interconnect)
Procedure:
1. Konfiguration der ) Configuration of the Master Firewall:
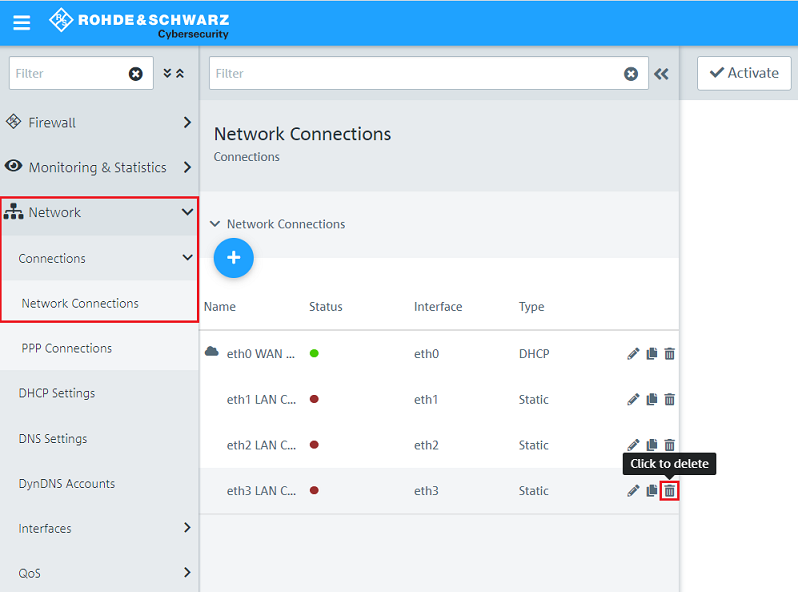
1.1 Öffnen Sie die Konfiguration der ) Open the configuration of the Unified Firewall im Browser und wechseln in das Menü Netzwerk → Verbindungen → Netzwerk-Verbindungen.in a browser and go to the menu Network → Connections → Network Connections.
A dedicated Ethernet port is necessary to set up an HA cluster. Therefore delete an unused Network Connection if the Interface is already in use (in this example the Network Connection which is assigned to the Interface eth3 has to be deletedFür den HA-Cluster Betrieb wird ein dedizierter Ethernet-Port benötigt. Löschen Sie daher eine nicht verwendete Netzwerk-Verbindung, sofern erforderlich (in diesem Beispiel muss die dem Interface eth3 zugewiesene Netzwerk-Verbindung gelöscht werden).
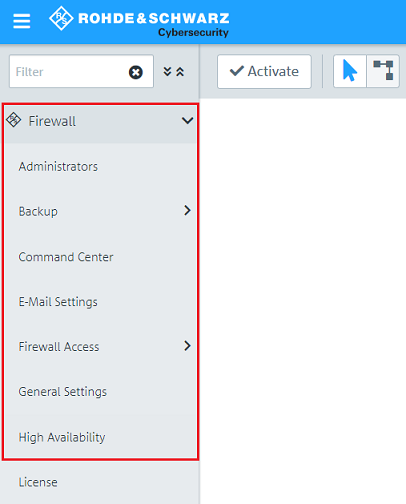
1.2 Wechseln Sie in das Menü Firewall → Hochverfügbarkeit) Go to the menu Firewall → High Availability.
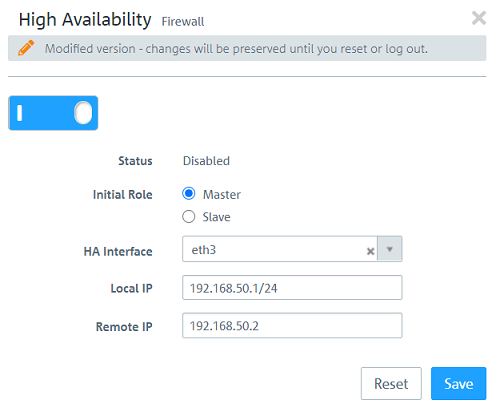
1.3 Aktivieren Sie die Hochverfügbarkeit über den Schieberegler und passen folgende Parameter an:) Activate the function High Availability via the slider and change the following parameters:
- Initial Role: Select the option Master.
- HA Interface: In the dropdown-menu select a free Ethernet port to be used for the synchronization between the two Unified Firewalls (in this example the port eth3).
- Local IP: Assign an IP address in CIDR format
- Initiale Rolle: Wählen Sie Master aus.
- HA-Interface: Wählen Sie im Dropdownmenü den freien Ethernet-Port aus, der für die Synchronisation zwischen den beiden Unified Firewalls verwendet werden soll (in diesem Beispiel der Port eth3).
- Lokale IP: Vergeben Sie eine IP-Adresse im CIDR-Format (Classless Inter Domain Routing) für die for the Master Firewall. Diese IP-Adresse bzw. dieses Netzwerk darf nicht bereits anderweitig verwendet werden.Remote-IP: Vergeben Sie eine IP-Adresse aus dem gleichen Netzwerk wie die Lokale IP für die Slave Firewall. IP-Adressen in einem anderen Netzwerk können nicht angesprochen werden This IP address / this network must not be used elsewhere in the configuration!
- Remote IP: Assign an IP address from the same network as the Local IP to the Slave Firewall. IP addresses in another network cannot be used.
1.4 Die Konfigurations-Schritte auf der Master Firewall sind damit abgeschlossen.) The configuration of the Master Firewall is thereby complete.
2) Configuration of the 2. Konfiguration der Slave Firewall:
2.1 Stellen Sie sicher, dass der gleiche Ethernet-Port wie auf der Master Firewall für die Synchronisierung verwendet werden kann, indem Sie - sofern erforderlich - die Netzwerkverbindung löschen (siehe Schritt ) Make sure, that the same Ethernet port as on the Master Firewall is available for the synchronization. Delete a Network Connection, if necessary (see step 1.1)).
| Hinweis |
|---|
Bei Verwendung der Hochverfügbarkeit müssen zwingend die gleichen Ethernet-Ports verwendet werden, da die Konfiguration identisch ist. |
2.2 Aktivieren Sie die Hochverfügbarkeit über den Schieberegler und passen folgende Parameter an:
For the function High Availability the use of the same Ethernet ports is mandatory, as the configuration is identical. |
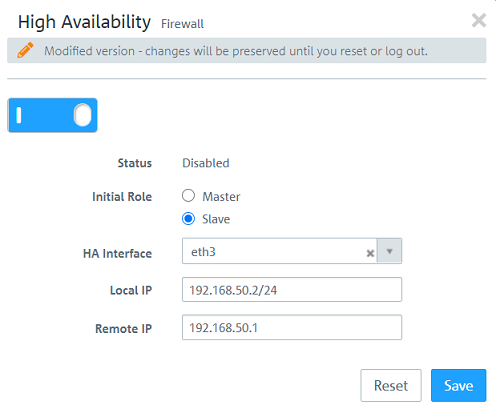
2.2) Activate the function High Availability via the slider and change the following parameters:
- Initial Role: Select the option Slave.
- HA Interface: In the dropdown-menu select a free Ethernet port to be used for the synchronization between the two Unified Firewalls (in this example the port eth3).
- Local IP: Assign the IP address of the Slave Firewall in CIDR format
- Initiale Rolle: Wählen Sie Slave aus.
- HA-Interface: Wählen Sie im Dropdownmenü den freien Ethernet-Port aus, der für die Synchrinisation zwischen den beiden Unified Firewalls verwendet werden soll (in diesem Beispiel der Port eth3).
- Lokale IP: Hinterlegen Sie die IP-Adresse der Slave Firewall im CIDR-Format (Classless Inter Domain Routing) , welche Sie in Schritt you assigned in step 1.3 als ) as the Remote - IP hinterlegt haben.
- Remote - IP: Hinterlegen Sie die IP-Adresse der Master Firewall, welche Sie in Schritt 1.3 als Lokale-IP hinterlegt habenAssign the IP address of the Master Firewall you assigned in step 1.3) as the Local IP.
2.3 Die Konfigurationsschritte auf der Slave Firewall sind damit abgeschlossen. Die Synchronisation wird nun durchgeführt) The configuration of the Slave Firewall is thereby complete. The synchrionization is now initiated.
| Hinweis |
|---|
After synchronizing the configuration the Slave Firewall cannot be reached via its web interface! |
3. Reading out the HA cluster status:
The current status of the HA cluster can be read out on the Master firewall in the Overview on the right side under High Availability.
4) Operating the HA cluster in the LMC (optional):
| Info |
|---|
The LMC supports the HA cluster, however it cannot be configured via Smart-Config in the LMC. Therefore the HA cluster has to be configured manually. |
| Hinweis |
|---|
Before conducting a role change on an HA cluster and pairing the cluster with the LMC, a valid license has to activated on the Master firewall (the demo license is not sufficient). |
4.1) Set up the HA cluster as described in steps 1) and 2).
4.2) Connect the Master Firewall to the LMC as described in the following Knowledge Base article in step 2.2.2):
Pairing a LANCOM device with the LMC
4.3) In the LMC menu Devices, the HA cluster is marked by a corresponding symbol (under Model).

