
| Seiteneigenschaften |
|---|
Description:
Wird eine Internet-Verbindung mit dynamischer IPv4-Adresse eingesetzt, müsste die neue IP-Adresse bei einem Wechsel umständlich bekanntgegeben werden. Um dies zu umgehen, besteht die Möglichkeit die aktuelle IP-Adresse an einen DynDNS-Dienst zu senden und die Verbindung zu dem Router über einen DNS-Namen aufzubauen. Die LANCOM Management Cloud bietet einen integrierten DynDNS-Dienst. Damit sind sowohl die Verwaltung der Router als auch der DynDNS-Dienst unter einem Dach.
If an Internet connection with a dynamic IPv4 address is used, the new IP address would have to be announced in a cumbersome way whenever the IP address changes. To bypass this issue the current IP address can be sent to a DynDNS service and a connection to the router or Unified Firewall can be established via a DNS name. The LANCOM Management Cloud features an integrated DynDNS service. Therefore the administration of the router or Unifed Firewall as well as the DynDNS service are under one roof.
This article describes the configuration steps for the DynDNS service in the LANCOM Management CloudIn diesem Artikel wird die Einrichtung des DynDNS-Dienstes in der LANCOM Management Cloud beschrieben.
Requirements:
- LCOS ab Version 10.42 RC3 (download aktuelle Version)
- Zugang zur LMC samt eigenem Projekt
- Bereits mit der LMC verbundener LANCOM Router samt gültiger LMC-Lizenz
- Bereits eingerichteter Standort mit zugewiesenem Netzwerk und Router
- Dem Router muss die Funktion Gateway zugewiesen sein
- Bereits eingerichteter und funktionsfähiger Internet-Zugang mit öffentlicher IPv4-Adresse auf dem Router
- Der Internet-Zugang kann wie folgt eingerichtet werden:
- manuell auf dem Router per LANconfig / WEBconfig
- manuell per Detail-Konfiguration der LMC
- automatisch über LMC-Addins
- Der Internet-Zugang kann wie folgt eingerichtet werden:
- as of version 10.42 on the LANCOM router or a LANCOM R&S®Unified Firewall with LCOS FX as of version 10.6 Rel
- Access to the LMC including your own project
- The LANCOM router or Unified Firewall has to be connected to the LMC including a valid LMC license
- Configured Site with assigned Network and router or Unified Firewall
- The Function Gateway has to be assigned to the router or Unified Firewall
- Configured and functional Internet connection with public IPv4 or IPv6 address on the router or Unified Firewall (as of august 2022, a Unified Firewall only supports IPv4)
- The Internet connection can be configured as follows:
- manually on the router via LANconfig / WEBconfig or via the webinterface on a Unified Firewall
- manually via the detail configuration in the LMC
- automatically via LMC addins
- The Internet connection can be configured as follows:
- Web browser for accessing the Web-Browser für den Zugriff auf die LMC
Procedure:
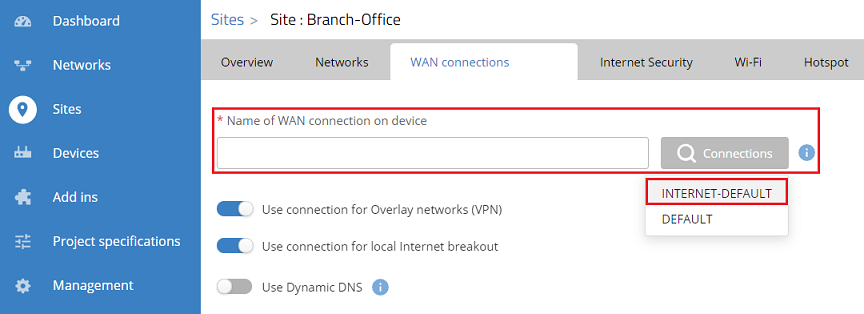
1) Connect to the LMC, click on Sites and select the used site.
...
| Info |
|---|
As an alternative you can also enter the name of the Internet connection manually. |
| Hinweis |
|---|
With a Unified Firewall the name of the Internet connection is not displayed in the dropdown menu. Therefore the name must be entered manually. If the name of the Internet connection isn't known, it can be looked up via the webinterface of the Unified Firewall in the menu Network → Connections → Network Connections (the connection with the green cloud symbol). Please note, that the name of the Internet connection in the Unified Firewall must be changed from the default setting, as the DynDNS service in the LMC doesn't support blanks. Furthermore the name must not begin with a number. It is expected, that both issues will be fixed in a future LMC version. On a Unified Firewall the DynDNS settings made by the LMC are not visible in the webinterface. |
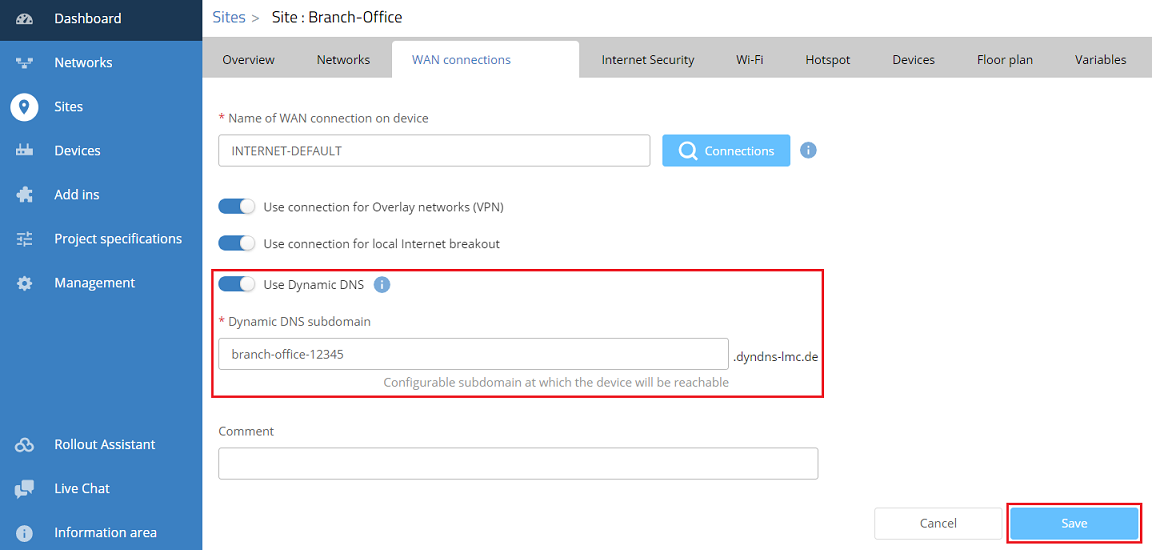
4. Aktivieren Sie die Funktion ) Activate the option Use Dynamic DNS verwenden, passen bei Bedarf die Dynamic DNS Subdomain an und klicken auf Speichern, adjust the Dynamic DNS subdomain if needed and click Save.
5. Wechseln Sie in das Menü Geräte, wählen den Router aus. der dem verwendeten Standort zugewiesen ist, und klicken auf das "Punkte-Symbol", um weitere Optionen aufzurufen.

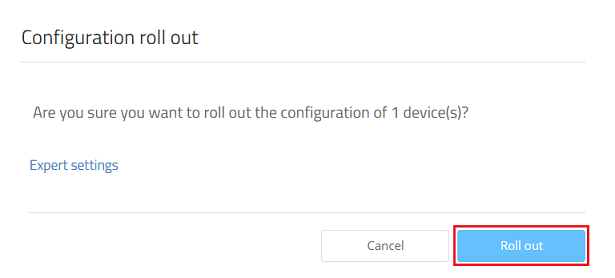
6. Klicken Sie auf Konfiguration ausrollen, um die vorgenommenen Einstellungen auf das Gerät zu übertragen.

7. Bestätigen Sie die Abfrage mit einem Klick auf Ausrollen.
| Info |
|---|
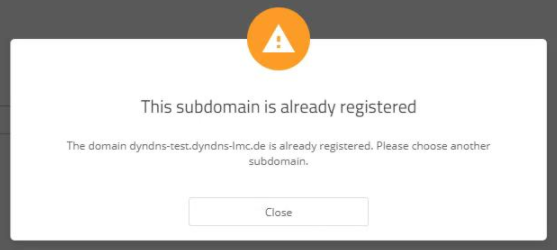
If a subdomain is entered, which is already in use, the error message This subdomain is already registered is displayed. In this case another subdomain has to be entered.
|
5) Go to the menu Devices, select the router which is assigned to the used site and click on the "dots" icon to gain access to the extended menu.
6) Click on Configuration roll out to transfer the configuration changes to the devices.
7) Acknowledge the query by clicking Roll out.
8) The configuration of the DynDNS service for a site is now complete.
| Info |
|---|
The current IP address can be read out in the menu Sites in the respective Site under WAN connections. Please check, if the displayed IP address matches the actual obtained or assigned IP address. The procedure to read out a dynamically assigned IP address is described in this Knowledge Base article.
|

...