
...
| Seiteneigenschaften |
|---|
Description:
In diesem Dokument ist beschrieben, wie eine IKEv2-Verbindung mit einem Mac/MacBook mit dem in macOS integrierten VPN Client zu einer This article describes how to set up an IKEv2 connection using a Mac/MacBook with the VPN client integrated in macOS to a LANCOM R&S®Unified Firewall eingerichtet werden kann.
Requirements:
- LANCOM R&S®Unified Firewall mit with LCOS FX ab Version as of version 10.4
- Bereits eingerichtete und funktionsfähige Internet-Verbindung auf der A configured and functional Internet connection on the Unified Firewall
- Apple MacBook oder or Mac mit macOS ab Version with macOS as of version 11 Big Sur (auch mit dem also with the Apple M1 Prozessorprocessor)
- Web -Browser zur Konfiguration der browser for configuring the Unified Firewall.
Es werden folgende Browser unterstützt
The following browsers are supported:- Google Chrome
- Chromium
- Mozilla Firefox
Scenario:
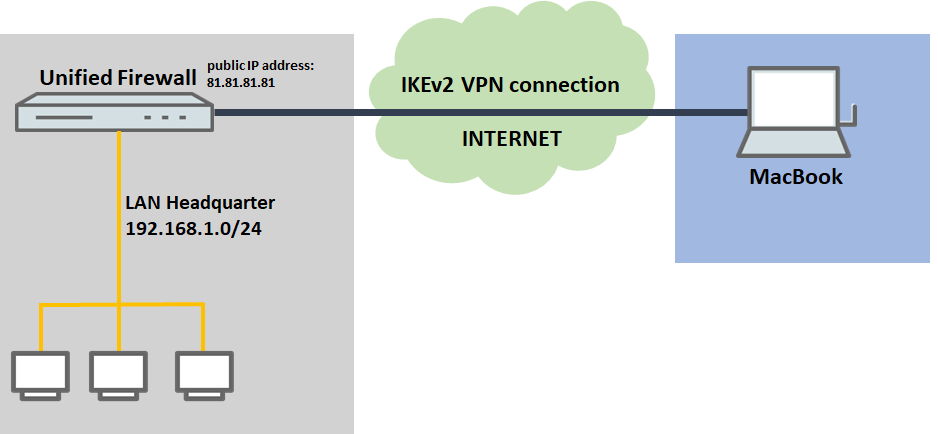
1. Die ) The Unified Firewall ist direkt mit dem Internet verbunden und verfügt über eine öffentliche IPv4-Adresse:
...
is connected directly to the Internet and has a public IPv4 address:
- A company wants its sales representatives to have access to the corporate network via an IKEv2 client-to-site connection.
- The employees use MacBooks.
- The company headquarters has a Unified Firewall as a gateway. It has an Internet connection with the fixed public IP address
...
- 81.81.81.81.
...
- The local network at the headquarters has the IP address range 192.168.1.0/24.
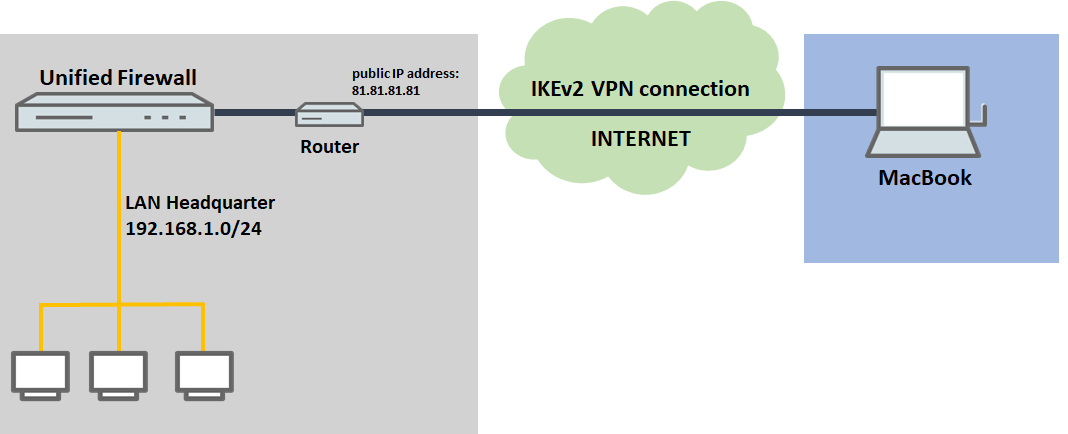
2. Die ) The Unified Firewall geht über einen vorgeschalteten Router ins Internet:
...
is connected to the Internet via an upstream router:
- A company wants its sales representatives to have access to the corporate network via an IKEv2 client-to-site connection.
- The employees use MacBooks.
- The company headquarters has a Unified Firewall as the gateway and an upstream router for the Internet connection. The router has the fixed public IP address
...
- 81.81.81.81.
...
- The local network at the headquarters has the IP address range 192.168.1.0/24.
Procedure:
Die Einrichtung ist bei Szenario 1 und 2 grundsätzlich gleich. Bei Szenario 2 muss zusätzlich ein Port- und Protokollforwarding auf dem vorgeschalteten Router eingerichtet werden (siehe Abschnitt The setup for scenarios 1 and 2 are basically the same. Scenario 2 additionally requires port and protocol forwarding to be set up on the upstream router (see section 3).
1. Konfigurationsschritte auf der ) Configuration steps on the Unified Firewall:
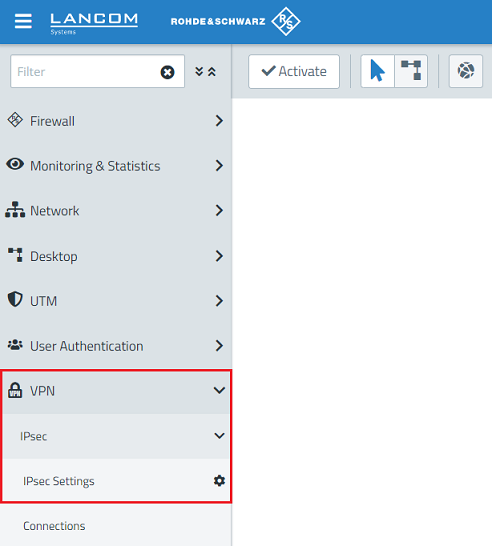
1.1 Verbinden Sie sich mit der Konfigurationsoberfläche der Unified Firewall und wechseln in das Menü VPN → IPSec-Einstellungen) Connect to the configuration interface of the Unified Firewall and navigate to the menu VPN → IPsec → IPsec Settings.
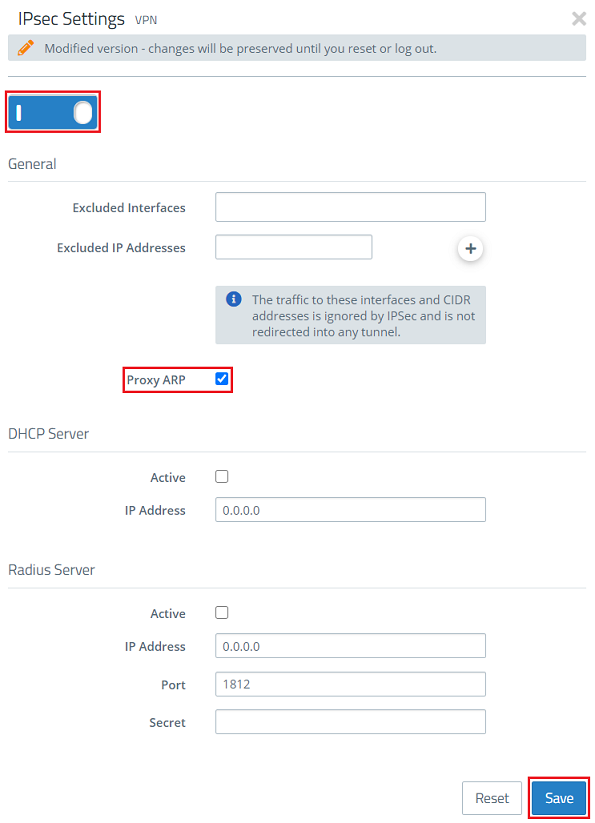
1.2 Aktivieren Sie IPSec und die Option Proxy-ARP und klicken anschließend auf Speichern) Activate IPsec and the option Proxy ARP and then click on Save.
| Info |
|---|
Mit aktivem Proxy-ARP antwortet die Unified Firewall auf ARP-Anfragen aus lokalen Netzwerken auf eine virtuelle IP-Adresse eines VPN-Clients mit der eigenen MAC-Adresse. Dadurch können VPN-Clients so eingebunden werden, als würden sich diese im lokalen Netzwerk befindenWith proxy ARP active, the Unified Firewall responds to ARP requests from local networks by sending its own MAC address to the virtual IP address used by the VPN client. This allows VPN clients to be integrated as if they were in the local network. |
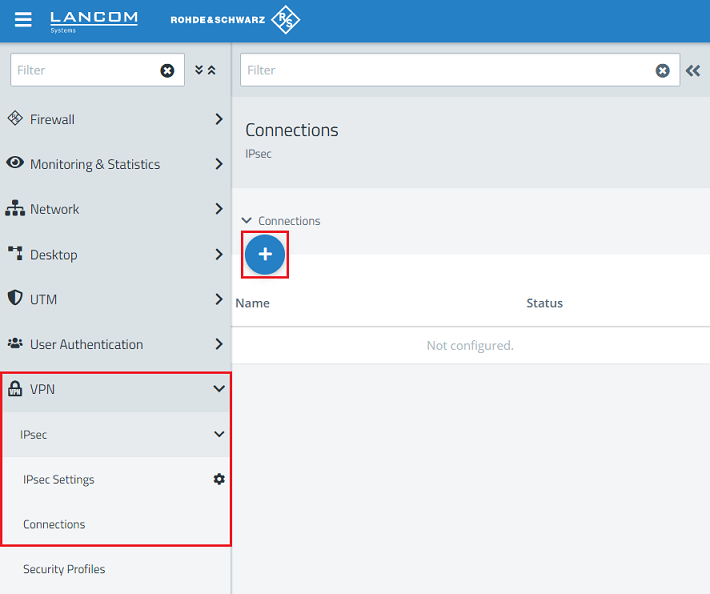
1.3 Wechseln Sie in das Menü ) Switch to the menu VPN → IPSec → Verbindungen und klicken auf das "Plus-Symbol", um eine neue IPSec-Verbindung zu erstellenIPsec → Connections and click on the “+” icon to create a new IPsec connection.
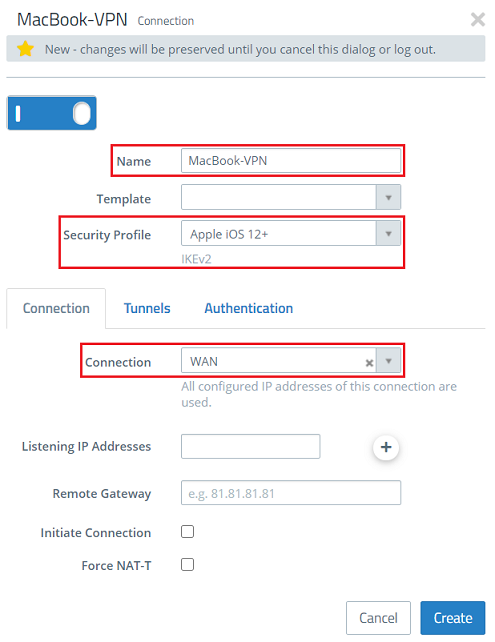
1.4 Passen Sie die folgenden Parameter an) Change the following parameters:
- Name: Enter a descriptive name.
- Security Profile: Here you select the ready-made profile Vergeben Sie einen aussagekräftigen Namen.Sicherheits-Profil: Wählen Sie hier das vorgefertigte Profil Apple iOS 12+ aus.
- Verbindung: Wählen Sie Ihre konfigurierte Internet-Verbindung aus.
- Connection: Select your configured Internet connection.
If you have created your own template or security profile, you can use these hereWenn Sie eine eigene Vorlage oder ein eigenes Sicherheits-Profil erstellt haben, können Sie diese hier ebenfalls verwenden.
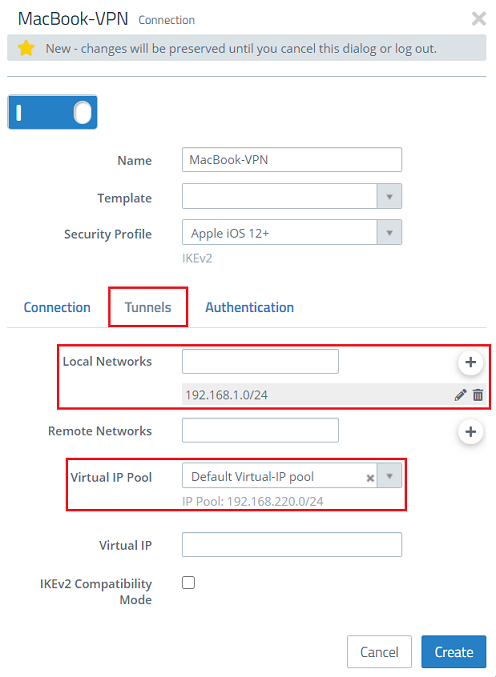
1.5 Wechseln Sie in den Reiter Tunnel und passen folgende Parameter an:) Change to the Tunnels tab and modify the following parameters:
- Local networks: Using CIDR notation, specify the local networks to be accessed by the VPN client (in this example the local network at the headquarters with the address range Lokale Netzwerke: Geben Sie die lokalen Netzwerke in CIDR-Notation an, welche vom VPN-Client erreicht werden sollen (in diesem Beispiel das lokale Netzwerk der Zentrale mit dem Adressbereich 192.168.1.0/24).
- Virtueller Virtual IP - Pool: Wählen Sie die Option Default Virtual-IP pool aus. Virtuelle IP-Pools können verwendet werden, um verbundenen VPN-Clients IP-Adressen-Konfigurationen zu sendenSelect the option Default virtual IP pool. Virtual IP pools can be used to send IP address configurations to connected VPN clients.
| Info |
|---|
If an IP address from a local network should be assigned to the VPN client instead of an address from the Virtual IP Pool (via the field Virtual IP), Route-based IPSec has to be activated and a routing entry for the VPN interface has to be created in the Routing Table 254 which refers to the virtual IP address in the local network. |
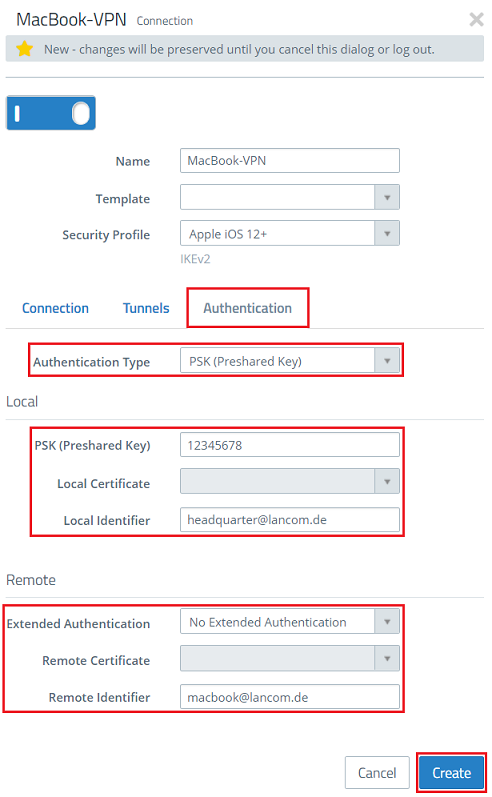
1.6 Wechseln Sie in den Reiter Authentifizierung, passen die folgenden Parameter an und klicken auf Erstellen:) Switch to the tab Authentication, adjust the following parameters and click Create:
- Authentication Type: Select the option PSK Authentifizierungstyp: Wählen Sie die Option PSK (Preshared Key) aus.
- PSK (Preshared Key): Vergeben Sie einen Preshared Key für diese Verbindung.Set a preshared key for this connection.
- Local Identifier: Set the local identity as FQUN (in this example headquarter@lancomLokaler Identifier: Vergeben Sie die Lokale Identität als FQUN ein (in diesem Beispiel zentrale@lancom.de).
- Remote Identifier: Vergeben Sie die Entfernte Identität als Set the Remote Identifier as a FQUN ein (in diesem Beispiel this example macbook@lancom.de).
| Hinweis |
|---|
Der Local und Remote Identifier dürfen nicht übereinstimmenThe local and remote identifiers must not match! |
1.7 Klicken Sie auf das Symbol zum Erstellen eines neuen VPN-Hosts) Click the icon to create a new VPN host.
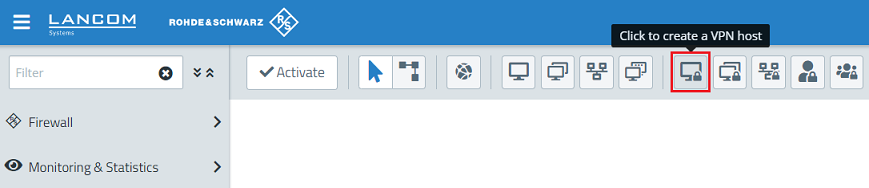
1.8 Passen Sie die folgenden Parameter an und klicken auf Erstellen) Modify the following parameters and then click Create:
- Name: Vergeben Sie einen aussagekräftigen NamenEnter a descriptive name.
- VPN -Verbindungstyp: Wählen Sie den Typ Connection Type: Select the type IPsec.
- IPsec -Verbindung: Wählen Sie im Dropdownmenü die in Schritt Connection: From the drop-down menu, select the VPN connection created in steps 1.4 - 1.6 erstellte VPN-Verbindung aus.
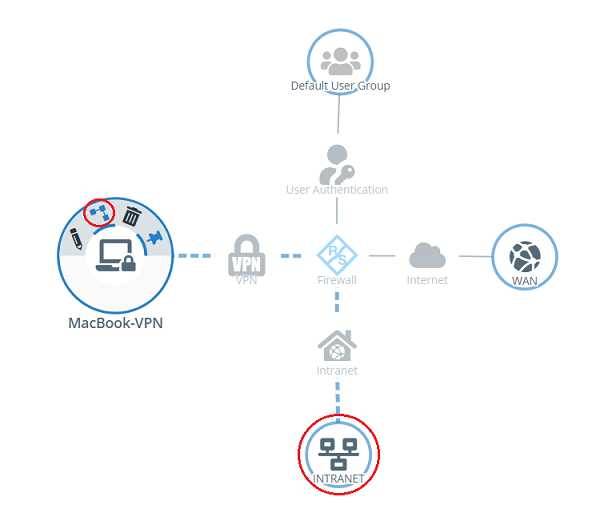
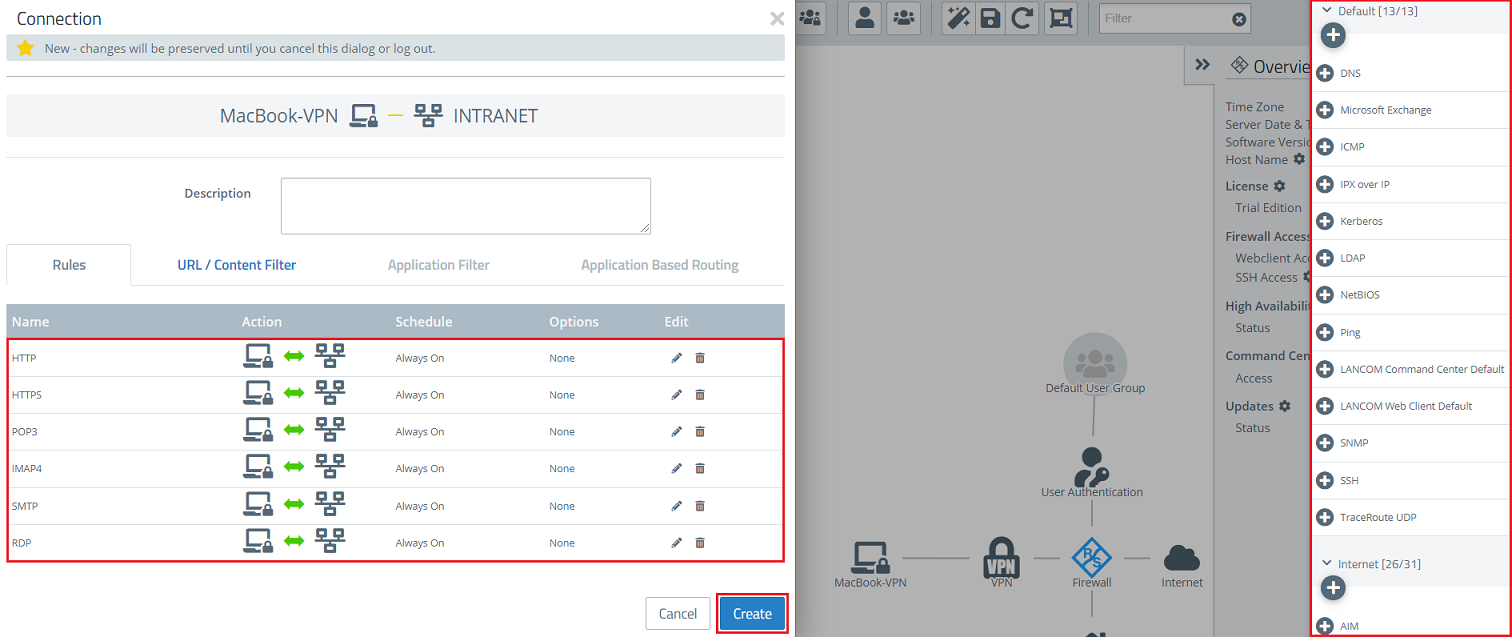
1.9 Klicken Sie auf dem Desktop auf den VPN-Host, wählen das "Verbindungswerkzeug" aus und klicken anschließend auf das Netzwerk-Objekt, auf welches der Mac / das MacBook zugreifen können soll, damit die Firewall-Objekte geöffnet werden) On the Desktop, click on the VPN host, select the “connection tool” icon and then select the network object that the Mac/MacBook should access. This opens the firewall object.
1.10 Weisen Sie über die "Plus-Zeichen" die erforderlichen Protokolle dem VPN-Host zu und klicken anschließend auf Erstellen) Use the “+” sign to assign the required protocols to the VPN host and then click Create.
| Info |
|---|
Eine A Unified Firewall verwendet eine Deny-All Strategie. Die Kommunikation muss also explizit erlaubt werdenuses a deny-all strategy. You therefore have to explicitly allow communication. |
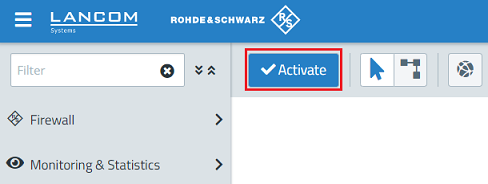
1.11 Klicken Sie zuletzt in der Firewall auf Aktivieren, damit die Konfigurations-Änderungen umgesetzt werden) Finally, implement the configuration changes by clicking Activate in the firewall.
1.12 Die Konfigurationsschritte auf der ) This concludes the configuration steps on the Unified Firewall sind damit abgeschlossen.
2. Manuelle Einrichtung der VPN-Verbindung auf dem ) Manual setup of the VPN connection on the Mac/MacBook:
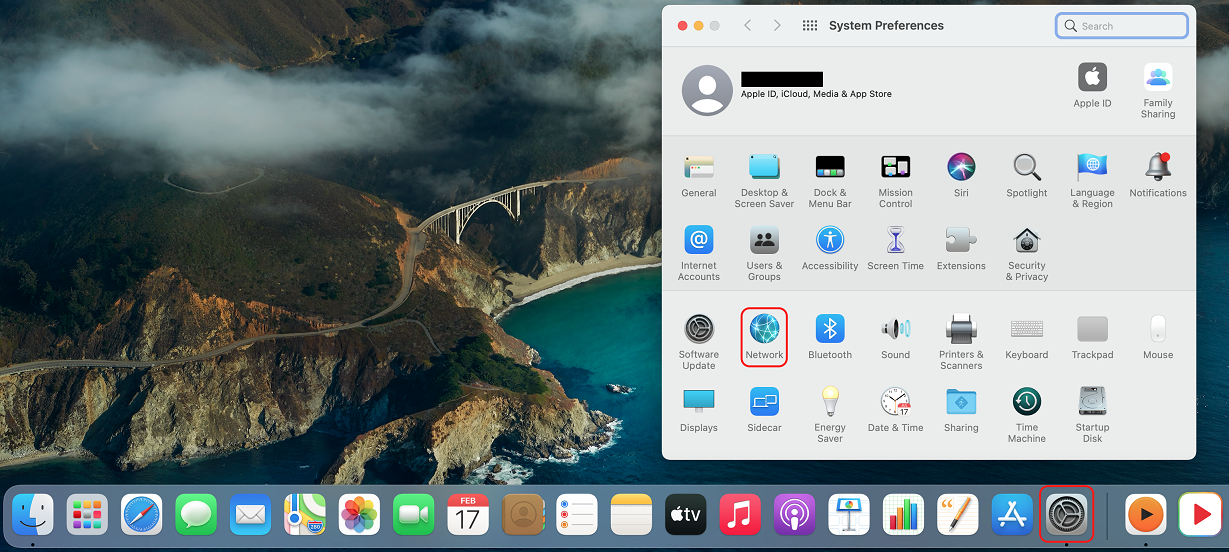
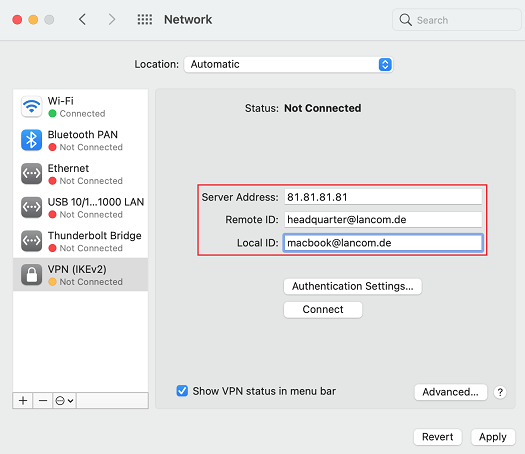
2.1 Klicken Sie in der Taskleiste Ihres Mac/MacBook auf das Symbol für die Systemeinstellungen und wechseln dort in das Menü Netzwerk) Click the System Preferences icon in the Dock of your Mac/MacBook and then switch to the menu Network.
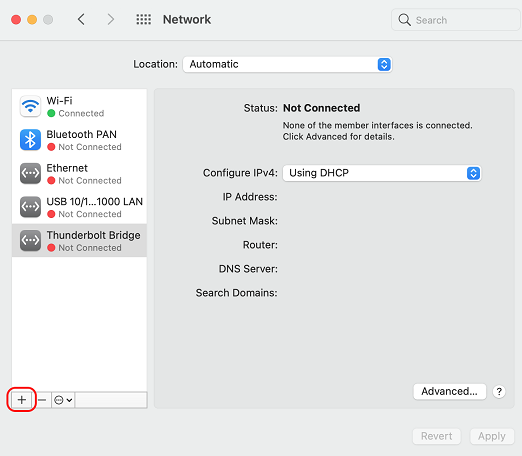
2.2 Klicken Sie auf das "Plus" Zeichen, um eine neue Netzwerk-Verbindung zu erstellen) Click on the “+” icon to create a new network connection.
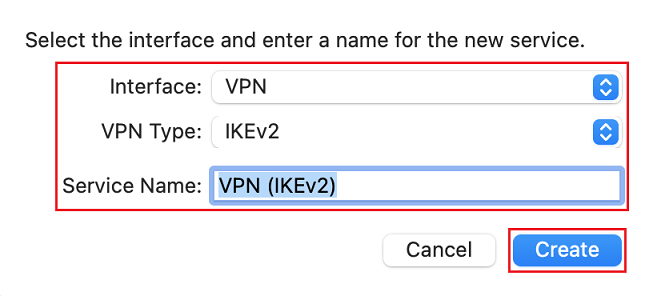
2.3 Passen Sie folgende Parameter an und klicken auf Erstellen:) Modify the following parameters and then click Create:
- Interface: From the drop-down menu, select the option VPN.
- VPN Type: From the drop-down menu, select the option IKEv2.
- Service Name: Give the VPN connection a descriptive name
- Anschluss: Wählen Sie im Dropdownmenü die Option VPN aus.
- VPN-Typ: Wählen Sie im Dropdownmenü die Option IKEv2 aus.
- Dienstname: Vergeben Sie einen aussagekräftigen Namen für die VPN-Verbindung.
2.4 Passen Sie die folgenden Parameter an) Change the following parameters:
- Server address: Specify the public IPv4 address or the DNS name where the Unified Firewall can be reached.
- Remote ID: Enter the remote ID as a FQUN (also see the local identifier in step 1.6). This example uses the address headquarter@lancom.de.
- Local ID : Enter the local ID as a FQUN (also see the remote identifier in step 1.6 ). This example uses the address macbook@lancom.de
- Serveradresse: Geben Sie die öffentliche IPv4-Adresse oder den DNS-Namen an, unter der die Unified Firewall erreichbar ist.
- Entfernte ID: Geben Sie die Entfernte Identität als FQUN an (siehe auch der Lokaler Identifier in Schritt 1.6). In diesem Beispiel wird die Identität zentrale@lancom.de verwendet.
- Lokale ID: Geben Sie die Lokale Identität als FQUN an (siehe auch der Remote Identifier in Schritt 1.6). In diesem Beispiel wird die Identität macbook@lancom.de verwendet.
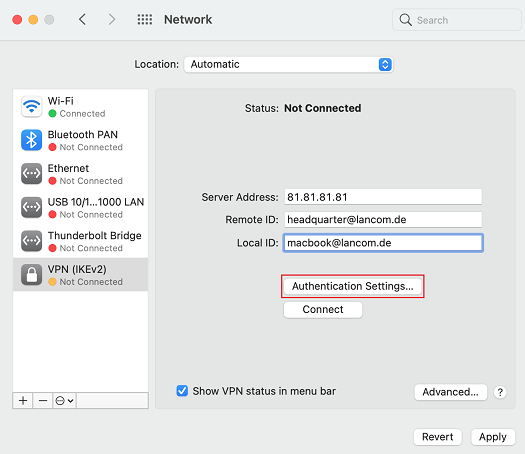
2.5 Wechseln Sie in das Menü Authentifizierungseinstellungen) Go to the menu Authentication Settings.
2.6 Wählen Sie die Option Ohne aus und geben bei Schlüssel ("Shared Secret") den Preshared-Key ein, den Sie in Schritt 1.6 als PSK (Preshared Key) hinterlegt haben) Select the option None and, under Shared secret, enter the pre-shared key that you set as the PSK (Preshared Key) in step 1.6.
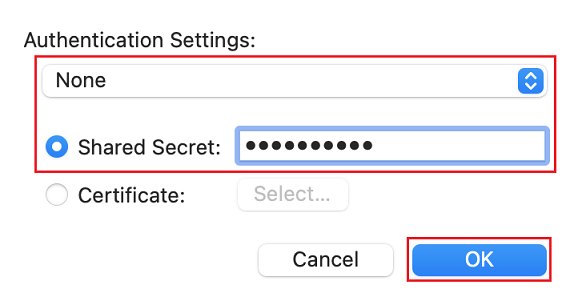
2.7 Die Konfiguration der VPN-Verbindung auf dem ) This concludes the configuration of the VPN connection on the Mac/MacBook ist damit abgeschlossen.
3. Einrichtung eines Port- und Protokoll-Forwarding auf einem LANCOM Router (nur Szenario 2):
Für IPSec werden die UDP-Ports 500 und 4500 sowie das Protokoll ESP benötigt. Diese müssen auf die Unified Firewall weitergeleitet werden.
Werden die UDP-Ports 500 und 4500 weitergeleitet, wird das Protokoll ESP automatisch mit weitergeleitet.
| Info |
|---|
Sollte ein Router eines anderen Herstellers verwendet werden, erfragen Sie die Vorgehensweise bei dem jeweiligen Hersteller. |
| Hinweis |
|---|
Werden die UDP-Ports 500 und 4500 sowie das Protokoll ESP auf die Unified Firewall weitergeleitet, kann eine IPSec-Verbindung auf dem LANCOM Router nur noch verwendet werden, wenn diese in HTTPS gekapselt wird (IPSec-over-HTTPS). Ansonsten kann keine IPSec-Verbindung mehr aufgebaut werden! |
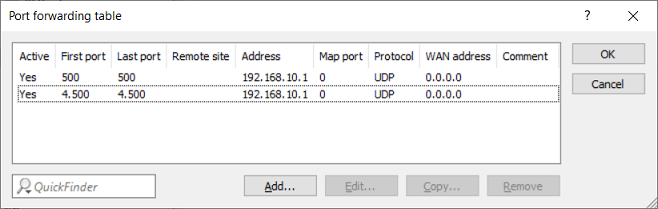
3.1 Öffnen Sie die Konfiguration des Routers in LANconfig und wechseln in das Menü IP-Router → Maskierung → Port-Forwarding-Tabelle.
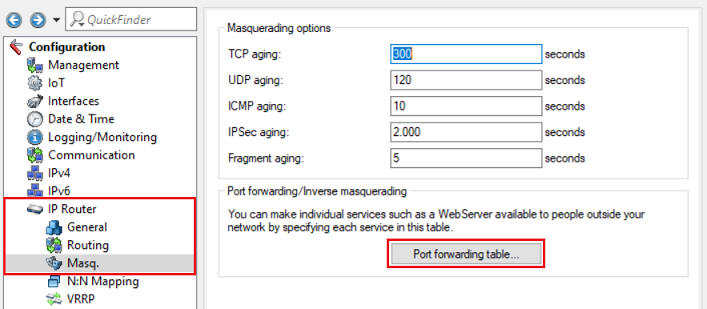
3.2 Hinterlegen Sie folgende Parameter:
- Anfangs-Port: Hinterlegen Sie den Port 500.
- End-Port: Hinterlegen Sie den Port 500.
- Intranet-Adresse: Hinterlegen Sie die IP-Adresse der Unified-Firewall im Transfernetz zwischen Unified Firewall und LANCOM Router.
- Protokoll: Wählen Sie im Dropdown-Menü UDP aus.
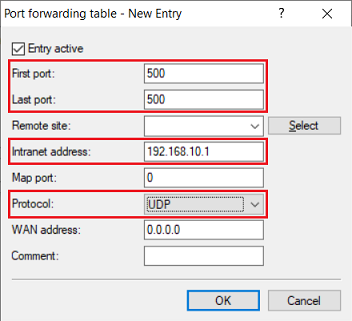
3.3 Erstellen Sie einen weiteren Eintrag und hinterlegen den UDP-Port 4500.
) Setting up port and protocol forwarding on a LANCOM router (scenario 2 only):
IPsec requires the use of the UDP ports 500 and 4500 as well as the protocol ESP. These must be forwarded to the Unified Firewall.
Forwarding the UDP ports 500 and 4500 automatically causes the ESP protocol to be forwarded.
| Info |
|---|
If you are using a router from another manufacturer, approach them for information about the appropriate procedure. |
| Hinweis |
|---|
If the UDP ports 500 and 4500 and the ESP protocol are forwarded to the Unified Firewall, an IPsec connection to the LANCOM router can only be used if it is encapsulated in HTTPS (IPsec-over-HTTPS). Otherwise, no IPsec connection will be established. |
3.1) Open the configuration for the router in LANconfig and switch to the menu item IP router → Masq. → Port forwarding table.
3.2) Enter the following parameters:
- First port: Specify the port 500.
- Last port: Specify the port 500.
- Intranet address: Specify the IP address of the Unified Firewall in the intermediate network between the Unified Firewall and the LANCOM router.
- Protocol : From the drop-down menu, select UDP .
3.3) Create a further entry and specify the UDP port 4500.
3.4) Write the configuration back to the router3.4 Schreiben Sie die Konfiguration in den Router zurück.