
...
| Seiteneigenschaften |
|---|
Description:
In bestimmten Szenarien ist es erforderlich, dass Geräte im lokalen Netzwerk über Angabe des DNS-Namens die öffentliche IP-Adresse der Internet-Verbindung aufrufen und per Portforwarding auf einen Server im lokalen Netzwerk zugreifen (Hairpin-NAT bzw. NAT-Reflection).certain scenarios it can be necessary, that devices in the local network invoke the IP address of the Internet connection (e.g. via DNS name) and access a server in the local network via portforwarding (Hairpin NAT or NAT reflection).
This article describes how to set up hairpin NAT on a Unified FirewallIn diesem Artikel wird beschrieben, wie Hairpin-NAT auf einer Unified Firewall eingerichtet werden kann.
| Hinweis |
|---|
Hairpin -NAT funktioniert nur im Standalone-Betrieb und mit einer Reihenschaltung. In einem Szenario mit der Layer-3 Schleife funktioniert Hairpin-NAT nicht, da der LANCOM Router die ausgehenden Pakete direkt auf sein WAN-Interface leitet!NAT only works in stand-alone operation and with a series connection. Hairpin NAT does not work with a layer-3 loop, because the LANCOM router forwards the outgoing packets directly to its WAN interface. |
Requirements:
- LANCOM R&S®Unified Firewall as of of LCOS FX 10.3
- Szenario mit einer Scenario with a Unified Firewall im Stand-Alone Betrieb oder mit einer Reihenschaltung
- Bereits eingerichtete und funktionsfähige Internet-Verbindung auf der Unified Firewall
- Internet-Verbindung mit fester öffentlicher IPv4-Adresse
- Bereits eingerichtetes und funktionsfähiges Portforwarding auf der Unified Firewall
- in stand-alone operation or with a series connection
- A configured and functional Internet connection on the Unified Firewall
- Internet connection with a fixed public IPv4 address
- Configured and functional port forwarding on the Unified Firewall
- Web browser for configuring the Unified Firewall.
The following browsers are supportedWeb-Browser zur Konfiguration der Unified Firewall.
Es werden folgende Browser unterstützt:- Google Chrome
- Chromium
- Mozilla Firefox
Scenario:
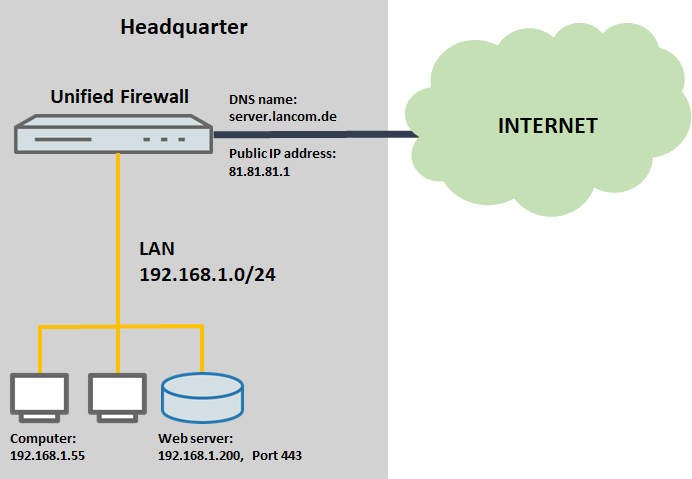
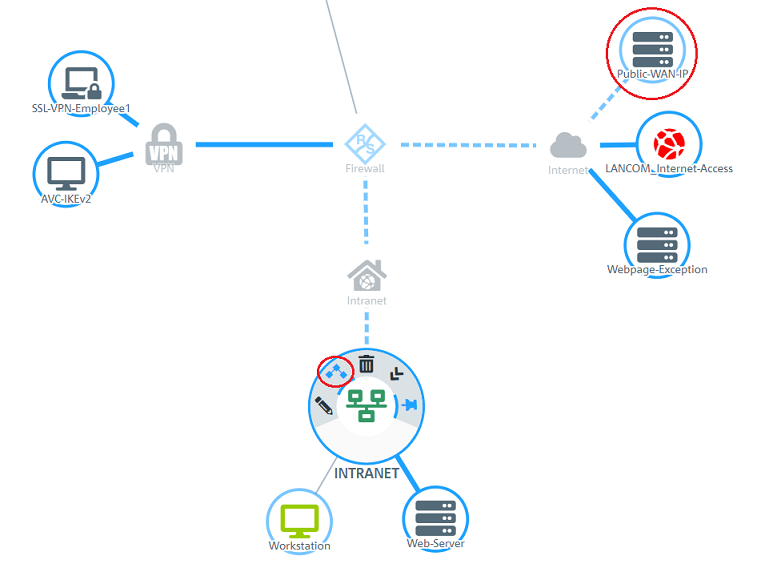
1. Die Unified Firewall ist direkt mit dem Internet verbunden) The Unified Firewall is directly connected to the Internet
- The Unified Firewall establishes the Internet connection. It has the public IP address Die Unified Firewall baut die Internet-Verbindung auf. Diese hat die öffentliche IP-Adresse 81.81.81.1. Die öffentliche IP-Adresse ist mit dem DNS-Namen The public IP address is linked with the DNS name server.lancom.de verknüpft..
- A web server on the local network of the Unified Firewall has the IP address Ein Web-Server im lokalen Netzwerk der Unified Firewall mit der IP-Adresse 192.168.1.100 ist aus dem Internet per HTTPS erreichbar. and is reached from the Internet via HTTPS.
- A computer on the local network with the IP address Ein Computer im lokalen Netzwerk mit der IP-Adresse 192.168.1.55 soll über den DNS-Namen needs to access the web server on the local network using the DNS name server.lancom.de auf den Web-Server im lokalen Netzwerk zugreifen .

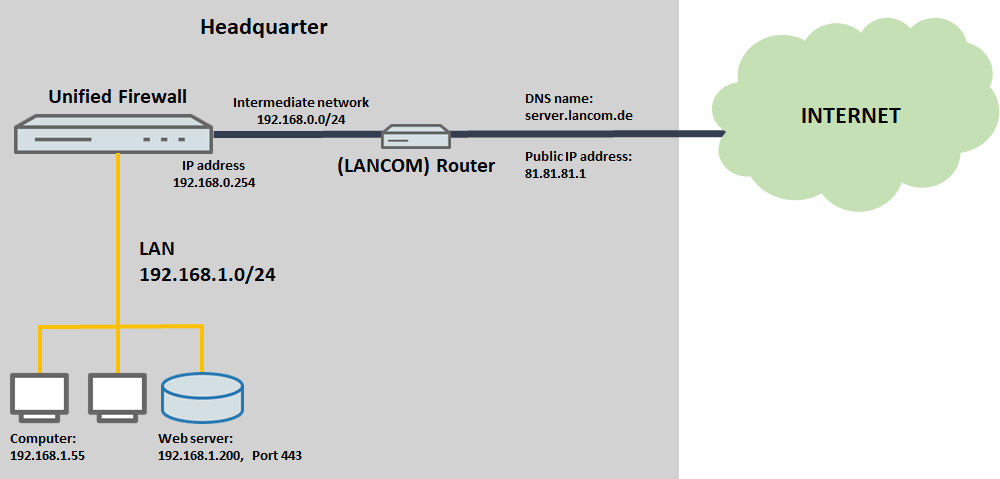
2. Ein Router vor der Unified Firewall baut die Internet-Verbindung auf) The router upstream from the Unified Firewall establishes the Internet connection
- A router upstream from the Unified Firewall establishes the Internet connection. It has the public IP address Ein vorgeschalteter Router vor der Unified Firewall baut die Internet-Verbindung auf. Dieser hat die öffentliche IP-Adresse 81.81.81.1. Die öffentliche IP-Adresse ist mit dem DNS-Namen The public IP address is linked with the DNS name server.lancom.de verknüpft.
- Die Unified Firewall und der vorgeschaltete Router sind beide Mitglied im Transfer-Netzwerk The Unified Firewall and the upstream router are both members of the intermediate network 192.168.0.0/24. Die In this network, the Unified Firewall hat dort die IP-Adresse has the IP address 192.168.0.254.
- Ein Web-Server im lokalen Netzwerk der Unified Firewall mit der IP-Adresse A web server on the local network of the Unified Firewall has the IP address 192.168.1.100 ist aus dem Internet per HTTPS erreichbar. and is reached from the Internet via HTTPS.
- A computer on the local network with the IP address Ein Computer im lokalen Netzwerk mit der IP-Adresse 192.168.1.55 soll über den DNS-Namen needs to access the web server on the local network using the DNS name server.lancom.de auf den Web-Server im lokalen Netzwerk zugreifen.

Procedure:
Die Vorgehensweise ist in beiden Szenarien gleich.
The procedure is the same for both scenarios.
1) Setting up the hairpin 1. Einrichtung des Hairpin- NAT:
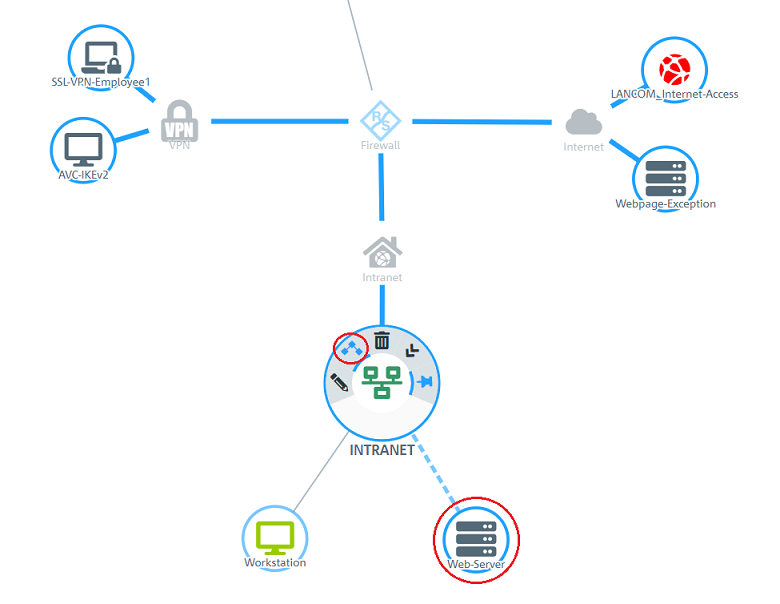
1.1 Öffnen Sie die Konfiguration der Unified Firewall im Browser.) Open the configuration of the Unified Firewall in a browser.
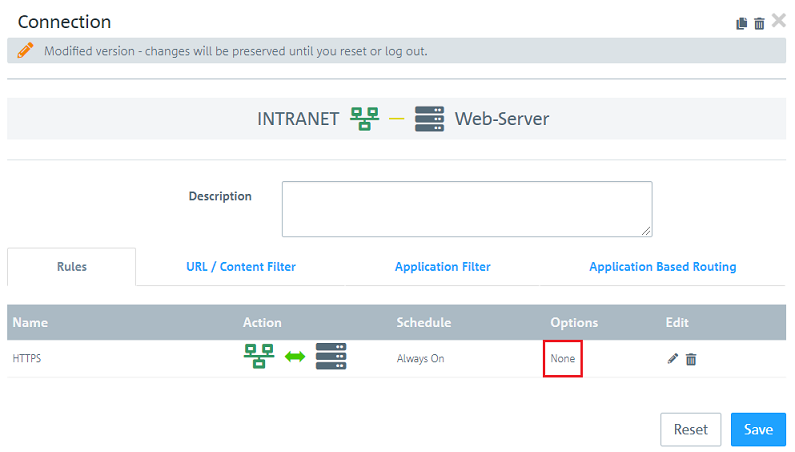
On the desktop, click the network object (in this example the network INTRANET). In the context menu, select the connection tool and click on the host object for which the port forwarding is set up (in this example the object web serverKlicken Sie auf auf dem Desktop auf das Netzwerk-Objekt (in diesem Beispiel das Netzwerk INTRANET). wählen im Kontextmenü das Verbindungswerkzeug aus und klicken auf das Host-Objekt, für welches das Portforwarding eingerichtet ist (in diesem Beispiel das Objekt Web-Server).
1.2 Wählen Sie das Protokoll aus, mit dem der Computer im lokalen Netzwerk auf den Web-Server zugreifen soll) Choose the protocol used by the computer on the local network to access the web server.
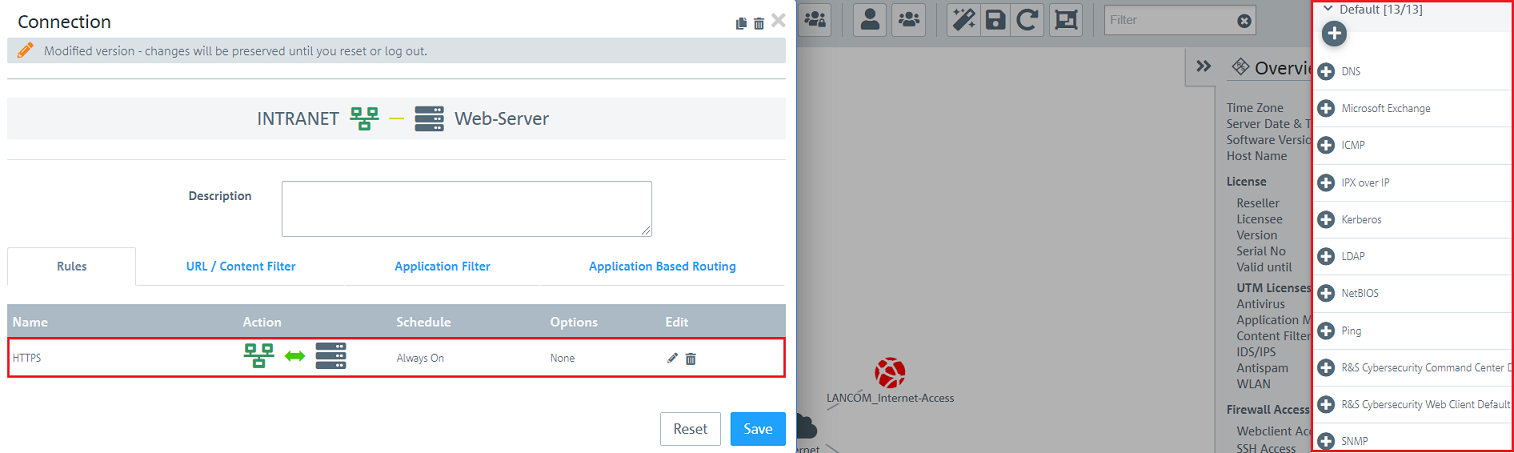
1.3 Klicken Sie bei Optionen auf None, um weitere Einstellungen vorzunehmen) Under Options, click None to make further settings.
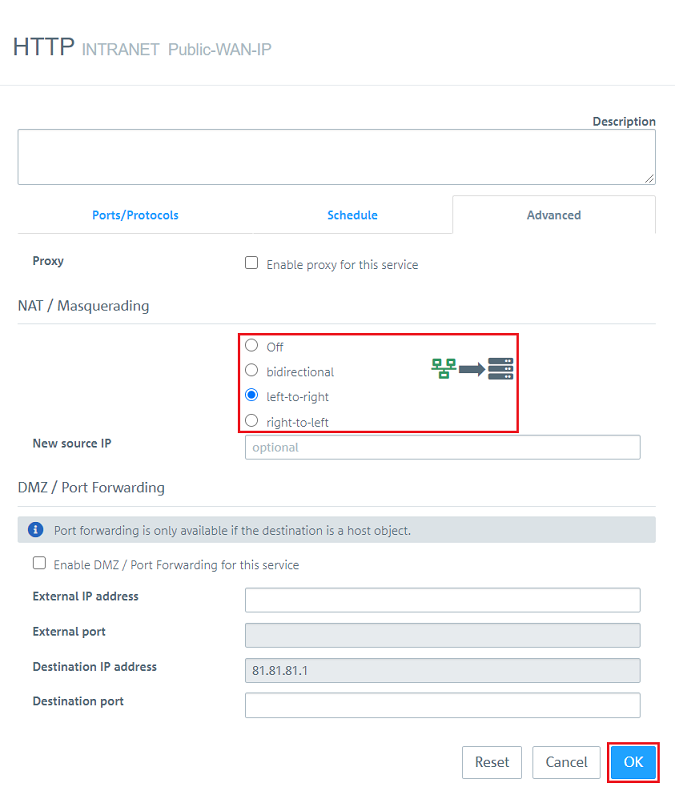
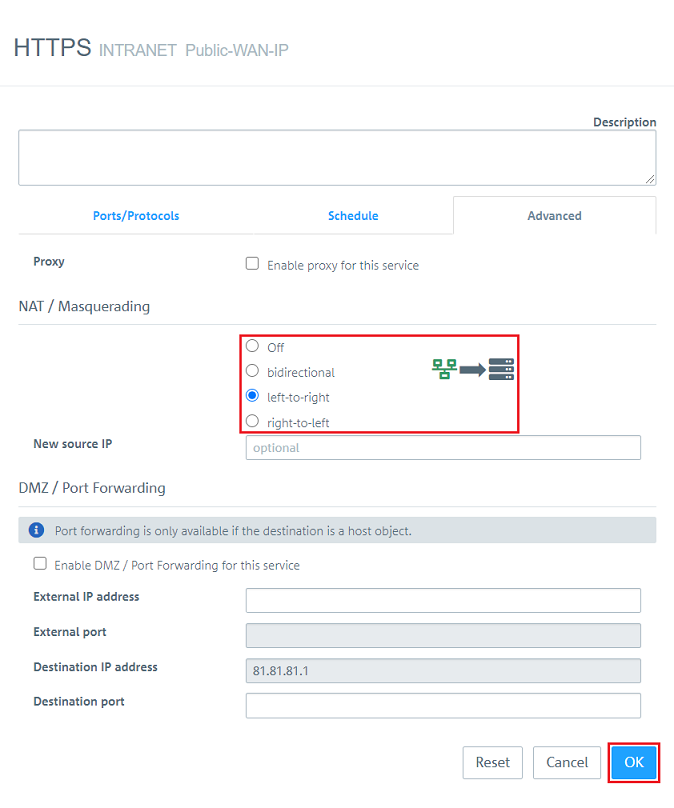
1.4 Passen Sie folgende Parameter an:) Enter the following parameters:
- Set the Wählen Sie bei NAT / Masquerading die Option to the option left-to-right aus.
- Aktivieren Sie die Option Enable DMZ Activate the option Enable DMZ / Port Forwarding for this service.
- Tragen Sie bei Under External IP address die , enter the WAN -IP-Adresse der IP address of the Unified Firewall an (in diesem Beispiel die IP-Adresse this example the IP address 81.81.81.1).
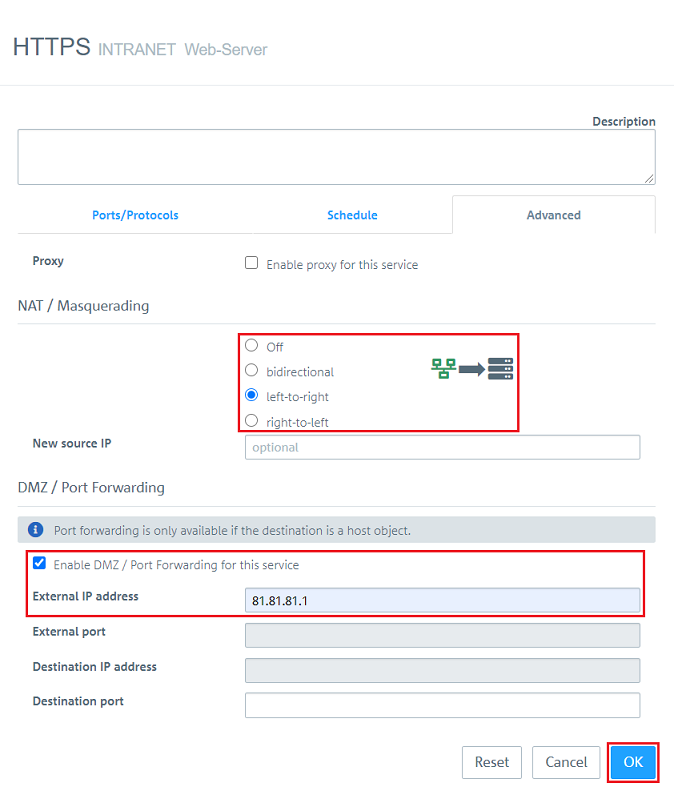
1.5 Klicken Sie auf .) Click on Save.

1.6 Klicken Sie auf Activate, damit die vorgenommenen Änderungen umgesetzt werden) Finally, implement the changes by clicking Activate.

1.7 Die Konfiguration des Hairpin-NAT ist damit abgeschlossen.
2. Ausnahme-Regel für die Protokolle HTTP und HTTPS erstellen (nur bei Verwendung des HTTP-Proxy erforderlich)
Da bei Verwendung des HTTP-Proxy die ausgehenden Pakete durch den Proxy gefiltert werden, funktioniert das Hairpin-NAT nicht. Es muss daher eine Ausnahme-Regel erstellt werden, die den Datenverkehr aus dem lokalen Netzwerk auf die öffentliche IPv4-Adresse am Proxy vorbeileitet.
| Info |
|---|
Dies gilt ebenso für den Mail-Proxy und auch den VoIP-Proxy. Es wäre allerdings ungewöhnlich die SIP-Registrierung aus dem lokalen Netzwerk über ein Portforwarding vorzunehmen. |
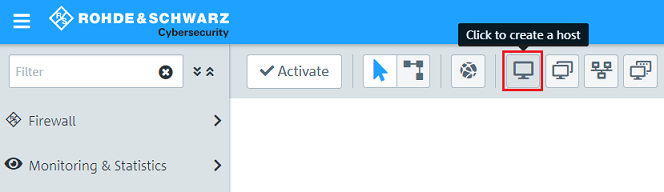
2.1 Klicken Sie auf das Symbol zum Erstellen eines Host-Objektes.
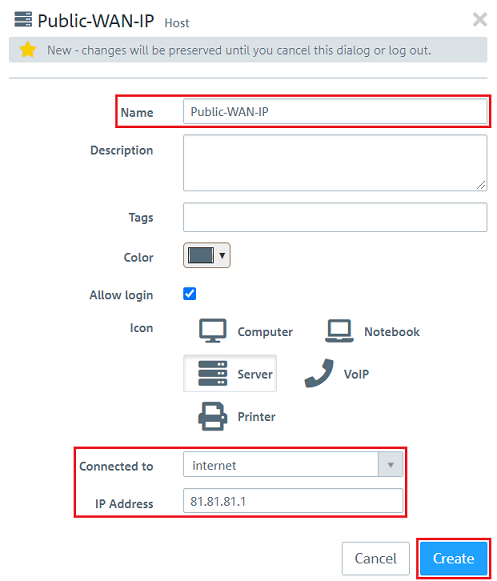
2.2 Passen Sie folgende Parameter an und klicken auf Erstellen:
- Name: Vergeben Sie einen aussagekräftigen Namen.
- Connected to: Wählen Sie im Dropdownmenü das Internet-Objekt aus.
- IP address: Geben Sie die öffentliche IPv4-Adresse Ihrer Internet-Verbindung an. Diese muss nicht direkt an der Unified Firewall anliegen, sondern kann auch an einem vorgeschalteten Router anliegen.
2.3 Klicken Sie auf dem Desktop auf das Netzwerk-Objekt (in diesem Beispiel INTRANET), wählen das Verbindungswerkzeug aus und klicken auf das in Schritt 2.2 erstellte Host-Objekt.
2.4 Fügen Sie die Protokolle HTTP und HTTPS hinzu.
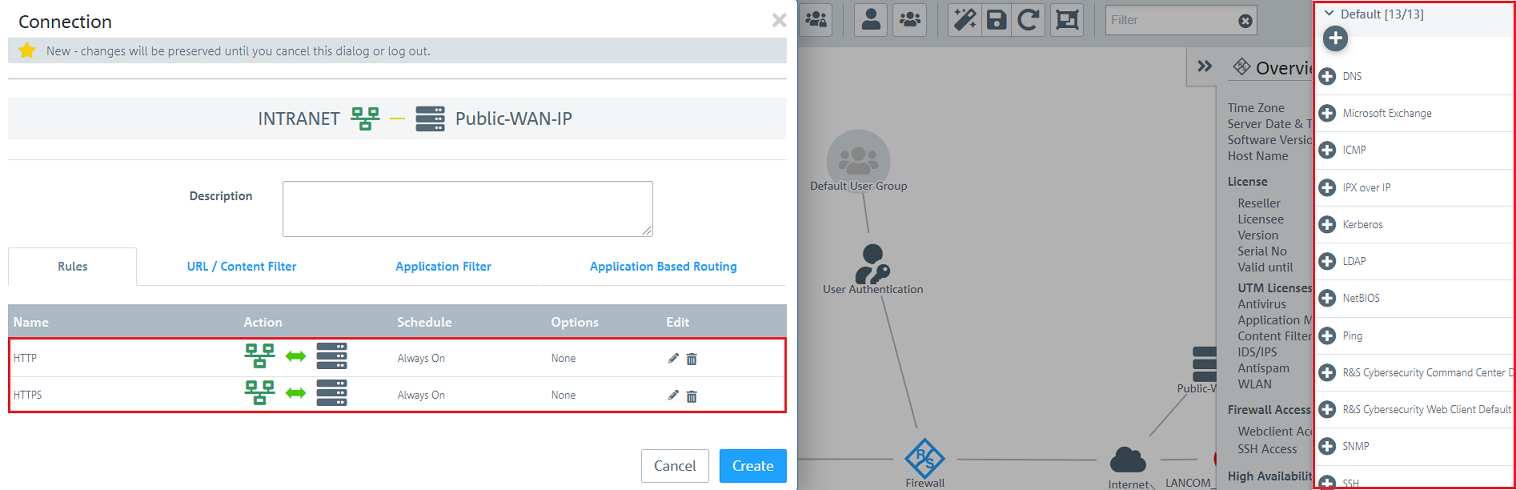
2.5 Klicken Sie für die Protokolle HTTP und HTTPS jeweils einmal auf das "Pfeil-Symbol", damit der Pfeil nach rechts zeigt.

) This concludes the configuration of the hairpin NAT.
2) Create an exception rule for the protocols HTTP and HTTPS (only required when using the HTTP proxy)
When using the HTTP proxy the outgoing packets are filtered by the proxy, which means that the hairpin NAT does not work. An exception rule must therefore be created so that the data traffic from the local network to the public IPv4 address bypasses the proxy.
| Info |
|---|
This also applies to the mail proxy and the VoIP proxy. However, it would be unusual to perform SIP registration from the local network via port forwarding. |
2.1) Click the icon to create a new host object.
2.2) Modify the following parameters and then click Create:
- Name: Enter a descriptive name.
- Connected to: Use the drop-down menu to select the Internet object.
- IP address: Enter the public IPv4 address of your Internet connection. This does not have to be directly on the Unified Firewall; it can also be on an upstream router.
2.3) Click the network object on the desktop (in this example INTRANET), select the connection tool and click the host object created in step 2.2.
2.4) Add the protocols HTTP and HTTPS.
2.5) For the protocols HTTP and HTTPS, click the “arrow” icon so that the arrow for each one points to the right.
2.6) For HTTP and HTTPS under Options, click None for each one to adjust further settings2.6 Klicken Sie für HTTP und HTTPS unter Options jeweils auf None, um weitere Einstellungen anzupassen.

2.7 Wählen Sie für HTTP und HTTPS bei ) For HTTP and HTTPS, set NAT / Masquerading jeweils die Option for each one to the option left-to-right aus und klicken auf and click OK.
2.8 Klicken Sie auf Create, um die Regeln anzulegen) Click Create to create the firewall rules.
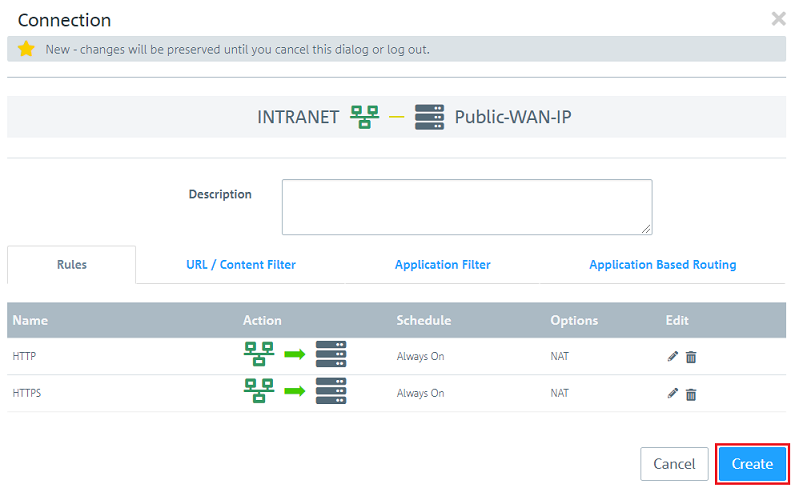
2.9 Klicken Sie auf Activate, damit die vorgenommenen Einstellungen von der Unified Firewall umgesetzt werden) Finally, implement the changes on the United Firewall by clicking Activate.