...
This article describes how to configure an SNMP user on an XS series switch and monitor the switch with the LANmonitor via SNMPv3. Of course It is also possible to use any other monitoring tool which supports SNMPv3.
| Info |
|---|
If another a monitoring tool other than LANmonitor is used, it is possible, that some parameters have to be configured dfifferently differently (e.g. the encryption). Please contact the respective manufacturer regarding the necessary settings. |
...
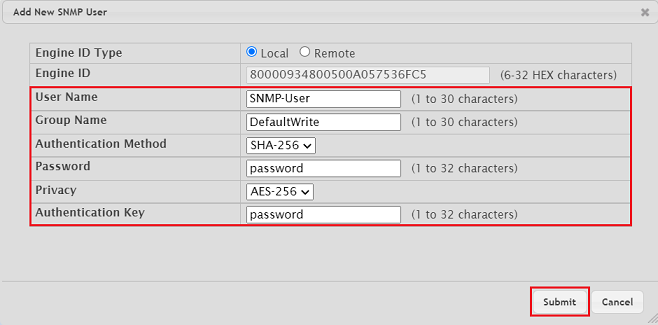
- User Name: Enter a descriptive user name.
- Group Name: Enter one the prefabricated groups in the menu Access Control Group (in this example DefaultWrite). The permissions are referenced in the menu View Entry.
- The following groups are available:
- DefaultRead: Only standard Standard read permissions
- DefaultSuper: Extended read and write permissions
- DefaultWrite: Standard read and write permissions
- The following groups are available:
- Authentication Method: In the dropdown menu select the option SHA-256.
- Password: Enter a password for the authentication. In conjunction with the user name it is used for the login.
- Privacy: In the dropdown menu select the option AES-256. This enables data encryption.
- Authentication Key: Enter a Password for data encryption.
| Info |
|---|
You can also create an own SNMP group in the menu Access Control Group with the desired permissions. Be sure to enter the correct Group Name when you Sie können in dem Menü Access Control Group auch eine eigene Gruppe mit den gewünschten Berechtigungen erstellen. Achten Sie dabei unbedingt darauf den Group Name beim Erstellen des SNMP-Benutzers entsprechend zu setzen. you create the SNMP user. When creating an own SNMP group the options Unsecure and All for the Group Access Rights must not be used as otherwise LANmonitor access won't be possibleBeim Erstellen einer eigenen Gruppe ist weiterhin darauf zu achten, dass die Optionen Unsecure und All bei den Group Access Rights nicht verwendet werden dürfen, da ein Zugriff per LANmonitor ansonsten nicht möglich ist. |
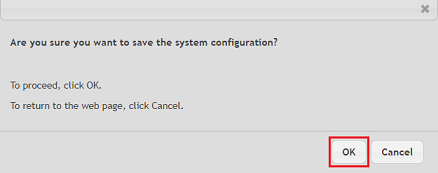
1.4 Klicken Sie in der rechten oberen Ecke auf Save Configuration, damit die Konfiguration als Start-Konfiguration gespeichert wird) Click on Save Configuration in the upper right corner to save the configuration as the start configuration.
| Info |
|---|
Die Start-Konfiguration bleibt auch nach einem Neustart des Gerätes oder einem Stromausfall erhaltenThe start configuration is retained even if the device is restarted or there is a power failure. |

1.5Bestätigen Sie den Speichervorgang mit einem Klick auf ) Acknowledge the save process by clicking OK.
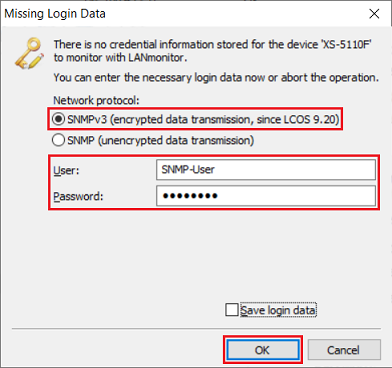
2.1 Verbinden Sie sich per LANmonitor mit dem Switch, stellen sicher, dass das Protokoll SNMPv3 ausgewählt ist und geben die in Schritt 1.3 vergebenen Login-Daten für den SNMP-Benutzer ein.) Connect to the switch via the LANmonitor, make sure, that the protocol SNMP3 is selected and enter the login credentials for the SNMP user entered in step 1.3).
2.2 Der Switch kann nun im LANmonitor überwacht und diverse Status-Informationen können ausgelesen werden. Sofern die Schreib-Berechtigung gegeben ist, können z.B. auch einzelne Ports deaktiviert und wieder aktiviert werden) The switch can now be monitored via the LANmonitor and various status information can be read out. If write permissions are given, individual ports can be deactivated and reactivated, for example.