Description: This document describes how to configure an VPN connection to the Amazon VPC and to propagate the routes dynamically by BGP. For further information on Amazon's Virtual Private Cloud please visit: https://aws.amazon.com/vpc/ | Hinweis |
|---|
In 2019 the IETF (Internet Engineering Task Force) has designated IKEv1 as deprecated and insecure and therefore it should not be used anymore. LANCOM Systems instead recommends to use the current standard IKEv2. The IKEv1 functionality in LANCOM devices remains intact and can still be used for scenarios where devices without IKEv2 support are used. However LANCOM Systems will not provide any support regarding the troubleshooting of connection problems with IKEv1 connections. Also there won't be any bug fixes or new features for IKEv1. In rare cases a disconnect can occur during rekeying. In such a case it can be useful to increase the lifetimes, so that the disconnects occur less often. |
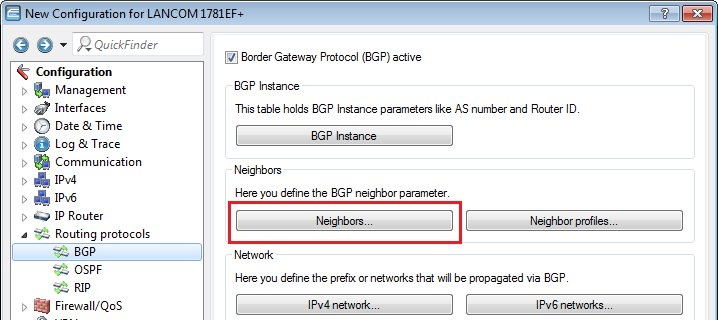
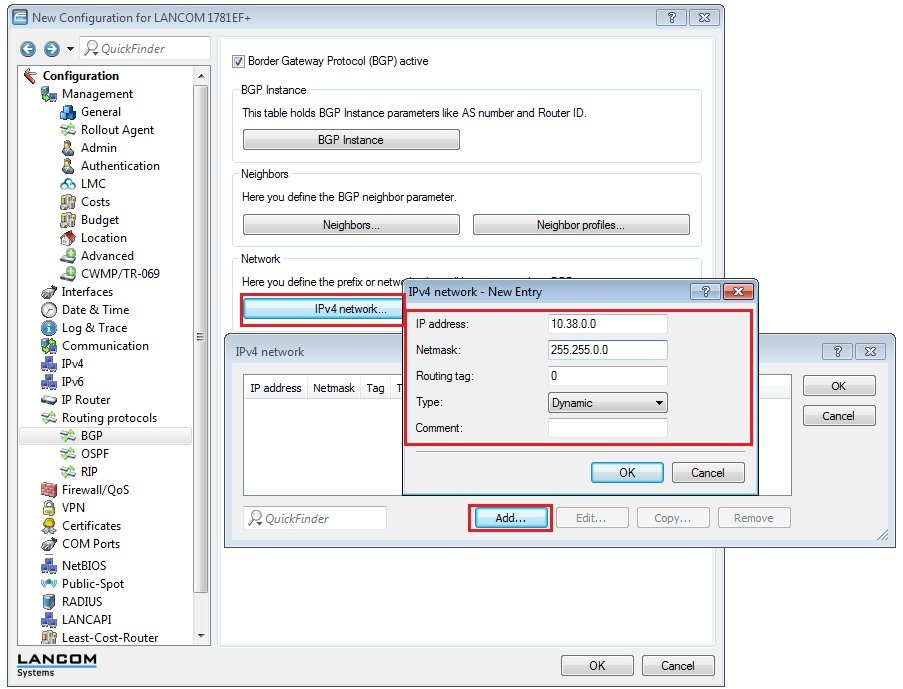
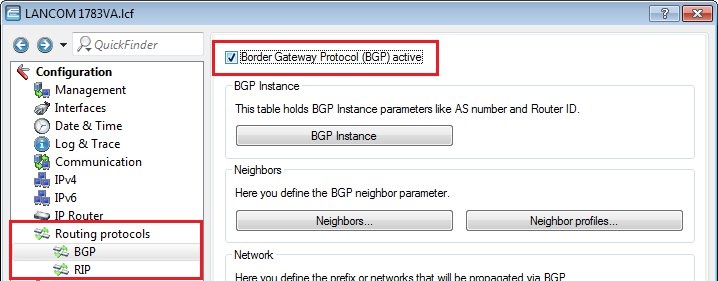
Requirements:Procedure:Two IPSec tunnels are for configured for the connection to the Amazon VPC, each one running a BGP session. Amazon stipulates the configuration of two VPN tunnels and two BGP connections for redundancy reasons. After creating the "VPN Connection" in your Amazon VPC interface, you receive the parameters for the VPN tunnels and the necessary data for the configuration of the two BGP sessions. An example configuration can be viewed at the following link: http://docs.aws.amazon.com/AmazonVPC/latest/NetworkAdminGuide/GenericConfig.html1) Configuring two VPN connections 1.1) Open the the LANCOM router configuration and navigate to VPN → General. Activate the VPN module and set the Establishment of net relationships (SAs) to Collectively with KeepAlive. 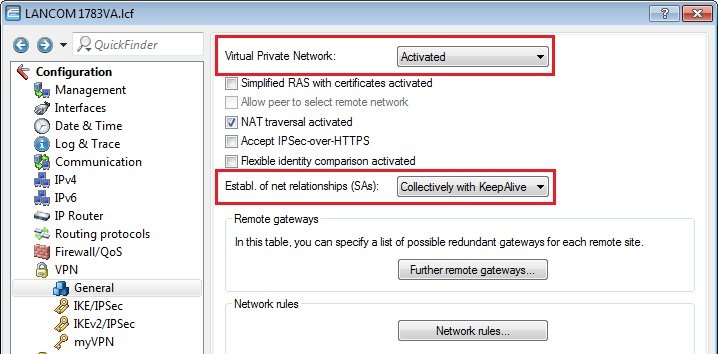 Image Modified Image Modified1.2) Change to the menu VPN → IKE/IPSec → IKE proposals... 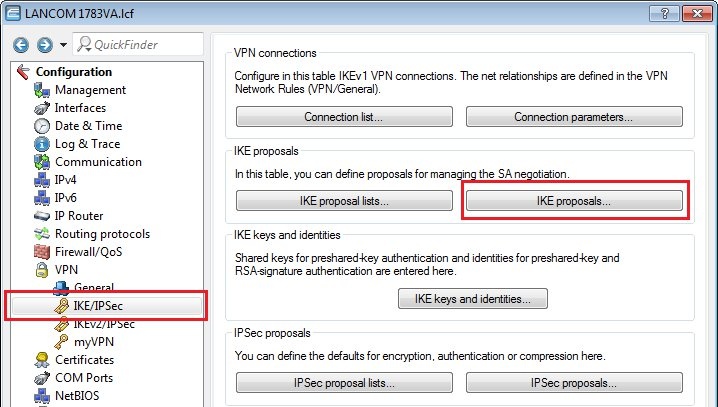 Image Modified Image Modified1.3) Click the Add button, enter a meaningful name and set the IKE proposal based on the specifications for your Amazon VPC.  Image Modified Image Modified1.4) Change to the menu VPN → IKE/IPSec → IKE proposal lists... Click the add button, enter a meaningful name and add the proposal you created in step 1.3) to this list. 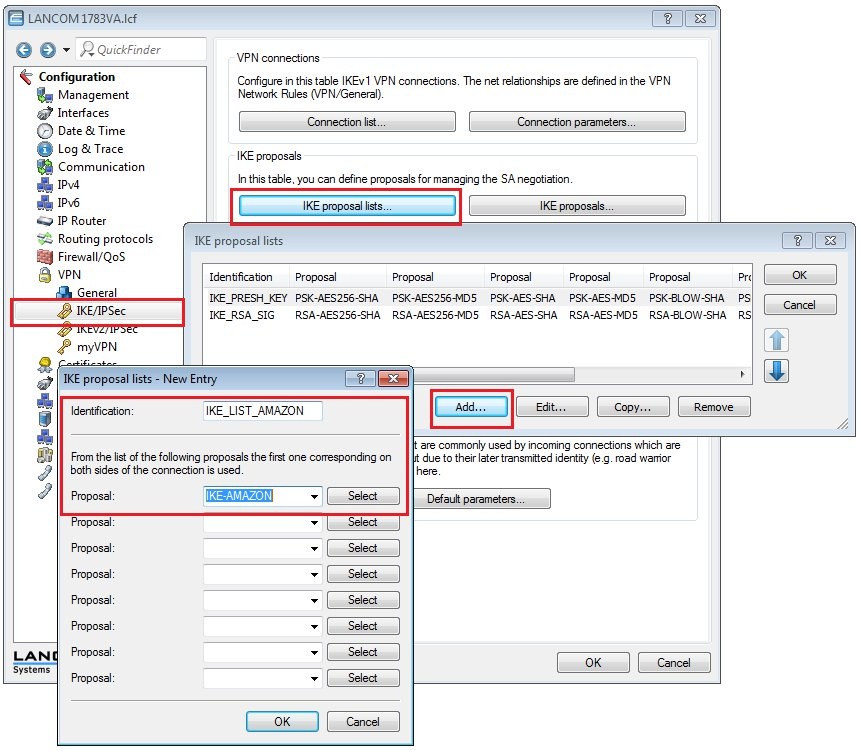 Image Modified Image Modified1.5) Change to the menu VPN → IKE/IPSec → IPSec proposals... 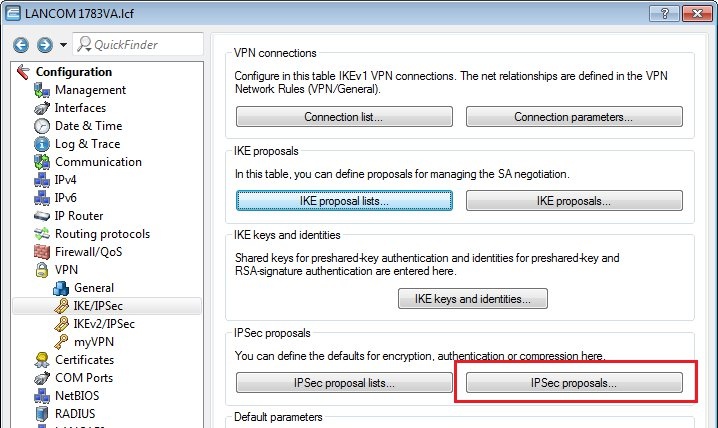 Image Modified Image Modified1.6) Click the Add button, enter a meaningful name and set the IPSec proposal based on the specifications for your Amazon VPC. 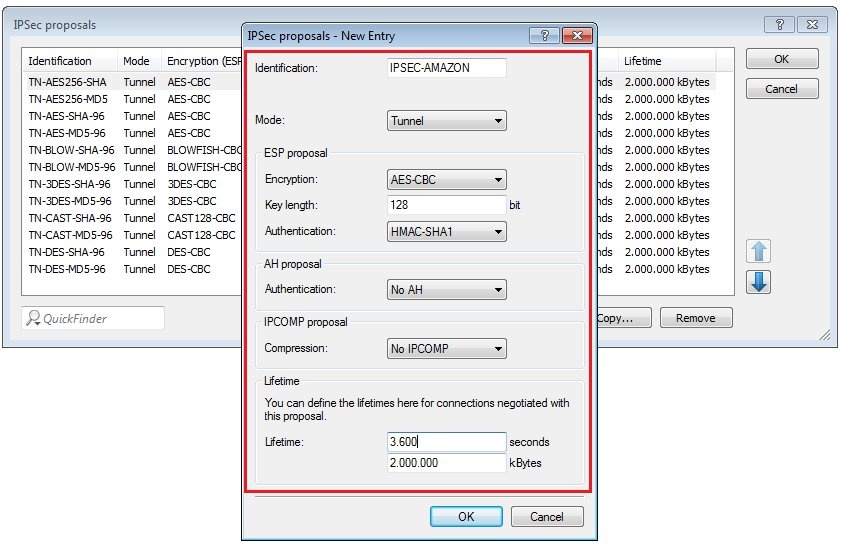 Image Modified Image Modified1.7) Change to the menu VPN → IKE/IPSec → IPSec proposal lists... Click the add button, enter a meaningful name and add the proposal you created in step 1.6) to this list. 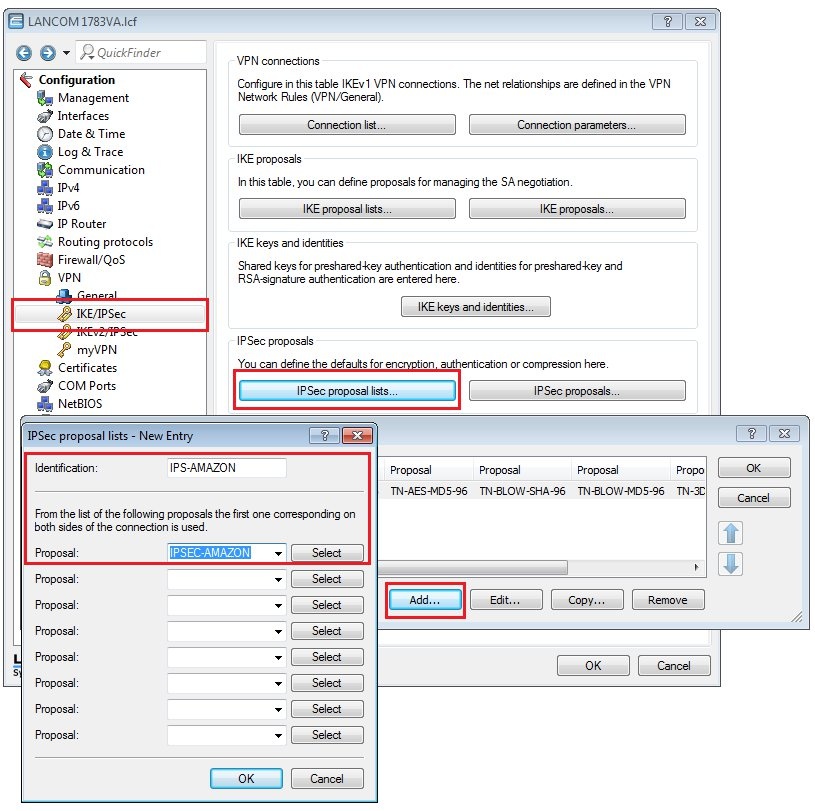 Image Modified Image Modified1.8) Change to the menu VPN → IKE/IPSec → IKE keys and identities... 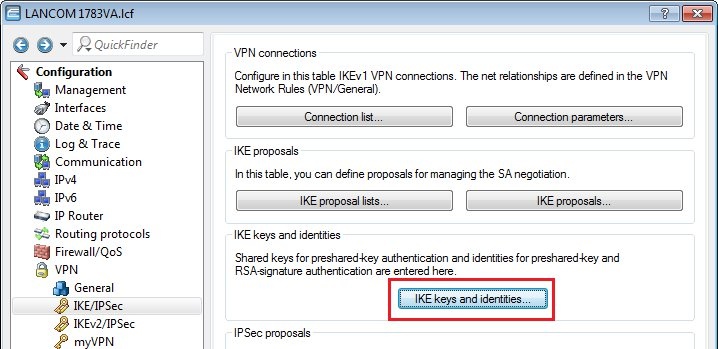 Image Modified Image Modified1.9) Click the Add button and enter the pre-shared key required for your Amazon VPC. Repeat the procedure and to set up the second entry for the second VPN connection. 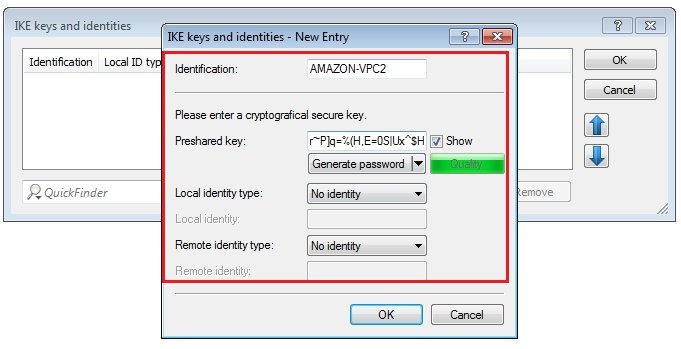 Image Modified Image Modified1.10) Navigate to the menu VPN → IKE/IPSec → Connection parameters... and add new entries to collect the lists, keys, IKE group and PFS group. Your Amazon VPC will inform you about which IKE and PFS group you need to use. Here, you should also create two entries for the two VPN connections. 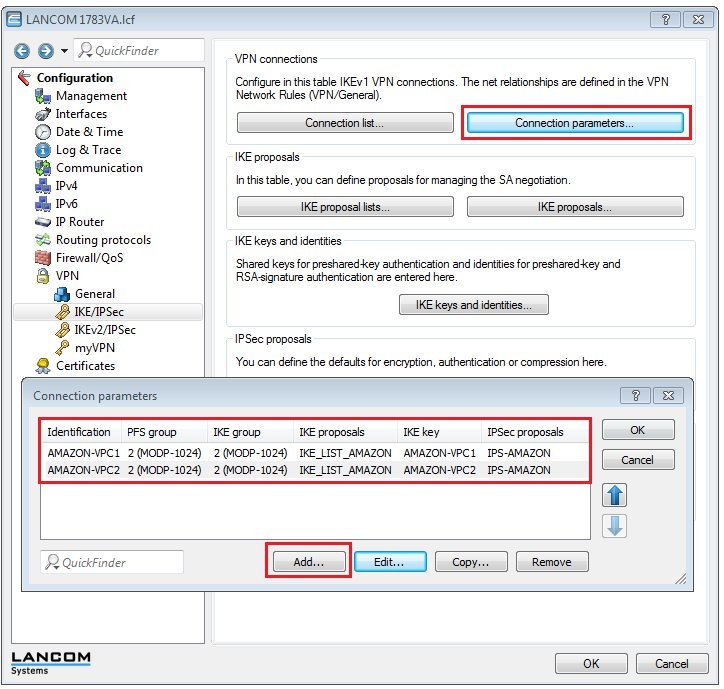 Image Modified Image Modified
| Info |
|---|
The proposal lists created in steps 1.2) to 1.7) can be used for both VPN connections. The connection parameters should be identical except for their IKE keys and identification. |
1.11) Change to the menu VPN → IKE/IPSec → Connection list... 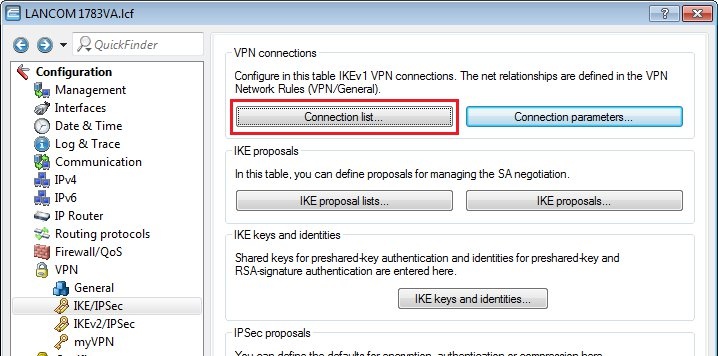 Image Modified Image Modified1.12) This is where you create the actual VPN remote peer. Click the Add button and create the first of the two VPN peers. Set the following parameters:- Name of connection: Set any meaningful name for the connection
- Short hold time: 9999
- Dead peer detection: 30 seconds
- Gateway: Here you enter the IP address of the “Virtual Private Gateway” of your Amazon VPC; in our example this is → 72.21.209.193*
- Connection parameters: Here, you select the previously created connection parameters, in our example → AMAZON-VPC1*
- IKE exchange: Main mode
- Rule creation: Manual
- IPv4 rules: RAS-WITH-NETWORK-SELECTION
*These entries must be different for both VPN tunnels. 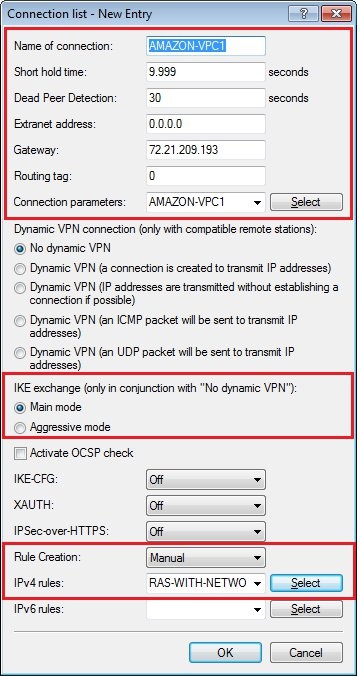 Image Modified Image Modified1.13) Repeat the procedure for the second VPN connection by entering the parameters for the second connection:- Name of connection: Set any meaningful name for the connection
- Short hold time: 9999
- Dead peer detection: 30 seconds
- Gateway: Here you enter the IP address of the “Virtual Private Gateway” of your Amazon VPC; in our example this is → 72.21.209.225*
- Connection parameters: Here, you select the previously created connection parameters, in our example → AMAZON-VPC2*
- IKE exchange: Main mode
- Rule creation: Manual
- IPv4 rules: RAS-WITH-NETWORK-SELECTION
*These entries must be different for both tunnels. 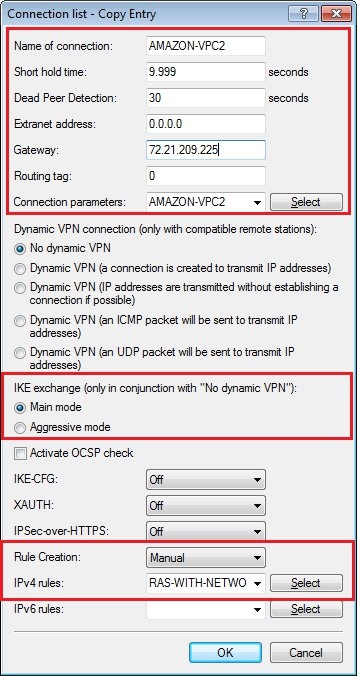 Image Modified Image Modified
| Info |
|---|
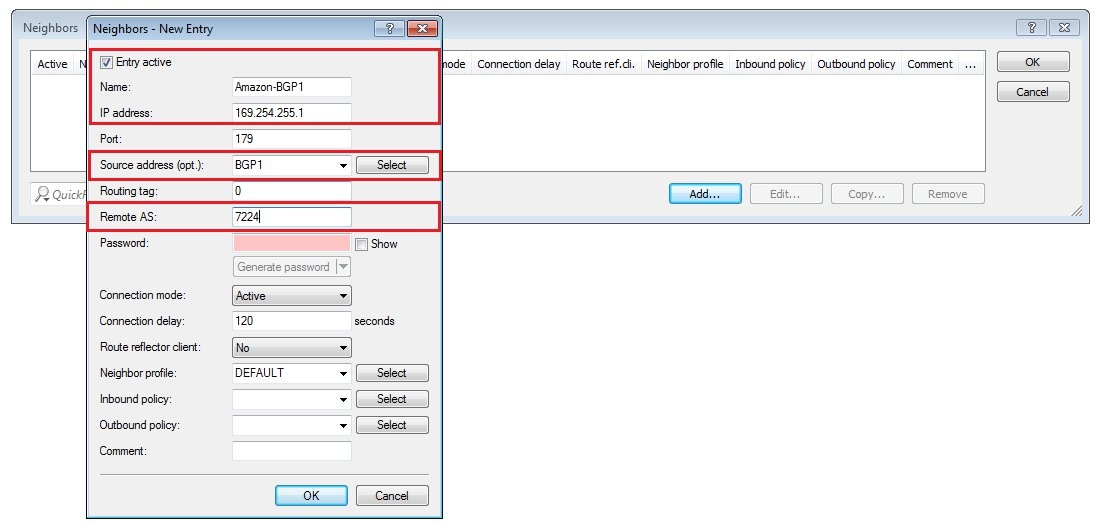
To conclude the VPN configuration, each tunnel needs a static routing entry . For this purpose, you received two /30 subnets when you created the “VPN Connection” in your Amazon VPC. One address is for the LANCOM side of the BGP session and the other is for the BGP neighbor on the Amazon VPC side. Enter the address of the LANCOM as the loopback address as described in steps 2.1) to 2.2). Configure the address for the BGP neighbor in the routing table of the LANCOM as a static route with a D mask (255.255.255.255) and then for the actual BGP neighbor (see steps 2.5) to 2.7)). |
1.14) In our example, we use address 169.254.255.1 for the first tunnel and address 169.254.255.5 for the second tunnel. Navigate to the menu IP router → Routing → IPv4 routing table... and enter a route for each of the VPN tunnels, as illustrated below: 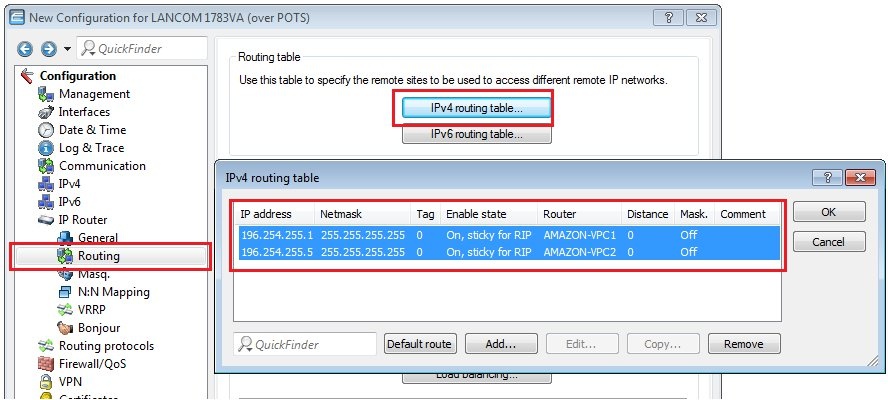 Image Modified Image Modified
2) Configuring two BGP connections 2.1) As mentioned previously, one or two loopback addresses must first be defined for the BGP connection. To do this, go to the menu IPv4 → General → Loopback addresses... 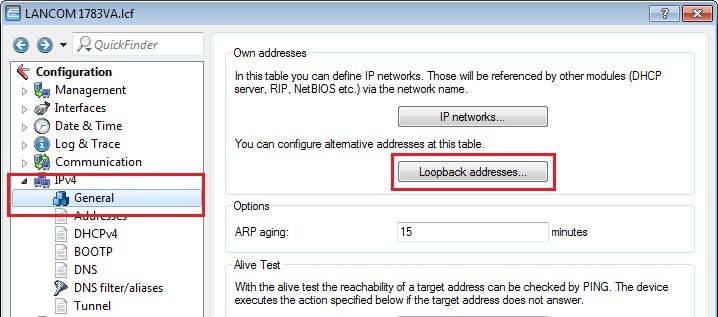 Image Modified Image Modified2.2) Click the Add button, assign a name and, for the LANCOM, enter the address from the /30 subnet that you received as a loopback address when you created the VPN connection in the Amazon VPC. Configure an entry for both /30 subnets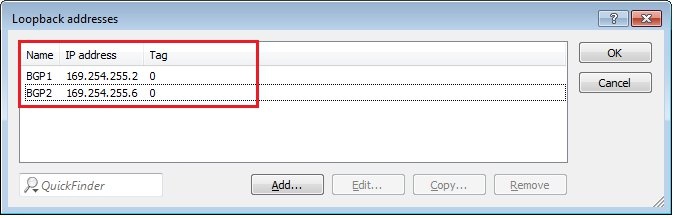 Image Modified Image Modified
| Info |
|---|
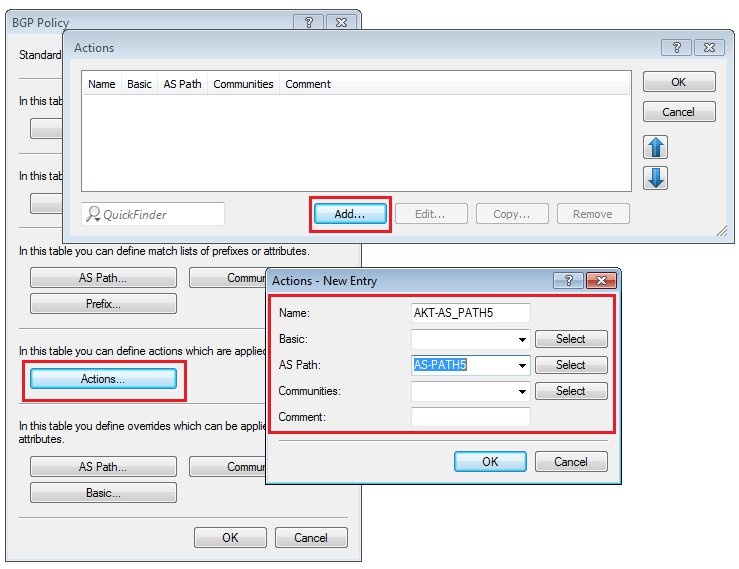
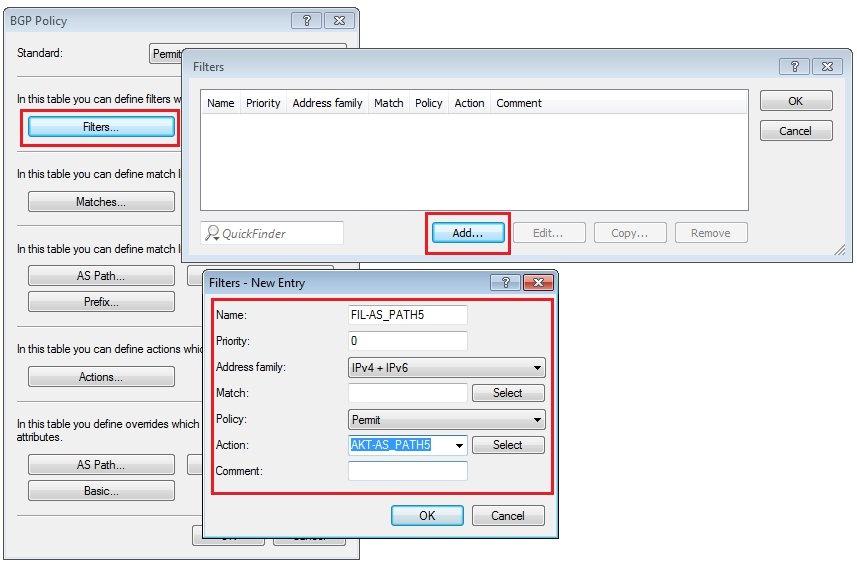
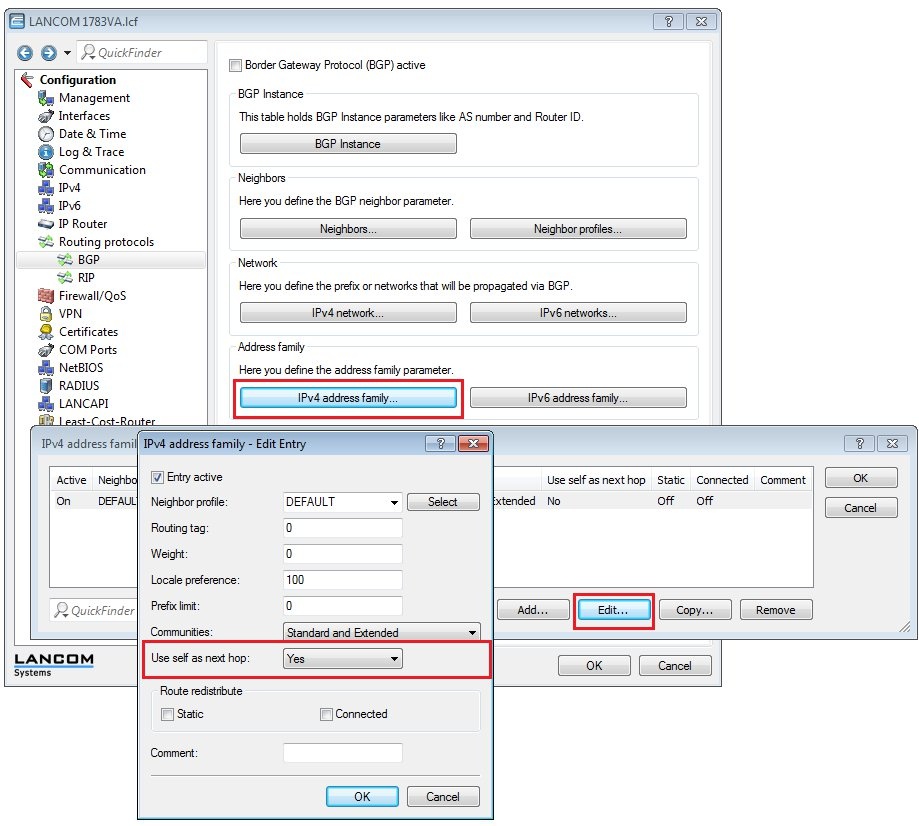
Since you are establishing two BGP sessions to the Amazon VPC, one of these sessions and the routes learned through it has to be prioritized. In order to ensure that both sides prioritize the propagated/learned networks via the same neighbor, so avoiding an asymmetrical routing, you need to configure an input filter and an output filter for one of the two neighbors. For this purpose, you need to create a filter that increases the length of the AS_PATH attribute for one of the two neighbors, thus making the routes learned via this neighbor less attractive. |
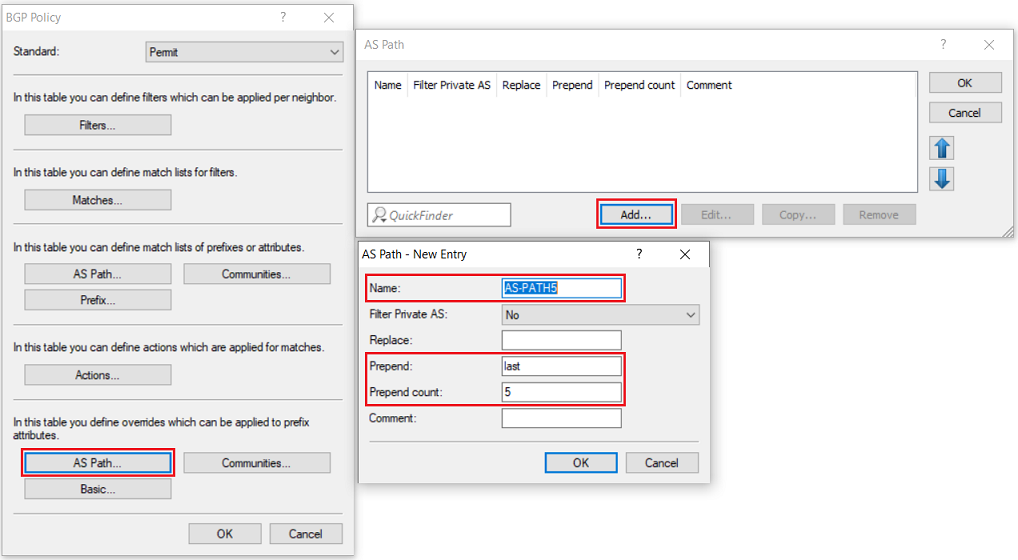
2.3) Specify BGP policy 2.3.1) BGP policy is specified in the menu Routing protocols → BGP → BGP policy...  Image Modified Image Modified2.3.2) First configure the prepending of your own AS to the AS_PATH attribute under "AS path ...". - To do this, click the Add button, assign any name, and under “Prepend” you type in the work
|