
| Seiteneigenschaften |
|---|
Description:
In diesem Dokument ist beschrieben, wie eine This document describes how to set up a VPN-SSL -Verbindung mit dem connection with the OpenVPN Client von einem Android Smartphone oder Tablet zu einer from an Android smartphone or tablet to a LANCOM R&S® Unified S®Unified Firewall (im Folgenden Unified Firewall genannt) eingerichtet werden kannreferred to here as the United Firewall).
Requirements:
- Bestandsinstallation einer Existing installation on a LANCOM R&S® Unified Firewall mit Firmware bis Version 10.3S®Unified Firewall
- OpenVPN Client
- Android ab Version from version 4.1
- Bereits eingerichtete und funktionsfähige Internet-Verbindung auf der A configured and functional Internet connection on the Unified Firewall
- Web -Browser zur Konfiguration der browser for configuring the Unified Firewall.
Es werden folgende Browser unterstützt
The following browsers are supported:- Google Chrome
- Chromium
- Mozilla Firefox
| Info |
|---|
| Wir empfehlen für VPN Client-Verbindungen die Verwendung des LANCOM Advanced VPN Client. Informationen zur Konfiguration erhalten Sie in folgendem Dokument. |
ProcedureScenario:
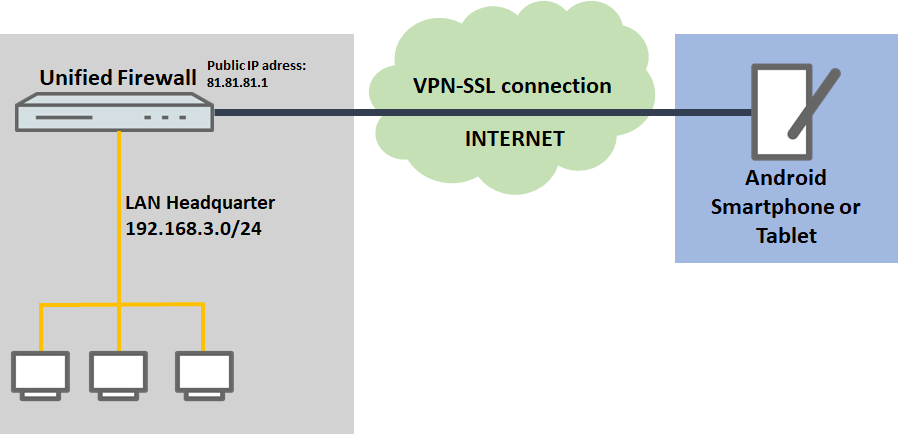
1. Die The Unified Firewall ist direkt mit dem Internet verbunden und verfügt über eine öffentliche IPv4-Adresse:is connected directly to the Internet and has a public IPv4 address:
- A company wants its sales representatives to have access to the corporate network via an VPN-SSL client-to-site connection.
- The Android smartphones used by the sales representatives have the Open VPN Client installed on them.
- The company headquarters has a Unified Firewall as a gateway with an Internet connection with the fixed public IP address
- Ein Unternehmen möchte seinen Außendienst-Mitarbeitern den Zugriff auf das Firmennetzwerk per VPN-SSL Client-to-Site Verbindung ermöglichen.
- Dazu ist auf den Android Smartphones der Außendienst-Mitarbeiter der OpenVPN Client installiert.
- Die Firmenzentrale verfügt über eine Unified Firewall als Gateway und eine Internetverbindung mit der festen öffentlichen IP-Adresse 81.81.81.1.
- Das lokale Netzwerk der Zentrale hat den IP-Adressbereich The local network at the headquarters has the IP address range 192.168.3.0/24.
...
- A company wants its sales representatives to have access to the corporate network via an VPN-SSL client-to-site connection.
- The Android smartphones used by the sales representatives have the Open VPN Client installed on them.
- The company headquarters has a Unified Firewall as the gateway and an upstream router for the Internet connection. The router has the fixed public IP address
...
- 81.81.81.1.
...
- The local network at the headquarters has the IP address range 192.168.3.0/24.
| Info |
|---|
| Dieses Szenario beinhaltet auch die "Parallel"-Lösung wie in diesem Artikel beschriebenThis scenario also includes the “parallel” solution as described in the following article. |

VorgehensweiseProcedure:
Die Einrichtung ist bei Szenario 1 und 2 grundsätzlich gleich. Bei Szenario 2 muss zusätzlich ein Portforwarding auf dem vorgeschalteten Router eingerichtet werden (siehe Abschnitt The setup for scenarios 1 and 2 are basically the same. Scenario 2 additionally requires port forwarding to be set up on the upstream router (see section 3).
1. Konfigurationsschritte auf der ) Configuration steps on the Unified Firewall:
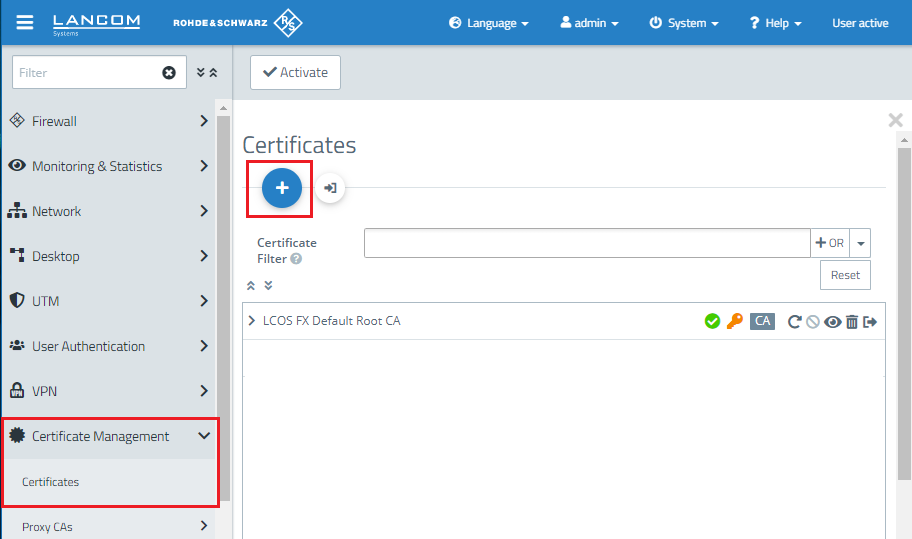
1.1 Verbinden Sie sich mit der ) Connect to the Unified Firewall, wechseln in das Menü switch to the menu Certificate Management → Certificates und klicken auf das "Plus-Zeichen", um ein neues Zertifikat zu erstellen.

1.2 Hinterlegen Sie folgende Parameter, um eine CA zu erstellen:
- Zertifikatstyp: Wählen Sie im Dropdownmenü CA für VPN-/Webserver-Zertifikat aus.
and click on the "+” icon to create a new certificate.
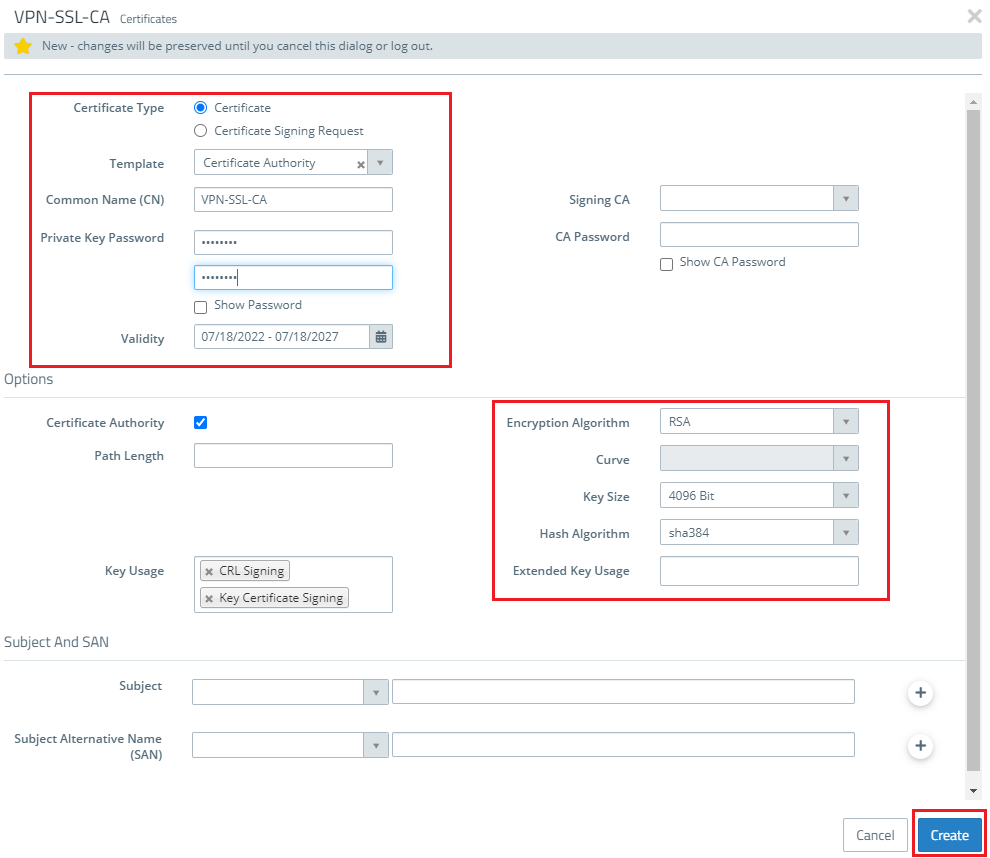
1.2) Enter the following parameters in order to create a CA:
- Certificate type: Select Certificate.
- Template: Select the template Certificate Authority.
- Common Name (CN): Enter a descriptive common name.
- Private key password: Set a password. This is used to encrypt the private key.
- Validity: Specify how long the certificate should remain valid. For a CA, the period of validity is usually set to be very high.
- Encryption Algorithm: From the drop-down menu, select RSA.
- Key size: Set the value in the drop-down menu to 4096.
1.3) Create another certificate by clicking on the "+” icon.
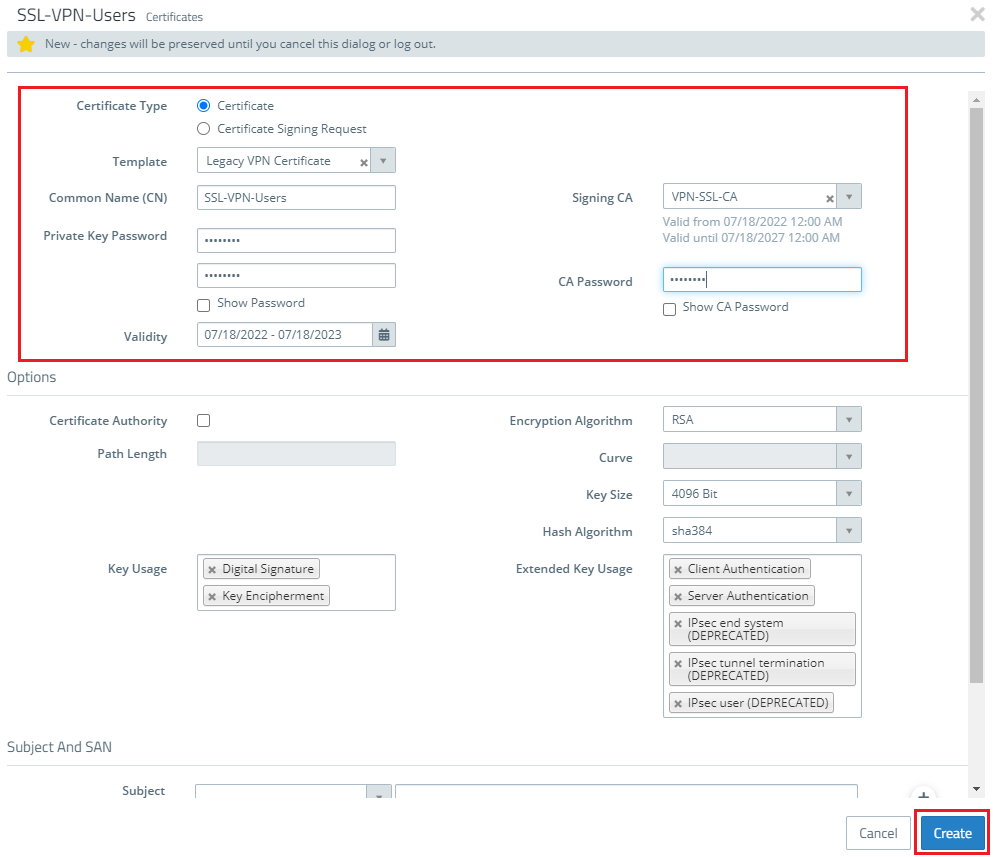
1.4) Store the following parameters in order to create a VPN certificate, which is used to authenticate VPN clients at the Unified Firewall:
- Certificate type: Select Certificate.
- Template: Select the template Certificate Authority.
- Common Name (CN): Enter a descriptive common name.
- Private key password: Set a password. This is used to encrypt the private key.
- Validity: Specify how long the certificate should remain valid. For a CA, the period of validity is usually set to be very high.
- Signing CA: From the drop-down menu, select the CA created in step 1.2.
- CA password: Enter the private key password set in step 1.2.
1.5) Create another certificate by clicking on the "+” icon.
1.6) Store the following parameters in order to create a VPN certificate, which is used to authenticate a particular employee or VPN client:
- Certificate type: Select Certificate.
- Template: Select the template Certificate Authority.
- Common Name (CN): Enter a descriptive common name.
- Private key password: Set a password. This is used to encrypt the private key.
- Validity: Specify how long the certificate should remain valid. For a CA, the period of validity is usually set to be very high.
- Signing CA: From the drop-down menu, select the CA created in step 1.2.
- CA password: Enter the private key password set in step 1.2.

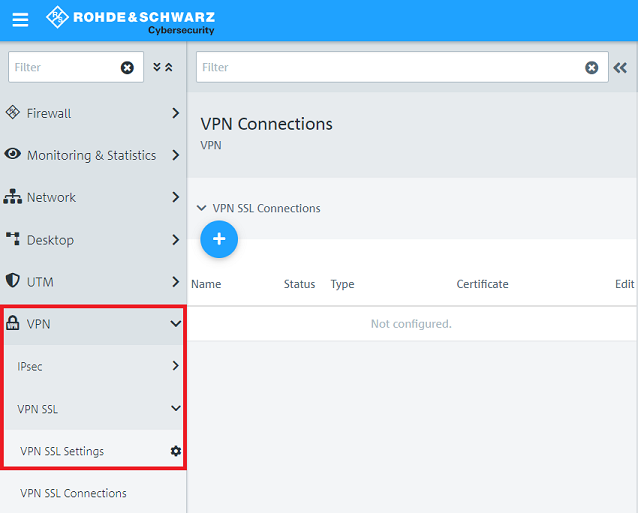
1.7) Switch to the menu VPN → VPN SSL → VPN SSL Settings.
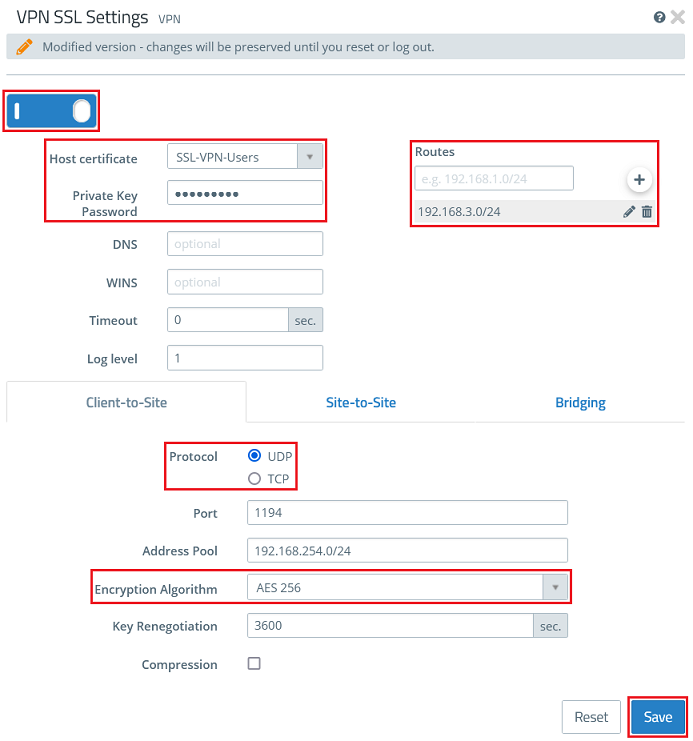
1.8) Enable the VPN SSL service and enter the following parameters:
- Host certificate: From the drop-down menu, select the VPN certificate created in step 1.4
- Private Key Password: Enter the private key password of the VPN certificate entered in step 1.4.
- Routes: The networks that the VPN client should communicate with should be entered in CIDR notation
- Private-Key-Verschlüsselung: Wählen Sie im Dropdownmenü RSA aus.
- Private-Key-Größe: Setzen Sie den Wert im Dropdownmenü auf 4096.
- Common-Name (CN): Vergeben Sie einen aussagekräftigen Common Name.
- Gültigkeit: Legen Sie fest wie lange das Zertifikat gültig sein soll. Bei einer CA wird die Gültigkeitsdauer üblicherweise sehr hoch gewählt.
- Private-Key-Passwort: Hinterlegen Sie ein Passwort. Dieses dient dazu den Private Key zu verschlüsseln.
1.3 Erstellen Sie mit einem Klick auf das "Plus-Zeichen" ein weiteres Zertifikat.

1.4 Hinterlegen Sie folgende Parameter, um ein VPN-Zertifikat zu erstellen, welches zur Authentifizierung von VPN-Clients auf der Unified Firewall dient:
- Zertifikatstyp: Wählen Sie im Dropdownmenü VPN-Zertifikat aus.
- Signierende CA: Wählen Sie im Dropdownmenü die in Schritt 1.2 erstellte CA aus.
- Private-Key-Verschlüsselung: Wählen Sie im Dropdownmenü RSA aus.
- Private-Key-Größe: Setzen Sie den Wert im Dropdownmenü auf 4096.
- Common-Name (CN): Vergeben Sie einen aussagekräftigen Common Name.
- Gültigkeit: Legen Sie fest wie lange das Zertifikat gültig sein soll. Bei einem VPN-Zertifikat zur Annahme von VPN-Clients wird die Gültigkeitsdauer üblicherweise sehr hoch gewählt.
- CA-Passwort: Hinterlegen Sie das in Schritt 1.2 vergebene Private-Key-Passwort.
- Private-Key-Passwort: Hinterlegen Sie ein Passwort. Dieses dient dazu den Private Key zu verschlüsseln.
1.5 Erstellen Sie mit einem Klick auf das "Plus-Zeichen" ein weiteres Zertifikat.

1.6 Hinterlegen Sie folgende Parameter, um ein VPN-Zertifikat zu erstellen, welches zur Authentifizierung eines bestimmten Mitarbeiters bzw. VPN-Clients dient:
- Zertifikatstyp: Wählen Sie im Dropdownmenü VPN-Zertifikat aus.
- Signierende CA: Wählen Sie im Dropdownmenü die in Schritt 1.2 erstellte CA aus.
- Private-Key-Verschlüsselung: Wählen Sie im Dropdownmenü RSA aus.
- Private-Key-Größe: Setzen Sie den Wert im Dropdownmenü auf 4096.
- Common-Name(CN): Vergeben Sie einen aussagekräftigen Common Name, der den Mitarbeiter bezeichnet.
| Info |
|---|
| In dem Feld Subject Alternative Name können zur einfacheren Zuordnung eines Mitarbeiters weitere Merkmale wie z.B. die E-Mail-Adresse hinterlegt werden. |
- Gültigkeit: Legen Sie fest wie lange das Zertifikat gültig sein soll. Bei einem VPN-Zertifikat für einen einzelnen Benutzer wird die Gültigkeitsdauer üblicherweise eher gering gewählt.
- CA-Passwort: Hinterlegen Sie das in Schritt 1.2 vergebene Private-Key-Passwort.
- Private-Key-Passwort: Hinterlegen Sie ein Passwort. Dieses dient dazu den Private Key zu verschlüsseln.
1.7 Wechseln Sie in das Menü VPN → VPN-SSL → VPN-SSL-Einstellungen.
1.8 Aktivieren Sie den VPN-SSL-Dienst und hinterlegen folgende Parameter:
- Host-Zertifikat: Wählen Sie im Dropdownmenü das in Schritt 1.4 erstellte VPN-Zertifikat aus.
- DNS: Hinterlegen Sie bei Bedarf einen DNS-Server.
- Routen: Hinterlegen Sie die Netzwerke in CIDR-Schreibweise (Classless Inter-Domain Routing), in die der VPN-Client Zugriff haben soll. Diese werden an alle VPN-SSL-Clients ausgeteilt.
- Verschlüsselungs-Algorithmus: Wählen Sie im Dropdownmenü AES 256 aus.
| Info |
|---|
| Bei Bedarf können Sie das Protokoll sowie den Port abändern. |
Bei dem Adressbereich handelt es sich um den Einwahl-Adressbereich, aus dem ein VPN-SSL-Client eine IP-Adresse zugewiesen bekommt. Dieser Adressbereich darf nicht bereits als internes Netzwerk in der Unified Firewall verwendet werden.

- . These are shared with all of the VPN SSL clients.
- Protocol: Make sure, that the option UDP is selected. If TCP is used for the VPN SSL tunnel and data is transferred via TCP within the tunnel, this could lead to a "TCP meltdown".
- Encryption algorithm: From the drop-down menu, select AES256.
| Info |
|---|
Optionally you can enter a DNS and/or WINS server, which are assigned to all VPN SSL clients. If necessary, you can change the Port. The Address Pool is the range of IP addresses that are assigned to the dial-in VPN SSL clients. This address range must not already be in use as an internal network in the Unified Firewall. |
The address pool is the range of IP addresses that are assigned to the dial-in VPN SSL clients. This address range may not already be in use as an internal network in the Unified Firewall.
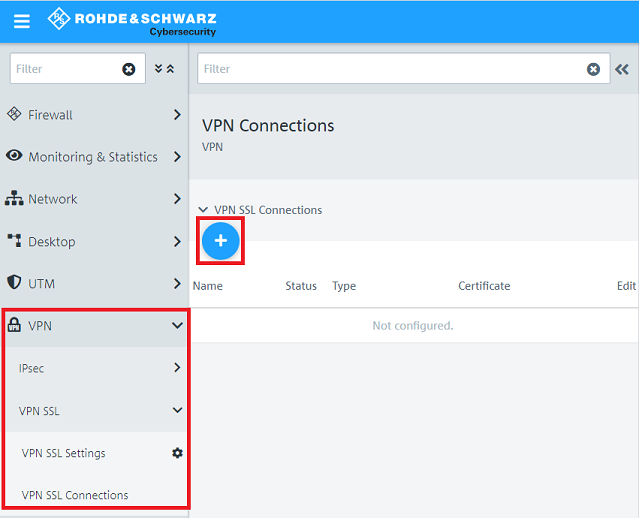
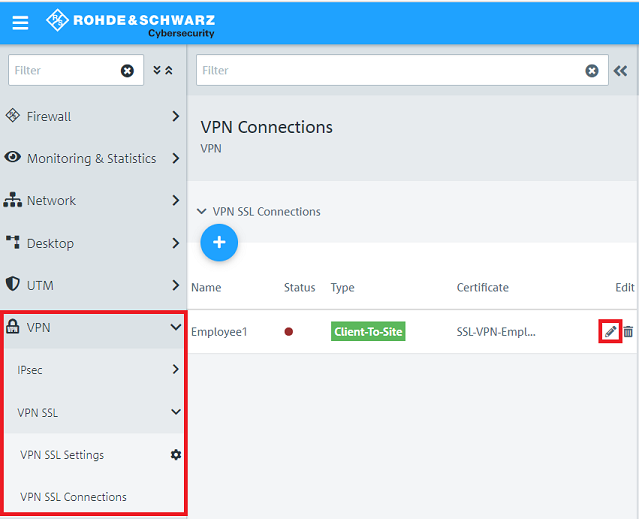
1.9) Change to the menu VPN → VPN SSL → VPN SSL Connections and click on the “+” icon to create a new VPN SSL connection1.9 Wechseln Sie in das Menü VPN → VPN-SSL → VPN-SSL-Verbindungen und klicken auf das "Plus-Zeichen", um eine neue VPN-SSL-Verbindung zu erstellen.
1.10 Aktivieren Sie die VPN-Verbindung und hinterlegen folgende Parameter) Enable the VPN connection and enter the following parameters:
- Name: Vergeben Sie einen aussagekräftigen NamenEnter a descriptive name.
- Zertifikat: Wählen Sie im Dropdownmenü das in Schritt 1.6 erstellte VPN-Zertifikat für den Mitarbeiter aus.
- Verbindungstyp: Wählen Sie Client-To-Site aus.
- Certificate: From the drop-down menu, select the VPN certificate for the employees created in step 1.6.
- Connection type: Choose Client-to-Site.
| Info |
|---|
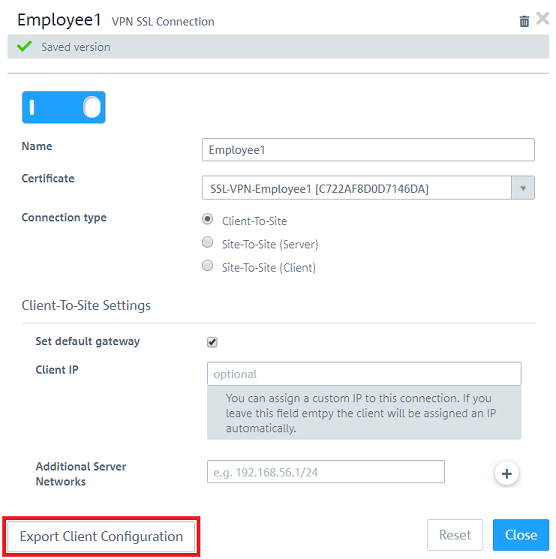
With the function Set standard gateway activated, the VPN client can communicate with the Internet via the Internet connection of the Unified Firewall. The item Client IP allows a fixed IP address to be assigned to the VPN client. If this entry is left empty, the VPN client is given an IP address from the address pool (see step 1.8). Additional server networks optionally allows the VPN client to access other local networks. In this way, individual employees can be given access to different local networks |
| Info |
Wird die Funktion Standard-Gateway setzen aktiviert, kann der VPN-Client über die Internet-Verbindung der Unified Firewall mit dem Internet kommunizieren. Bei Client IP besteht die Möglichkeit dem VPN-Client eine feste IP-Adresse zuzuweisen. Bleibt dieser Eintrag leer, wird dem VPN-Client eine IP-Adresse aus dem Adressbereich zugewiesen (siehe Schritt 1.8). Bei Zusätzliche Server-Netzwerke besteht die Möglichkeit dem VPN-Client den Zugriff auf weitere lokale Netzwerke zu erlauben. So kann einzelnen Mitarbeitern der Zugriff auf unterschiedliche lokale Netzwerke ermöglicht werden. |
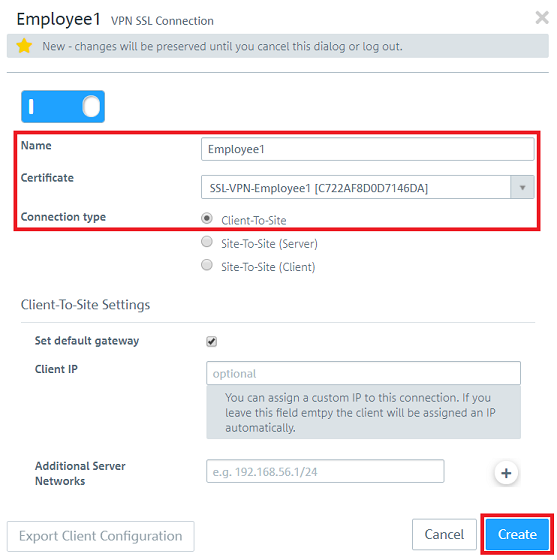
1.11 Bearbeiten Sie die in Schritt 1.10 erstellte VPN-SSL-Verbindung mit einem Klick auf das "Stift-Symbol") Edit the VPN SSL connection created in step 1.10 by clicking on the “pencil” icon.
1.12 Klicken Sie auf Client-Konfiguration exportieren, um das VPN-Profil mitsamt dem Zertifikat zu exportieren.
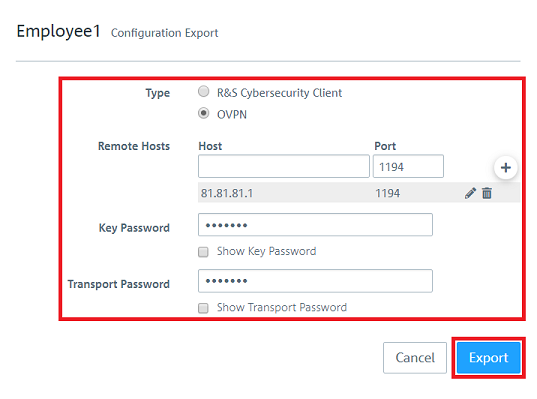
1.13 Hinterlegen Sie folgende Parameter und klicken auf Exportieren:
) Click Export client configuration to export the VPN profile together with the certificate.
| Info |
|---|
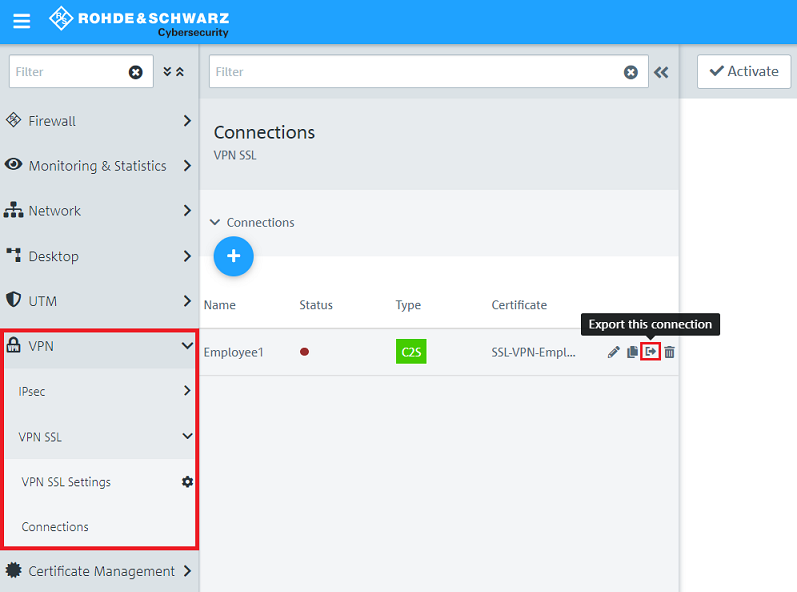
As of LCOS FX 10.5 you can export the profile directly in the menu VPN → VPN SSL → Connections by clicking on the option Export this connection for a specific connection. It is possible that you have to click on the double arrow symbol first (right next to the field Filter) to expand the menu, so that the symbol for the profile export is visible.
|
1.13) Enter the following parameters and then click on Export.
- Type: Select OVPN to generate a profile for the OpenVPN client.
- Remote Hosts: Enter the public IPv4 address or the DynDNS name of the Unified Firewall along with the VPN SSL port (see step 1.8).
- Key Password: Enter the private key password set in step 1.6.
- Transport Password: Set a password. This has to be entered when the user starts the VPN connection with the OpenVPN client.
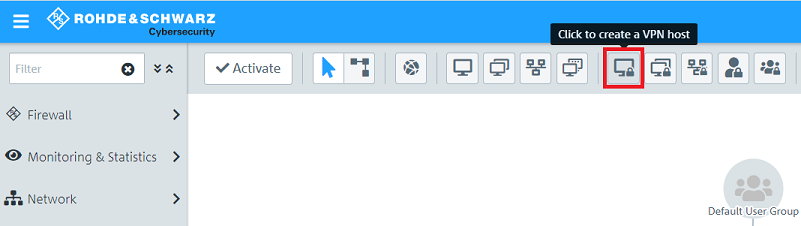
1.14) Click the button to create a new VPN host.
1.15) Save the following parameters:
- Name: Enter a descriptive name.
- VPN connection type: Select VPN-SSL.
- VPN SSL connection: From the drop-down menu, select the VPN SSL connection created in step 1.10

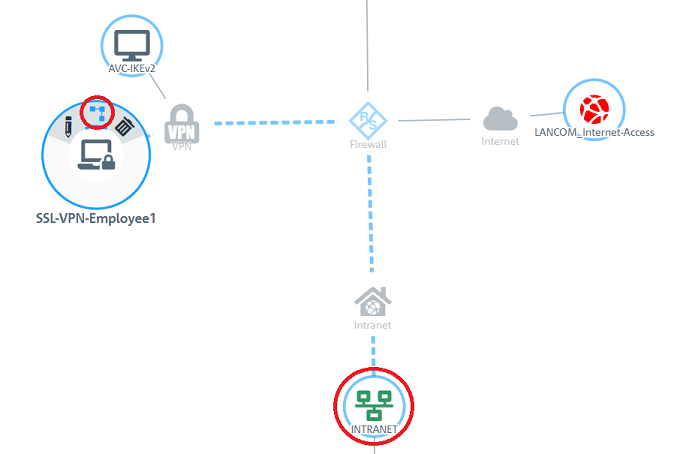
1.16) In the VPN host click on the "connection" icon and, to open the firewall objects, click on the network object that the OpenVPN client should access.
Repeat this step for every network that the OpenVPN client should be able to access.
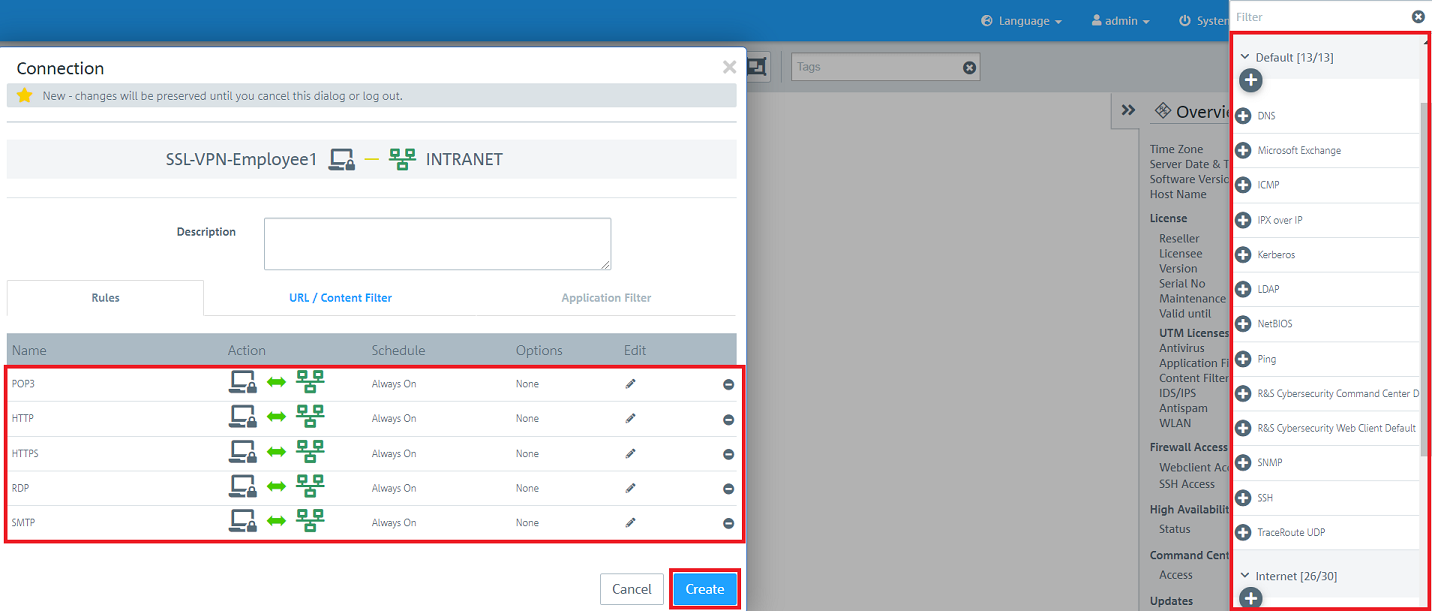
1.17) Use the “+” sign to assign the required protocols to the VPN host.
| Info |
|---|
| A Unified Firewall uses a deny-all strategy. You therefore have to explicitly allow communication. |
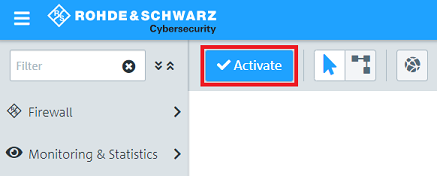
1.19) This concludes the configuration steps on the Unified Firewall.
2) Configuration steps in the OpenVPN client:
2.1) Transfer the SSL VPN profile exported in step 1.13 to the Android device.
| Hinweis |
|---|
| Make sure that the method of transmission is secure! |
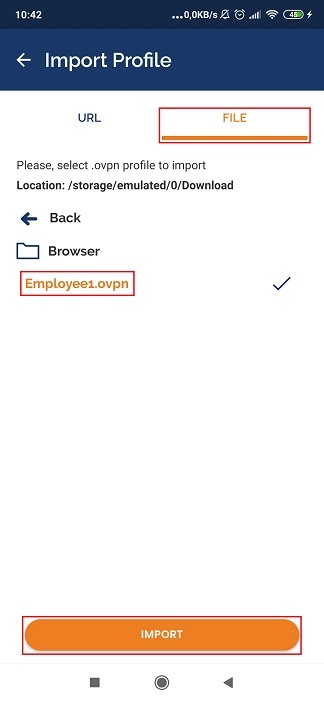
2.2) Open the OpenVPN app on the Android device, click on Import Profile → FILE and select the profile from the folder where you saved the SSL VPN profile.
Then click on IMPORT.
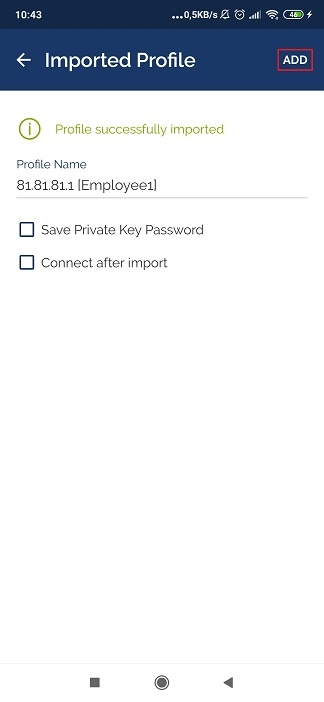
2.3) A message is displayed to indicate that the profile was successfully imported.
2.4) Click on Add to save the configuration.
| Hinweis |
|---|
| The checkmark next to Save Private Key Password should not be set in case the device is lost. It would then be possible for anybody to access to the company network without having to enter the Transport Password (see step 1.13)! |
2.5) This concludes the configuration steps in the OpenVPN client.
3) Setting up port forwarding on a LANCOM router (scenario 2 only):
VPN SSL uses the UDP port 1194 by default. It must be forwarded to the Unified Firewall.
| Info |
|---|
The port for SSL VPN can be changed in the Unified Firewall (see step 1.8 ). If you are using a router from another manufacturer, approach them for information about the appropriate procedure. |
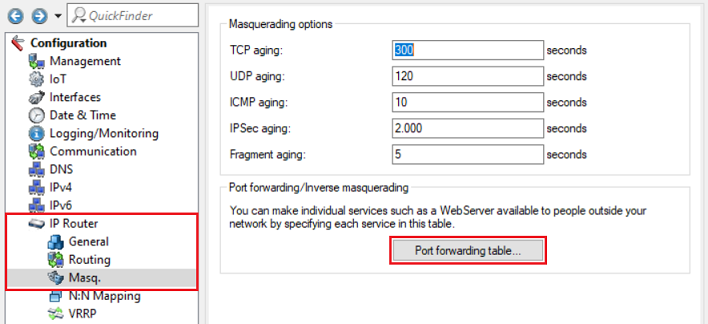
3.1) Open the configuration of the router in LANconfig and switch to the menu item IP router → Masq. → Port forwarding table.
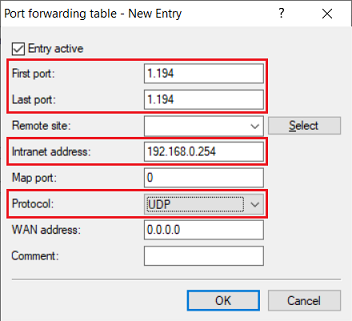
3.2) Save the following parameters:
- First port: Specify the Port 1194.
- Last port: Specify the Port 1194.
- Intranet address: Specify the IP address of the Unified Firewall in the transfer network between the Unified Firewall and the LANCOM router.
- Protocol: From the drop-down menu, select UDP.
3.3) Write the configuration back to the router
1.14 Klicken Sie auf die Schaltfläche zum Erstellen eines neuen VPN-Hosts.
1.15 Hinterlegen Sie folgende Parameter:
- Name: Vergeben Sie einen aussagekräftigen Namen.
- VPN-Verbindungstyp: Wählen Sie VPN-SSL aus.
- VPN-SSL-Verbindung: Wählen Sie im Dropdownmenü die in Schritt 1.10 erstellte VPN-SSL Verbindung aus.
1.16 Klicken Sie in dem VPN-Host auf das "Verbindungswerkzeug" und klicken anschließend auf das Netzwerk-Objekt, auf welches der OpenVPN Client zugreifen können soll, damit die Firewall-Objekte geöffnet werden.
Wiederholen Sie diesen Schritt für jedes weitere Netzwerk, in welches der OpenVPN Client Zugriff haben soll.
1.17 Weisen Sie über die "Plus-Zeichen" die erforderlichen Protokolle dem VPN-Host zu.
| Info |
|---|
| Eine Unified Firewall verwendet eine Deny-All Strategie. Die Kommunikation muss also explizit erlaubt werden. |
| Info |
|---|
| Die Firewall-Objekte können Sie auch über Desktop → Desktop-Verbindungen aufrufen, indem Sie auf das "Stift-Symbol" zum Bearbeiten klicken. |

1.18 Klicken Sie zuletzt in der Unified Firewall auf Aktivieren, damit die Konfigurations-Änderungen umgesetzt werden.
1.19 Die Konfigurationsschritte auf der Unified Firewall sind damit abgeschlossen.
2. Konfigurationsschritte im OpenVPN Client:
2.1 Übertragen Sie das in Schritt 1.13 exportierte SSL-VPN-Profil auf das Android Gerät.
| Hinweis |
|---|
| Stellen Sie sicher, dass eine sichere Übertragungsart gewählt wird! |
2.2 Öffnen Sie die OpenVPN App auf dem Android Gerät, klicken auf Import Profile → FILE und wählen in dem Ordner, in dem Sie das SSL-VPN-Profil abgelegt haben, das Profil aus.
Klicken Sie anschließend auf IMPORT.
2.3 Der erfolgreiche Import des Profils wird mit einer entsprechenden Meldung quittiert.
2.4 Klicken Sie auf ADD, um das Profil zu speichern.
| Hinweis |
|---|
| Der Haken bei Save Private Key Password sollte nicht gesetzt werden, da bei Verlust des Gerätes ein Zugriff auf das Firmen-Netzwerk ohne Eingabe des Transport Password (siehe Schritt 1.13) möglich ist! |
2.5 Die Konfigurationsschritte im OpenVPN Client sind damit abgeschlossen.
3. Einrichtung eines Port-Forwarding auf einem LANCOM Router (nur Szenario 2):
Für VPN-SSL wird im Standard der TCP-Port 1194 verwendet. Dieser muss auf die Unified Firewall weitergeleitet werden.
| Info |
|---|
| Der Port für SSL-VPN lässt sich in der Unified Firewall ändern (siehe Schritt 1.8). Sollte ein Router eines anderen Herstellers verwendet werden, erfragen Sie die Vorgehensweise bei dem jeweiligen Hersteller. |
3.1 Öffnen Sie die Konfiguration des Routers in LANconfig und wechseln in das Menü IP-Router → Maskierung → Port-Forwarding-Tabelle.

3.2 Hinterlegen Sie folgende Parameter:
- Anfangs-Port: Hinterlegen Sie den Port 1194.
- End-Port: Hinterlegen Sie den Port 1194.
- Intranet-Adresse: Hinterlegen Sie die IP-Adresse der Unified-Firewall im Transfernetz zwischen Unified Firewall und LANCOM Router.
- Protokoll: Wählen Sie im Dropdown-Menü TCP aus.
3.3 Schreiben Sie die Konfiguration in den Router zurück.