Versionen im Vergleich

Schlüssel

  • Diese Zeile wurde hinzugefügt.
  • Diese Zeile wurde entfernt.
  • Formatierung wurde geändert.


Seiteneigenschaften


Description:
This document describes how to use a LANCOM WLAN controller with the One Click Backup feature to backup existing certificates and then transfer them to another LANCOM WLAN controller. This can be useful, if for example, an existing WLAN Controller is to be replaced by a new one.


Requirements:
Info

How you transfer certificates between WLAN controllers with a firmware version older than LCOS 9 is described in the following Knowledge Base article Image Removed.

  •  


Procedure:

1) Steps to carry out on the source device:

1.1) Creating the One Click Backup:
On the LANCOM WLAN controller containing the certificates, you first perform a backup to the CA (certification authority). The backup is stored on the WLAN controller.
  • Open a CLI session via SSH on the WLAN controller and run following command:
    do /Setup/Certificates/SCEP-CA/CA-certificates/Create-PKCS12-Backup-Files <password>
Info

At this point you set the <password> to a password of your choice.The password is required because it is only possible to upload certificate containers to a LANCOM device if a password has been set.

Image Removed

Image Added

You then enter the command ls /Status/File-System/Contents. This allows you to check whether the backup files were successfully created. The following files should appear in the list:

  • scep_ca_backup
  • scep_ra_backup
Image Removed

Image Added


1.2) Exporting the "One Click Backup":
1.2.1) Exporting the "One Click Backup" via LANconfig:
1.2.1.1) Mark the WLAN Controller in LANconfig, perform a rightclick, and in the context menu select
Konfigurations-Verwaltung → Zertifikat als Datei sichern.
Configuration Management → Save Certificate as File .
Image Added
1.2.1.2
Wählen Sie einen Speicherort aus, passen bei Bedarf den Dateinamen an und wählen als Zertifikattyp die 
) Choose a folder location, edit the File Name if necessary and select the option Option SCEP-CA - One Click Backup
 aus. Klicken Sie anschließend auf Speichern
as Certificate . Click Save afterwards .

1.2.2) Exporting the "One Click Backup" via WEBconfig:
Öffnen Sie die Konfiguration des WLAN-Controllers im Browser, wechseln in das Menü 
Open the configuration of the WLAN Controller in a web browser, go to the menu (Extras) →
LCOS-Menübaum → Dateimanagement → Zertifikat oder Datei herunterladen und wählen als Dateityp die Option SCEP-
File Management → Download Certificate or File and select the option SCEP CA - One
Click In the next step, the files for the CA & RA backups, the SCEP CA certificate list, and the SCEP CA serial number need to be downloaded from the WLAN controller and saved to your PC or an external data medium (see figure).
  • You can do this, for example, using WEBconfig with the menu item File management -> Download certificate or file.
  • For the file type, select the option of
    click Backup
    . Klicken Sie anschließend auf Download starten und speichern die Datei am gewünschten Speicher-Ort ab.
    as File Type.
    Click Start Download afterwards and save the backup to the desired folder.
    Image Added


    2) Steps to carry out on the target device:

    The new WLAN Controller has to be in factory state! If the device was already configured or the backup of the old WLAN Controller was uploaded, the device has to be reset to factory state.

    2.1) Uploading the "One Click Backup":
    2.1.1) Uploading the "One Click Backup" via LANconfig:
    2.1.1.1) Mark the WLAN Controller in LANconfig, perform a rightclick, and in the context menu select Configuration Management → Upload Certificate or File .
    Image Added
    2.1.1.2) Select the SCEP-CA - One Click Backup file, select the o ption 
    SCEP-CA - One Click Backup
    . This methods exports all of the required files to a file named "scep_download_oneclick_backup".
    2) Steps to carry out on the target device:

    Der neue WLAN-Controller muss sich zwingend im Werkszustand befinden! Sollte dieser bereits konfiguriert bzw. das Backup des alten WLAN-Controllers eingespielt worden sein, setzen Sie das Gerät auf den Werkszustand zurück.

    2.1. Hochladen des "One Click Backup" per LANconfig:
    2.1.1 Markieren Sie den WLAN-Controller in LANconfig, führen einen Rechtsklick aus und wählen im Kontextmenü Konfigurations-Verwaltung → Zertifikat oder Datei hochladen.
    2.1) Open WEBconfig and use the item File management -> Upload certificate or file.
    2.2) Set the file type to the option SCEP-CA - One Click Backup and, in the file name box, specify the path to the file "scep_download_oneclick_backup" which you saved in step 1.2.
    2.3) In the Password field you have to enter the password that you assigned in step 1.1.
    Image Removed
    2.3) Run the following command on the SSH console to perform
    as Certificate and enter the Cert. password (see step 1.1 ).  Click Open afterwards to upload the backup to the device .

    2.1.2) Uploading the "One Click Backup" via WEBconfig:
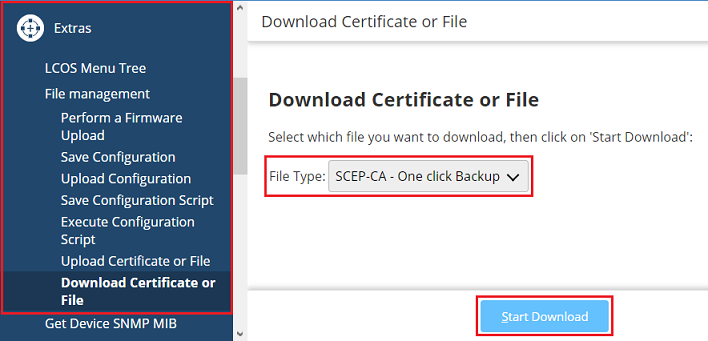
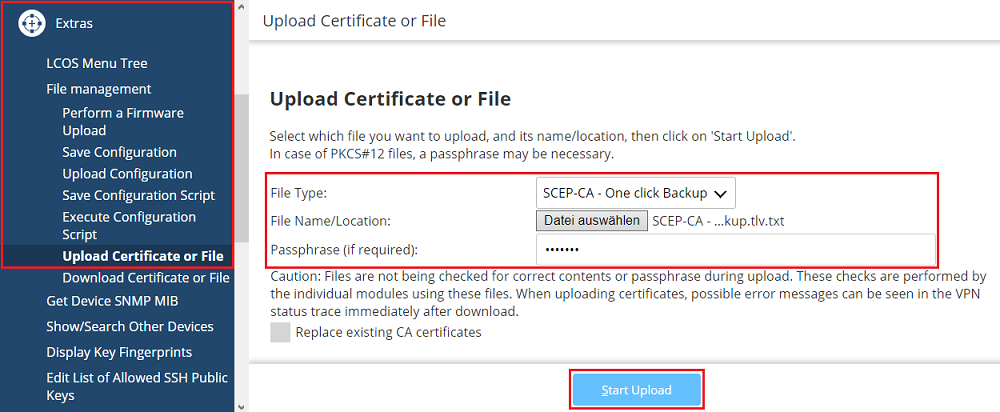
    Open the configuration of the WLAN Controller in a web browser, go to the menu (Extras) → File Management → Upload Certificate or File and select the option SCEP CA - One click Backup as File Type
    Afterwards select the backup at File Name/Location and enter the Passphrase for the One Click Backup (see step 1.1).
    Then click Start Upload.
    Image Added


    2.2) Uploading the script configuration of the old WLAN Controller into the new device:


    Info

    The main device password isn't included in a script configuration and therefore has to be set manually after importing the script.

    2.2.1) Uploading the script configuration via LANconfig:

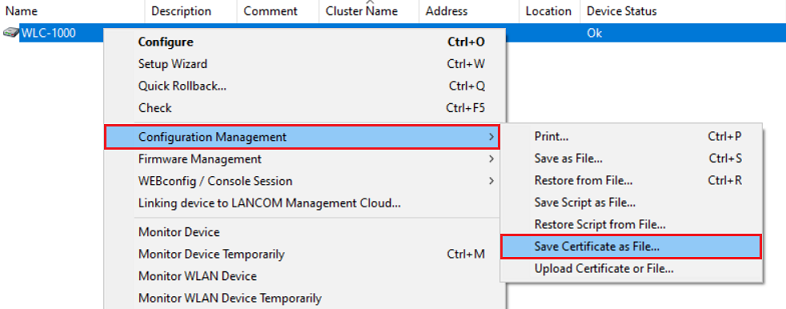
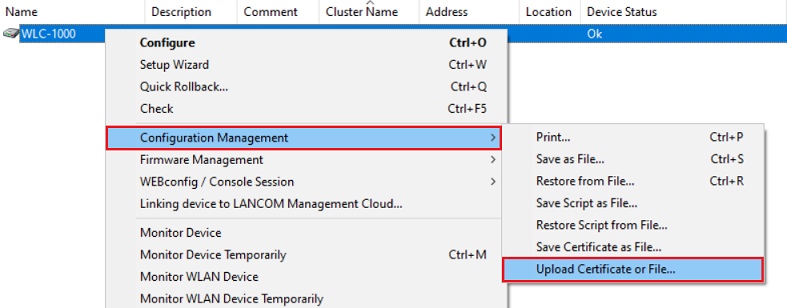
    2.2.1.1) Mark the WLAN Controller in LANconfig, perform a rightclick, and in the context menu select   Configuration Management → Restore Script from File.
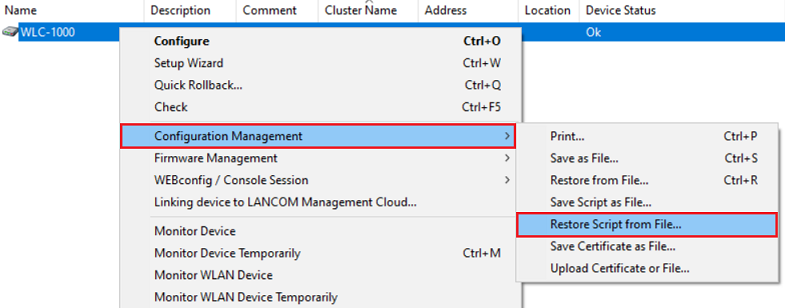
    Image Added
    2.2.1.2) Select the script backup and click  Open.

    2.2.2) Uploading the script configuration via WEBconfig:
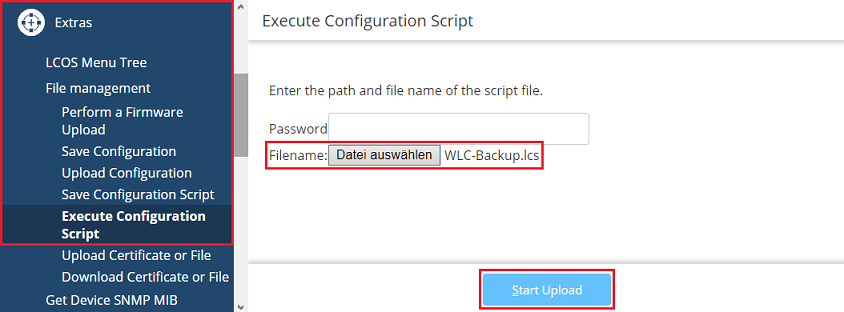
    Open the configuration of the new WLAN Controller in a Web browser, go to the menu (Extras) → File management → Execute Configuration Script, select the script backup and click Start Upload
    Image Added


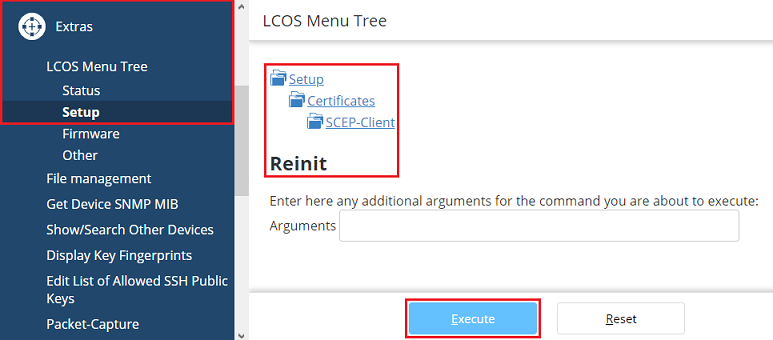
    2.3) Reinitializing the SCEP Client:
    2.3.1) Reinitializing the SCEP Client via the CLI:
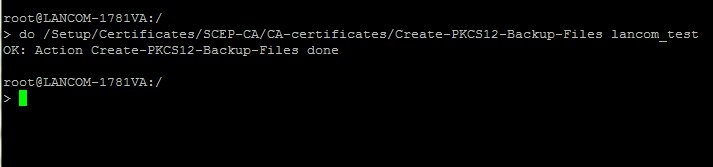
    Connect to the WLAN Controller via the CLI and enter the following command
    the upload
    :
    do /Setup/Certificates/SCEP-Client/Reinit

    2.3.
    4
    2)
    This concludes the transfer of the certificates.
    Reinitializing the SCEP Client via WEBconfig:
    In WEBconfig go to the menu (Extras) → LCOS Menu Tree → Setup → Certificates → SCEP-Client → Reinit  and click Execute.
    Image Added