
| Seiteneigenschaften |
|---|
Description:In diesem Artikel wird beschrieben, wie ein ePaper-Server mittels Modern Authentication an Office 365 angebunden werden kann, um Termine aus Office 365 auf den ePaper-Displays darzustellen
This article describes how an ePaper server can be connected to Office 365 using modern authentication in order to show appointments in Office 365 on ePaper displays.
| Hinweis |
|---|
Please note, that LANCOM Systems cannot perform troubleshooting for such a scenario as an analysis of the external systems (Microsoft Azure and Office 365) is not possible. |
| Info |
|---|
The ePaper server was discontinued in January 2024 (End of Sale).Therefore LANCOM Systems will not provide support for new installations of the ePaper server. LANCOM Systems will provide support for existing ePaper server installations up to and including January 2026. |
Requirements:
- Zugang zu Access to Office 365Zugriff
- auf das Access to the Office 365 Admin-Konto
- In Office 365 muss ein Benutzerkonto existieren, welches als Postfachstellvertreter in allen gewünschten Raumpostfächern eingetragen wird.
- Die Raumpostfächer müssen als Ressourcenpostfächer angelegt werden.
- Bereits eingerichtetes und funktionsfähiges ePaper-Szenario
- Der ePaper-Server muss auf einem Windows System installiert sein
- Windows PowerShell muss auf dem Windows System verfügbar sein, auf dem der ePaper-Server installiert ist
- Aktueller Web-Browser mit Java-Script Support als Standard-Browser
- admin account
- An Office 365 user account must be available that can be entered as a mailbox delegate in all of the required room mailboxes.
- The room mailboxes need to be created as resource mailboxes.
- Installed and functional ePaper scenario
- The ePaper server must be installed on a Windows system
- Windows PowerShell as of version 7.0 must be available on the Windows system where the Python scripts are executed
- Current web browser with Java Script support as the default browser
- Python from version Python ab Version 3.4
Procedure:
1. Vorbereitende Schritte ) Preparation in Microsoft Azure:
Der Zugang zu Office 365 wird im Hintergrund über Microsoft Azure realisiert. Daher ist bei Verwendung von Office 365 immer auch ein Zugang zu Microsoft Azure vorhanden. Damit der ePaper-Server an Office 365 angebunden werden kann, müssen in Microsoft Azure einige Einstellungen vorgenommen werden.
Access to Office 365 is implemented in the background via Microsoft Azure, so whenever the system uses Office 365, it also needs access to Microsoft Azure. Some settings must be made in Microsoft Azure in order for the ePaper server to connect to Office 365.
1.1) Use the following link to log into Microsoft Azure1.1 Rufen Sie den folgenden Link auf, um sich bei Microsoft Azure anzumelden.
https://portal.azure.com/#blade/Microsoft_AAD_RegisteredApps/ApplicationsListBlade
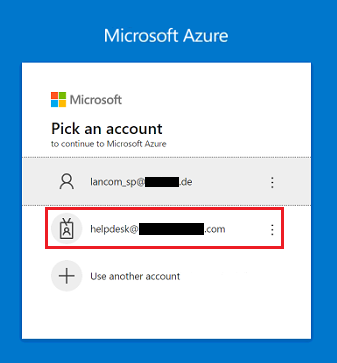
1.2 Wählen Sie das Administrator-Konto von Office 365 aus und melden sich an) Select the Office 365 administrator account and log in.
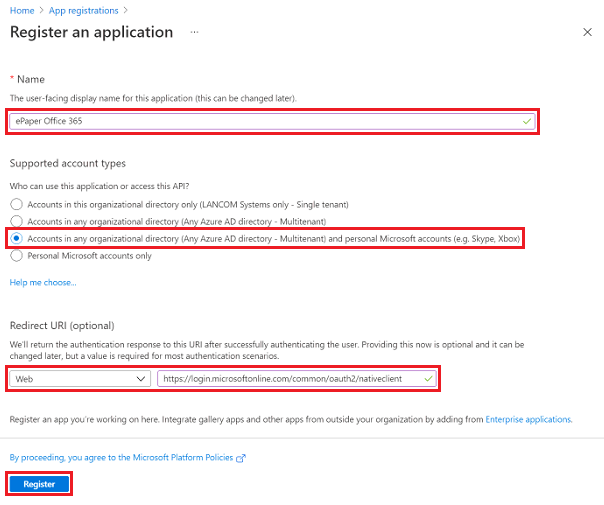
1.3 Klicken Sie bei ) Under App registrations auf click on New registration , um eine Anwendung mit Azure zu verbindento connect an application to Azure.

1.4 Passen Sie die folgenden Parameter an und klicken auf Registrieren) Modify the following parameters and then click Register:
- Name: Vergeben Sie einen aussagekräftigen Namen für die Anwendung (in diesem Beispiel LANCOM ePaper O365Enter a descriptive name for the application (in this example ePaper Office 365).
- Supported account types: Wählen Sie die Option Select the option Accounts in any organizational directory and personal Microsoft accounts aus.
- Redirect URI: Stellen Sie sicher, dass Web ausgewählt ist und tragen den folgenden Link einMake sure that Web is selected and enter the following link:
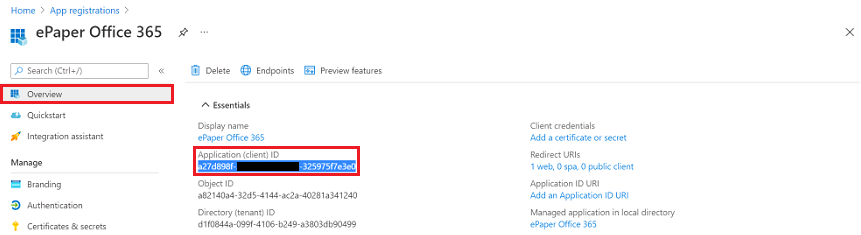
1.5 Kopieren Sie in der Overview die ) In the Overview, copy the Application (client) ID und speichern diese zur späteren Verwendung in einer Text-Datei ab and save it in a text file for later use.
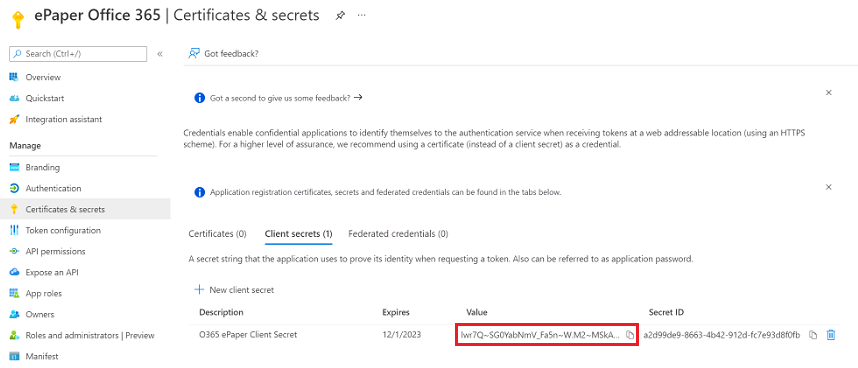
1.6 Wechseln Sie in den Reiter ) Switch to the tab Certificates & secrets und klicken auf and click on New client secret , um einen Schlüssel für die Kommunikation mit Office 365 zu generierento generate a key for communicating with Office 365.
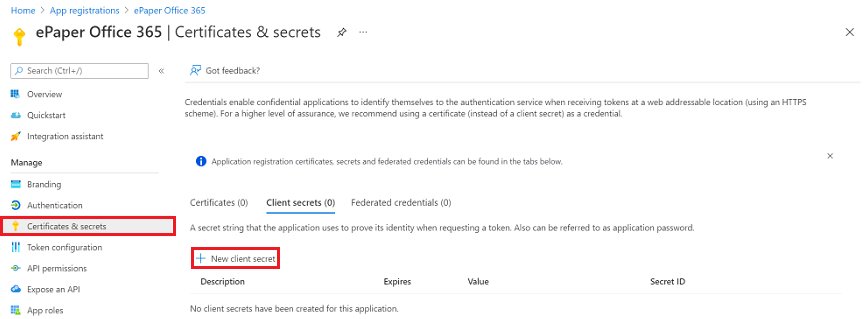
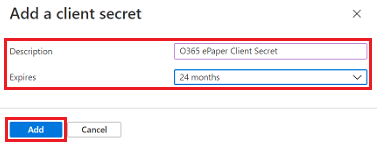
1.7 Passen Sie die folgenden Parameter an und klicken auf ) Modify the following parameters and then click Add:
- Description: Vergeben Sie einen aussagekräftigen Namen für den SchlüsselEnter a descriptive name for the new key.
- Expires: Wählen Sie im Dropdownmenü eine Gültigkeitsdauer aus (in diesem Beispiel 24 MonateFrom the drop-down menu, select a validity period (in this example 24 months).
| Info |
|---|
Nach Ablauf der Gültigkeit muss ein neuer Schlüssel erstellt werden und dieser in den Python-Skripten hinterlegt werden (siehe Schritt 2.2 und After the validity expires, a new key must be created and stored in the Python scripts (see steps 2.2 and 2.3). |
1.8 Kopieren Sie den secret key (Value) und speichern diesen zur späteren Verwendung in einer Textdatei ab) Copy the Secret key (value) and save it in a text file for later use.
| Hinweis |
|---|
Der geheime Schlüssel muss zwingend zu diesem Zeitpunkt kopiert werden, da dies zu einem späteren Zeitpunkt nicht mehr möglich ist. In diesem Fall muss der Schlüssel gelöscht und ein neuer erstellt werdenThe secret key must be copied at this time, as this is subsequently no longer possible. In this case the key must be deleted and a new one created. |
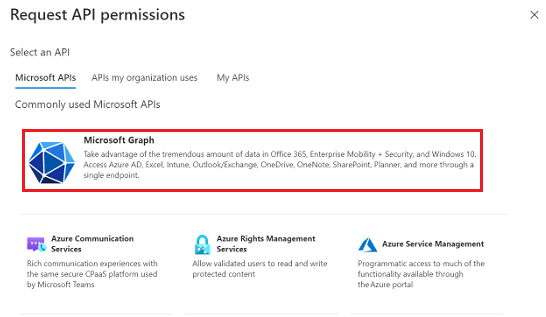
1.9 Wechseln Sie in den Reiter API permission und klicken auf ) Change to the API permissions tab and click on Add a permission.

1.10 Klicken Sie auf ) Click on Microsoft Graph.
1.11 Wählen Sie ) Choose Delegated permissions aus.
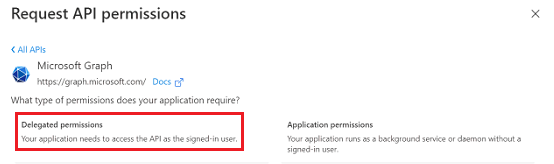
1.12 Wählen Sie die folgenden Berechtigungen aus und klicken anschließend auf ) Select the following permissions and then click Add permissions:
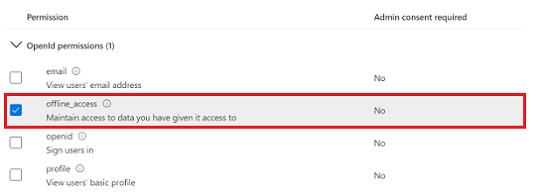
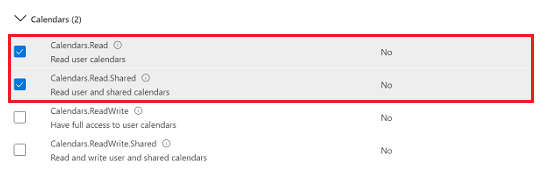
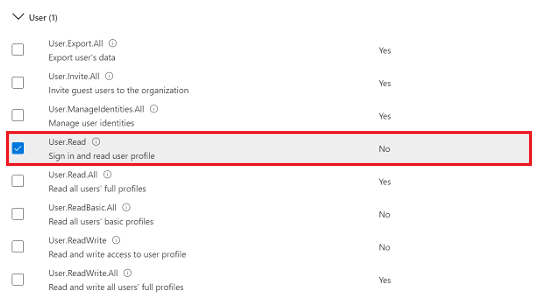
- OpenId permissions:
- offline_access
- Calendars:
- Calendars.Read
- Calendars.Read.Shared
- User:
- User.Read (Standardmäßig ausgewähltselected by default)
![]()
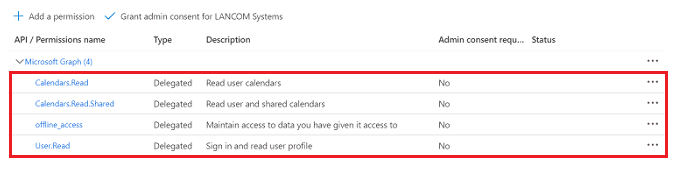
1.13 Die Berechtigungen sehen anschließend wie folgt aus) The permissions should appear as shown below.
1.14 Die vorbereitenden Schritte ) This concludes the preparations in Microsoft Azure sind damit abgeschlossen.
2. Anpassung der mitgelieferten Skript-Dateien:
Damit die Anbindung funktioniert, müssen in den Python-Skripten noch die Login-Daten und in der Konfigurations-Datei noch einige Informationen zum ePaper Server hinterlegt werden. Weiterhin muss das ePaper-Template in das Installationsverzeichnis des ePaper-Servers kopiert werden, sofern noch kein eigenes Template verwendet wird.
) Adapting the supplied script files:
For the connection to work, the login data has to be stored in the Python scripts and information about the ePaper server has to be stored in the configuration file. Furthermore, the ePaper template has to be copied to the installation directory of the ePaper server, unless you use a customized template.
To do this, download the file in the attachment Laden Sie sich dazu die im Anhang befindliche Datei ePaper-Office 365-Scripts.zip herunter und entpacken diese and unzip it.
| View file | ||||
|---|---|---|---|---|
|
2.1 Kopieren des ePaper-Templates in das Installationsverzeichnis des ePaper-Servers:
| Info |
|---|
Sollten Sie bereits ein angepasstes Template verwenden, so überspringen Sie diesen Schritt. |
Kopieren Sie das ePaper-Template lcsconference_landscape.xsl und fügen dieses im Installationsverzeichnis des ePaper-Servers in den Ordner data → template ein.
2.2 Anpassung der Datei "O365_Auth.py":
Bearbeiten Sie die Datei O365_Auth.py in einem Texteditor und tragen bei credentials die in Schritt 1.5 kopierte Anwendungs-ID (Client) und den in Schritt 1.8 kopierten Geheimen Schlüssel (Wert) ein.
| Hinweis |
|---|
Die Logindaten müssen jeweils in Hochkommata eingetragen werden, wie auf dem Screenshot ersichtlich. |
2.3 Anpassung der Datei "O365_Update.py" bzw. "O365_Update_24h.py":
Bearbeiten Sie die Datei O365_Update.py oder O365_Update_24h.py in einem Texteditor und passen folgende Parameter an:
- credentials: Tragen Sie die in Schritt 1.5 kopierte Anwendungs-ID (Client) und den in Schritt 1.8 kopierten Geheimen Schlüssel (Wert) ein.
- tzone: Passen Sie bei Bedarf die Zeitzone an.
) Copy the ePaper template into the installation directory of the ePaper server:
| Info |
|---|
Skip this step if you are already using a customized template. |
Copy the ePaper template lcsconference_landscape.xsl and add this to the installation directory of the ePaper server (Default: C:\Program Files (x86)\LANCOM\WePD-Server) in the folder data → template.
2.2) Adapting the file “O365_Auth.py”:
Edit the file O365_Auth.py in a text editor and, under credentials, add the Application ID (client) copied in step 1.5 and the Secret key (value) copied in step 1.8.
| Hinweis |
|---|
The login data must be entered in single quotes, as shown in the screenshot. |

2.3) Adapting the file “O365_Update_v3.py” or “O365_Update_24h_v3.py”:
Edit the file O365_Update_v3.py or O365_Update_24h_v3.py in a text editor and adjust the following parameters:
- credentials: Enter the Application ID (client) copied in step 1.5 and the Secret key (value) copied in step 1.8.
- tzone: If required, change the time zone.
| Info |
|---|
One of the following scriptsis used: O365_Update_v3.py or O365_Update_24h_v3.py.
|
| Info |
Es wird entweder das Skript O365_Update.py oder O365_Update_24h.py verwendet:
|
| Hinweis |
|---|
Die Logindaten sowie die Zeitzone müssen jeweils in Hochkommata eingetragen werden, wie auf dem Screenshot ersichtlich. |
The login data and the time zone must be entered in single quotes, as shown in the screenshot. |

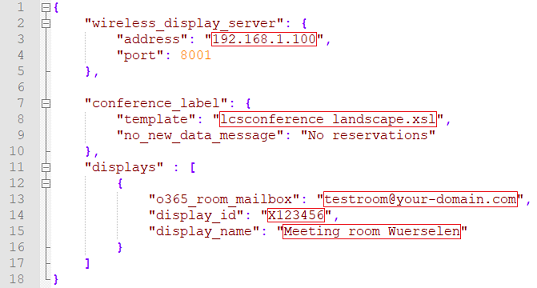
2.4) Adapting the file “config.json”2.4 Anpassung der Datei "config.json":
2.4.1 Bearbeiten Sie die Datei ) Edit the file config.json und passen die folgenden Parameter an: and modify the following parameters:
- Under Tragen Sie unter wireless_display_server die IP-Adresse des ePaper-Servers als address ein.
- Hinterlegen Sie unter conference_label das von ihnen verwendete Template, sofern Sie ein eigenes Template verwenden und diesem einen anderen Namen gegeben haben.
- , set the address as the IP address of the ePaper server.
- Under conference_label enter your preferred template, assuming that you use your own template and have given it a different name.
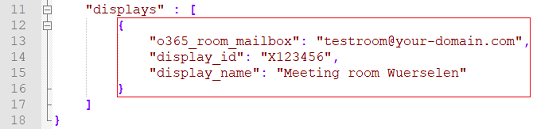
- Modify the following parameters under displayPassen Sie unter displays folgende Parameter an:
- o365_room_mailbox: Tragen Sie die E-Mail-Adresse des gewünschten Kalender-Postfachs einEnter the e-mail address of the required calendar mailbox.
- display_id: Tragen Sie die Enter the Display - ID eines ePaper-Displays einof an ePaper Display.
- display_name: Tragen Sie einen aussagekräftigen Namen für das ePaper-Display einEnter a descriptive name for the ePaper Display.
| Hinweis |
|---|
The parameters must be entered in closing quotation marks, as shown in the screenshot. |
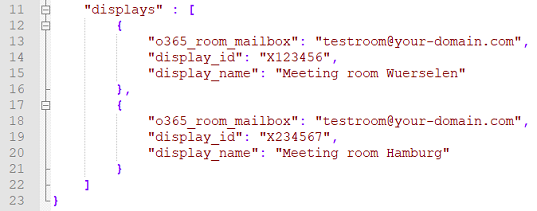
2.4.2 Bei Verwendung mehrerer ePaper-Displays muss im Abschnitt displays für jedes Display der markierte Bereich kopiert und darunter eingefügt werden. Der Abschnitt eines ePaper-Displays muss jeweils durch ein Komma von dem Abschnitt des nächsten Displays getrennt werden. Die Parameter der weiteren Displays müssen wie in Schrtt ) When using multiple ePaper displays, for each display the selected area in the displays section must be copied and pasted immediately below. The section for each ePaper display has to be separated by a comma from the section for the next display below. The parameters for the other displays must be adapted as described in step 2.4.1 beschrieben angepasst werden.
2.4.3 Für zwei ePaper-Displays sieht der Abschnitt displays anschließend wie folgt aus.
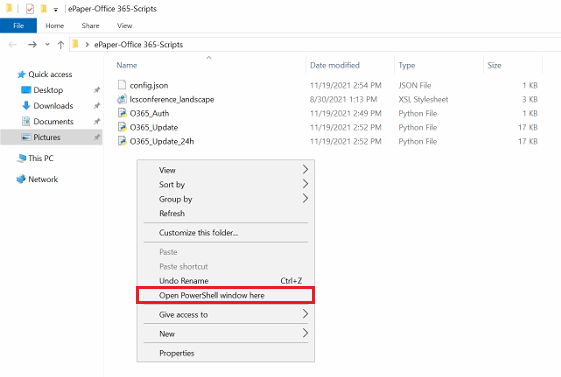
3. Abschließende Schritte in der Windows Power-Shell auf dem System mit dem ePaper-Server:
...
) For two ePaper displays, see the displays section appears as follows.
3) Final steps in the Windows Power Shell on the system with the ePaper server:
Open the folder containing the Python scripts, open the context menu by right-clicking while holding down the <shift key>, and select Open PowerShell window here.
| Info |
|---|
As an alternative you can also start a Powershell instance and navigate to the script folder. |
3.1 Installation der Python Module für ) Installing the Python modules for Office 365:
Geben Sie den folgenden Befehl ein3.1.1) Enter the following command: pip install o365
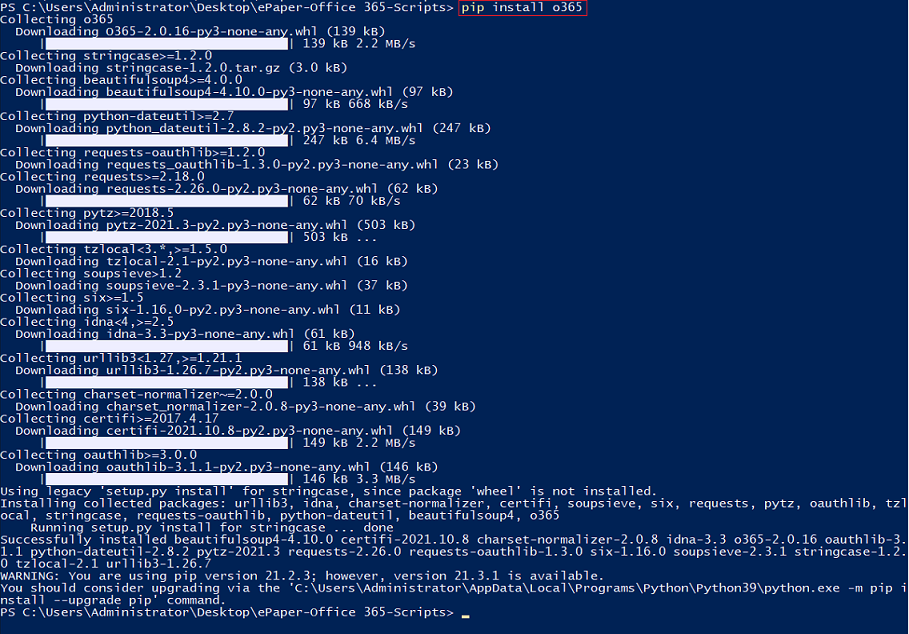
3.1.2) Enter the command pip install tzdata to connect the IANA timezone database.

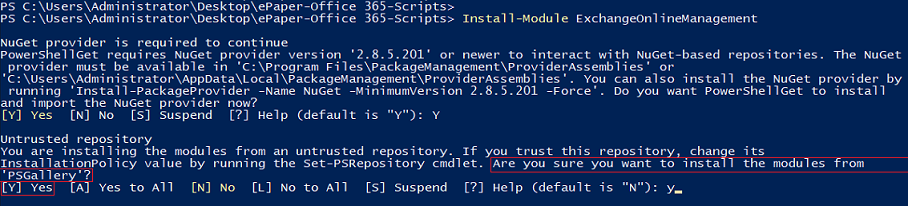
3.2 Installation des ExchangeOnlineManagement-Moduls) Installing the ExchangeOnlineManagement module:
3.2.1 Geben Sie den folgenden Befehl ein) Enter the following command: Install-Module ExchangeOnlineManagement
3.2.2 Bestätigen Sie die Abfrage ) Confirm the query Do you want PowerShellGet to install and import the NuGet provider now? mit with Y (Yes).

3.2.3 Bestätigen Sie die Abfrage ) Confirm the prompt Are you sure you want to install the modules from 'PSGallery'? mit with Y (Yes).
3.3 Import des ExchangeOnlineManagement-Moduls:) Importing the ExchangeOnlineManagement module:
To do this, enter the following command: Geben Sie den folgenden Befehl ein: Import-Module ExchangeOnlineManagement

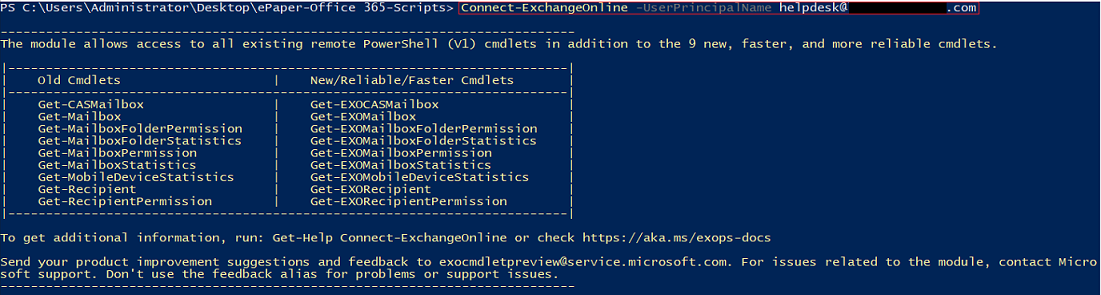
3.4 Registrierung des ) Registering the Office 365 Administrator-Kontos am ExchangeOnline-Moduladministrator account on the ExchangeOnline module:
3.4.1 Geben Sie den Befehl für die Registrierung in dem folgenden Format ein) Enter the command for registering in the following format: Connect-ExchangeOnline -UserPrincipalName <admin@your-domain.com>
Tragen Sie als Set the <admin@your-domain.com> die E-Mail Adresse des Office 365 Administrator-Kontos einas the e-mail address of the Office 365 administrator account used in step 1.2.
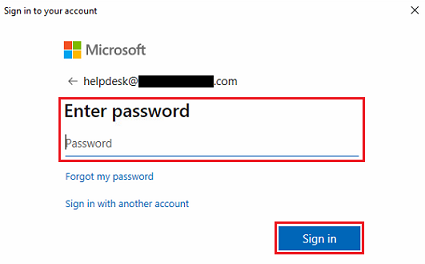
3.4.2 Loggen Sie sich in dem Popup-Fenster des Web-Browsers im Administrator-Konto ein.) In the web browser pop-up window, log into the Administrator account.
| Hinweis |
|---|
The popup window is only displayed correctly if the web browser supports JavaScript |
| Hinweis |
Das Popup-Fenster wird nur korrekt angezeigt, wenn der verwendete Web-Browser JavaScript unterstützt. |
3.5 Anzeige des Organisators und des Betreffs auf den ePaper-Displays ermöglichen:) Displaying the organizer and the subject on the ePaper Displays:
To register, enter the command in the following formatGeben Sie für die Registrierung den Befehl in dem folgenden Format ein: Set-CalendarProcessing -Identity <testroom@your<testroom@your-domain.com> com> -DeleteSubject $False -AddOrganizerToSubject $FalseTragen Sie als <testroom@your
Set the <testroom@your-domain.com> die E-Mail Adresse des Kalender-Postfachs eincom> as the e-mail address of the room mailbox.

3.6 Generierung eines Tokens zur Authentifizierung des Postfachstellvertreters) Generating a token for authenticating the mailbox proxy:
3.6.1 Geben Sie den folgenden Befehl ein) Enter the following command: python O365_Auth.py
3.6.2 Kopieren Sie den Link unter ) Copy the link under Visit the following url to give consent: und geben diesen in einem Web-Browser ein and enter it into a web browser.

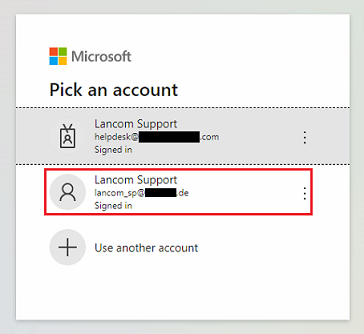
3.6.3 Loggen Sie sich mit dem Account für das Kalender-Postfach ein) Log in using the account for the mailbox delegate.
3.6.4 Kopieren Sie nach dem Login den Link aus dem Web-Browser) After logging in, copy the link from the web browser.

3.6.5 Fügen Sie den kopierten Link in der PowerShell ein. Die erfolgreiche Authentifizierung wird mit der Meldung Authenticated! quittiert.) Paste the link into PowerShell. Successful authentication is acknowledged with the message Authenticated!

3.8 Starten des ePaper-Update-Skriptes:) Starting the ePaper update script:
Enter one of the following commands (see also step Geben Sie einen der folgenden Befehle ein (siehe auch Schritt 2.3): python O365_Update_v3.py .\config.json -i 3 -u required oder or python O365_Update_24h_v3.py .\config.json -i 3 -u required
| Info |
|---|
The parameter -i stands for the update interval in minutes. In this example, the ePaper server searches for updates every 3 minutes. However, an update is only rolled out to the ePaper displays if there is actually a change. You can use the Windows Task Scheduler to continuously run the update scriptDer Parameter -i steht für das Update-Intervall in Minuten. Der ePaper-Server sucht in diesem Beispiel also alle 3 Minuten nach Updates. Ein Update wird aber nur auf die ePaper-Displays ausgerollt, wenn es auch eine Änderung gibt. |
