Description: As a rule, each VPN dial-in access requires the creation of a separate user. In larger-scale scenarios it therefore makes sense to set up an IKEv2 connection with RADIUS forwarding. All you have to do then is create a single VPN dial-up access in the router. This article describes how to set up an IKEv2 client-to-site VPN connection between a device using the Advanced VPN Client and a LANCOM router. Authentication takes place via the RADIUS server integrated in the LANCOM router. Requirements:Scenario:- A VPN client dial-in is to be set up at the headquarters for the mobile employees.
- Authentication is handled by the RADIUS server integrated in the LANCOM router.
- The headquarters has the IP address range 192.168.0.0/24.
 Image Removed Image Removed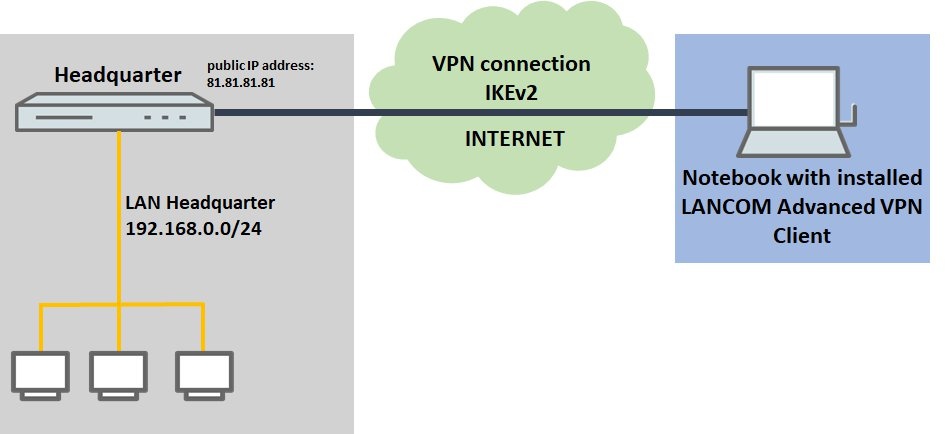 Image AddedProcedure: Image AddedProcedure:1) Configuration steps on the router at the headquarters: 1.1) Open the configuration for the router in LANconfig and switch to the menu item VPN → General.  Image Removed Image Removed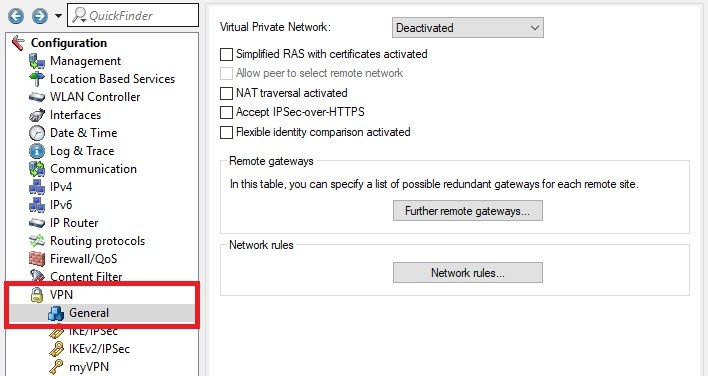 Image Added Image Added1.2) Enter the following parameters: - For Virtual Private Network set the drop-down menu to activated.
- Set a checkmark next to NAT traversal activated.
- Set a checkmark next to Accept IPSec-over-HTTPS.
 Image Removed Image Removed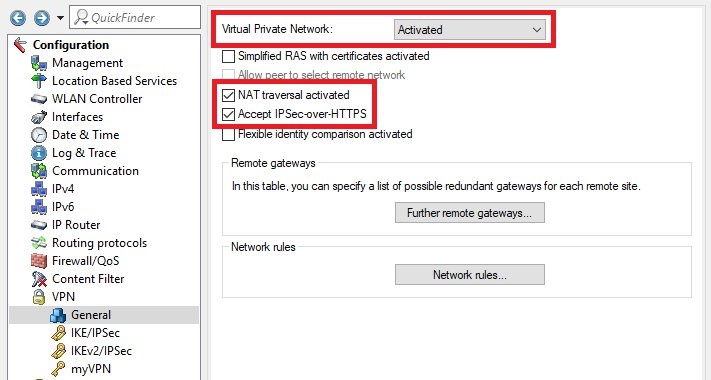 Image Added Image Added1.3) Switch to the menu VPN → IKEv2/IPSec → Extended settings.  Image Removed Image Removed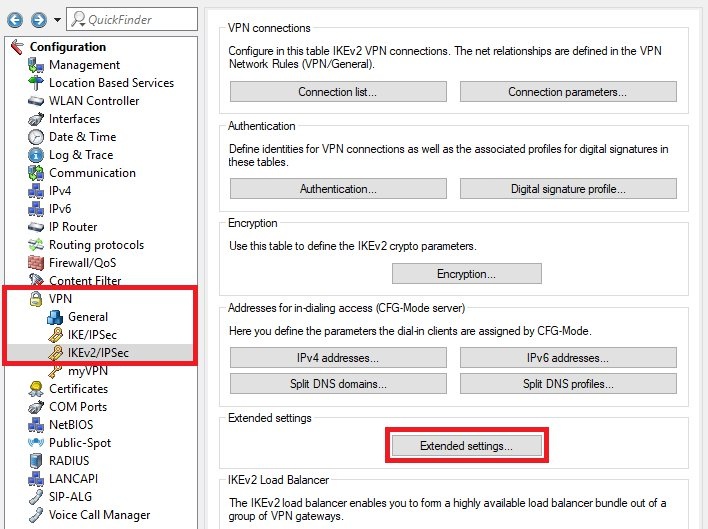 Image Added Image Added1.4) Fill out the field Password with a challenge password. The RADIUS server receives this in the access request attribute as the user password. | Info |
|---|
Normally, the RADIUS server assigns the challenge password directly to a VPN remote site. However, with IKEv2 it is not the RADIUS server that authorizes the requesting VPN remote site, but the VPN module. After the VPN module has received the access-accept message from the RADIUS server, the VPN module authenticates the VPN remote site. |
 Image Removed1.5) On the panel RADIUS authentication, go to the menu RADIUS server Image Removed1.5) On the panel RADIUS authentication, go to the menu RADIUS server Image Removed Image Removed1.6) Save the following parameters: - Name: Set a descriptive name.
- Server address: Enter the loopback address 127.0.0.1.
- Port: Check that the port is set to 1812.
 Image Removed Image Removed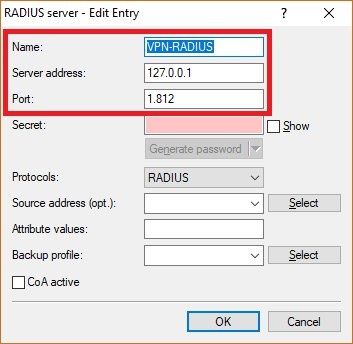 Image Added Image Added1.7) Set the Update cycle to the value 60, so that the accounting is updated every 60 seconds. | Hinweis |
|---|
The update cycle must be set to a value other than 0, since the value 0 deactivates the updates! |
 Image Removed Image Removed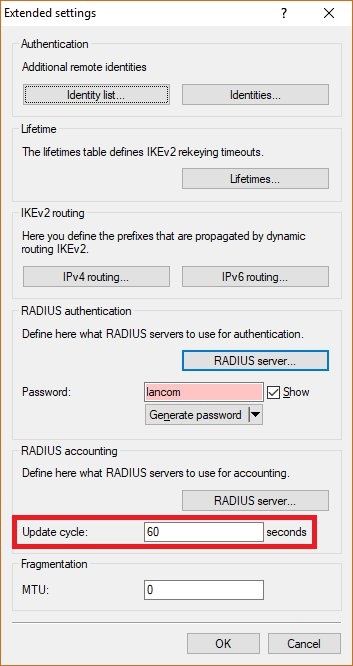 Image Added Image Added1.8) On the panel RADIUS accounting, go to the menu RADIUS server.  Image Removed Image Removed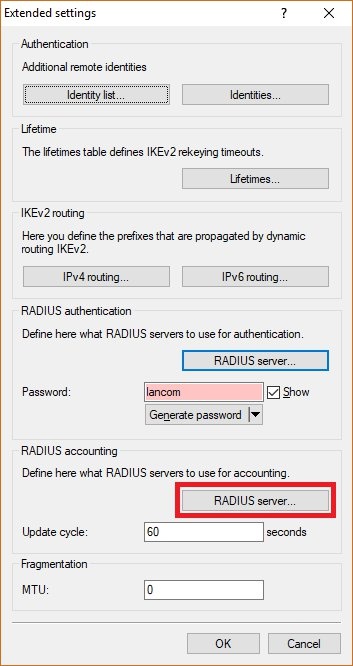 Image Added Image Added1.9) Save the following parameters: - Name: Set a descriptive name.
- Server address: Enter the loopback address 127.0.0.1.
- Port: Check that the port is set to 1813.
 Image Removed Image Removed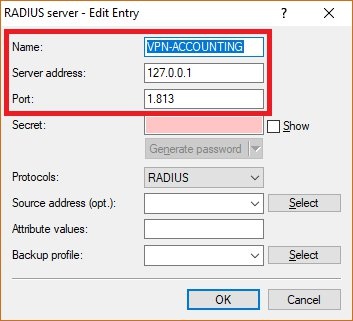 Image Added Image Added1.10) Switch to the menu VPN → IKEv2/IPSec → Authentication.  Image Removed Image Removed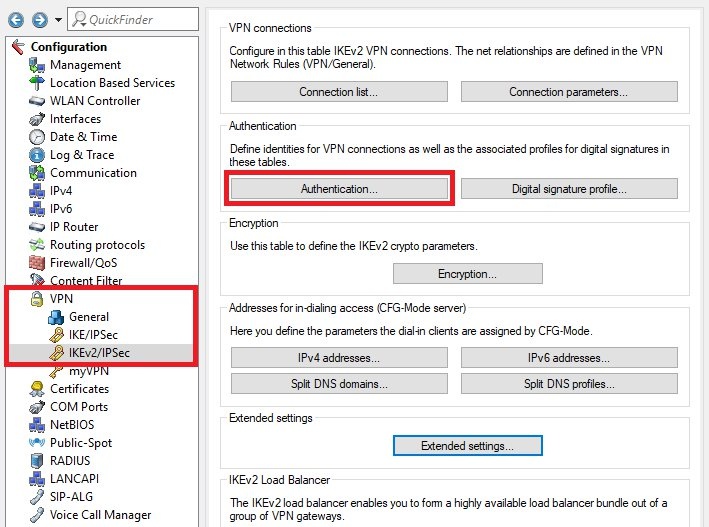 Image Added Image Added1.11) Create a new entry and enter the following parameters: - Name: Enter a descriptive name.
- Local identifier type: Select an identifier type from the drop-down menu, such as Fully Qualified Domain Name (FQDN).
- Local identifier: Set a local identity that is appropriate for the chosen identity type.
 Image Removed Image Removed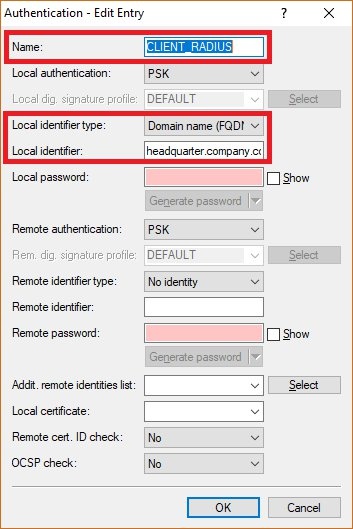 Image Added Image Added1.12) Switch to the menu VPN → IKEv2/IPSec → IPv4 addresses.  Image Removed Image Removed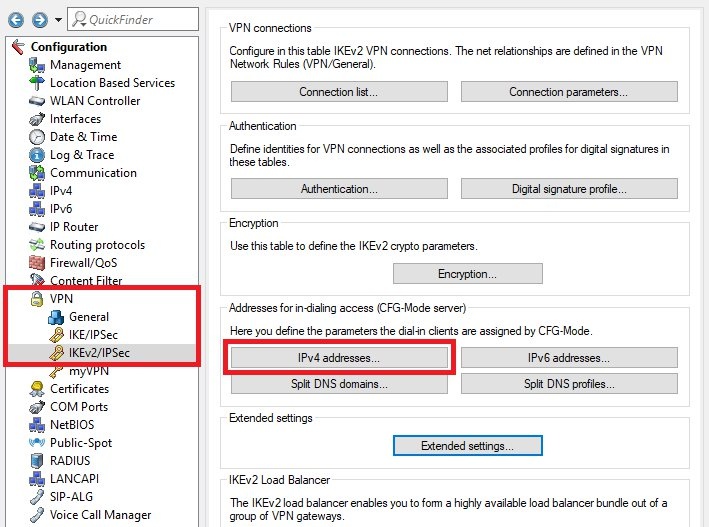 Image Added Image Added1.13) If not already available, create a new entry for the dial-in address range and save the following parameters: - Name: Enter a descriptive name.
- First address: Set the first IP address to be assigned to the VPN clients.
- Last address: Set the last IP address to be assigned to the VPN clients.
- Primary DNS: Set the IP address of a DNS server. This is assigned to the VPN clients as the first DNS server. Usually, the IP address of the router is used.
 Image Removed Image Removed Image Added Image Added1.14) Navigate to the menu VPN → IKEv2/IPSec → Connection list.  Image Removed Image Removed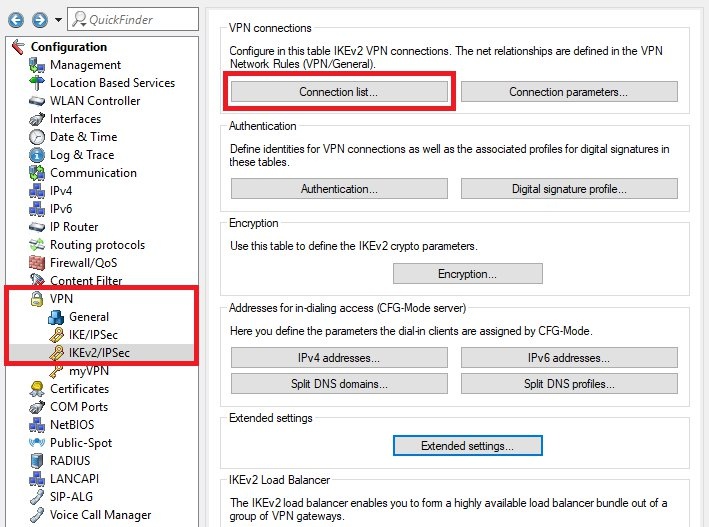 Image Added Image Added1.15) Edit the DEFAULT entry and modify the following parameters: - Authentication: From the drop-down menu, select the authentication object created in step 1.11.
- IPv4 rules: From the drop-down menu, select the object RAS-WITH-NETWORK-SELECTION.
- IKE-CFG: From the drop-down menu, select Server.
- IPv4 address pool: From the drop-down menu, select the dial-in address object created in step 1.13.
- RADIUS auth. server: From the drop-down menu, select the RADIUS object created in step 1.6.
- RADIUS acc. server: From the drop-down menu, select the accounting object created in step 1.9.
| Info |
|---|
Modifying the profile DEFAULT does not affect any existing dial-up VPN connections. |
 Image Removed Image Removed1.16) Change to the menu RADIUS → Server and set a checkmark next to RADIUS authentication active and RADIUS accounting active.  Image Removed Image Removed1.17) Navigate to the menu RADIUS service ports.  Image Removed Image Removed1.18) Check that the authentication port is set to port 1812 and that the accounting port is set to port 1813 Image Removed Image Removed 1.19) Go to the menu User table.  Image Removed Image Removed1.20) Create a new entry and enter the following parameters: - Name / MAC address: Enter a descriptive name.
- Password: Enter the Challenge password set in step 1.4.
- Tunnel password: Set a password to be used by the dial-in user to authenticate at the VPN module.
- Expiry type: From the drop-down menu, select Never.
- Disable the multiple login feature.
| Info |
|---|
Optionally you can assign a fixed IP address to the VPN client by entering the parameter Framed-IP-Address in the field Attribute values. It has to be entered in the syntax Framed-IP-Address=<IP address> (e.g. Framed-IP-Address=192.168.0.33). The IP address must be within the dial-in address range created in step 1.13. By assigning a fixed IP address, it is possible to assign individual rights to a user via the firewall. |
 Image Removed Image Removed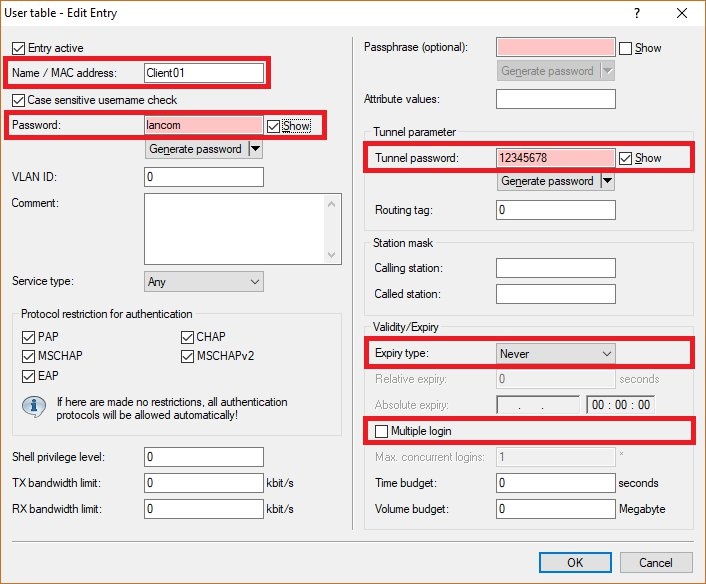 Image Added Image Added
1.20) Write the configuration back to the router. This concludes the configuration of the router.
2) Configuring the Advanced VPN Client: 2.1) Open the Advanced VPN Client and navigate to the menu Configuration → Profiles.  Image Removed Image Removed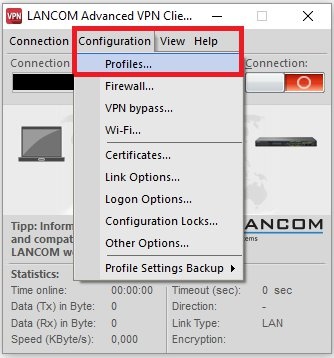 Image Added Image Added2.2) Click on Add / import to create a new VPN connection.  Image Removed Image Removed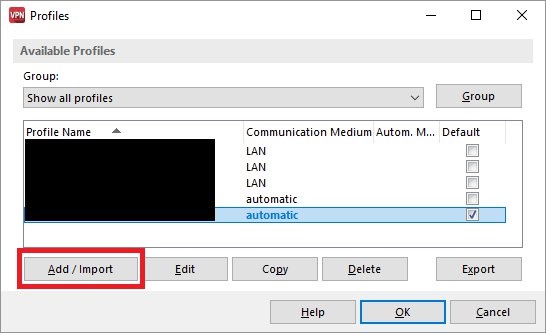 Image Added Image Added2.3) Select Link to corporate network using IPSec.  Image Removed Image Removed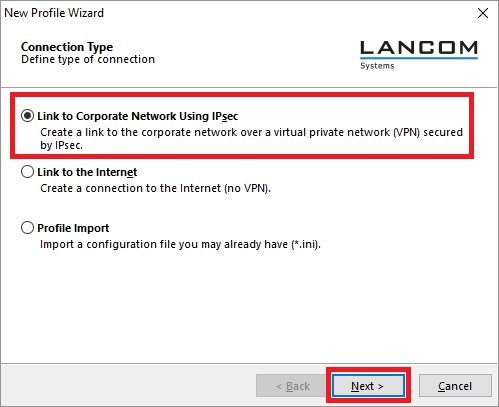 Image Added Image Added2.4) Enter a descriptive name.  Image Removed Image Removed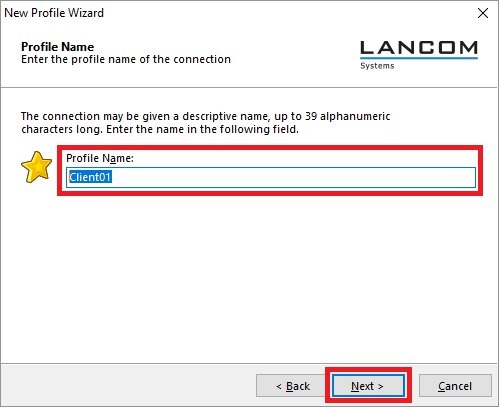 Image Added Image Added2.5) Select the Communication medium. | Info |
|---|
If you are using changing communication media (e.g. LAN and WLAN), use the option Communication media automatic. |
 Image Removed Image Removed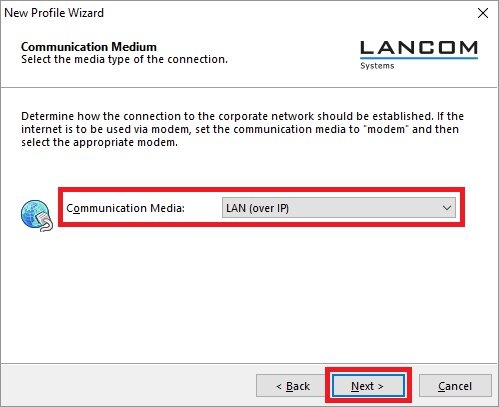 Image Added Image Added2.6) Enter the public IP address or the DynDNS name of the headquarters.  Image Removed Image Removed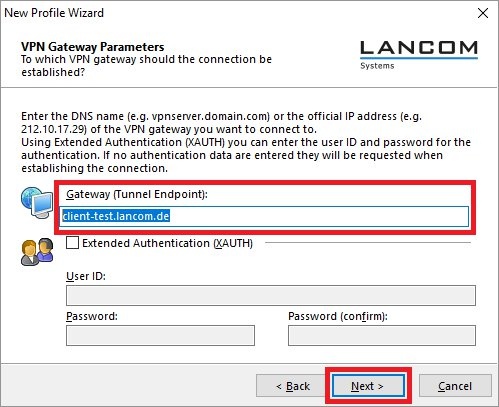 Image Added Image Added2.7) Set the Exchange mode to IKEv2 and the PFS group to DH14 (modp2048).  Image Removed Image Removed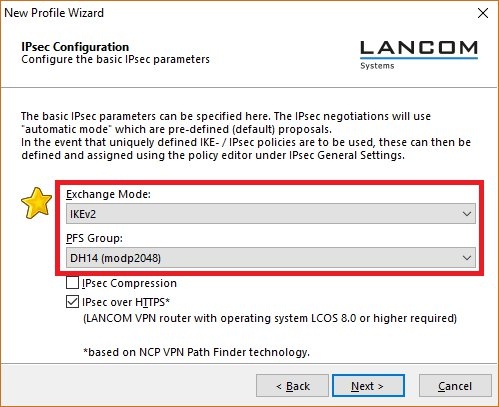 Image Added Image Added2.8) Save the following parameters: - Type: From the drop-down menu, select the Identity Type Fully Qualified Username (FQUN).
- ID: Enter the Name / MAC address set in step 1.20.
- Shared Secret: Enter the tunnel password set in step 1.20.
 Image Removed Image Removed Image Added Image Added2.9) From the drop-down menu, select the IKE Config Mode so that the VPN client automatically receives the IP address from the router.  Image Removed Image Removed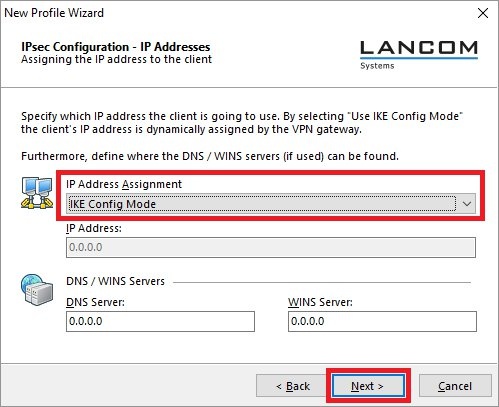 Image Added Image Added2.10) In order to use the function Split Tunneling, enter the target network to be reached via the VPN tunnel. | Hinweis |
|---|
If split tunneling is not configured, all traffic is transferred over the VPN tunnel while it is established, including traffic intended for the local network or the Internet. This can lead to problems with the communication! |
 Image Removed Image Removed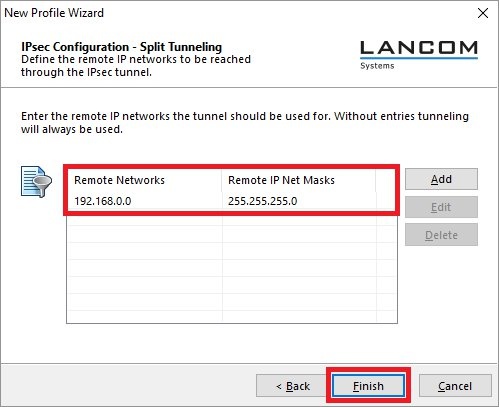 Image Added Image Added2.11) This concludes the configuration steps in the Advanced VPN Client.
3) View information for the connected clients in the router (optional): Additional information (e.g. assigned IP address and connection time) for the connected VPN clients can be viewed via the following CLI command: ls Status/TCP-IP/RADIUS-Server/Accounting/Completed-Accounting-Sessions/ | Info |
|---|
The following parameters are useful for further analysis: - User-Name: User name
- Start-Time: Login time
- Stop-Time: Logout time
- Session-Time: Connection time in seconds
- IP-Address: Assigned IP address
The table is limited to 128 entries. After reaching the limit, the oldest entry is overwritten. The table is not bootpersistent and will therefore be deleted by a cold boot. |
| 
