
...
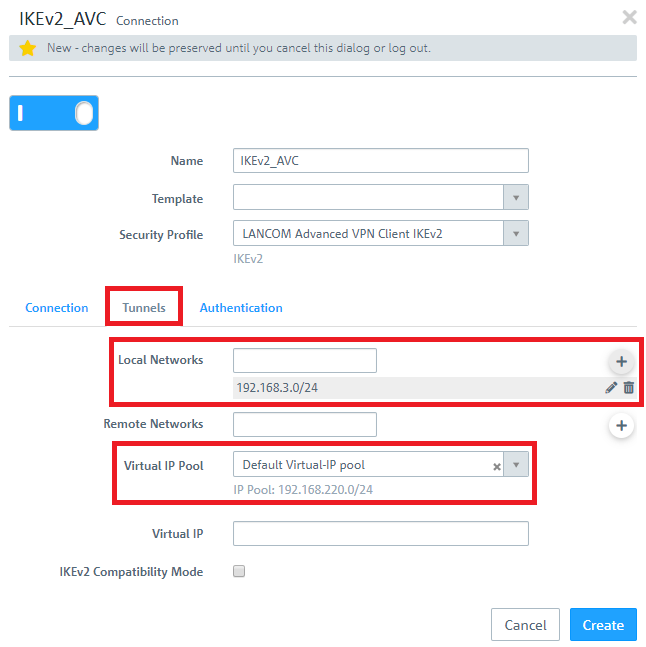
- Local Networks: Here you enter the local networks (in CIDR notation) that the VPN client should reach. In this example, the local network at the headquarters has the IP address range 192.168.3.0/24.
- Virtual IP Pool: Select the option Default virtual IP pool. Virtual IP pools can be used to send IP address configurations to connected VPN clients.
| Info |
|---|
If an IP address from a local network should be assigned to the VPN client instead of an address from the Virtual IP Pool (via the field Virtual IP), Route-based IPSec has to be activated and a routing entry for the VPN interface has to be created in the Routing Table 254 which refers to the virtual IP address in the local network. |
1.6) Change to the Authentication tab and enter the following parameters:
- Authentication: Select the option PSK (Preshared Key).
- PSK (Preshared Key): Set a preshared key for this connection.
- Local Identifier: Set the local identifier.
- Remote identifier: Set the remote identifier.
| Hinweis |
|---|
Due to security reasons different identities should be chosen for Local Identifier and Remote Identifier! |
| Info |
|---|
The Advanced VPN Client transmits the remote identity as an E-Mail address (ID_RFC822_ADDR). If the @ symbol isn't used in the remote identity, the Unified Firewall can't identify the identity type and the VPN connection can't be established. To enforce the use of the identity type E-Mail it is possible to use the string email: before the identity (e.g. email:home). |
...
2) Configuring the Advanced VPN Client:
2.1 Unpack Unpack the Zip file your exported in step 1.15 with a separate compression tool. In In it you will find an *.ini file, which you can import in the LANCOM Advanced VPN Client.
| Hinweis |
|---|
The integrated compression tool in Windows does not support the Archive Password. Therefore the decompression process fails. |
2.2) Open the Advanced VPN Client and navigate to the menu Configuration → Profiles.
...
2.8) Click on OK to close the Profiles menu.
2.9) The VPN client connection can now be established by clicking on the Connection switch.
3) Setting up port and protocol forwarding on a LANCOM router (scenario 2 only):
...