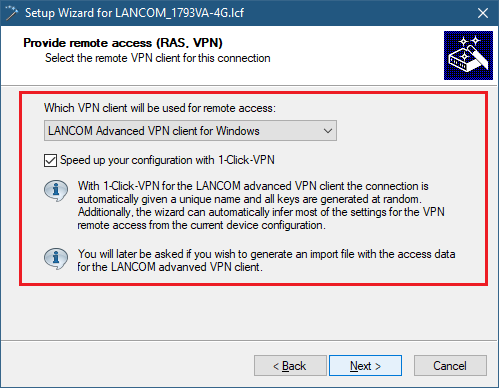
Versionen im Vergleich

Schlüssel

  • Diese Zeile wurde hinzugefügt.
  • Diese Zeile wurde entfernt.
  • Formatierung wurde geändert.


Seiteneigenschaften


Description:

This document describes how to set up a IKEv2 VPN connection between a LANCOM router and the LANCOM Advanced VPN Client.


Requirements:
1781A
  • 1793VA)
  • LCOS as of version
7.80
7.80


Procedure:

1) Start the Setup Wizard on the LANCOM router in LANconfig and select the option Provide remote access (RAS, VPN).
Image Removed

Image Added

2)
Select the option
We configure an IKEv2 VPN connection
over the Internet
.
Image Removed

Image Added

3) In the following dialog, select the client LANCOM Advanced VPN Client. A simplified setup procedure is available with the option 1-Click-VPN.

Information:
In the case of 1-Click-VPN, all required keys (e.g. the preshared key) are automatically created by random number generator. The wizard also will deduce most of the settings required for the VPN connection from the settings in the LANCOM router.
Image Removed

Image Added

4) Enter a name for the VPN client connection. You must also set the the address of this router to its public IP address or a DynDNS address of the LANCOM router.
Image Removed

Image Added

5)
If you require the NetBIOS functionality, enable the NetBIOS module.
Image Removed
Choose an ip address range which will be used by all users that dial in on the LANCOM Router using this VPN connection.

Image Added

6) In the next dialog window, click on the Browse... button to set a location to save the profile file.
Image Removed

Image Added

7) The Finish button exits the configuration wizard. The configuration is uploaded to the LANCOM router and the profile file is saved to your PC.
Image Removed

Image Added


Import the VPN Client profile into the LANCOM Advanced VPN Client:

1) Start the LANCOM Advanced VPN Client and open the menu Configuration-> Profiles.
Image Removed

Image Added

2) Click the button Add/Import.
Image Removed

Image Added

3) Select the option Profile import.
Image Removed

Image Added

4) Enter the path to the import file (*.ini).
Image Removed

Image Added

5) In the next dialog window, click on Next.
Image Removed

Image Added

6) A message is displayed after a successful profile import. Click on Finish to complete the import.
Image Removed

Image Added

7) Click on the OK button to save your settings.
Image Removed

Image Added

8) The VPN Client connection can now be established with a click on the Connection switch.
Image Removed

Image Added