
| Seiteneigenschaften |
|---|
BeschreibungDescription:
Dieser Artikel beschreibt die Konfiguration des This article describes how to configure the LANCOM-internen DHCPv6-Servers, sodass dieser IPV6-Adressen internal DHCPv6 server to assign IPV6 addresses (IN_NA) im lokalen Netzwerk (z.Bon the local network (e.g. INTRANET) vergeben kann.
VoraussetzungenRequirements:
- LCOS ab Version version 10.40 or later (download)
- LANtools ab Version version 10.40 or later (download)
- Der LANCOM Router muss über eine funktionierende IPv6-Internet-Verbindung verfügen.
- The LANCOM router must have a functional IPv6 Internet connection.
- The Internet provider provides a static IPv6 prefix (recommendedDer Internet-Provider stellt ein statisches IPv6-Präfix zur Verfügung (empfohlen).
| Hinweis | ||
|---|---|---|
| ||
|
Szenario:
|
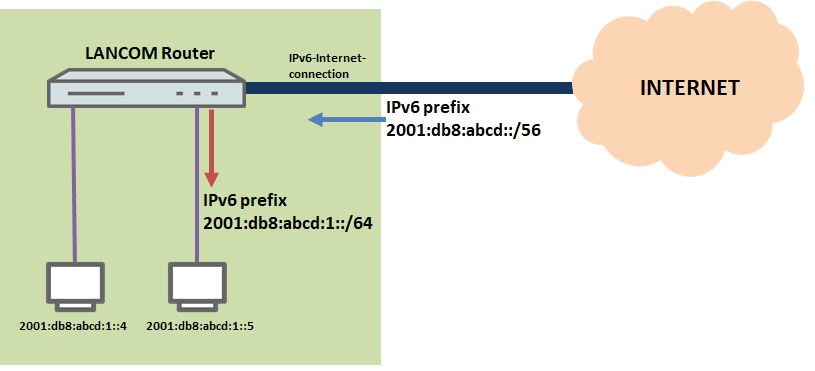
Scenario:
- The LANCOM router receives the static IPv6 prefix 2001:db8:abcd::/56 from the Internet provider.
- The first IPv6 subnet is "1". This should be used on the local network, so the IPv6 prefix used is
- Der LANCOM Router erhält vom Internet-Provider das statische IPv6-Präfix 2001:db8:abcd:1::/56.
- Das erste IPv6-Subnetz ist die "1". Dieses soll im lokalen Netzwerk verwendet werden, also wird das IPv6-Präfix 2001:db8:abcd:1::/64 verwendet.

VorgehensweiseProcedure:
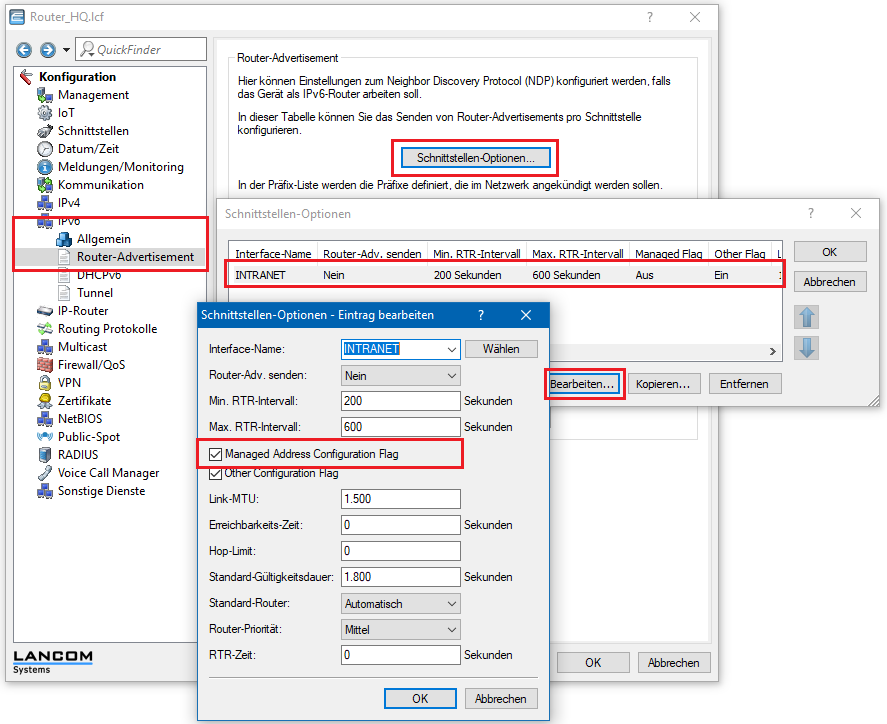
1. Öffnen Sie die Konfoguration des LANCOM Routers und wechseln Sie in das Menü ) Open the configuration dialog for the LANCOM router and switch to the menu item IPv6 → Router-Advertisement.
2. Bearbeiten Sie den vorhandenen Eintrag für das lokale Netzwerk INTRANET.
- Aktivieren Sie die Option Managed Address Configuration Flag.
- Die Option Other Configuration Flag kann wahlweise aktiviert bleiben (Standard) oder deaktiviert werden.
| Info |
|---|
Die aktive Option Managed Address Configuration Flag weist einen Client an, den DHCPv6-Server nach einer IPv6-Adresse zu fragen („Stateful Address Assignment“). |
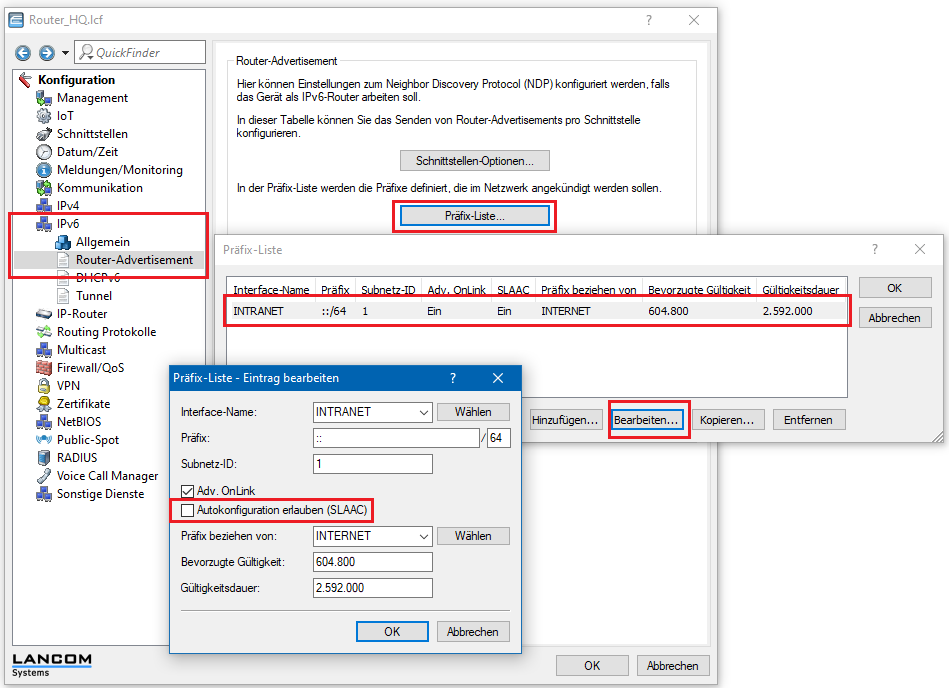
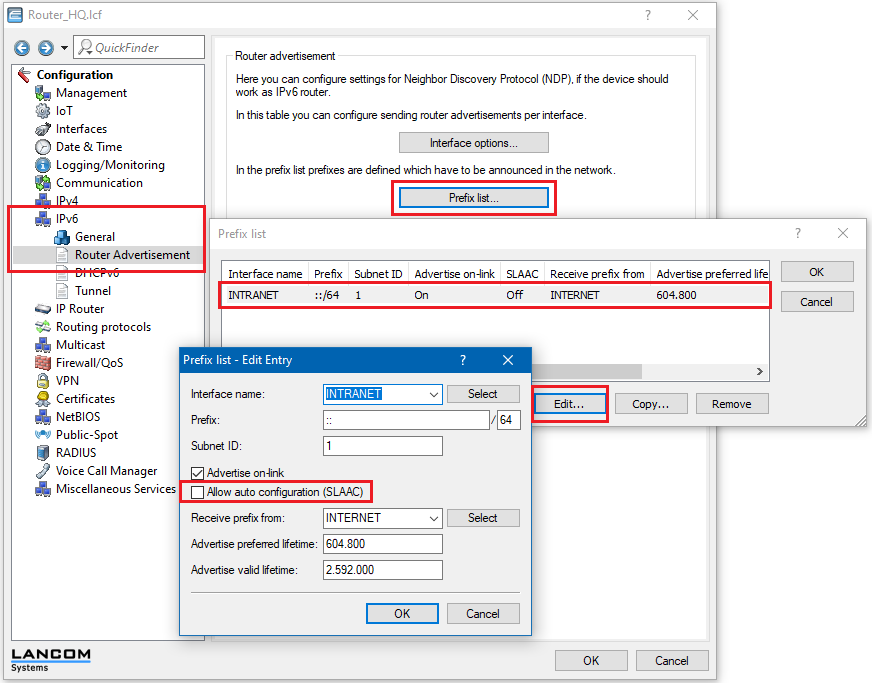
3. Wechseln Sie in das Menü IPv6 → Router-Advertisement → Präfix-Liste.
4. Bearbeiten Sie den vorhandenen Eintrag für das lokale Netzwerk INTRANET.
- Deaktivieren Sie die Option Autokonfiguration erlauben (SLAAC). Wenn diese Option deaktiviert ist, generieren Clients keine Adresse per Autokonfiguration, sondern beziehen eine IPv6-Adresse nur noch per DHCPv6. Bei aktivierter Option, generieren Clients IPv6-Adressen sowohl per Autokonfiguration als auch per DHCPv6.
| Info |
|---|
Wenn Sie die Option Autokonfiguration erlauben (SLAAC) deaktivieren, können Android-Clients keine IPv6-Adresse mehr beziehen. |
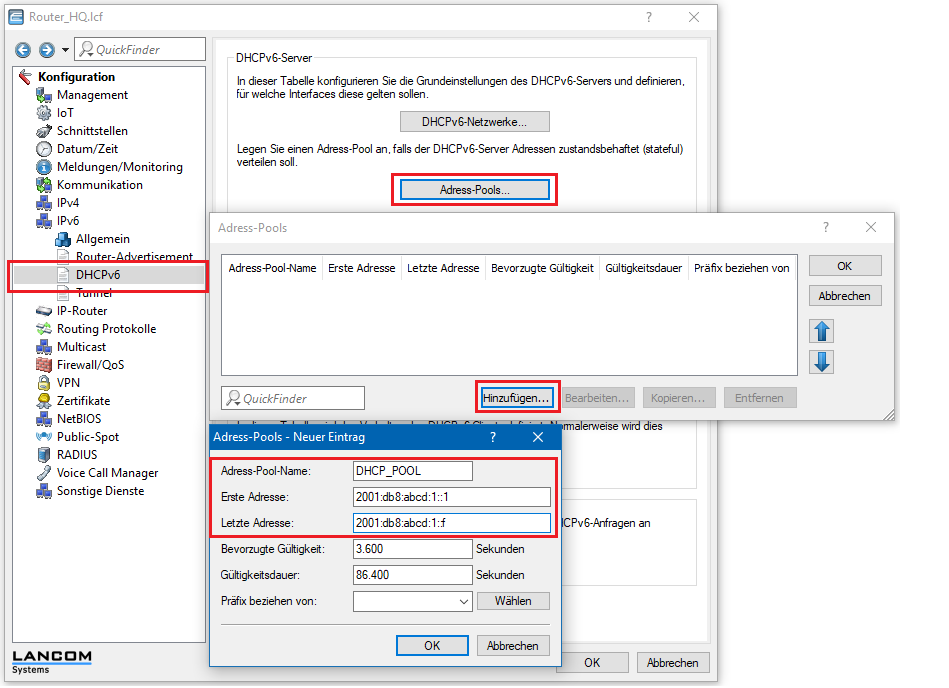
5. Wechseln Sie in das Menü IPv6 → DHCPv6 → Adress-Pools.
6. Erstellen Sie einen neuen Eintrag (empfohlene Variante):
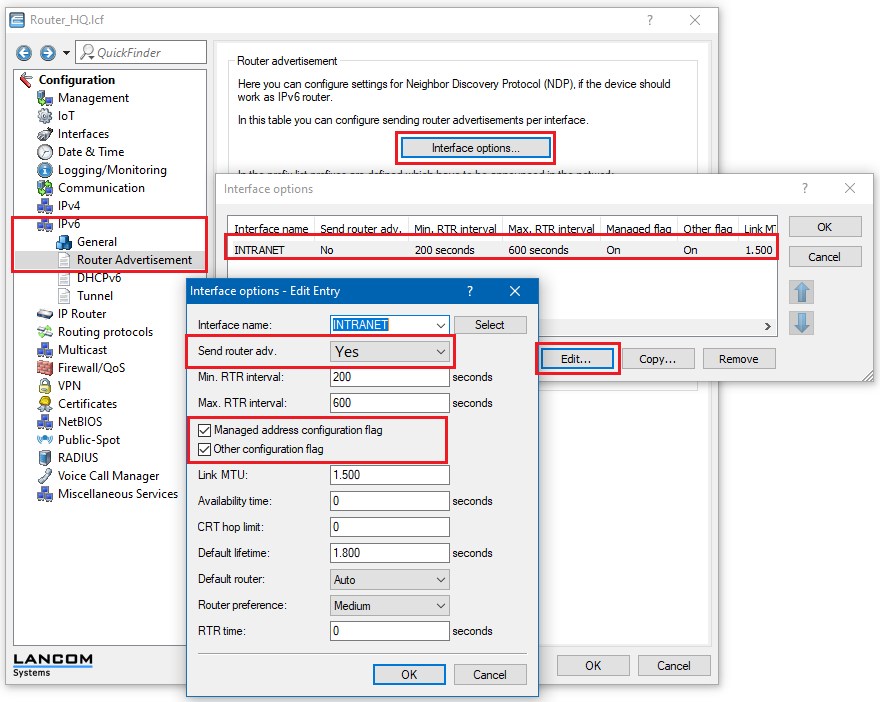
) Modify the entry for the local network INTRANET.
- Enable the option Managed address configuration flag.
- The option Other configuration flag can either remain enabled (default) or disabled.
| Info |
|---|
When enabled, the option Managed address configuration flag instructs a client to request the DHCPv6 server for an IPv6 address (“Stateful Address Assignment”). |
3) Switch to the menu IPv6 → Router Advertisement → Prefix list.
4) Modify the entry for the local network INTRANET.
- Disable the option Allow auto-configuration (SLAAC). If this option is disabled, clients do not generate an address using auto-configuration and can only obtain an IPv6 address via DHCPv6. If this option is enabled, clients generate IPv6 addresses both via auto-configuration and via DHCPv6.
| Info |
|---|
If you disable the Allow auto configuration (SLAAC) option, Android clients can no longer obtain an IPv6 address. |
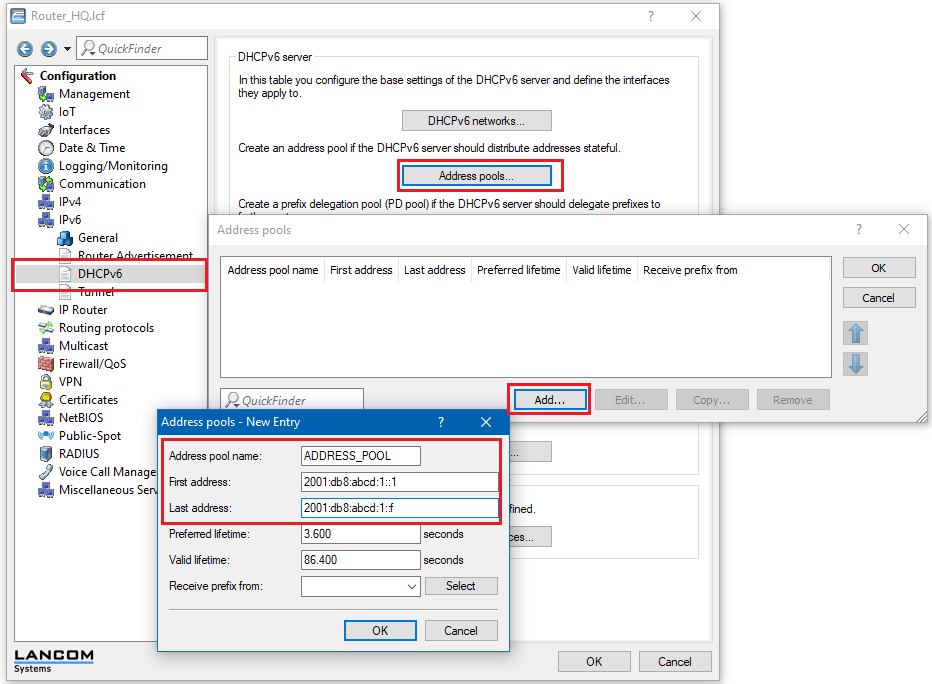
5) Switch to the menu IPv6 → DHCPv6 → Address pools.
6) Create a new entry (recommended variant):
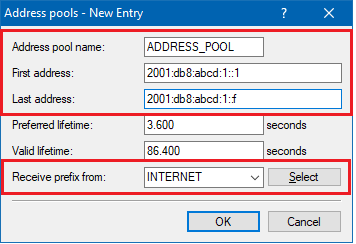
- Address pool name: Enter a name for the address pool.
- First address: Set the first address in the DHCPv6 pool to
- Adress-Pool-Name: Vergeben Sie einen Namen für den Adress-Pool.
- Erste Adresse: Setzen Sie als erste Adresse des DHCPv6-Pools, 2001:db8:abcd:1:0:0:0:1.Letzte Adresse: Setzen Sie als letzte Adresse des DHCPv6-Pools,
- Last address: Set the last address of the DHCPv6 pool to 2001:db8:abcd:1:0:0:0:F.
| Info | ||
|---|---|---|
| ||
|

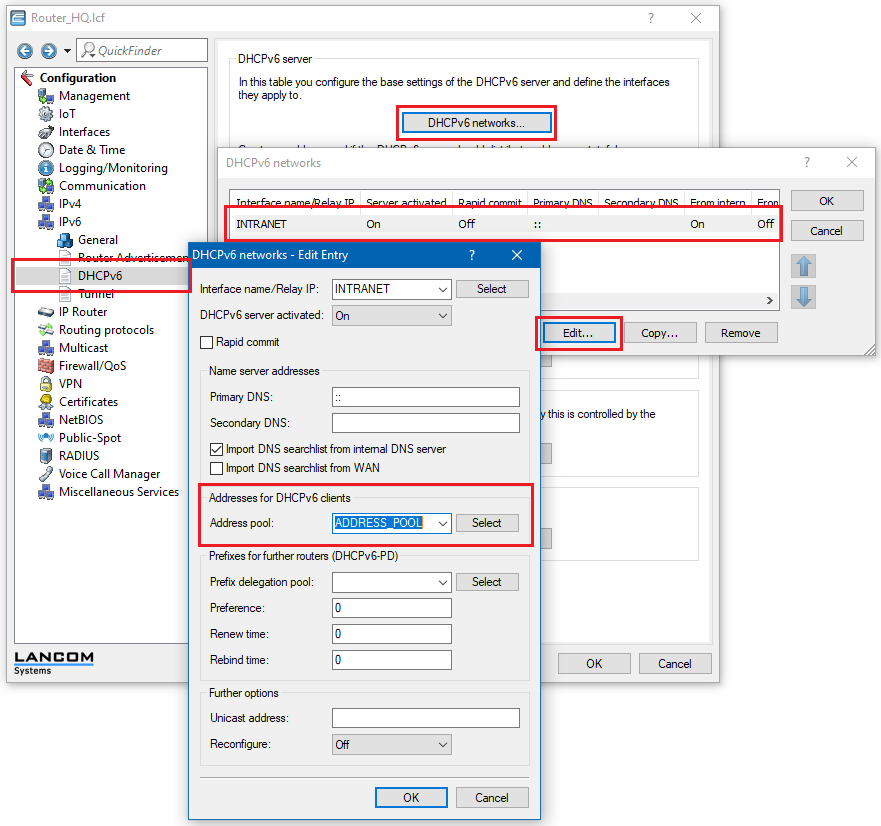
7. Wechseln Sie in das Menü ) Switch to the menu IPv6 → DHCPv6 → DHCPv6 -Netzwerkenetworks.
8. Bearbeiten Sie den vorhandenen Eintrag für das lokale Netzwerk INTRANET.
- Wählen Sie als Adress-Pool den im Schritt 6 erstellten Pool aus.
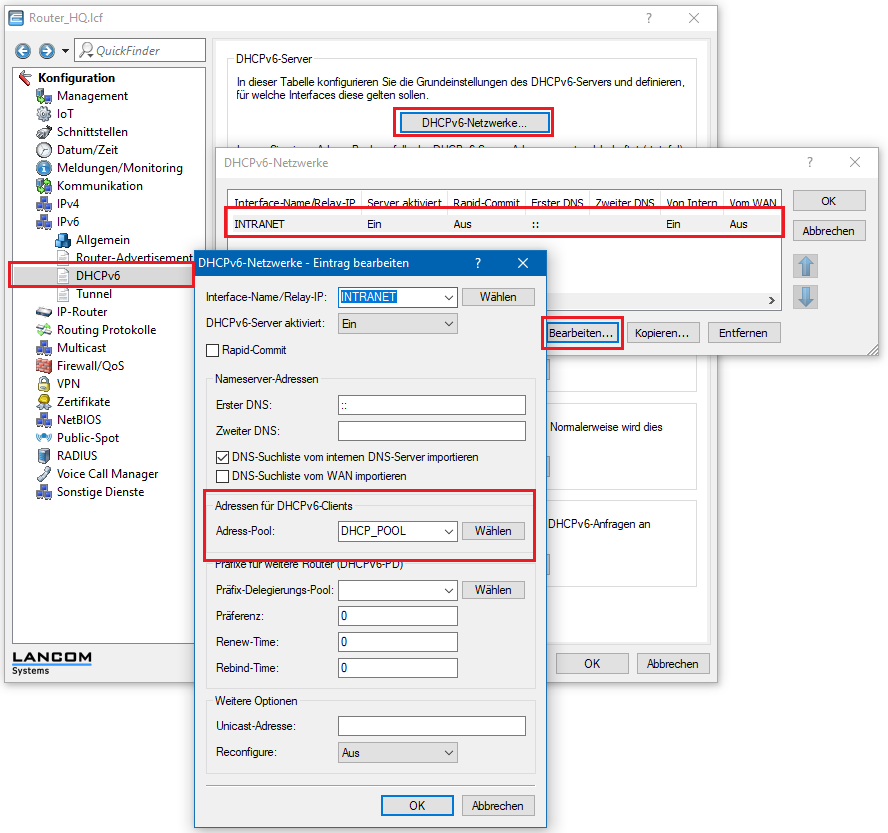
) Modify the entry for the local network INTRANET.
- Set the address pool as the pool created in step 6.
9) Write the configuration back to the LANCOM router. This concludes the configuration9. Schreiben Sie die Konfiguration in den LANCOM Router zurück. Die Konfigurationsschritte sind damit abgeschlossen.