
| Seiteneigenschaften |
|---|
BeschreibungDescription:
Dieser Artikel beschreibt die Konfiguration des This article describes how to configure the LANCOM-internen DHCPv6-Servers, sodass dieser IPV6-Adressen internal DHCPv6 server to assign IPV6 addresses (IN_NA) im lokalen Netzwerk (z.Bon the local network (e.g. INTRANET) vergeben kann.
VoraussetzungenRequirements:
- LCOS ab Version version 10.40 or later (download)
- LANtools ab Version version 10.40 or later (download)
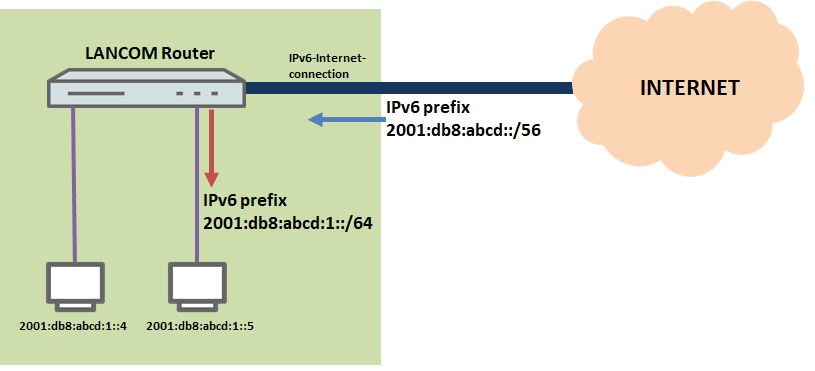
- Der LANCOM Router muss über eine funktionierende IPv6-Internet-Verbindung verfügen.
- The LANCOM router must have a functional IPv6 Internet connection.
- The Internet provider provides a static IPv6 prefix (recommendedDer Internet-Provider stellt ein statisches IPv6-Präfix zur Verfügung (empfohlen).
| Hinweis | ||
|---|---|---|
| ||
|
Szenario:
|
Scenario:
- The LANCOM router receives the static IPv6 prefix Der LANCOM Router erhält vom Internet-Provider das statische IPv6-Präfix 2001:db8:abcd::/56 from the Internet provider.
- Das erste IPv6-Subnetz ist die The first IPv6 subnet is "1". Dieses soll im lokalen Netzwerk verwendet werden, also wird das IPv6-Präfix This should be used on the local network, so the IPv6 prefix used is 2001:db8:abcd:1::/64 verwendet.
VorgehensweiseProcedure:
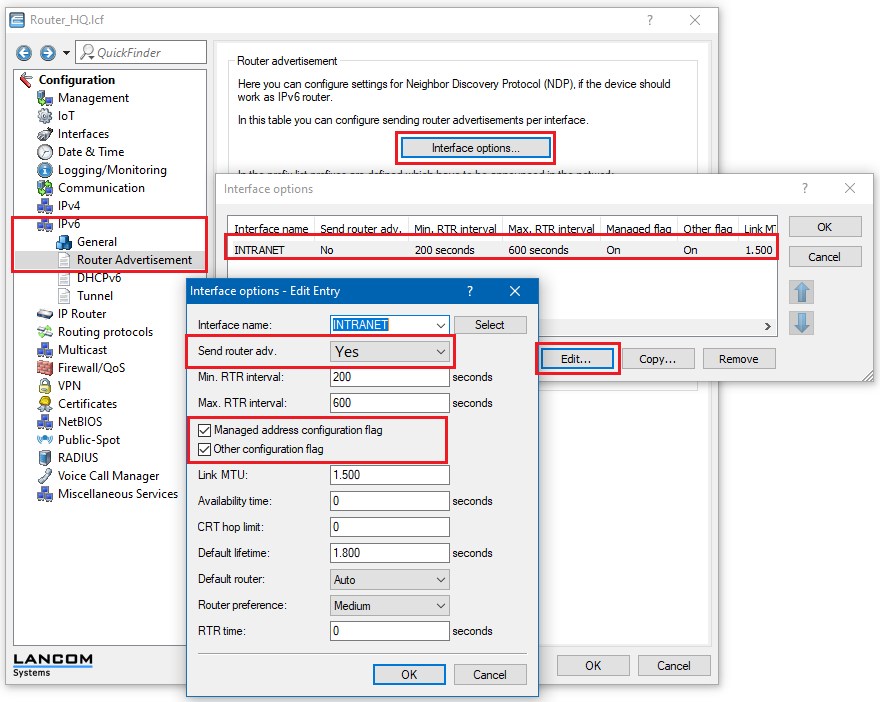
1. Öffnen Sie die Konfoguration des LANCOM Routers und wechseln Sie in das Menü ) Open the configuration dialog for the LANCOM router and switch to the menu item IPv6 → Router-Advertisement.
2. Bearbeiten Sie den vorhandenen Eintrag für das lokale Netzwerk INTRANET.
- The Option send router adv. has to be switched to Yes.
- Aktivieren Sie die Option Managed Address Configuration Flag.
- Die Option Other Configuration Flag kann wahlweise aktiviert bleiben (Standard) oder deaktiviert werden.
) Modify the entry for the local network INTRANET.
- Enable the option Managed address configuration flag.
- The option Other configuration flag can either remain enabled (default) or disabled.
| Info |
|---|
When enabled, the option Managed address configuration flag instructs a client to request the DHCPv6 server for an IPv6 address (“Stateful Address Assignment” |
| Info |
Die aktive Option Managed Address Configuration Flag weist einen Client an, den DHCPv6-Server nach einer IPv6-Adresse zu fragen („Stateful Address Assignment“). |
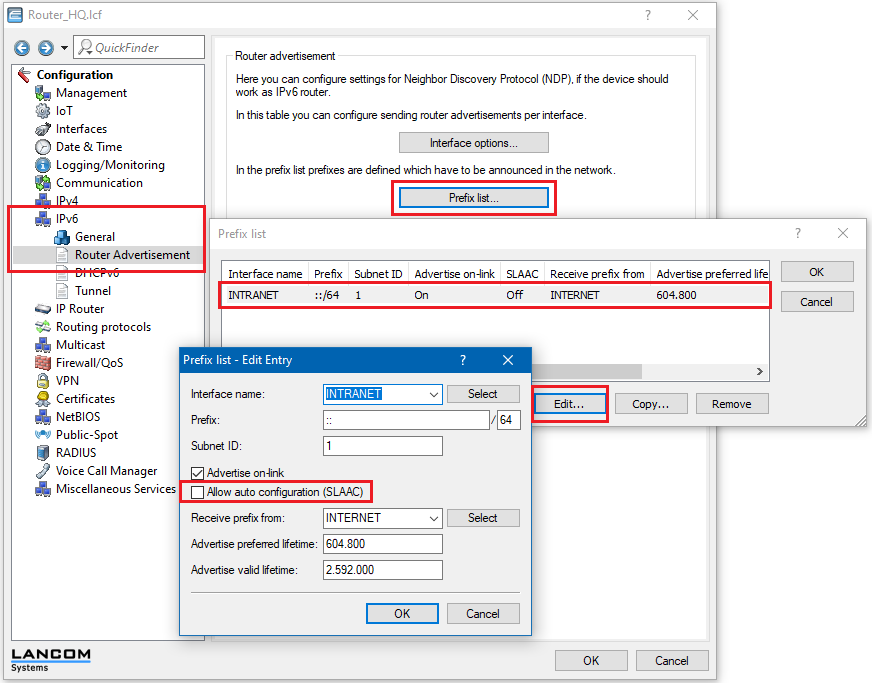
3. Wechseln Sie in das Menü ) Switch to the menu IPv6 → Router - Advertisement → Präfix-ListePrefix list.
4. Bearbeiten Sie den vorhandenen Eintrag für das lokale Netzwerk INTRANET.
- Deaktivieren Sie die Option Autokonfiguration erlauben (SLAAC). Wenn diese Option deaktiviert ist, generieren Clients keine Adresse per Autokonfiguration, sondern beziehen eine IPv6-Adresse nur noch per DHCPv6. Bei aktivierter Option, generieren Clients IPv6-Adressen sowohl per Autokonfiguration als auch per DHCPv6.
| Info |
|---|
Wenn Sie die Option Autokonfiguration erlauben (SLAAC) deaktivieren, können Android-Clients keine IPv6-Adresse mehr beziehen. |
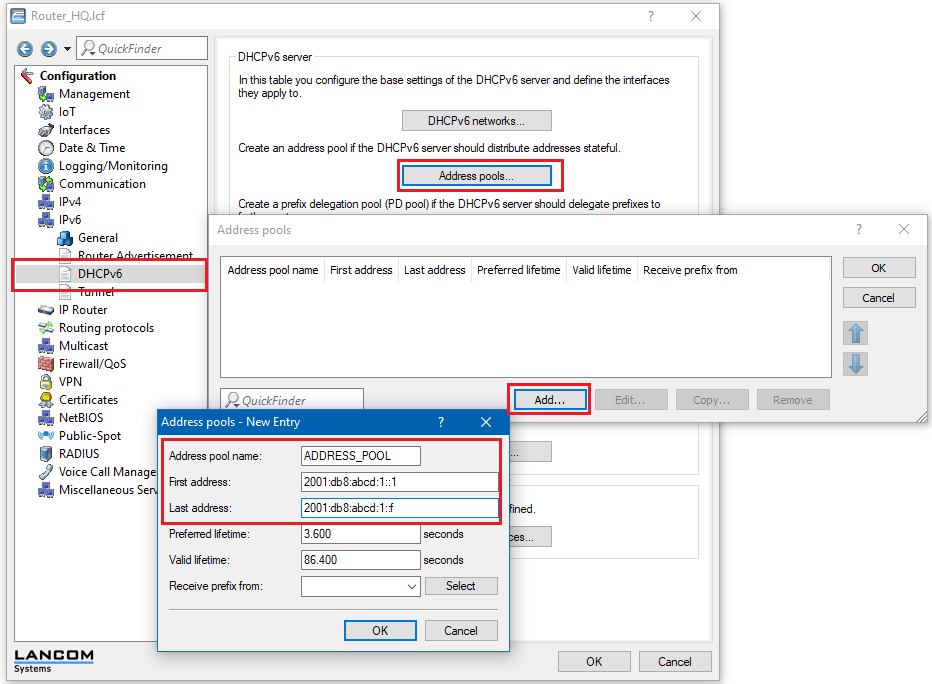
5. Wechseln Sie in das Menü IPv6 → DHCPv6 → Adress-Pools.
6. Erstellen Sie einen neuen Eintrag (empfohlene Variante):
) Modify the entry for the local network INTRANET.
- Disable the option Allow auto-configuration (SLAAC). If this option is disabled, clients do not generate an address using auto-configuration and can only obtain an IPv6 address via DHCPv6. If this option is enabled, clients generate IPv6 addresses both via auto-configuration and via DHCPv6.
| Info |
|---|
If you disable the Allow auto configuration (SLAAC) option, Android clients can no longer obtain an IPv6 address. |
5) Switch to the menu IPv6 → DHCPv6 → Address pools.
6) Create a new entry (recommended variant):
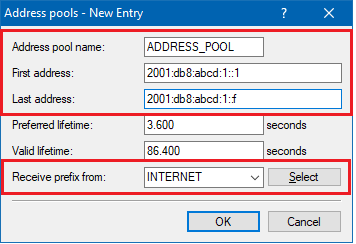
- Address pool name: Enter a name for the address pool.
- First address: Set the first address in the DHCPv6 pool to
- Adress-Pool-Name: Vergeben Sie einen Namen für den Adress-Pool.
- Erste Adresse: Setzen Sie als erste Adresse des DHCPv6-Pools, 2001:db8:abcd:1:0:0:0:1.Letzte Adresse: Setzen Sie als letzte Adresse des DHCPv6-Pools,
- Last address: Set the last address of the DHCPv6 pool to 2001:db8:abcd:1:0:0:0:F.
| Info | ||
|---|---|---|
| ||
|
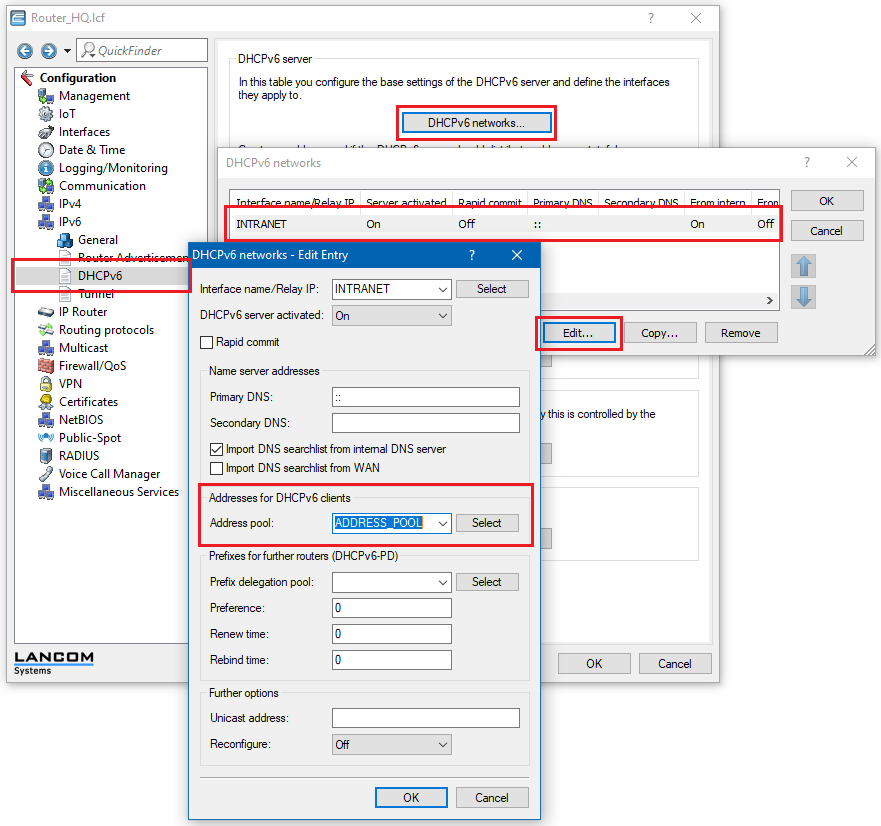
7. Wechseln Sie in das Menü ) Switch to the menu IPv6 → DHCPv6 → DHCPv6 -Netzwerkenetworks.
8. Bearbeiten Sie den vorhandenen Eintrag für das lokale Netzwerk INTRANET.) Modify the entry for the local network INTRANET.
- Set the address pool as the pool created in step 6Wählen Sie als Adress-Pool den im Schritt 6 erstellten Pool aus.
9. Schreiben Sie die Konfiguration in den LANCOM Router zurück. Die Konfigurationsschritte sind damit abgeschlossen) Write the configuration back to the LANCOM router. This concludes the configuration.