
...
This article describes how to set up VLAN on an XS or GS-51xx 45xx series switch.
| Info |
|---|
For the VLAN setup, please also refer to the Knowledge Base article VLAN tagging modes explained. |
Requirements:
- Switch of the XS or GS-51xx 45xx series
- LCOS SX as of version 5.00 RU2 (download latest version)
- Any web browser for access to the web interface
...
1.1) Connect to the switch via the web interface and navigate to the menu Switching → VLAN → Overview and click Add VLAN.
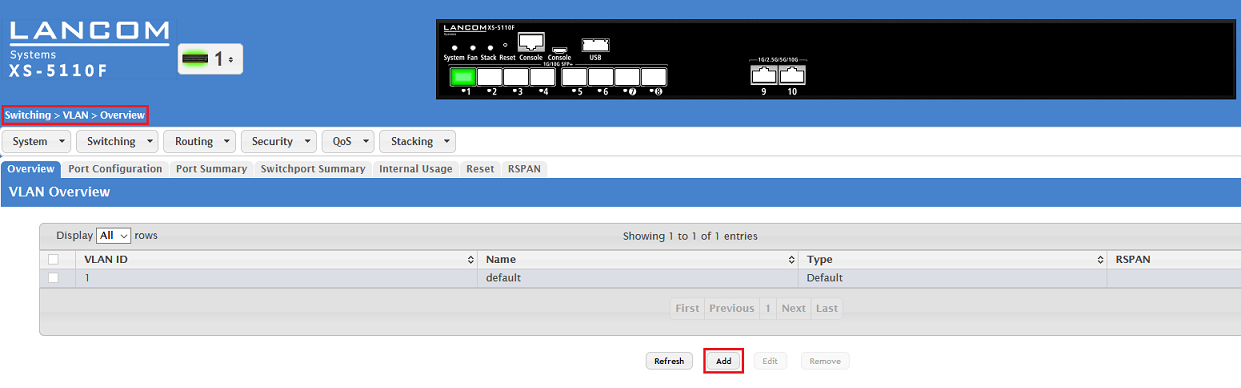
1.2) Enter the desired VLAN ID (in this example the VLAN 20) and click on Submit.
...
- Untagged: The packet that is outbound from the switch is not tagged (access Access and hybrid Hybrid for the port VLAN ID).
- Tagged: The outbound packet is tagged (trunk Trunk and hybrid hybrid for the tagged VLANs).

2.1.2) Description of the menu Switching → VLAN → Port Summary:
...
| Info |
|---|
You can edit all of the interfaces at the same time by clicking the button Edit allAll. It is also possible to check multiple interfaces and click on Edit to edit all of them at the same time. The same settings are saved for all of them. |
...
| Info |
|---|
You can edit all of the interfaces at the same time by clicking the button Edit allAll. It is also possible to check multiple interfaces and click on Edit to edit all of them at the same time. The same settings are saved for all of them. |
...
| Info |
|---|
You can edit all of the interfaces at the same time by clicking the button Edit allAll. It is also possible to check multiple interfaces and click on Edit to edit all of them at the same time. The same settings are saved for all of them. |
...
| Info |
|---|
You can edit all of the interfaces at the same time by clicking the button Edit allAll. It is also possible to check multiple interfaces and click on Edit to edit all of them at the same time. The same settings are saved for all of them. |
...
| Info |
|---|
You can edit all of the interfaces at the same time by clicking the button Edit allAll. It is also possible to check multiple interfaces and click on Edit to edit all of them at the same time. The same settings are saved for all of them. |
...
- Participation: Select the option Include so that VLAN 20 may communicate via the interface.
- Tagging: Select the option tagged Tagged.
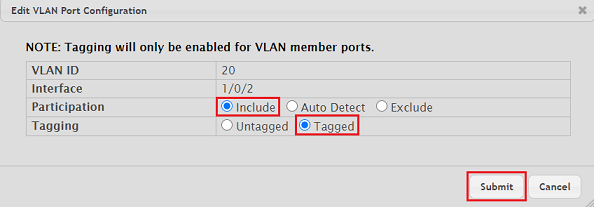
2.3.5) Change to the tab Port Summary, mark the interface 1/0/2 and click on Edit.
| Info |
|---|
You can edit all of the interfaces at the same time by clicking the button Edit allAll. It is also possible to check multiple interfaces and click on Edit to edit all of them at the same time. The same settings are saved for all of them. |
...
- Participation: Select the option Include so that VLAN 1 may communicate via the interface.
- Tagging: Select the option tagged Tagged.
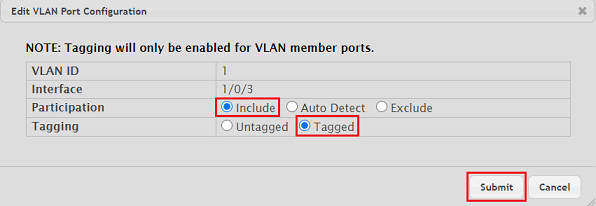
2.4.3) Select the VLAN ID 20 created in step 1. Then select the interface 1/0/3 and click Edit.
| Info |
|---|
You can edit all of the interfaces at the same time by clicking the button Edit allAll. It is also possible to check multiple interfaces and click on Edit to edit all of them at the same time. The same settings are saved for all of them. |
...
- Participation: Select the option Include so that VLAN 20 may communicate via the interface.
- Tagging: Select the option tagged Tagged.
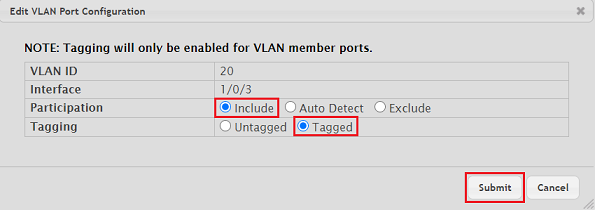
2.4.5) Change to the tab Port Summary, mark the interface 1/0/3 and click on Edit.
| Info |
|---|
You can edit all of the interfaces at the same time by clicking the button Edit allAll. It is also possible to check multiple interfaces and click on Edit to edit all of them at the same time. The same settings are saved for all of them. |
...