
| Seiteneigenschaften |
|---|
Description:In diesem Artikel wird beschrieben, wie eine zertifikatsbasierte IKEv2 VPN-Verbindung zwischen zwei
This article describes how to set up a certificate-based IKEv2 VPN connection between two LANCOM R&S®Unified Firewalls.
| Info |
|---|
The certificate module was updated in LCOS FX 10.7, therefore the corresponding menus differ compared to older LCOS FX versions. The configuration of a certificate-based IKEv2 connection between two Unified Firewalls as of LCOS FX 10.7 is described in the following article: Setting up a certificate-based IKEv2 VPN connection between two LANCOM R&S®Unified Firewalls |
...
Rquirements:
- Zwei Two LANCOM R&S® Unified Firewalls mit s with LCOS FX ab Version as of version 10.4 up to and including LCOS FX 10.6
- A configured and functional Internet connection on the two Bereits eingerichtete und funktionsfähige Internet-Verbindung auf den beiden Unified Firewalls
- Web -Browser zur Konfiguration der Unified Firewalls.
Es werden folgende Browser unterstütztbrowser for configuring the Unified Firewall.
The following browsers are supported:- Google Chrome
- Chromium
- Mozilla Firefox
Scenario:
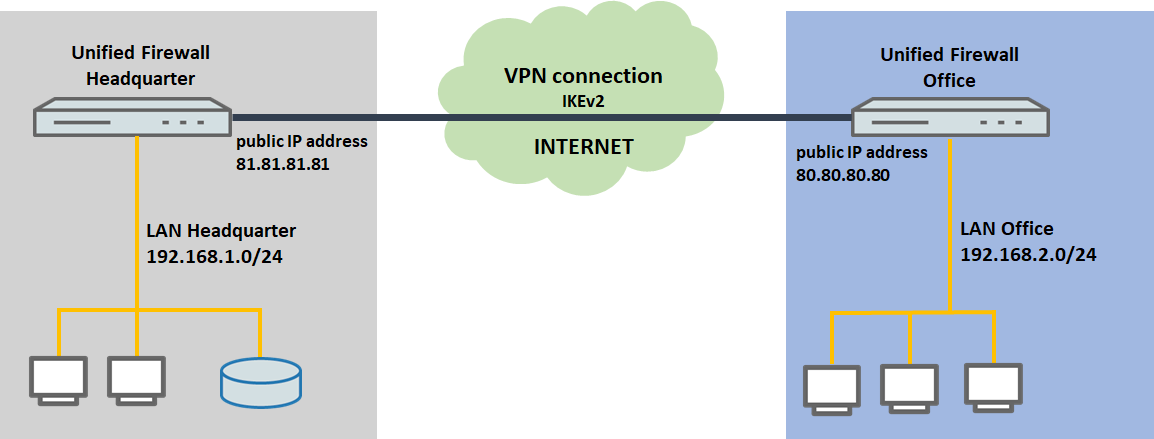
1. Die ) The Unified Firewall ist direkt mit dem Internet verbunden und verfügt über eine öffentliche IPv4-Adresse:is connected directly to the Internet and has a public IPv4 address:
- A certificate-based IKEv2 VPN connection should be set up between two Unified Firewalls (headquarters and branch office).
- The Unified Firewall at the headquarters has the local network
- Es soll eine zertifikatsbasierte IKEv2 VPN-Verbindung zwischen zwei Unified Firewalls eingerichtet werden (Zentrale und Filiale).
- Die Unified Firewall in der Zentrale hat das lokale Netzwerk 192.168.1.0/24.Die Unified Firewall in der Filiale hat das lokale Netzwerk
- The Unified Firewall at the branch office has the local network 192.168.2.0/24.
- Die The Unified Firewall in der Zentrale hat die feste öffentliche IP-Adresse at the headquarters has the fixed public IP address 81.81.81.81.Die Unified Firewall in der Filiale hat die feste öffentliche IP-Adresse
- The Unified Firewall at the branch office has the fixed public IP address 80.80.80.80.
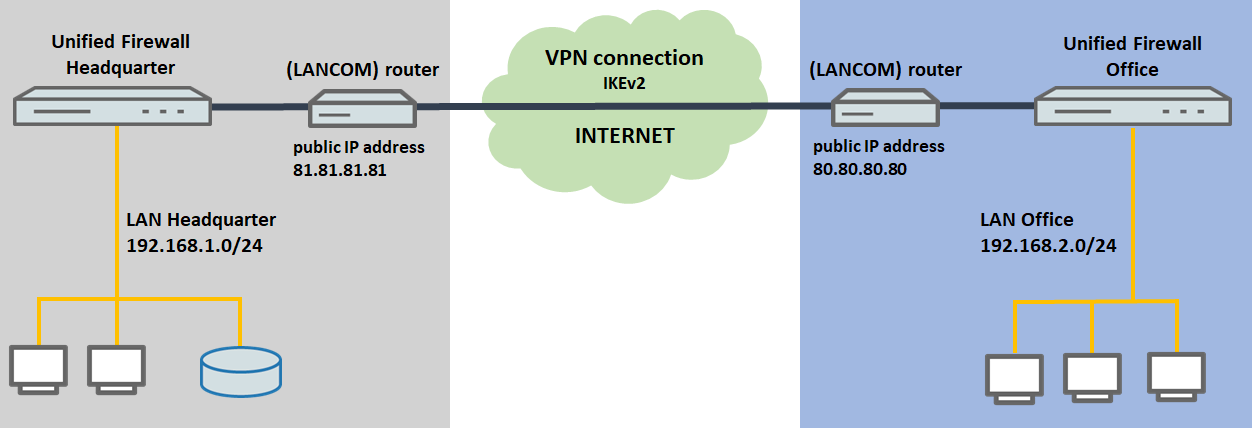
2. Die Unified Firewall ist über einen vorgeschalteten Router mit dem Internet verbunden:) The Unified Firewall is connected to the Internet via an upstream router:
- A certificate-based IKEv2 VPN connection should be set up between two Unified Firewalls (headquarters and branch office).
- The Unified Firewall at the headquarters has the local network
- Es soll eine zertifikatsbasierte IKEv2 VPN-Verbindung zwischen zwei Unified Firewalls eingerichtet werden (Zentrale und Filiale).
- Die Unified Firewall in der Zentrale hat das lokale Netzwerk 192.168.1.0/24.Die Unified Firewall in der Filiale hat das lokale Netzwerk
- The Unified Firewall at the branch office has the local network 192.168.2.0/24.
- Die Unified Firewall in der Zentrale ist mit einem Router verbunden, welcher die Internet-Verbindung herstellt. Dieser hat die feste öffentliche IP-Adresse The Unified Firewall at the headquarters is connected to a router, which establishes the Internet connection. It has the fixed public IP address 81.81.81.81.Die Unified Firewall in der Filiale ist mit einem Router verbunden, welcher die Internet-Verbindung herstellt. Dieser hat die feste öffentliche IP-Adresse
- The Unified firewall at the branch office is connected to a router, which establishes the Internet connection. It has the fixed public IP address 80.80.80.80.
Procedure:
Die Einrichtung ist bei Szenario 1 und 2 grundsätzlich gleich. Bei Szenario 2 muss zusätzlich ein Port- und Protokollforwarding auf dem vorgeschalteten Router eingerichtet werden (siehe Abschnitt The setup for scenarios 1 and 2 are basically the same. Scenario 2 additionally requires port and protocol forwarding to be set up on the upstream router (see section 3).
1. Konfigurations-Schritte auf der Unified Firewall in der Zentrale) Configuration steps on the Unified Firewall at the headquarters:
1.1 Erstellen und Export der Zertifikate) Creating and exporting the certificates:
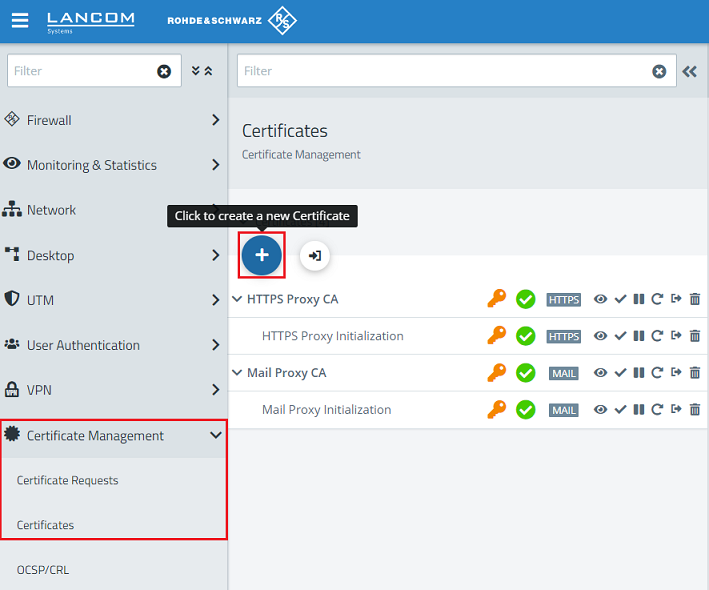
1.1.1 Verbinden Sie sich per Web-Browser mit der Unified Firewall in der Zentrale, wechseln in das Menü Certificate Management → Certificates und klicken auf das "Plus-Symbol", um ein neues Zertifikat zu erstellen) Use a browser to connect to the Unified Firewall, switch to the menu Certificate Management → Certificates and click on the “+” icon to create a new certificate.
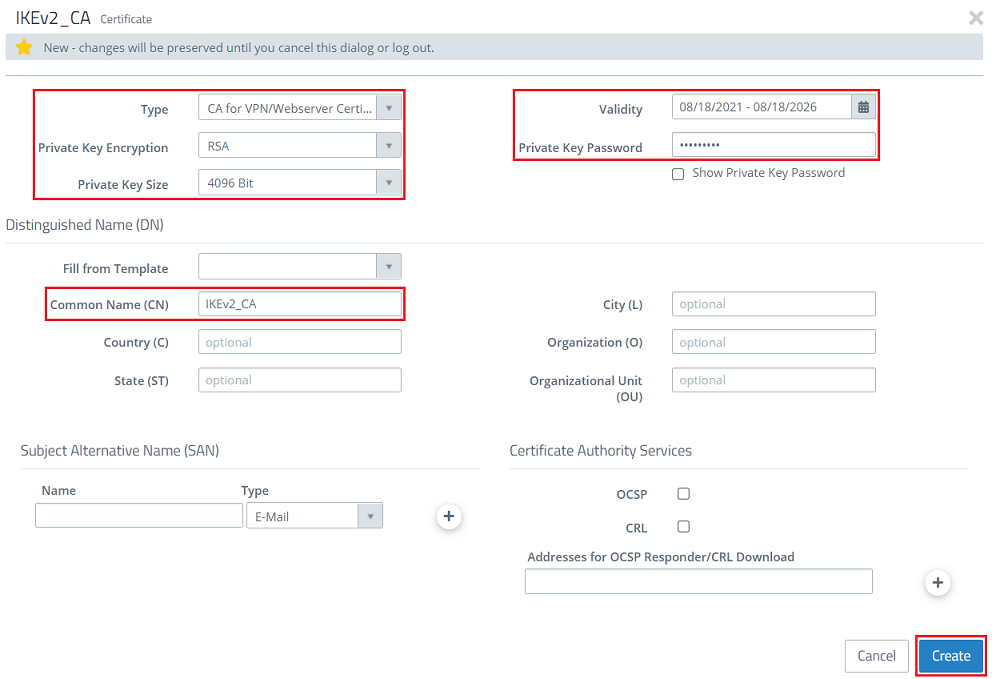
1.1.2 Erstellen Sie als Erstes eine ) First, create a CA (Certificate Authority). Passen Sie dazu die folgenden Parameter an und klicken auf Modify the following parameters for it and then click Create:
- Type: Wählen Sie im Dropdownmenü die Option From the drop-down menu, select the option CA for VPN/Webserver Certificate ausweb-server certificate.
- Private Key Encryption: Stellen Sie sicher, dass die Option RSA ausgewählt istMake sure that the option RSA is selected.
- Private Key Size: Wählen Sie im Dropdownmenü die Option 4096 Bit ausFrom the drop-down menu, select the option 4096 bit.
- Common Name (CN): Vergeben Sie einen aussagekräftigen Common Name für die CA (in diesem Beispiel IKEv2_CA)Set a descriptive common name for the CA.
- Validity: Wählen Sie eine Laufzeit für die CA aus. Eine CA soll üblicherweise eine lange Laufzeit haben, daher wird diese in diesem Beispiel auf 5 Jahre gesetzt.Private Key Password: Vergeben Sie ein Passwort für den Private Key. Dieses dient dazu den Private Key der CA zu verschlüsselnSelect a validity period for this CA. A CA usually requires a long period of validity, which is why it is set to 5 years in this example.
- Private key password: Set a password for the private key. This is used to encrypt the private key.
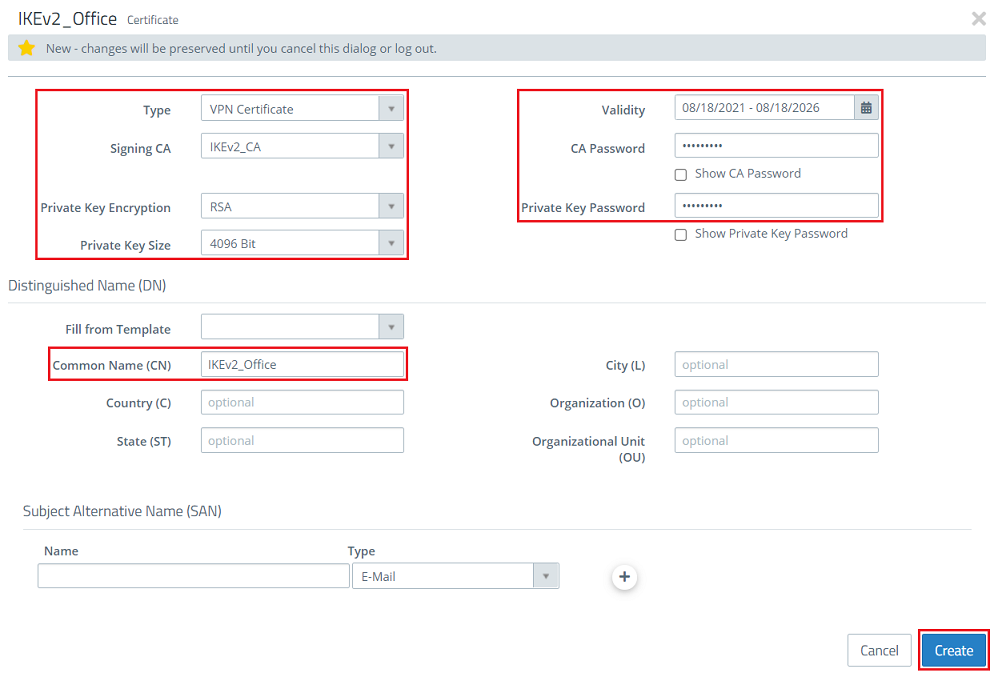
1.1.3 Erstellen Sie anschließend ein VPN-Zertifikat für die Zentrale. Passen Sie dazu die folgenden Parameter an und klicken auf ) Next, create a VPN certificate for the headquarters. Modify the following parameters for it and then click Create:
- Type: Wählen Sie im Dropdownmenü die Option VPN-Zertifikat ausFrom the drop-down menu, select the option VPN certificate.
- Signing CA: Wählen Sie im Dropdownmenü die in Schritt From the drop-down menu, select the CA created in step 1.1.2 erstellte CA aus.
- Private Key Encryption: Stellen Sie sicher, dass die Option RSA ausgewählt istMake sure that the option RSA is selected.
- Private Key Size: Wählen Sie im Dropdownmenü die Option 4096 Bit ausFrom the drop-down menu, select the option 4096 bit.
- Common Name (CN): Vergeben Sie einen aussagekräftigen Common Name für das Zertifikat der Zentrale (in diesem Beispiel IKEv2_Zentrale).
- Validity: Wählen Sie eine Laufzeit für das Zertifikat aus. Eine VPN-Zertifikat für eine Site-to-Site VPN-Verbindung soll üblicherweise eine lange Laufzeit haben, daher wird diese in diesem Beispiel auf 5 Jahre gesetzt.
- CA Password: Hinterlegen Sie das in Schritt 1.1.2 vergebene Private-Key-Passwort.
- Set a descriptive common name for certificate at the headquarters.
- Validity: Select a validity period for this certificate. A VPN certificate for a site-to-site VPN connection usually requires a long period of validity, which is why it is set to 5 years in this example.
- CA password: Enter the private key password set in step 1.1.2.
- Private key password: Assign any private key password.Private Key Password: Vergeben Sie ein Passwort für den Private Key. Dieses dient dazu den Private Key des VPN-Zertifikats zu verschlüsseln.

1.1.4 Erstellen Sie abschließend ein VPN-Zertifikat für die Filiale. Passen Sie dazu die folgenden Parameter an und klicken auf ) Next, create a VPN certificate for the branch office. Modify the following parameters for it and then click Create:
- Type: Wählen Sie im Dropdownmenü die Option VPN-Zertifikat ausFrom the drop-down menu, select the option VPN certificate.
- Signing CA: Wählen Sie im Dropdownmenü die in Schritt From the drop-down menu, select the CA created in step 1.1.2 erstellte CA aus.
- Private Key Encryption: Stellen Sie sicher, dass die Option RSA ausgewählt istMake sure that the option RSA is selected.
- Private Key Size: Wählen Sie im Dropdownmenü die Option 4096 Bit ausFrom the drop-down menu, select the option 4096 bit.
- Common Name (CN): Vergeben Sie einen aussagekräftigen Common Name für das Zertifikat der Filiale (in diesem Beispiel IKEv2_Filiale)Set a descriptive common name for certificate at the branch office.
- Validity: Wählen Sie eine Laufzeit für die CA aus. Eine VPN-Zertifikat für eine SiteSelect a validity period for this CA. A VPN certificate for a site-to-Site VPN-Verbindung, daher wird diese in diesem Beispiel auf 5 Jahre gesetzt.site VPN connection usually requires a long period of validity, which is why it is set to 5 years in this example.
- CA password: Enter the private key password set in step CA Password: Hinterlegen Sie das in Schritt 1.1.2 vergebene Private-Key-Passwort.
- Private Key Password: Vergeben Sie ein Passwort für den Private Key. Dieses dient dazu den Private Key des VPN-Zertifikats zu verschlüsseln.key password: Assign any private key password.
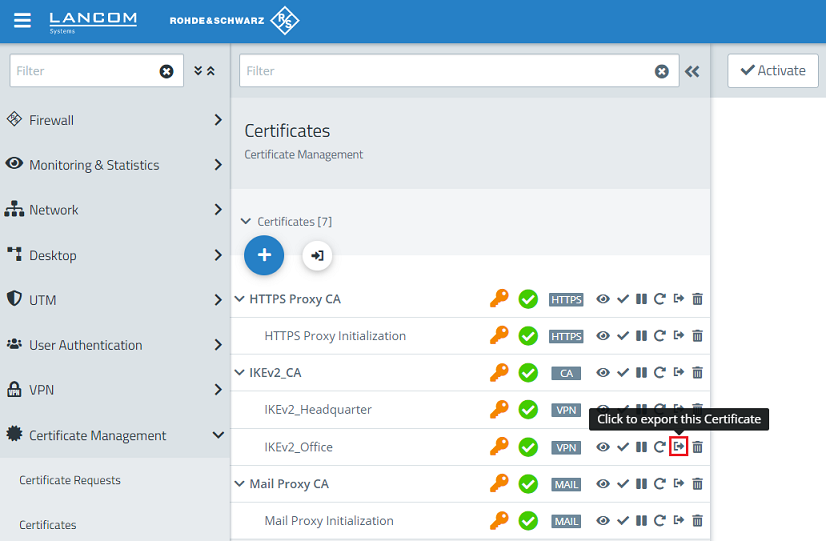
1.1.5 Klicken Sie in der Certificate Management bei dem Zertifikat der Filiale auf die Schaltfläche zum Export) Under Certificate management, go to the certificate of the branch office and click the export button.
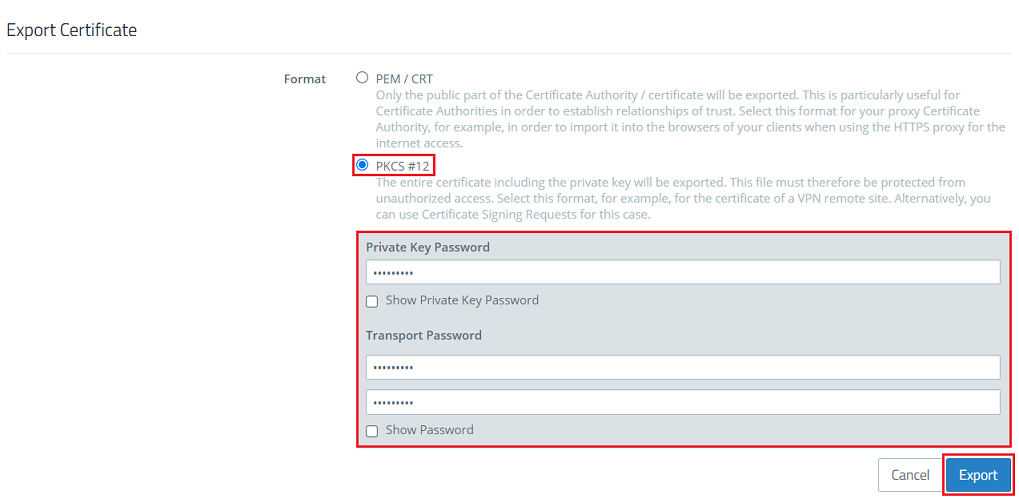
1.1.6 Wählen Sie als Format die Option ) As the format, select the option PKCS #12 aus, tragen die Passwörter ein und klicken auf , enter the passwords and click on Export:
- Private Key Password: Tragen Sie das Private-Key-Passwort ein, welches Sie in Schritt key password: Enter the private key password that you set in step 1.1.4 vergeben haben.
- Transport Password: Tragen sie ein Passwort ein. Dieses wird beim Import des Zertifikates auf der Unified Firewall in der Filiale benötigt (siehe Schritt Enter a password. This is required when importing the certificate into the Unified Firewall at the branch office (see step 2.1.2).
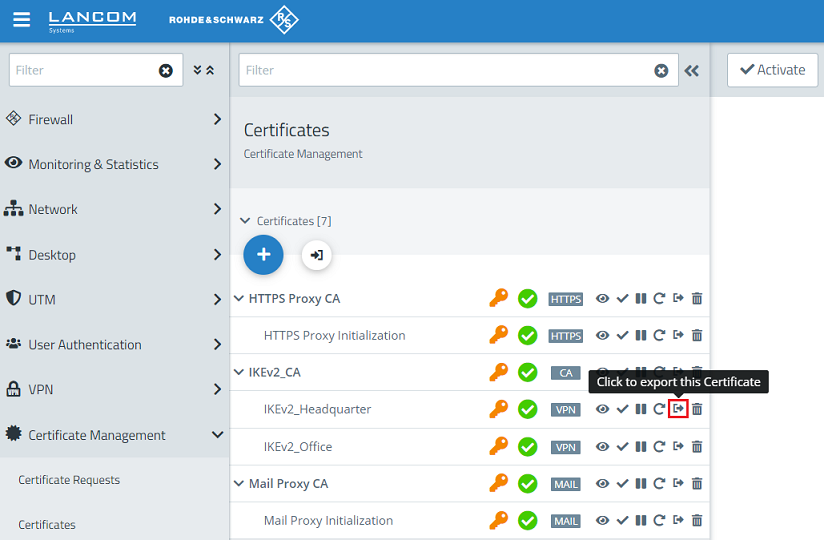
1.1.7 Klicken Sie in der Certificate Management bei dem Zertifikat der Zentrale auf die Schaltfläche zum Export) Under Certificate management, go to the certificate of the headquarters and click the export button.
1.1.8 Wählen Sie als Format die Option PEM aus und klicken auf 8) As the format, select the option PEM and click on Export.

1.2 Einrichtung der VPN-Verbindung) Setting up the VPN connection:
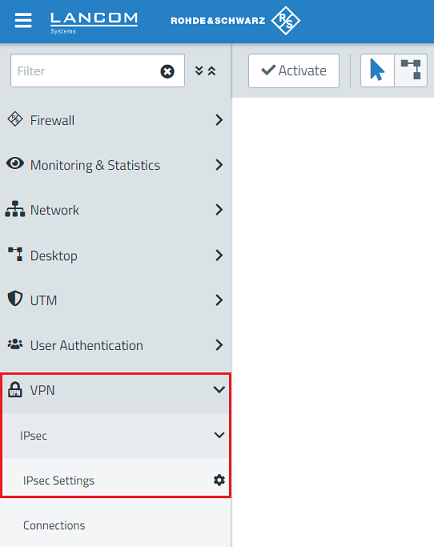
1.2.1 Wechseln Sie in das Menü ) Go to the menu VPN → IPSec IPsec → IPSec SettingsIPsec settings.
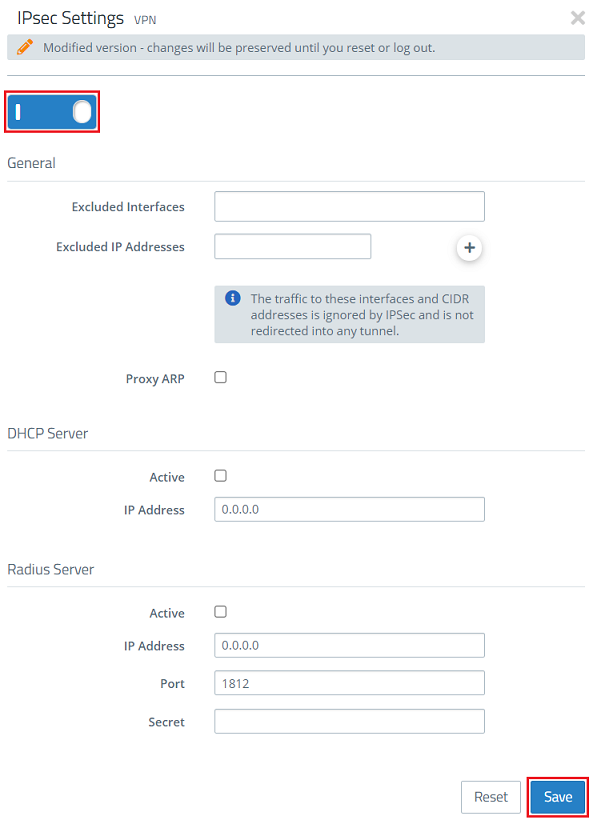
1.2.2 Aktivieren Sie die IPSec-Funktionalität über den Schieberegler und klicken auf ) Use the slider to enable the IPsec functionality and click on Save.
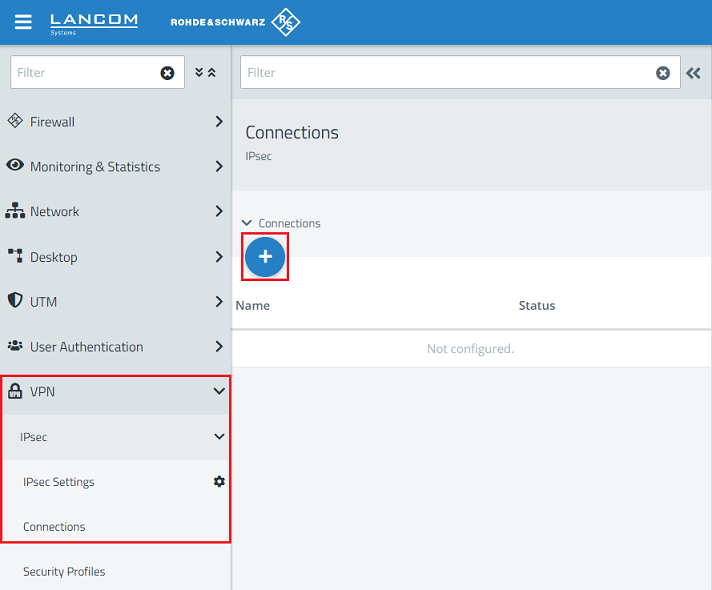
1.2.3 Wechseln Sie in das Menü ) Switch to the menu VPN → IPSec → Connections und klicken auf das "Plus-Symbol", um eine neue VPN-Verbindung zu erstellenIPsec → Connections and click on the “+” icon to create a new VPN connection.
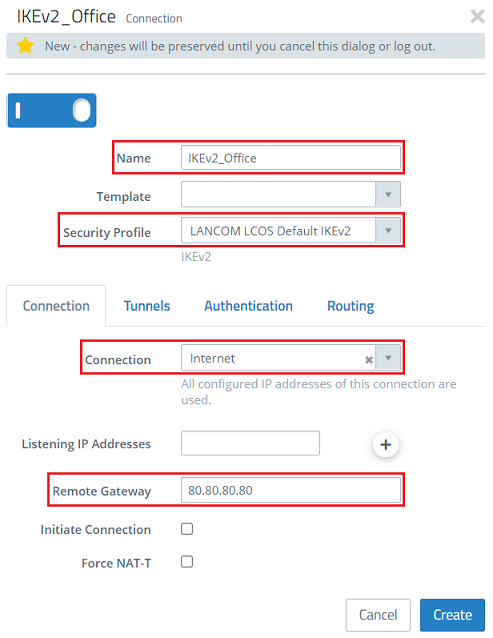
1.2.4 Passen Sie die folgenden Parameter an) Modify the following parameters:
- Name: Vergeben Sie einen aussagekräftigen Namen für die VPN-Verbindung (in diesem Beispiel Set a descriptive name for the VPN connection (in this example IKEv2_Office).
- Security Profile: Wählen Sie im Dropdownmenü das Sicherheits-Profil From the drop-down menu, select the security profile LANCOM LCOS Default IKEv2 aus. Bei Bedarf können Sie auf beiden Seiten auch ein anderes Profil verwenden.
- Connection: Wählen Sie im Dropdownmenü die Internet-Verbindung aus (in diesem Beispiel Internet).
- . If necessary, you can at both ends use a different profile.
- Connection: Use the drop-down menu to select the Internet connection (in this example Internet)
- Remote Gateway: Enter the IP address or the DNS name of the Unified Firewall at the branch office (in this example the IP address Remote Gateway: Geben Sie die IP-Adresse oder den DNS-Namen der Unified Firewall in der Filiale an (in diesem Beispiel die IP-Adresse 80.80.80.80).
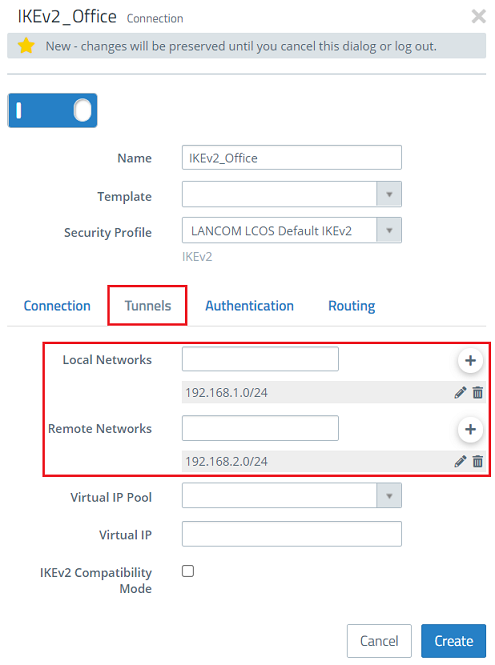
1.2.5 Wechseln Sie in den Reiter Tunnels und passen die folgenden Parameter an) Go to the Tunnels tab and modify the following parameters:
- Local Networks: Hinterlegen Sie über das "Plus-Symbol" die Netz-Adresse des lokalen Netzwerks der Zentrale in CIDR-Schreibweise (in diesem Beispiel also networks: Use the “+” icon to store the network address of the local network at the headquarters in CIDR notation (in this example 192.168.1.0/24).
- Remote Networks: Hinterlegen Sie über das "Plus-Symbol" die Netz-Adresse des lokalen Netzwerks der Filiale in CIDR-Schreibweise (in diesem Beispiel also Use the “+” icon to store the network address of the local network of the branch office in CIDR notation (in this example 192.168.2.0/24).
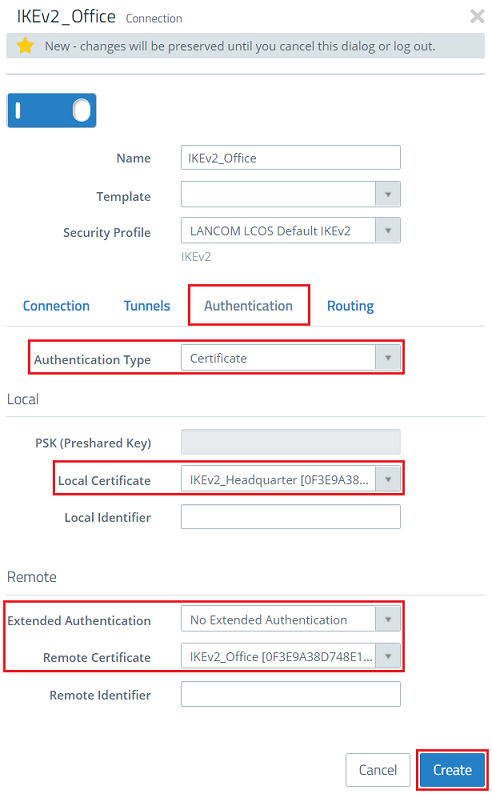
1.2.6 Wechseln Sie in den Reiter Authentication, passen die folgenden Parameter an und klicken auf ) Go to the Authentication tab, adjust the following parameters and click Create:
- Authentication Type: Stellen Sie sichder, dass im Dropdownmenü die Option Zertifikat ausgewählt istMake sure that the drop-down menu is set to the option Certificate.
- Local Certificate: Wählen Sie im Dropdownmenü das in Schritt certificate: From the drop-down menu, select the certificate for the headquarters created in step 1.1.3 erstellte Zertifikat für die Zentrale aus.
- Extended Authentication: Stellen Sie sicher, dass die Option Make sure that the option No Extended Authentication ausgewählt ist is selected.
- Remote Certificate: Wählen Sie im Dropdownmenü das in Schritt From the drop-down menu, select the certificate for the branch office created in step 1.1.4 erstellte Zertifikat für die Filiale aus.
1.2.7 Klicken Sie auf das Symbol zum Create ) Click the button to create a VPN network.

1.2.8 Passen Sie die folgenden Parameter an und klicken auf ) Modify the following parameters and click Create:
- Name: Vergeben Sie einen aussagekräftigen Namen für die VPN-Verbindung (in diesem Beispiel Set a descriptive name for the VPN connection (in this example IKEv2_Office).
- Connection Type: Wählen Sie die Option IPSec austype: Select the option IPsec.
- IPSec Connection: Wählen Sie im Dropdownmenü die in Schritt IPsec Connection: From the drop-down menu, select the VPN connection created in steps 1.2.4 - – 1.2.6 erstellte VPN-Verbindung aus.

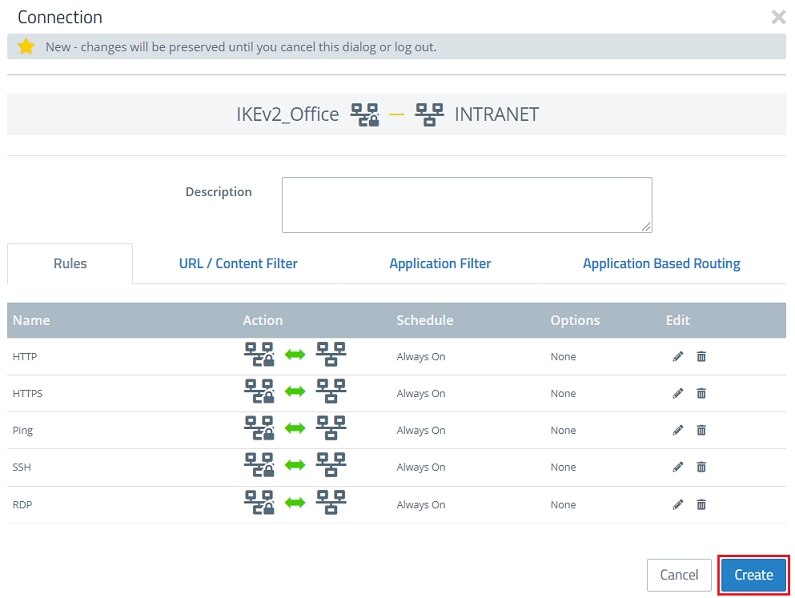
1.3 Kommunikation über die VPN-Verbindung in der Firewall freigeben) Enable communication via the VPN connection in the firewall:
1.3.1 Klicken sie auf dem Desktop auf das in Schritt ) On the desktop, click the VPN network created in step 1.2.8 erstellte VPN-Netzwerk, wählen das Verbindungswerkzeug aus und klicken auf das Netzwerk-Objekt, für welches die Kommunikation erlaubt werden soll, select the connection tool, and click the network object for which communications should be enabled.
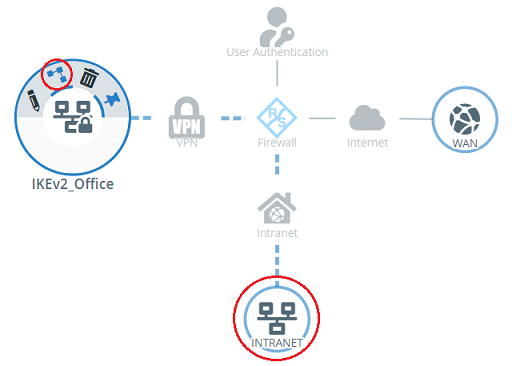
1.3.2 Wählen Sie auf der rechten Seite die erforderlichen Protokolle aus und fügen diese über die "Plus-Symbole" hinzu) Select the required protocols on the right-hand side and add them using the “+” icon.

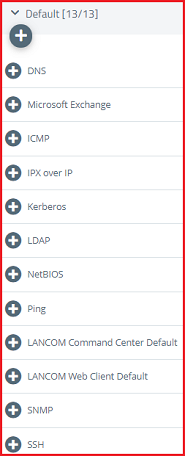
1.3.3 Klicken Sie auf Create, um die Firewall-Regel anzulegen) Click Create to create the firewall rule.
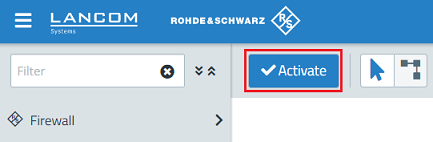
1.3.4 Die Konfiguration der Unified Firewall in der Zentrale ist damit abgeschlossen. Klicken Sie auf Activate, damit die auf dem Desktop vorgenommenen Änderungen umgesetzt werden) This concludes the configuration of the Unified Firewall at the headquarters. Finally, implement the changes on the Desktop by clicking Activate.
2. Konfigurations-Schritte auf der Unified Firewall in der Filiale) Configuration steps on the Unified Firewall at the branch office:
2.1 Import der Zertifikate) Importing the certificates:
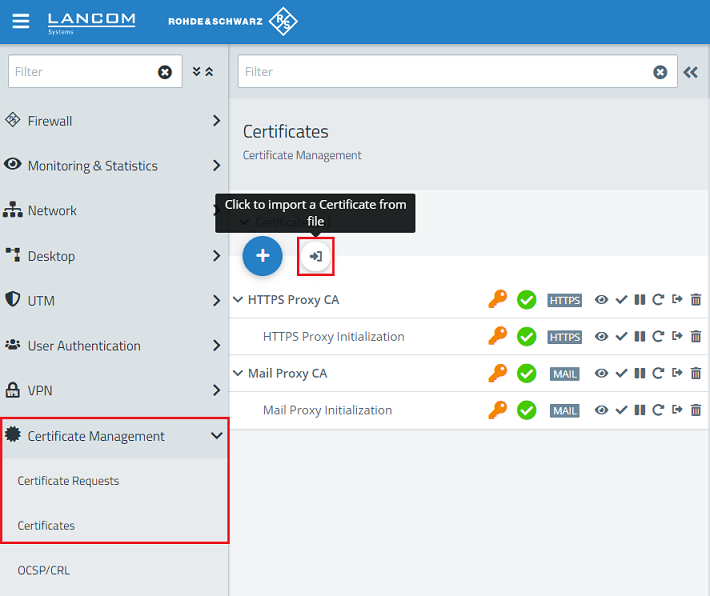
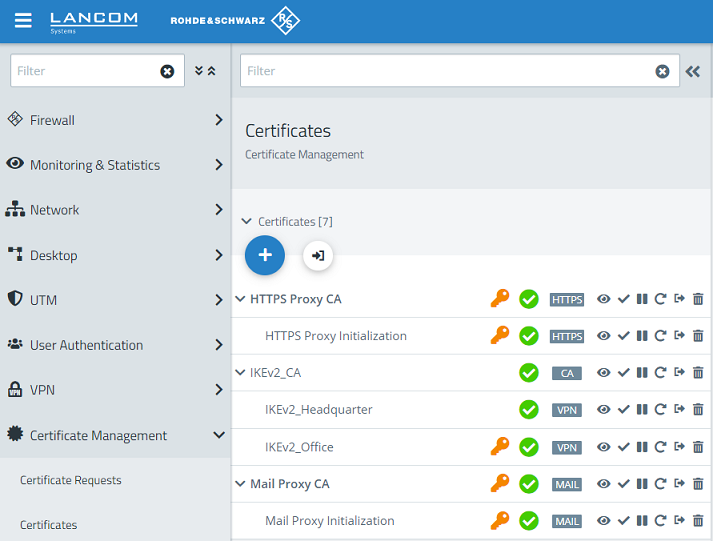
2.1.1 Verbinden Sie sich per Web-Browser mit der Unified Firewall in der Filiale, wechseln in das Menü Certificate Management → Certificates und klicken auf das Symbol zum Import eines Zertifikates) Use a browser to connect to the branch-office Unified Firewall, switch to the menu Certificate Management → Certificates and click on the icon for importing a certificate.
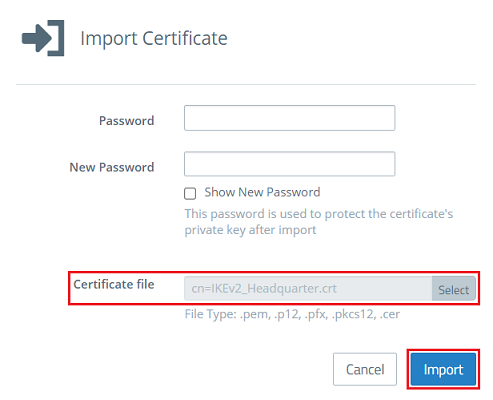
2.1.2 Wählen Sie bei Certificate File das Zertifikat der Filiale aus, geben die Passwörter an und klicken auf ) Under Certificate file, select the branch-office certificate, enter the passwords and click on Import:
- Password: Tragen Sie das in Schritt Enter the transport password set in step 1.1.6 vergebene Transport-Passwort ein.
- New Password: Tragen Sie ein neues Passwort ein. Mit diesem wird der Private Key nach dem Import verschlüsseltEnter a new password. This is used to encrypt the private key after the import.

2.1.3 Importieren Sie ein weiteres Zertifikat. Wählen sie bei Certificate File das Zertifikat der Zentrale aus und klicken auf ) Import a further certificate. Under Certificate file, select the certificate for the headquarters and click on Import:
| Info |
|---|
Die Passwörter müssen nicht angegeben werden, da bei dem Export des Zertifikats für die Zentrale keine Passwörter angegeben wurdenThere is no need to enter passwords here, because exporting the headquarters certificate does not require passwords to be set. |
2.1.4 Die Certificate Management sieht nach dem Import der Zertifikate wie folgt aus) After importing the certificates, the Certificate management should look like this.
2.2 Einrichtung der VPN-Verbindung) Setting up the VPN connection:
2.2.1 Wechseln Sie in das Menü ) Go to the menu VPN → IPSec IPsec → IPSec SettingsIPsec settings.
2.2.2 Aktivieren Sie die IPSec-Funktionalität über den Schieberegler und klicken auf ) Use the slider to enable the IPsec functionality and click on Save.
2.2.3 Wechseln Sie in das Menü ) Switch to the menu VPN → IPSec → Connections und klicken auf das "Plus-Symbol", um eine neue VPN-Verbindung zu erstellenIPsec → Connections and click on the “+” icon to create a new VPN connection.
2.2.4 Passen Sie die folgenden Parameter an) Modify the following parameters:
- Name: Vergeben Sie einen aussagekräftigen Namen für die VPN-Verbindung (in diesem Beispiel Set a descriptive name for the VPN connection (in this example IKEv2_Headquarter).
- Security Profile: Wählen Sie im Dropdownmenü das Sicherheits-Profil From the drop-down menu, select the security profile LANCOM LCOS Default IKEv2 aus. Bei Bedarf können Sie auf beiden Seiten auch ein anderes Profil verwenden.
- Connection: Wählen Sie im Dropdownmenü die Internet-Verbindung aus (in diesem Beispiel Internet).
- . If necessary, you can use a different profile at both ends.
- Connection: Use the drop-down menu to select the Internet connection (in this example Internet)
- Remote Gateway: Enter the IP address or the DNS name of the Unified Firewall at the headquarters (in this example the IP address Remote Gateway: Geben Sie die IP-Adresse oder den DNS-Namen der Unified Firewall in der Zentrale an (in diesem Beispiel die IP-Adresse 81.81.81.81).
- Setzen Sie den Haken bei Set the checkmark next to Initiate Connection, damit die Unified Firewall in der Filiale die VPN-Verbindung aufbautso that the Unified Firewall at the branch office establishes the VPN connection.

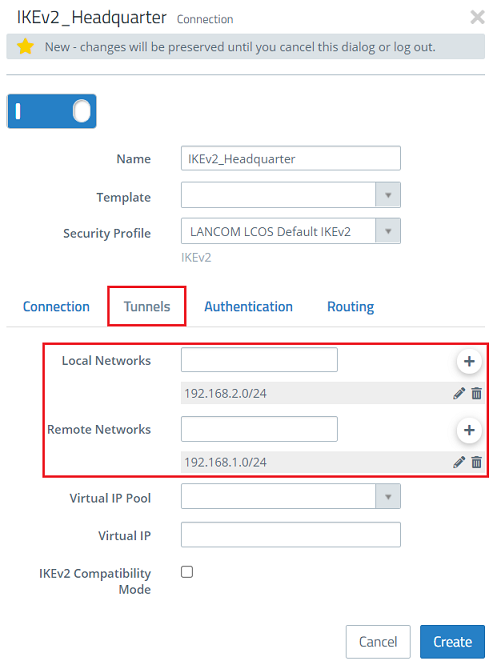
2.2.5 Wechseln Sie in den Reiter Tunnels und passen die folgenden Parameter an) Go to the Tunnels tab and modify the following parameters:
- Local Networks: Hinterlegen Sie über das "Plus-Symbol" die Netz-Adresse des lokalen Netzwerks der Zentrale in CIDR-Schreibweise (in diesem Beispiel also networks: Use the “+” icon to store the network address of the local network at the headquarters in CIDR notation (in this example 192.168.2.0/24).
- Remote Networks: Hinterlegen Sie über das "Plus-Symbol" die Netz-Adresse des lokalen Netzwerks der Filiale in CIDR-Schreibweise (in diesem Beispiel also Use the “+” icon to store the network address of the local network of the branch office in CIDR notation (in this example 192.168.1.0/24).
2.2.6 Wechseln Sie in den Reiter Authentifizierung, passen die folgenden Parameter an und klicken auf ) Go to the Authentication tab, adjust the following parameters and click Create:
- Authentication Type: Stellen Sie sicher, dass im Dropdownmenü die Option Certificate ausgewählt istMake sure that the drop-down menu is set to the option Certificate.
- Local Certificate: Wählen Sie im Dropdownmenü das in Schritt certificate: From the drop-down menu, select the certificate for the branch office imported in step 2.1.2 importierte Zertifikat für die Filiale aus.
- Extended Authentication: Stellen Sie sicher, dass die Option Make sure that the option No Extended Authentication ausgewählt ist is selected.
- Remote Certificate: Wählen Sie im Dropdownmenü das in Schritt From the drop-down menu, select the certificate for the headquarters imported in step 2.1.3 importierte Zertifikat für die Zentrale aus.

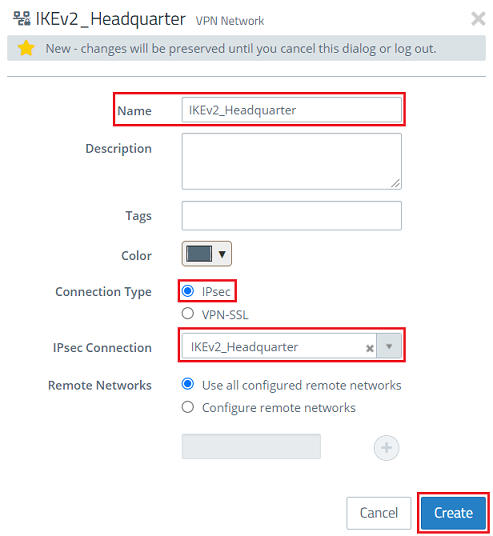
2.2.7 Klicken Sie auf das Symbol zum Create ) Click the button Click to create a VPN network.
2.2.8 Passen Sie die folgenden Parameter an und klicken auf ) Modify the following parameters and click Create:
- Name: Vergeben Sie einen aussagekräftigen Namen für die VPN-Verbindung (in diesem Beispiel Set a descriptive name for the VPN connection (in this example IKEv2_Headquarter).
- Connection Type: Wählen Sie die Option IPSec austype: Select the option IPsec.
- IPSec Connection: Wählen Sie im Dropdownmenü die in Schritt IPsec Connection: From the drop-down menu, select the VPN connection created in steps 2.2.4 - – 2.2.6 erstellte VPN-Verbindung aus.
2.3 Kommunikation über die VPN-Verbindung in der Firewall freigeben) Enable communication via the VPN connection in the firewall:
2.3.1 Klicken sie auf dem Desktop auf das in Schritt ) On the desktop, click the VPN network created in step 2.2.8 erstellte VPN-Netzwerk, wählen das Verbindungswerkzeug aus und klicken auf das Netzwerk-Objekt, für welches die Kommunikation erlaubt werden soll, select the connection tool, and click the network object for which communications should be enabled.
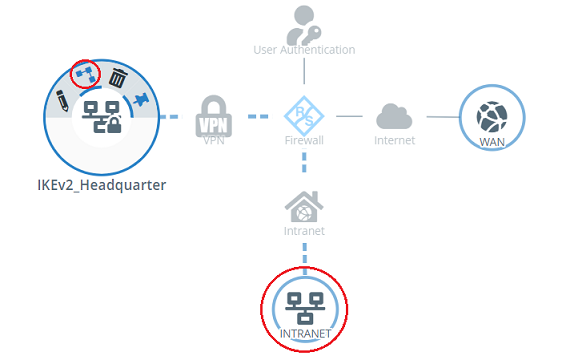
2.3.2 Wählen Sie auf der rechten Seite die erforderlichen Protokolle aus und fügen diese über die "Plus-Symbole" hinzu) Select the required protocols on the right-hand side and add them using the “+” icon.
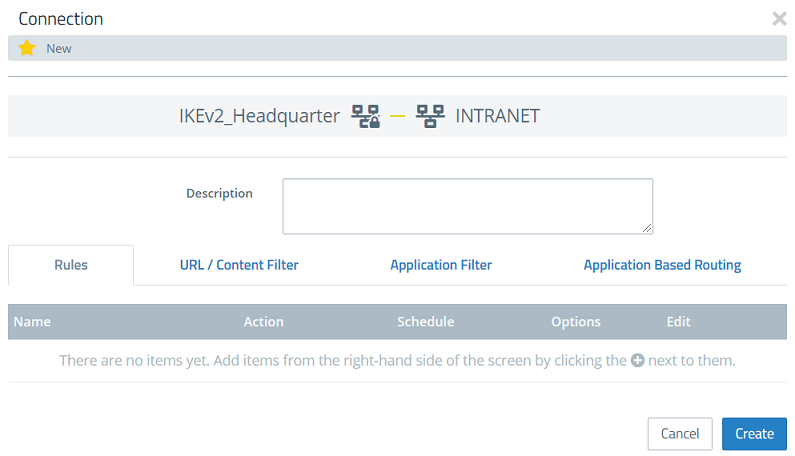
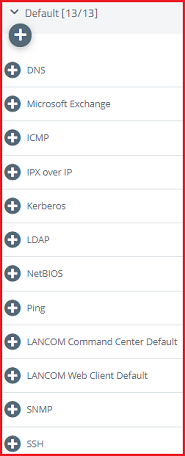
2.3.3 Klicken Sie auf Create, um die Firewall-Regel anzulegen) Click Create to create the firewall rule.

2.3.4 Die Konfiguration der Unified Firewall in der Zentrale ist damit abgeschlossen. Klicken Sie auf Activate, damit die auf dem Desktop vorgenommenen Änderungen umgesetzt werden.
3. Einrichtung eines Port- und Protokoll-Forwarding auf einem LANCOM Router (nur Szenario 2):
Für IPSec werden die UDP-Ports 500 und 4500 sowie das Protokoll ESP benötigt. Diese müssen auf die Unified Firewall weitergeleitet werden.
Werden die UDP-Ports 500 und 4500 weitergeleitet, wird das Protokoll ESP automatisch mit weitergeleitet.
| Info |
|---|
Sollte ein Router eines anderen Herstellers verwendet werden, erfragen Sie die Vorgehensweise bei dem jeweiligen Hersteller. |
| Hinweis |
|---|
Werden die UDP-Ports 500 und 4500 sowie das Protokoll ESP auf die Unified Firewall weitergeleitet, kann eine IPSec-Verbindung auf dem LANCOM Router nur noch verwendet werden, wenn diese in HTTPS gekapselt wird (IPSec-over-HTTPS). Ansonsten kann keine IPSec-Verbindung mehr aufgebaut werden! |
) This concludes the configuration of the Unified Firewall at the headquarters. Finally, implement the changes on the Desktop by clicking Activate.
3) Setting up port and protocol forwarding on a LANCOM router (scenario 2 only):
IPsec requires the use of the UDP ports 500 and 4500 as well as the protocol ESP. These must be forwarded to the Unified Firewall.
Forwarding the UDP ports 500 and 4500 automatically causes the ESP protocol to be forwarded.
| Info |
|---|
If you are using a router from another manufacturer, approach them for information about the appropriate procedure. |
| Hinweis |
|---|
If the UDP ports 500 and 4500 and the ESP protocol are forwarded to the Unified Firewall, an IPsec connection to the LANCOM router can only be used if it is encapsulated in HTTPS (IPsec-over-HTTPS). Otherwise, no IPsec connection will be established. |
3.1) Open the configuration for the router in LANconfig and switch to the menu item IP router 3.1 Öffnen Sie die Konfiguration des Routers in LANconfig und wechseln in das Menü IP Router → Masq. → Port forwarding table.
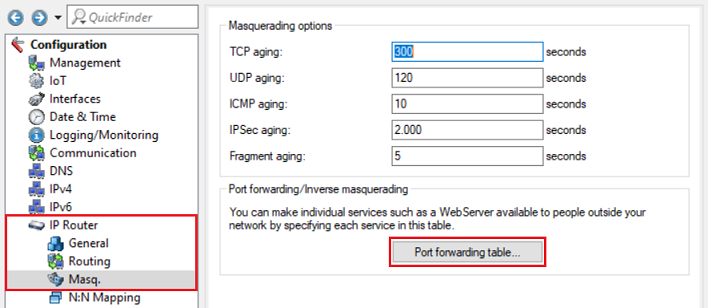
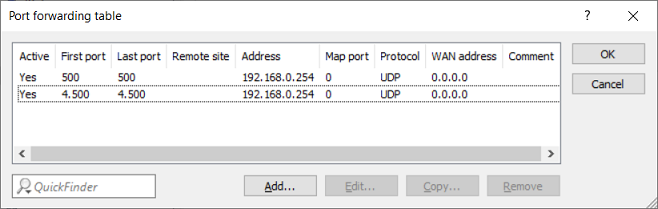
3.2 Hinterlegen Sie folgende Parameter) Enter the following parameters:
- First port: Hinterlegen Sie den Port Specify the port 500.
- Last port:
...
- Specify the port 500.
- Intranet address:
...
- Specify the IP address of the Unified Firewall in the intermediate network between the Unified Firewall and the LANCOM router.
- Protocol:
...
- From the drop-down menu, select UDP.
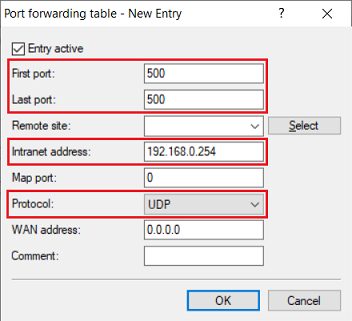
3.3
...
) Create a further entry and specify the UDP port 4500.
3.4
...
) Write the configuration back to the router.