
...
This article describes how to set up a certificate-based IKEv2 VPN connection between two LANCOM R&S®Unified Firewalls.
| Info |
|---|
The certificate module was updated in LCOS FX 10.7, therefore the corresponding menus differ compared to older LCOS FX versions. The configuration of a certificate-based IKEv2 connection between two Unified Firewalls as of LCOS FX 10.7 is described in the following article: |
Rquirements:
- Two LANCOM R&S® Unified Firewalls with LCOS FX as of version 10.4 up to and including LCOS FX 10.6
- A configured and functional Internet connection on the two Unified Firewalls
- Web browser for configuring the Unified Firewall.
The following browsers are supported:- Google Chrome
- Chromium
- Mozilla Firefox
...
- A certificate-based IKEv2 VPN connection should be set up between two Unified Firewalls (headquarters and branch office).
- The Unified Firewall at the headquarters has the local network 192.168.1.0/24.
- The Unified Firewall at the branch office has the local network 192.168.2.0/24.
- The Unified Firewall at the headquarters: has has the fixed public IP address 81.81.81.81.
- The Unified Firewall at the branch office has the fixed public IP address 80.80.80.80.
...
- A certificate-based IKEv2 VPN connection should be set up between two Unified Firewalls (headquarters and branch office).
- The Unified Firewall at the headquarters has the local network 192.168.1.0/24.
- The Unified Firewall at the branch office has the local network 192.168.2.0/24.
- The Unified Firewall at the headquarters: is is connected to a router, which establishes the Internet connection. It has the fixed public IP address 81.81.81.81.
- The Unified firewall at the branch office is connected to a router, which establishes the Internet connection. It has the fixed public IP address 80.80.80.80.
...
- Type: From the drop-down menu, select the option CA for VPN/web-server certificate.
- Private Key Encryption: Make sure that the option RSA is selected.
- Private Key Size: From the drop-down menu, select the option 4096 bit.
- Common Name (CN): Set a descriptive common name for the CA (in this example IKEv2_ CA).
- Validity: Select a validity period for this CA. A CA usually requires a long period of validity, which is why it is set to 5 years in this example.
- Private key password: Set a password for the private key. This is used to encrypt the private key.
...
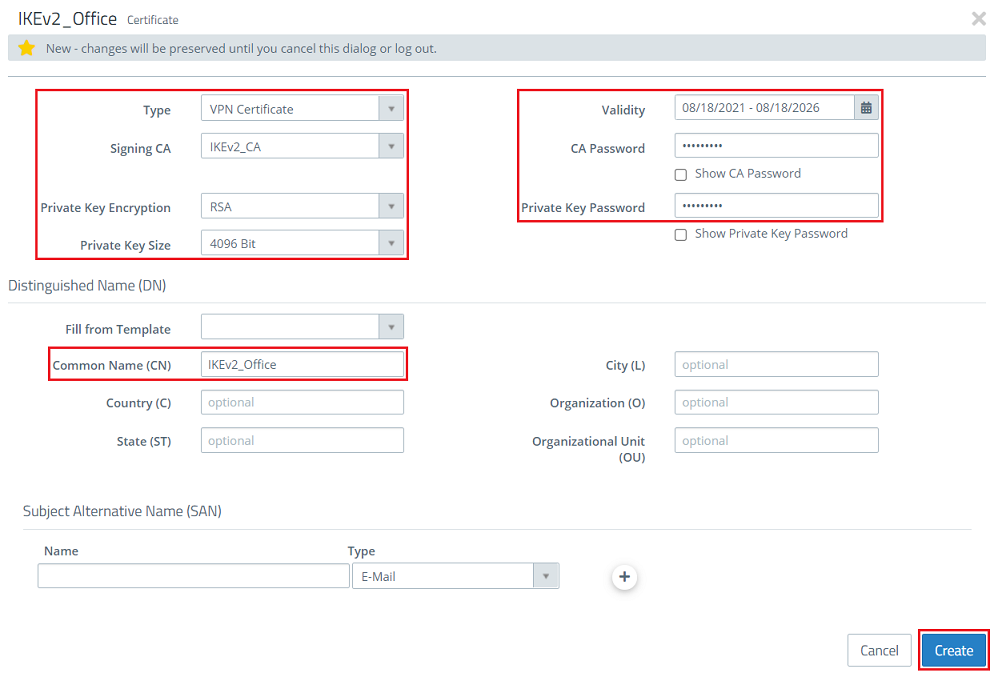
- Type: From the drop-down menu, select the option VPN certificate.
- Signing CA: From the drop-down menu, select the CA created in step 1.1.2.
- Private Key Encryption: Make sure that the option RSA is selected.
- Private Key Size: From the drop-down menu, select the option 4096 bit.
- Common Name (CN): Set a descriptive common name for certificate at the headquarters (in this example IKEv2_Headquarter).
- Validity: Select a validity period for this certificate. A VPN certificate for a site-to-site VPN connection usually requires a long period of validity, which is why it is set to 5 years in this example.
- CA password: Enter the private key password set in step 1.1.2.
- Private key password: Set a password for the private key. This is used to encrypt the private key of the VPN certificateAssign any private key password.

1.1.4) Next, create a VPN certificate for the branch office. Modify the following parameters for it and then click Create:
- Type: From the drop-down menu, select the option VPN certificate.
- Signing CA: From the drop-down menu, select the CA created in step 1.1.2.
- Private Key Encryption: Make sure that the option RSA is selected.
- Private Key Size: From the drop-down menu, select the option 4096 bit.
- Common Name (CN): Set a descriptive common name for certificate at the branch office (in this example IKEv2_Office).
- Validity: Select a validity period for this CA. A VPN certificate for a site-to-site VPN connection usually requires a long period of validity, which is why it is set to 5 years in this example.
- CA password: Enter the private key password set in step 1.1.2.
- Private key password: Set a password for the Assign any private key . This is used to encrypt the private key of the VPN certificate.password.
1.1.5) Under Certificate management, go to the certificate of the branch office and click the export button.
...
- Local networks: Use the “+” icon to store the network address of the local network at the headquarters in CIDR notation (in this example 192.168.1.0/24).
- Remote Networks: Use the “+” icon to store the network address of the local network of the branch office in CIDR notation (in this example 192.168.2.0/24).
...
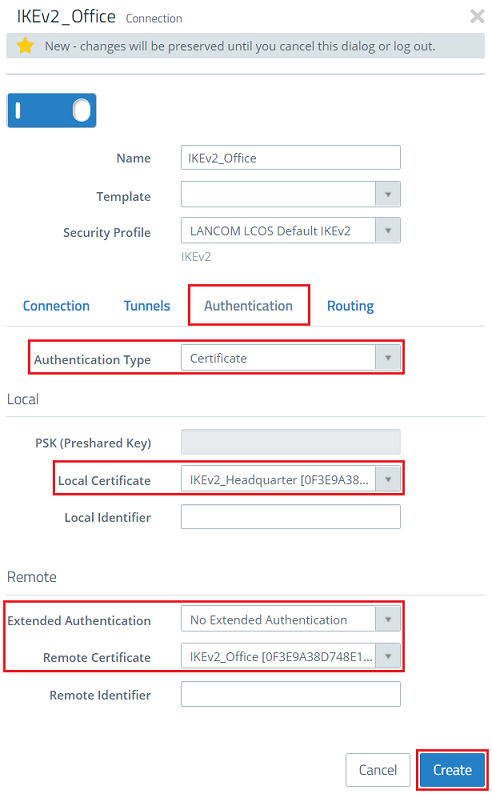
- Authentication Type: Make sure that the drop-down menu is set to the option Certificate.
- Local certificate: From the drop-down menu, select the certificate for the headquarters created in step 1.1.3.
- Extended Authentication: Make sure that the option No Extended Authentication is selected.
- Remote Certificate: From the drop-down menu, select the certificate for the branch office created in step 1.1.4.
1.2.7) Click the button Click to create a VPN network.

1.2.8) Modify the following parameters and click Create:
...
- Name: Set a descriptive name for the VPN connection (in this example IKEv2_Headquarter).
- Security Profile: From the drop-down menu, select the security profile LANCOM LCOS Default IKEv2. If necessary, you can at both ends use a different profile at both ends.
- Connection: Use the drop-down menu to select the Internet connection (in this example Internet)
- Remote Gateway: Enter the IP address or the DNS name of the Unified Firewall at the headquarters (in this example the IP address 81.81.81.81).
- Set the checkmark next to Initiate Connection, so that the Unified Firewall at the branch office establishes the VPN connection.
...
- Local networks: Use the “+” icon to store the network address of the local network at the headquarters in CIDR notation (in this example 192.168.2.0/24).
- Remote Networks: Use the “+” icon to store the network address of the local network of the branch office in CIDR notation (in this example 192.168.1.0/24).
...
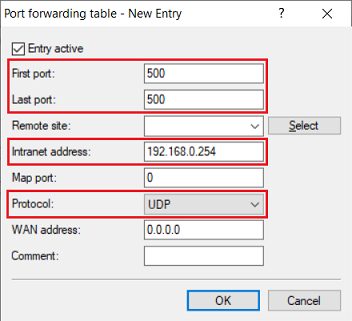
- First port: Specify the port 500.
- Last port: Specify the port 500.
- Intranet address: Specify the IP address of the Unified Firewall in the intermediate network between the Unified Firewall and the LANCOM router.
- Protocol: From the drop-down menu, select UDP.
3.3) Create a further entry and specify the UDP port 4500.
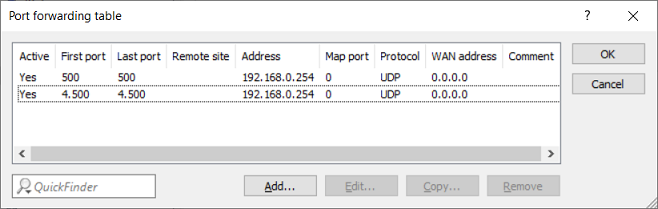
3.4) Write the configuration back to the router.