...
The procedure is basically the same for all switch types. As the different switch series use different file formats for the configuration files, this has to be taken into consideration for the file extension.
GS-23xx series:
1) Saving the switch configuration:
1.1) Start an instance of the Windows command line and go the menu where the tool PSCP is saved. If you installed the PuTTY utilities via the "Windows Installer" package, PSCP can also be run directly.
...
| Info |
|---|
The parameter -P 22 makes sure, that the port 22 is used for the SSH connection. If you are using another port it has to be modified accordingly. The parameter -P has to be capitalized. If you omit the destination folder and only specify the file name (e.g. configuration.xml), the file is saved in the folder, from where PSCP is invoked. The configuration file of a GS-23xx series switch has to be saved as XML file. |
2) Uploading the switch configuration:
...
After uploading the switch configuration it has to be saved as start configuration.
2.1
...
) Start an instance of the Windows command line and go the menu where the tool PSCP is saved. If you installed the PuTTY utilities via the "Windows Installer"
...
package,
...
PSCP can also be run directly.
2.2
...
) Enter the command in the format pscp -P 22 -pw
...
<password> -scp C:\Temp\<Datei Name>.xml
...
<user name>@<IP address>:config to upload a configuration file from the folder C:\Temp
...
into the switch.
In
...
this example the command pscp -P 22 -pw password -scp C:\Temp\configuration.xml admin@192.168.45.250:config
...
was used.

...
| Info |
|---|
The parameter -P 22 |
...
makes sure, that the port 22 is used for the SSH connection. If you are using another port it has to be modified accordingly. The parameter -P has to be capitalized. |
...
2.3) Connect to the webinterface, change to the menu item
Maintenance → Save/Restore → Save Start
...
and click Save to save the configuration as start configuration.
| Info |
|---|
The start configuration is retained even if the device is restarted or there is a power failure. |

GS-3xx series:
1) Saving the switch configuration:
1.1) Start an instance of the Windows command line and go the menu where the tool PSCP is saved. If you installed the PuTTY utilities via the "Windows Installer" package, PSCP can also be run directly.
...
| Info |
|---|
The parameter -P 22 makes sure, that the port 22 is used for the SSH connection. If you are using another port it has to be modified accordingly. The parameter -P has to be capitalized. If you omit the destination folder and only specify the file name (e.g. configuration.lcfsx), the file is saved in the folder, from where PSCP is invoked. The configuration file of a GS-3xxx series switch has to be saved as lcfsx file. |
2) Uploading the switch configuration:
...
After uploading the switch configuration it has to be saved as start configuration.
2.1
...
) Start an instance of the Windows command line and go the menu where the tool PSCP is saved. If you installed the PuTTY utilities via the "Windows Installer"
...
package,
...
PSCP can also be run directly.
2.2
...
) Enter the command in the format pscp -P 22 -pw
...
<password> -scp C:\Temp\<Datei Name>.lcfsx
...
<user name>@<IP address>:config to upload a configuration file from the folder C:\Temp
...
into the switch.
In
...
this example the command pscp -P 22 -pw Test12345 -scp C:\Temp\configuration.lcfsx admin@192.168.45.180:config
...
was used.

...
| Info |
|---|
The parameter -P 22 |
...
2.3 Klicken Sie rechts oben auf das Disketten-Symbol, um die Konfiguration als Start-Konfiguration zu speichern.
...
makes sure, that the port 22 is used for the SSH connection. If you are using another port it has to be modified accordingly. The parameter -P has to be capitalized. |
2.3) Connect to the webinterface of the switch and click on the disk symbol on the upper right corner to save the configuration as start configuration.
| Info |
|---|
The start configuration is retained even if the device is restarted or there is a power failure. |

2.4
...
) Acknowledge the save process by clicking Ok.
XS-51xx series:
1) Saving the switch configuration:
1.1) Start an instance of the Windows command line and go the menu where the tool PSCP is saved. If you installed the PuTTY utilities via the "Windows Installer" package, PSCP can also be run directly.
...
| Info |
|---|
The parameter -P 22 makes sure, that the port 22 is used for the SSH connection. If you are using another port it has to be modified accordingly. The parameter -P has to be capitalized. If you omit the destination folder and only specify the file name (e.g. configuration.cfg), the file is saved in the folder, from where PSCP is invoked. The configuration file of an XS-51xx series switch has to be saved as cfg file. |
2) Uploading the switch configuration:
Nach dem Import der Konfiguration als Startup Configuration muss diese noch aktiv geschaltet werden. Dazu muss die Konfiguration neu geladen oder alternativ der Switch neugestartet werden.
After importing a switch configuration as start configuration it has to be activated. To do this the configuration has to be reloaded or as an alternative the switch can also be rebooted.
| Hinweis |
|---|
Wenn eine Konfigurations-Sicherung mit Stacking-Einstellungen importiert wird, muss anschließend zwingend ein Neustart des Gerätes erfolgen, damit die Einstellungen übernommen werden. Einen Neustart können Sie z.B. im Webinterface in dem Menü System → Utilities → System Reboot vornehmen. |
2.1
...
) Start an instance of the Windows command line and go the menu where the tool PSCP is saved. If you installed the PuTTY utilities via the "Windows Installer"
...
package,
...
PSCP can also be run directly.
2.2
...
) Enter the command in the format pscp -P 22 -pw <passwort> -scp C:\Users\...\Downloads\Backup\<Datei Name>.cfg
...
<user name>@<IP address>:startup-config ein, um die Konfigurations Datei aus dem Verzeichnis C:\Users\...\Downloads\Backup als Start-Konfiguration in den Switch hochzuladen.
In diesem Beispiel wurde der Befehl pscp -P 22 -pw Test12345 -scp C:\Users\...\Downloads\Backup\XS-5110-configuration.cfg admin@192.168.45.148:startup-config verwendet.

Der Parameter -P 22 stellt sicher, dass der Port 22 für SSH verwendet wird. Sollten Sie einen anderen Port verwenden, passen Sie diesen entsprechend an. Der Parameter -P muss groß geschrieben werden.
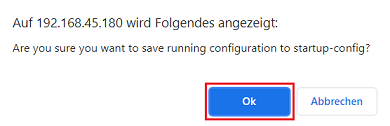
Alternativ kann die Konfiguration mit dem Parameter :config anstatt :startup-config auch als aktuelle Konfiguration hochgeladen werden. In diesem Fall muss diese noch über die Schaltfläche Save Configuration rechts oben im Webinterface als Start-Konfiguration gespeichert werden.
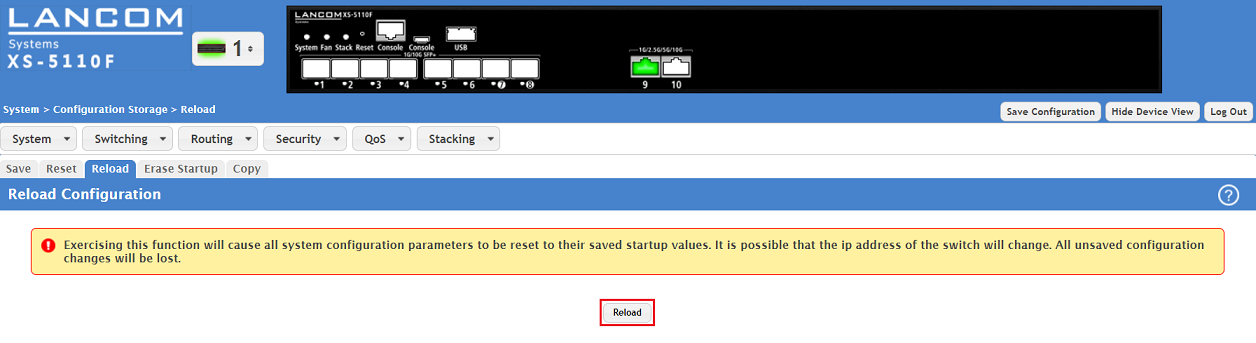
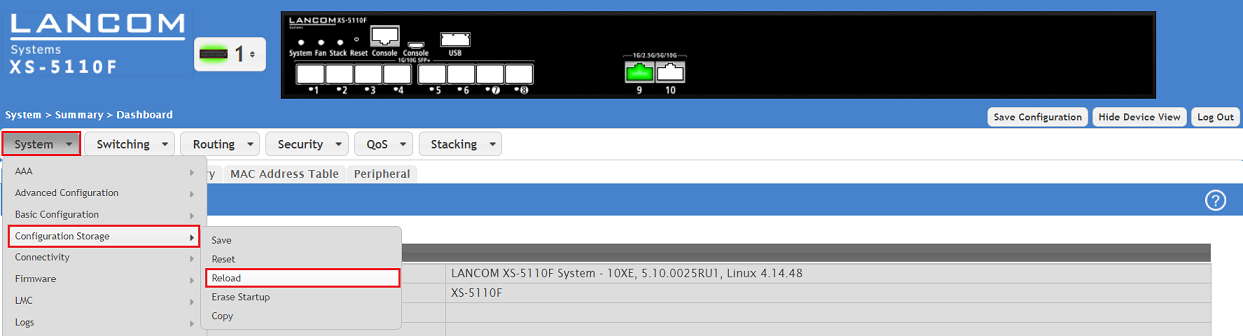
2.3 Wechseln Sie in das Menü System → Configuration Storage → Reload.
2.4 Klicken Sie auf die Schaltfläche Reload, damit die Start-Konfiguration aktiv geschaltet wird.
Alternativ kann dieser Vorgang auch auf der Konsole mit dem Befehl reload configuration durchgeführt werden.