
Description:
If the Single 802.1X or Multi 802.1X methods of network-user authentication cannot detect any EAPoL packets, then enabling MAC-based fallback allows authentication by MAC address (similar to the authentication mode MAC-based Auth.). Once EAPoL packets are detected on the port again, authentication returns to the modes Single 802.1X or Multi 802.1X.
Without further adjustments, the authentication mode MAC-based Auth. only allows the first network user to communicate via the port. All other network users are ignored. The menu Port Security Limit Control Configuration can be used to set up a user limit for MAC authentication and to store actions that are carried out if the user limit is exceeded. The authentication mode Multi 802.1X additionally allows different network users to authenticate at the same time by 802.1X and by MAC address.
The MAC-based fallback feature only works with the authentication modes Single 802.1X or Multi 802.1X. |
Requirements:
- LCOS SX as of the following versions:
- Any web browser for access to the web interface
- Configured and functioning 802.1X authentication via Single 802.1X or Multi 802.1X
Procedure:
Information for configuring a user for authentication by MAC-based fallback on the RADIUS server:
The MAC address must be entered on the RADIUS server in the format 00-12-34-ab-cd-ef (lower case). The service type on the RADIUS server must be set to the option Call-Check, as switches of the GS-23xx and GS-3xxx series always send RADIUS requests with this service type.
How to set up the RADIUS server and a user on a LANCOM router or access point (LCOS only) is described in step 1 of the following Knowledge Base article:
Setting up MAC-based authentication at a LANCOM RADIUS server through a LANCOM GS-23xx switch
Configuring MAC authentication as a fallback for the authentication modes “Single 802.1X” or “Multi 802.1X” on a GS-23xx series switch:
1) Enabling MAC-based fallback:
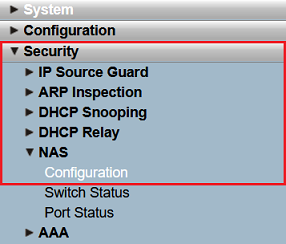
1.1) Connect to the web interface of the GS-23xx switch and navigate to the menu Security → NAS → Configuration.
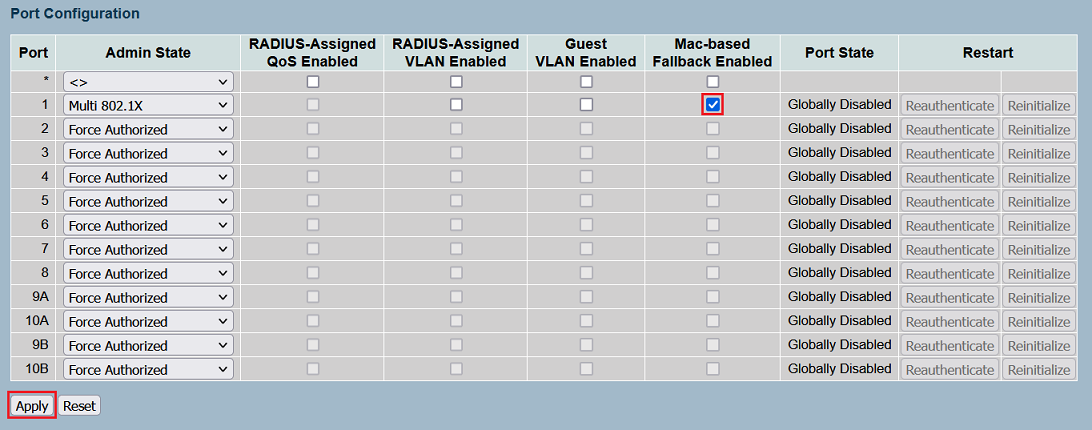
1.2) Select the option MAC-based Fallback Enabled for the port where the authentication mode Single 802.1X or Multi 802.1X is enabled (under Admin State). Then click Apply.
2) Configuring “Port Security” (optional):
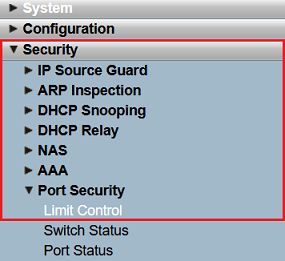
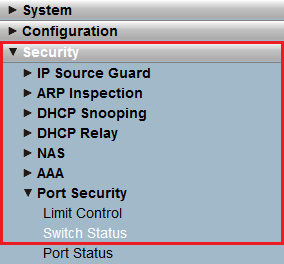
2.1) Switch to the menu Security → Port Security → Limit Control.
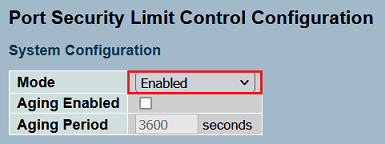
2.2) Under System Configuration set the Mode parameter to Enabled. This enables the feature globally.
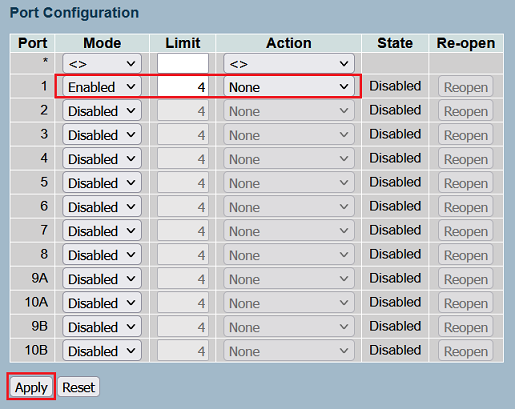
2.3) Under Port Configuration, edit the following parameters and then click Apply:
- Mode: For the appropriate port, select the option Enabled.
- Limit: You can optionally adjust the Limit on the number of network users allowed to communicate via this port (maximum 1024 network users).
- Action: Optionally select an Action that takes effect when the Limit is exceeded. In general, communication is prevented for all network users over the limit.
- None (default setting):
When the limit is exceeded, no further action is taken. - Trap:
- When the limit is exceeded, an SNMP trap is sent. With Aging deactivated, the SNMP trap is only sent when the limit is exceeded for the first time. With Aging activated, an SNMP trap is sent every time the limit is exceeded.
- Shutdown:
When the limit is exceeded, the port is shut down and no further communication is possible. Communication is enabled again by clicking the button Reopen. - Trap & Shutdown:
When the limit is exceeded, the port is shut down and the actions described under Trap and Shutdown are executed.
3) Checking the port security status:
3.1) Go to the menu Security → Port Security → Switch Status.
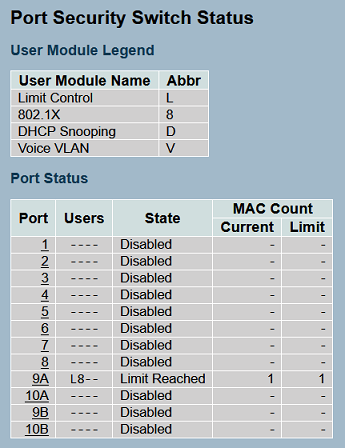
3.2) In the Switch Status menu you can view the following parameters for each port:
- Users: With Port Security enabled, this shows which modules are active on the port (see the explanation under User Module Legend).
- State: Displays the current port status. This can be one of the following statuses:
- Disabled: Port security is not activated on this port.
- Ready: Port security is activated on this port and is waiting for packets from connected devices (which are checked using the MAC address).
- Limit Reached: Port security is activated on this port and the user limit has been reached. No additional devices are allowed to communicate via this port.
- Shut down: Port security is activated on this port. The port has been shut down and communication is no longer possible.
- MAC Count:
- Current: Shows the total number of connected MAC addresses up to the limit. The number of MAC addresses of connected devices over the limit are not displayed (unlike the implementation in the GS-3xxx series).
- Limit: Shows the Limit set in step 2.3 (in this case the value was set to 1).
3.3) By clicking the Port you access a detailed view of the selected port, where you can see the following information:
- MAC Address: Show the MAC address of a device connected to this port. MAC addresses of connected devices over the limit are not displayed (unlike the implementation in the GS-3xxx series).
- VLAN ID: Shows the VLAN ID assigned to this port.
- State: Shows whether the device is allowed to communicate via the port (Forwarding) or is Blocked.
- Time of Addition: Shows date and time when the device was first detected on that port.
- Age/Hold: Show the permitted runtime for the connected device in seconds. If no packets are detected after this time elapses, the MAC address is deleted from the table. Otherwise, a new authentication takes place and the runtime starts again.

4) Save the configuration as the startup configuration:
Navigate to the menu Maintenance → Save/Restore → Save Start and click on Save so that the configuration is saved as a Start configuration.
The start configuration is retained even if the device is restarted or there is a power failure. |

Configuring MAC authentication as a fallback for the authentication modes “Single 802.1X” or “Multi 802.1X” on a GS-3xxx series switch:
1) Enabling the feature “MAC-based fallback”:
1.1) Connect to the webinterface of the Gs-3xxx switch and navigate to the menu Security → 802.1X → Configuration.
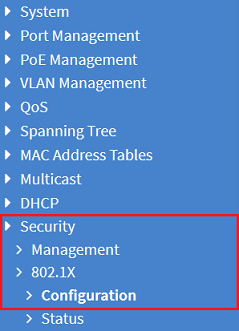
1.2) Select the option MAC-based Fallback Enabled for the port where the authentication mode Single 802.1X or Multi 802.1X is enabled (under Admin State). Then click Apply.


2) Configuring “Port Security” (optional):
2.1) Go to the menu Security → Port Security → Configuration.
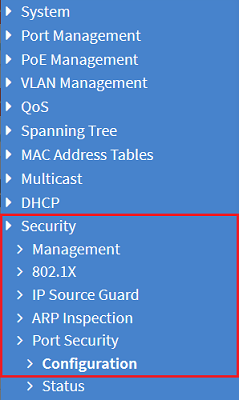
2.2) Under Port Configuration, edit the following parameters and then click Apply:
- Mode: For the appropriate port, select the option Enabled.
- Limit: You can optionally adjust the Limit on the number of network users allowed to communicate via this port (maximum 1024 network users).
- Violation Mode: Optionally select an Action that takes effect when the Limit is exceeded.
- Protect (default setting):
Communication for network users who exceed the limit is prevented. - Restrict:
Communication for network users who exceed the limit is prevented. Further, network users who are above the violation limit are marked as Violating. - Shutdown:
Once the limit is exceeded, no further communication is possible via this port. Communication is enabled again by clicking the button Reopen.
- Violation Limit:
An option is to adjust the value of the Violation Limit. Network users who are above the Limit are marked as Violating. This value is only used in combination with the Restrict
In most scenarios the parameters Limit and Violation Limit can be set to the same value. |


3) Checking the port security status:
3.1) Switch to the menu Security → Port Security → Status.
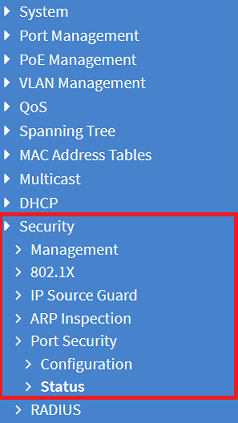
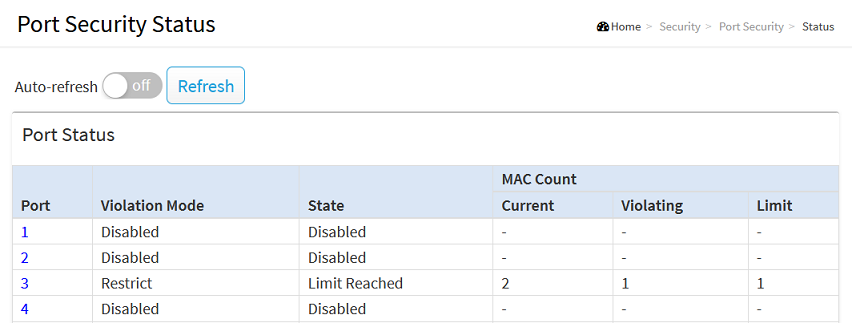
3.2) In the Status menu you can view the following parameters for each port:
- Violation Mode: Shows the Violation Mode selected in step 2.2. If Port Security is Disabled for a port, Disabled is displayed here as well.
- State: Displays the current port status. This can be one of the following statuses:
- Disabled: Port security is not activated on this port.
- Ready: Port security is activated on this port and is waiting for packets from connected devices (which are checked using the MAC address).
- Limit Reached: Port security is activated on this port and the user limit has been reached.
- Shut down: Port security is activated on this port. The port has been shut down and communication is no longer possible (only when using the Violation Mode Shutdown).
- MAC Count:
- Current: Shows the total number of connected MAC addresses.
- Violating: Shows the number of MAC addresses over the limit.
- Limit: Shows the Violation Limit set in step 2.2 (in this case the value was set to 1).
3.3) By clicking the Port you access a detailed view of the selected port, where you can see the following information:
- MAC Address: Show the MAC address of a device connected to this port.
- VLAN ID: Shows the VLAN ID assigned to this port.
- State: Shows whether the device is allowed to communicate via the port (Forwarding) or whether it is blocked (Violating).
- Time of Addition: Shows date and time when the device was first detected on that port.
- Age/Hold: Show the permitted runtime for the connected device in seconds. If no packets are detected after this time elapses, the MAC address is deleted from the table. Otherwise, a new authentication takes place and the runtime starts again. Devices with the status Violating have no expiry time.

4) Save the configuration as the startup configuration:
Click the red disk icon in the top right corner to save the configuration as the start configuration.
The start configuration is retained even if the device is restarted or there is a power failure. |


