Description:
This article describes what information is required after an abrupt restart or crash of an XS or GS-45xx switch and how this information can be read out.
Requirements:
- LCOS SX as of version 5.20 (download latest version)
- SSH client for command-line access (e.g. PuTTY)
- TFTP, FTP, SCP or SFTP server in the network (for uploading a crash dump only)
- Any browser for access via the web interface
Procedure:
Activate the "Persistent Log":
If the Persistent Log is activated, messages are saved permanently (bootpersistent). Which messages are saved depends on the selected severity (Severity Filter).
The Persistent Log should only be activated if necessary. It makes no sense to enable this feature permanently, and this is not recommended.
The Persistent Log is deactivated in the default configuration and therefore must be activated first. The Persistent Log is part of the Technical Support Log and therefore does not have to be read out separately.
1) Connect to the switch via the webinterface and go to the menu System → Logs → Configuration.
2) In the section Persistent Log Configuration set the Admin Mode to Enable and in the dropdown menu for the Severity Filter select the option Warning. Click Submit afterwards.
After saving the Technical Support Log the Persistent Log has to be deactivated again. To do this, select the option Disable for the Admin Mode and save the configuration.
3) Click on Save Configuration in the top right-hand corner to save the configuration as the start configuration.
The start configuration is retained even if the device is restarted or there is a power failure.
As an alternative, the current configuration can be saved as the Start Configuration from the command line with the command write memory.
4) Confirm your changes by clicking OK.
Read out the technical support logs:
The Technical Support Log contains various device information (including processor load and running processes) as well as the switch configuration and is an essential requirement.
Reading out the technical support log via web interface:
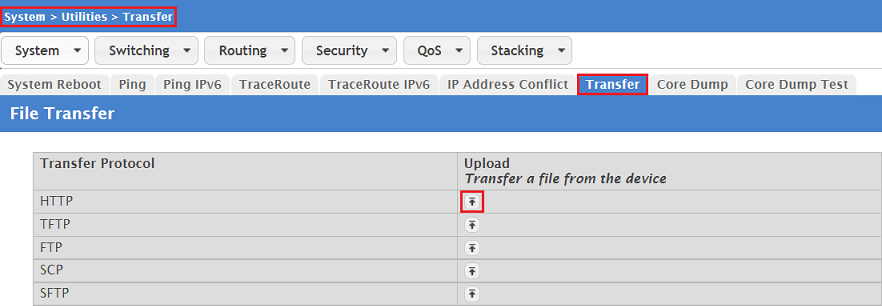
1) Connect to the switch via the web interface and go to the menu System → Utilities → Transfer. For the protocol HTTP under the heading Upload, click the “Upload” button.
The Transfer menu is designed from the point of view of the switch. Consequently, an upload from this device is therefore a download to the other device.
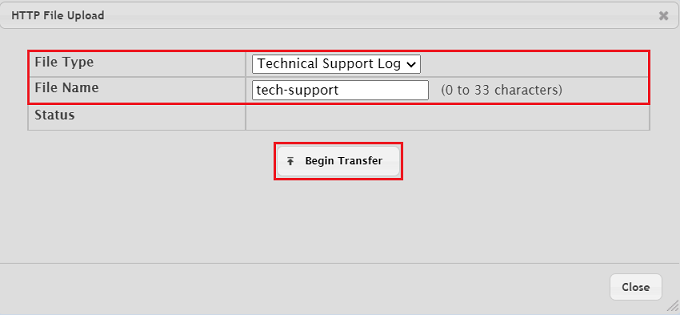
2) Modify the following parameters and then click Begin Transfer:
- File Type: From the drop-down menu, select the option Technical Support Log.
- File Name: Give the log file a descriptive name.
The switch must first compile the information. It may take a few seconds before the dialog opens and you can save the file.
Reading out the technical support log from the command line:
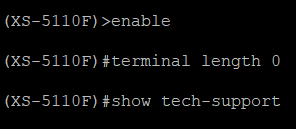
1) Connect to the switch from the command line and enter the command enable to gain extended privileges.
2) Then enter the command terminal length 0 so that the subsequent output is displayed without interruptions.
3) Enter the command show tech-support.
The output of the command show tech-support is rather exhaustive. Make sure that the settings for the SSH client have a sufficient scrollback buffer (at least 15,000 lines are recommended here). In PuTTY, this is configured in the menu under Window → Lines of scrollback.
4) Then save the output as a text file.
Reading out the “crash log” after an abrupt restart of the switch:
If an abrupt restart of the switch occurs, the crash log helps with further analysis. This is created automatically and does not have to be activated separately.
Reading out the “crash log” via web interface:
1) Connect to the switch via the web interface and go to the menu System → Utilities → Transfer. For the protocol HTTP under the heading Upload, click the “Upload” button.
The Transfer menu is designed from the point of view of the switch. Consequently, an upload from this device is therefore a download to the other the device.
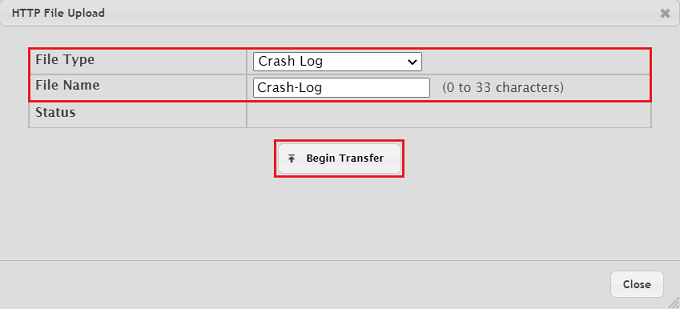
2) Modify the following parameters and then click Begin Transfer:
- File Type: From the drop-down menu, select the option Crash Log. This allows the crash log for the last crash that occurred to be downloaded.
- File Name: Give the log file a descriptive name.
Reading out the “crash log” from the command line:
1) Connect to the switch from the command line and enter the command enable to gain extended privileges.
2) Then enter the command terminal length 0 so that the subsequent output is displayed without interruptions.
3) Enter the command in the format debug crashlog x. This will output the crash report. A maximum of 5 reports are retained, which are referenced by the numbers 0 to 4.
In this example, the command debug crashlog 0 outputs the first crash report.
The output of the command debug crashlog is rather exhaustive. Make sure that the settings for the SSH client have a sufficient scrollback buffer (at least 10000 lines are recommended here). In PuTTY, this is configured in the menu under Window → Lines of scrollback.
4) Copy the output to a text file.
Collecting crash information for a process (core dump):
When a process on the switch exits unexpectedly, the crash information is stored to a core dump. Since this function is not enabled in the factory settings, it has to be activated first.
The Core Dump feature should only be activated when required and is therefore only suitable for reproducible or recurring crashes. It makes no sense to enable this feature permanently, and this is not recommended.
1) Enabling the Core Dump:
1.1) Enabling the core dump via web interface:
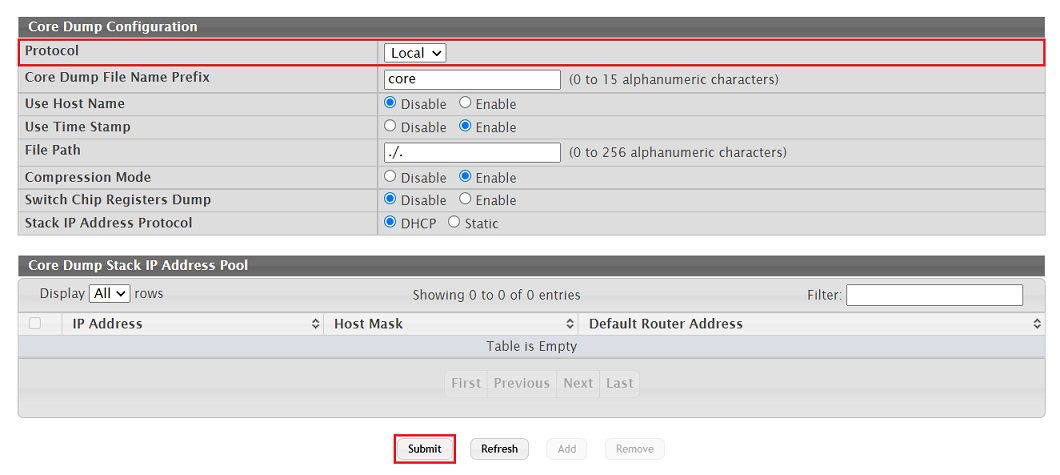
1.1.1) Connect to the web interface of the switch and navigate to the menu System → Utilities → Core Dump.
1.1.2) In the drop-down menu Protocol select the option Local. This stores the core dump to the local memory in the device. Then click on Submit.
Core dumps can also be saved to a USB stick using the menu under Protocol by selecting the option USB and specifying the file path. In this case, there is no need for a manual upload to a server on the network (see step 2).
After the core dump has been saved, the function must be deactivated again. To do this, go to Protocol, select the option None and save the configuration.
1.2) Enabling the core dump from the command line:
1.2.1) Connect to the switch from the command line and enter the command enable to gain extended privileges.
1.2.2) Enter the command configure to enter the configuration menu.
1.2.3) Enter the command exception protocol local. This stores a core dump to the local memory in the device.
1.2.4) Enter the command exit to quit the configuration menu.
1.2.5) Finally, enter the command write memory confirm to save a boot-persistent copy of the configuration. The parameter confirm means there is no need to additionally confirm the saving of the file.
After the core dump has been saved, the function must be deactivated again. To do this, use the CLI command exception protocol none.
2) Uploading a core dump from the local device memory to a server on the network:
Core dumps located in the local device memory cannot be downloaded via web interface, but can only be sent using the command line on the switch to a TFTP, FTP, SCP or SFTP server on the network.
2.1) Connect to the switch from the command line and enter the command enable to gain extended privileges.
2.2) Then enter the command show exception core-dump-file to output a list of core dumps stored in local memory.
Copy the file name of the required core dump for the purpose of uploading the file (see step 2.1). If it is unclear which core dump is required, please contact LANCOM Support.
2.3) Enter the command to upload the core dump in the format copy nvram:core-dump <Name of the Core Dump.bz2> <Protocol>://<User name on the server>@<IP address of the server>/<File path><New file name>.
In this example of an FTP server, the command is as follows:
copy nvram:core-dump lighttpd_core_3168.0.bz2 ftp://admin@192.168.45.178/home/coredump.bz2
Then enter the remote password, which is the password of the user on the server, confirm the query with the <y> key and finally press the <Enter> button.
Reading out the “event log”:
The event log can be viewed via the web interface using the menu System → Logs → Event Log, but it cannot be saved or copied there. For this reason, the event log can only be saved from the command line.
1) Connect to the switch from the command line and enter the command enable to gain extended privileges.
2) Then enter the command terminal length 0 so that the subsequent output is displayed without line breaks.
3) Enter the command show eventlog. This will output the event log via the command line.
4) Copy the output to a text file.
Sending the information to LANCOM Support:
If no support case has been opened yet, please contact LANCOM Support with the following information.
- Precise description of the error
- The switch model and firmware version
- Technical Support Log
- Crash Log (only after an abrupt restart)
- Core Dump (for recurring/reproducible crashes only)
- Event Log


