Description:
This article describes how to initiate the pairing of a LANCOM device with the LANCOM Management Cloud.
Requirements:
- LCOS as of version 10.x (download latest version)
- LCOS FX as of version 10.4 (download latest version)
- LCOS LX as of version 4.00 (download latest version)
- LCOS SX as of version 3.30 for GS-23xx (download latest version)
- LCOS SX as of version 4.00 for GS-3xxx (download latest version)
- LCOS SX as of version 4.30 for GS-24xx / XS-3xxx (download latest version)
- LCOS SX as of version 5.00 for XS-51xx / XS-61xx (download latest version)
- LCOS SX as of version 5.20 for GS-45xx / XS-45xx (download latest version)
- LCOS SX as of version 5.30 for CS-8132F and YS-7154CF (download latest version)
- LANtools as of version 10.x (download latest version)
Procedure:
Pairing by cloud PIN and serial number:
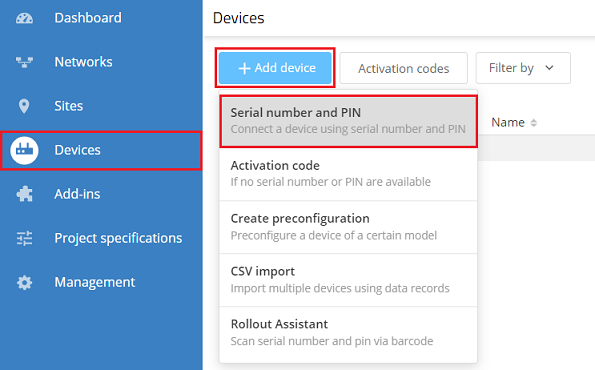
1) Connect to the LMC and navigate to the menu Devices. Then click on Add device and choose the option Serial number and PIN.
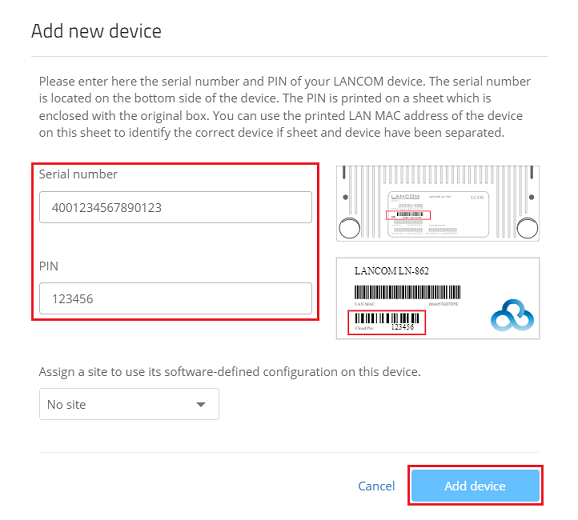
2) Enter the serial number of the device together with the associated PIN code and click Add device.
You can optionally assign the device to an existing location.
Pairing with an activation code:
1) Generate an activation code in the LANCOM Management Cloud:
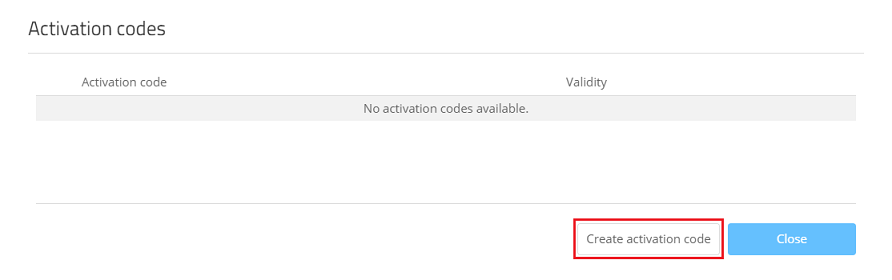
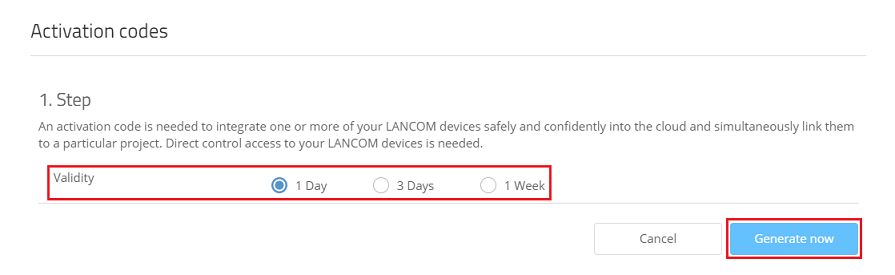
1.1) Connect to the LMC, navigate to the menu Devices and click Activation codes.

1.2) Click Create activation code.
1.3) Set a suitable Validity and click Generate now. In most cases, a validity of 1 day is sufficient.
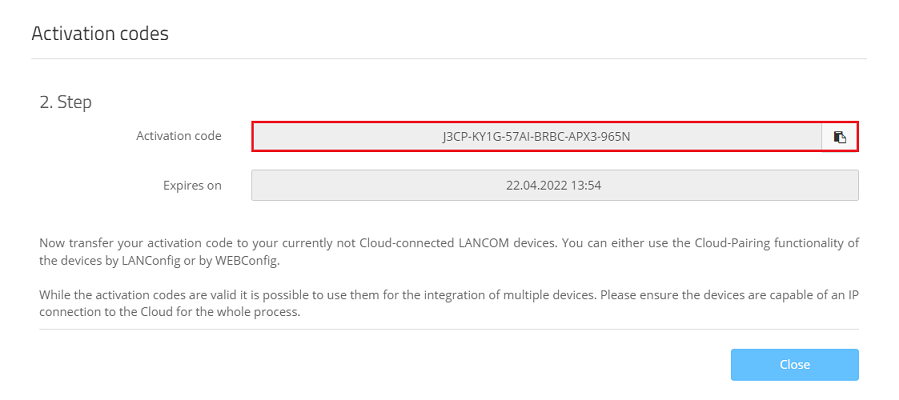
1.4) Copy the Activation code and save it in a text file.
2) Initiate the pairing procedure:
2.1) Pairing with LANconfig:
The following device types can be paired with LANconfig:
- All LANCOM routers
- All LANCOM access points
- All LANCOM WLAN controllers
- All LANCOM managed switches
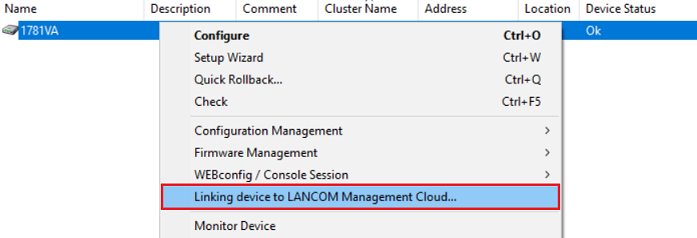
2.1.1) Select the device in LANconfig, right-click on it and, from the context menu, choose Linking device to LANCOM Management Cloud.
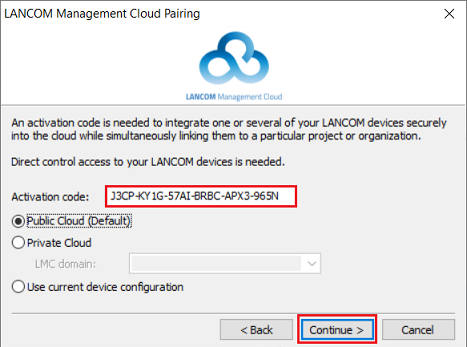
2.1.2) Click Continue.
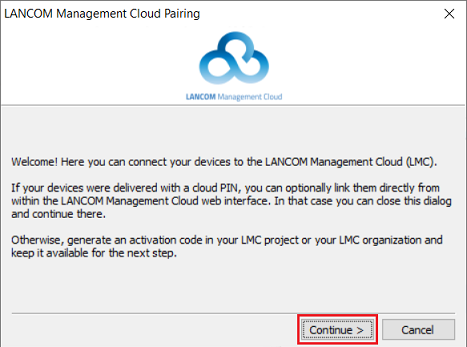
2.1.3) Enter the activation code copied in step 1.4 and click Continue.
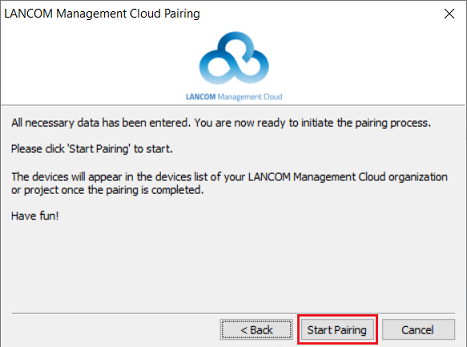
2.1.4) Then click Start pairing to start pairing with the LMC.
2.2) Pairing with WEBconfig / web interface:
2.2.1) All routers and access points with LCOS:
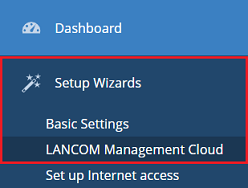
2.2.1.1) Use WEBconfig to connect to the device and navigate to the menu Setup Wizards → LANCOM Management Cloud.
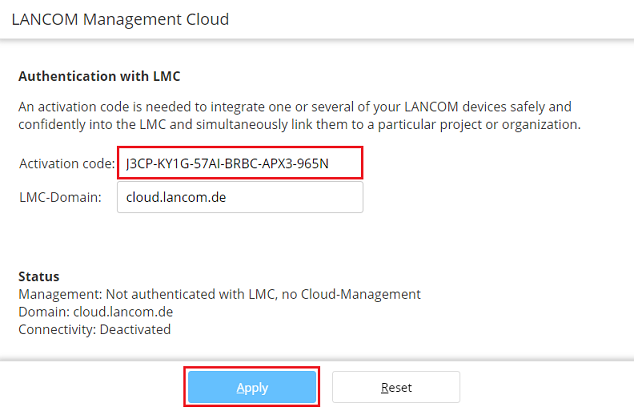
2.2.1.2) Enter the activation code copied in step 1.4 and click Apply.
2.2.2) All LANCOM R&S®Unified Firewalls (LCOS FX):
For a HA-Cluster only the primary Firewall must be paired with the LMC.
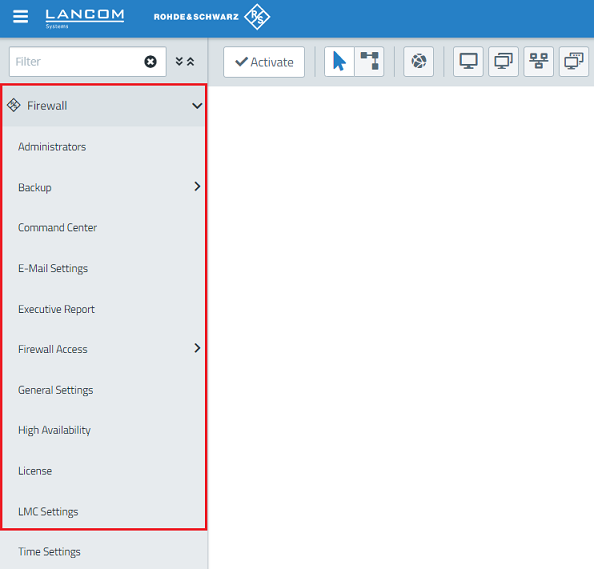
2.2.2.1) Connect to the web interface of the Unified Firewall and navigate to the menu Firewall → LMC Settings.
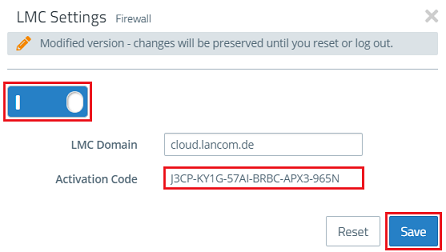
2.2.2.2) Confirm the slider, enter the activation code copied in step 1.4 and click Save.
2.2.3) All access points with LCOS LX:
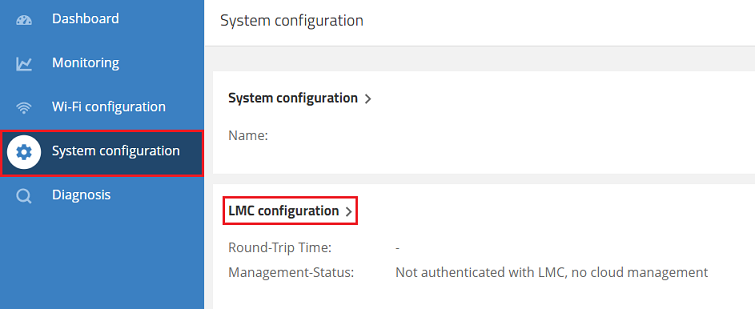
2.2.3.1) Use WEBconfig to connect to the access point and navigate to the menu Setup configuration → LMC configuration.
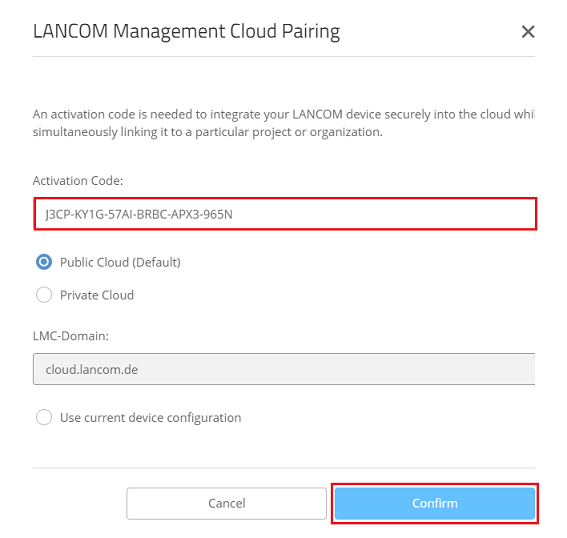
2.2.3.2) Enter the activation code copied in step 1.4 and click Confirm.
2.2.4) All LANCOM managed switches:
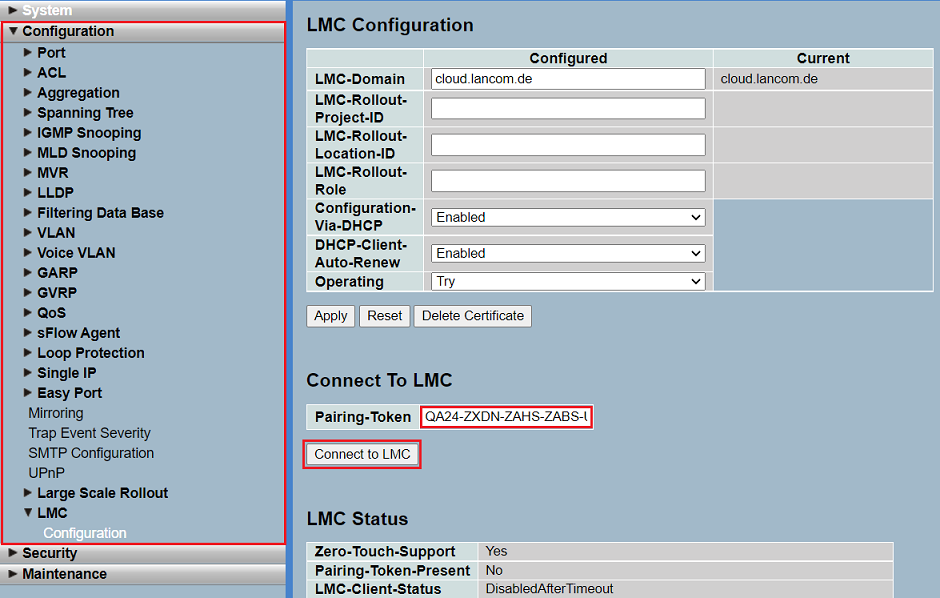
2.2.4.1) All GS-23xx switches (LCOS SX 3.3x):
Connect to the switch via the web interface and switch to the menu Configuration → LMC → Configuration, enter the activation code copied in step 1.4 into the box Pairing Token and click Connect to LMC.
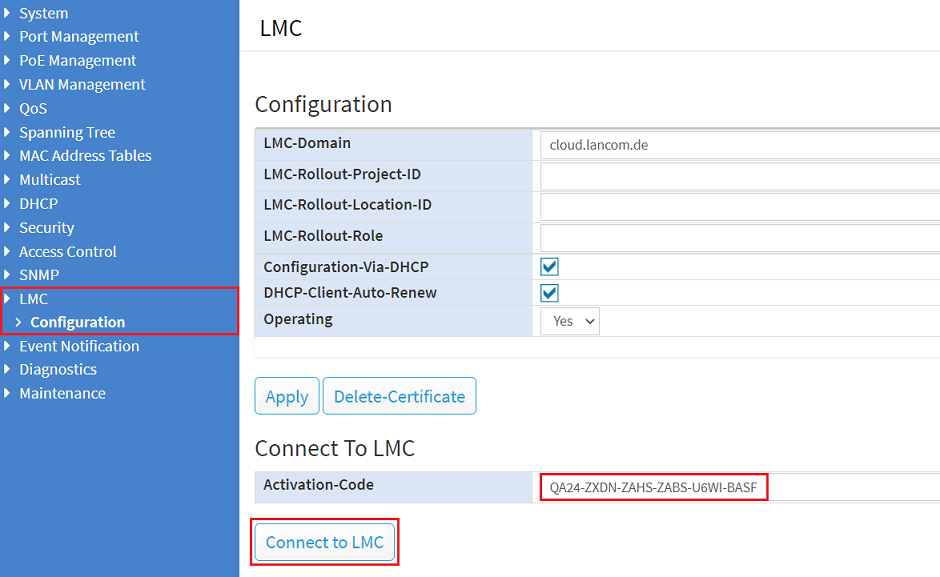
2.2.4.2) All GS-24xx / GS-3xxx / XS-3xxx switches (LCOS SX 4.00 / 4.20 / 4.30):
Connect to the switch via the web interface, go to the menu LMC → Configuration, enter the activation code copied in step 1.4 into Activation Code and click Connect to LMC.
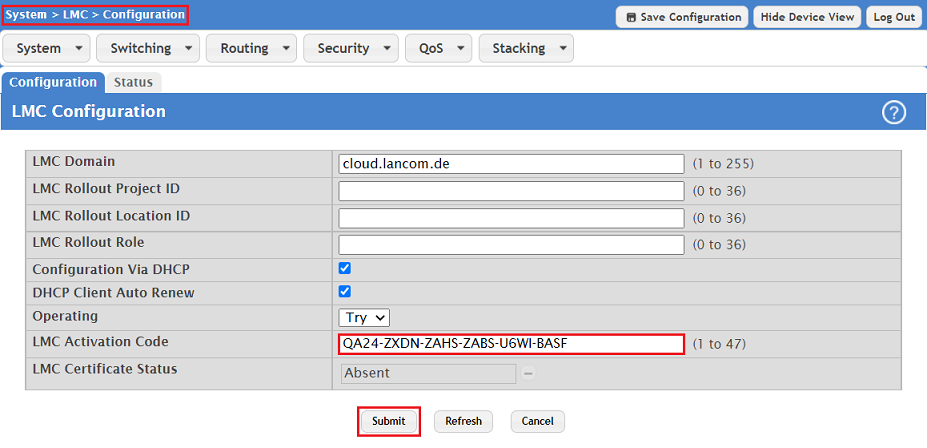
2.2.4.3) All switches with LCOS SX 5.xx (XS-51xx / XS-6128QF, GS-45xx / XS-45xx, CS-8132F, YS-7154CF):
Connect to the switch via the web interface and switch to the menu System → LMC → Configuration, enter the activation code copied in step 1.4 into the box LMC Activation Code and click Submit.
2.3) Pairing with the CLI:
2.3.1) All routers and access points with LCOS and LCOS LX:
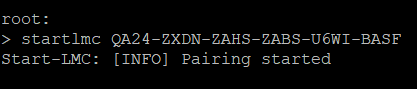
From the command line, enter the pairing command in the format startlmc <activation code> (in this example startlmc QA24-ZXDN-ZAHS-ZABS-U6WI-BASF).
2.3.2) All LANCOM managed switches:
2.3.2.1) All GS-23xx switches (LCOS SX 3.3x):
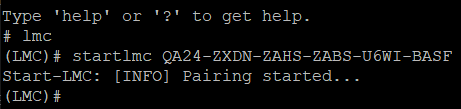
- From the command line, enter the command lmc to go to the configuration menu for the LMC.
- Then enter the pairing command in the format startlmc <activation code> (in this example startlmc QA24-ZXDN-ZAHS-ZABS-U6WI-BASF).
2.3.2.2) All GS-24xx / GS-3xxx / XS-3xxx switches (LCOS SX 4.00 / 4.20 /4.30):
From the command line, enter the pairing command in the format startlmc <activation code> (in this example startlmc QA24-ZXDN-ZAHS-ZABS-U6WI-BASF).

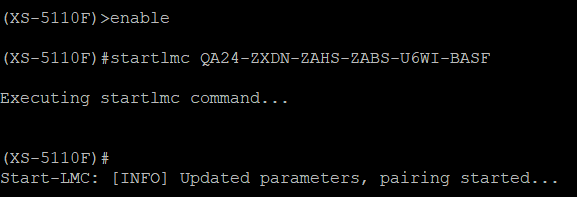
2.3.2.3) All XS-51xx / XS-61xx and GS-45xx switches (LCOS SX 5.xx):
- From the command line, enter the command enable to gain extended privileges.
- Then enter the pairing command in the format startlmc <activation code> (in this example startlmc QA24-ZXDN-ZAHS-ZABS-U6WI-BASF ).