
Description:
This document describes how the local networks at two branch offices can communicate with one another via existing VPN connections to the router at the headquarters.
Requirements:
- LCOS as of version 9.24 (download latest version)
- LANtools as of version 9.24 (download latest version)
- SSH client for restarting the VPN connections via the CLI (e.g. PuTTY)
Scenario:
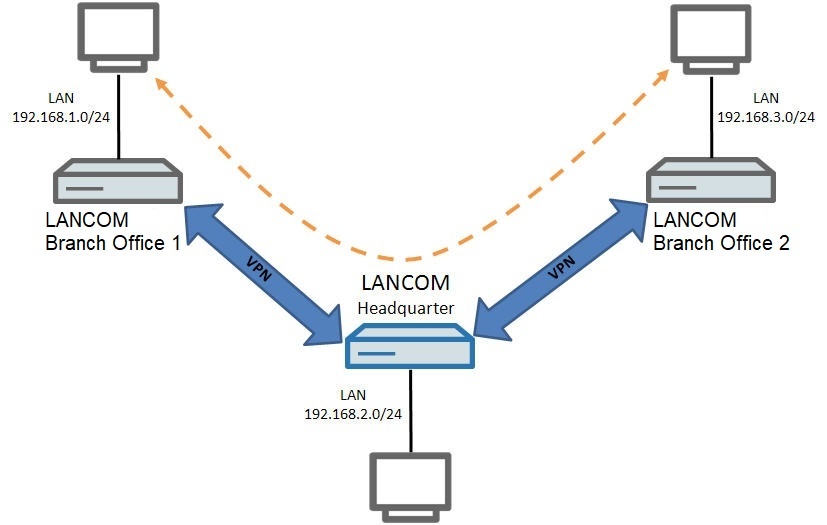
- A LANCOM router is used at each of three locations, with each one running a local area network and providing access to the Internet.
- The router at branch office 1 has the local network 192.168.1.0/24.
- The router at the headquarters has the local network 192.168.2.0/24.
- The router at branch office 2 has the local network 192.168.3.0/24.
- A functioning VPN via the Internet has been set up between the routers at Branch office 1 and Headquarters. This VPN link connects the local networks 192.168.1.0/24 (Branch office 1) and 192.168.2.0/24 (Headquarters) allowing data to be exchanged.
- A functioning VPN via the Internet has been set up between the routers at Branch office 2 and Headquarters. This VPN link connects the local networks 192.168.3.0/24 (Branch office 2) and 192.168.2.0/24 (Headquarters) allowing data to be exchanged.
Additionally communications between the local networks at Branch office 1 (192.168.1.0/24) and Branch office 2 (192.168.3.0/24) should be enabled by routing the data traffic via the router at the headquarters using the VPN connections that are already in place.
Procedure:
One option is to use ANY-TO-ANY VPN rules, which allow communications between any networks. Another option is to use custom VPN rules, which allow communication only between specified networks.
The procedure for configuring routing entries when using ANY-TO-ANY VPN rules and custom VPN rules is basically the same. When using custom VPN rules, the VPN rules also need to be checked and adjusted if necessary (see step 2).
1) Configuration steps when using ANY-TO-ANY VPN rules:
If all routers are to use ANY-TO-ANY VPN rules (as is the case when configuring with the Setup Wizard), the VPN rules allow communication in any network. All you have to do is add additional routing entries at the two branches.
LANCOM Systems recommends ANY-TO-ANY VPN rules as they are much easier to configure. All you have to do is adjust the routing entries.
Furthermore, this only creates one VPN rule. This can reduce the load on the router, especially in larger scenarios.
1.1) Configuration steps on the router at branch office 1:
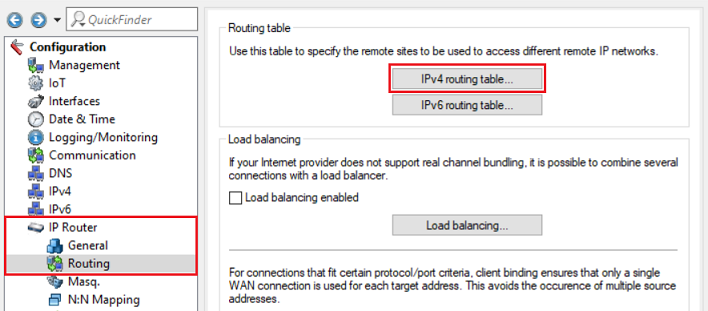
1.1.1) In LANconfig, open the configuration of the router at branch office 1 and switch to the menu item IP router → Routing → IPv4 routing table.
1.1.2) Add an additional route to branch office 2 by clicking Add.
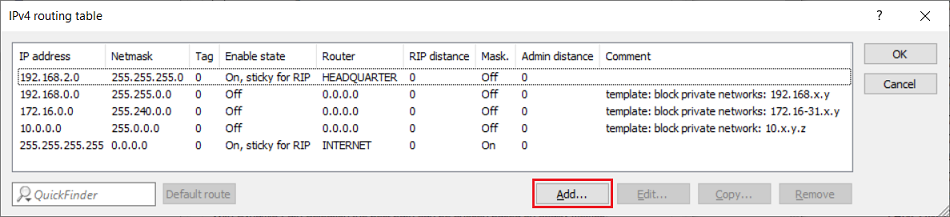
1.1.3) Modify the following parameters:
- IP address: Enter the network address of the network at branch office 2 (in this example 192.168.3.0).
- Netmask: Enter the netmask of the network at branch office 2 (in this example 255.255.255.0).
- Router: Select the VPN connection to the headquarters (in this example HEADQUARTER).
- IP masquerading: Select the option IP masquerading switched off.

1.1.4) This concludes the configuration steps at branch office 1. Write the configuration back to the router.
1.2) Configuration steps on the router at branch office 2:
1.2.1) In LANconfig, open the configuration of the router at branch office 2 and switch to the menu item IP router → Routing → IPv4 routing table.
1.2.2) Add an additional route to branch office 1 by clicking Add.
1.2.3) Modify the following parameters:
- IP address: Enter the network address of the network at branch office 1 (in this example 192.168.1.0).
- Netmask: Enter the netmask of the network at branch office 1 (in this example 255.255.255.0).
- Router: Select the VPN connection to the headquarters (in this example HEADQUARTER).
- IP masquerading: Select the option IP masquerading switched off.

1.2.4) This concludes the configuration steps at branch office 2. Write the configuration back to the router.
2) Configuration steps when using custom VPN rules:
When using custom VPN rules, communication is only permitted in the specified networks. This is why the VPN rules need to be checked and adjusted if necessary, and additional routing entries need to be created.
The configuration of the routing settings at both branches is described in step 1.
For more information on creating VPN rules, see this Knowledge Base article.
2.1) Configuration steps on the router at branch office 1:
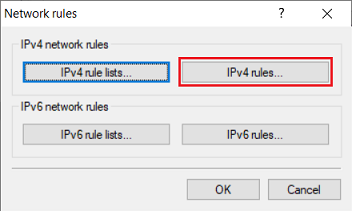
2.1.1) Open the configuration for the router at Branch office 1 and switch to the menu item VPN → General → Network rules.
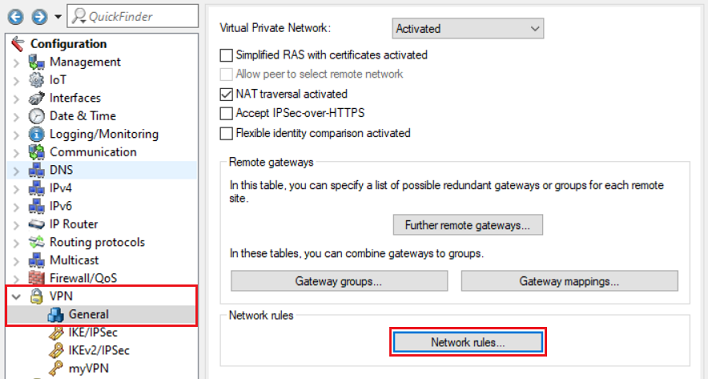
2.1.2) Go to the menu IPv4 rules.
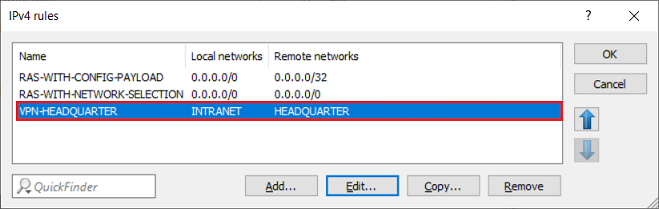
2.1.3) Check the structure of the VPN rule to the headquarters:
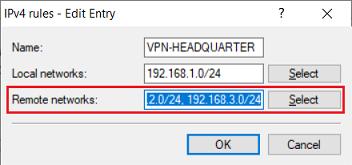
- If the field Remote network contains the network address of the headquarters, the VPN rule has to be adjusted. To do this, click on Edit.

- In the Remote networks box, enter the network address for Branch office 2 in CIDR notation, in this example 192.168.3.0/24. The entries are separated by a comma.
If the Remote networks box contains the VPN to the headquarters (in this example HEADQUARTERS), there is no need to adjust the VPN rule, since it refers to the entries in the IPv4 routing table.
2.1.4) This concludes the configuration steps at branch office 1.
2.2) Configuration steps on the router at branch office 2:
2.2.1) Open the configuration for the router at Branch office 2 and switch to the menu item VPN → General → Network rules.
2.2.2) Go to the menu IPv4 rules.
2.2.3) Check the structure of the VPN rule to the headquarters:
- If the field Remote networks contains the network address of the headquarters in CIDR notation (in this example 192.168.2.0/24), the VPN rule has to be adjusted. To do this, click on Edit.
- In the Remote networks box, enter the network address for Branch office 1 in CIDR notation, in this example 192.168.1.0/24. The entries are separated by a comma.

If the Remote networks box contains the VPN to the headquarters (in this example HEADQUARTERS), there is no need to adjust the VPN rule, since it refers to the entries in the IPv4 routing table.
2.2.4) This concludes the configuration steps at branch office 2.
2.3) Configuration steps on the router at the headquarters:
2.3.1) Open the configuration for the router at the Headquarters and switch to the menu item VPN → General → Network rules.
2.3.2) Go to the menu IPv4 rules.
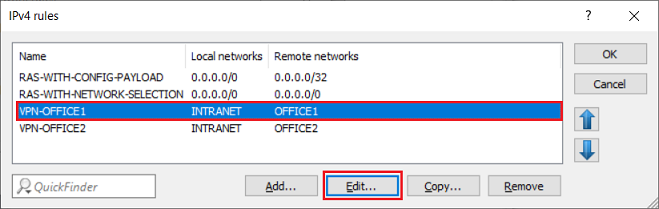
2.3.3) Mark the VPN rule of the VPN connection to branch office 1 (in this example OFFICE1) and click Edit.
The procedure at the Headquarters stays the same, even if the network addresses of the Local networks and Remote networks are stored in CIDR notation.
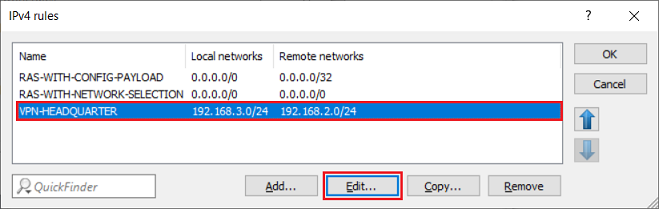
2.3.4) In the Local networks box, add the network address for Branch office 2 in CIDR notation, in this example 192.168.3.0/24. The entries are separated by a comma.

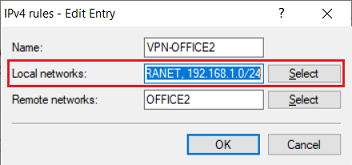
2.3.5) Mark the VPN rule of the VPN connection to branch office 2 (in this example OFFICE2) and click Edit.
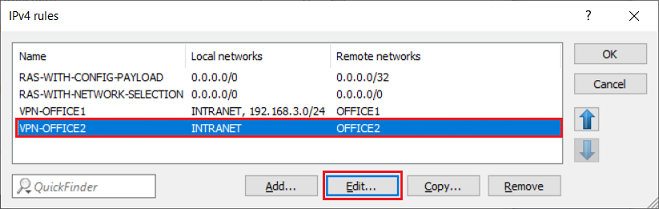
2.3.6) In the Local networks box, add the network address for Branch office 1 in CIDR notation, in this example 192.168.1.0/24. The entries are separated by a comma.
2.3.7) This concludes the configuration steps at the headquarters.
2.4) Restart the VPN connections:
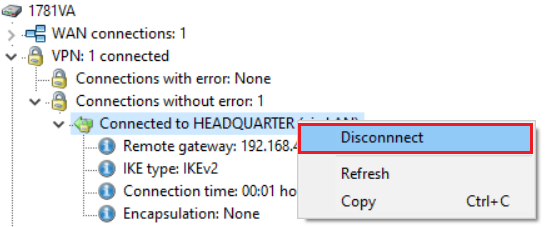
These changes only come into effect after restarting the VPN connections. The disconnect can be initiated at one of the branch offices or at the headquarters.
2.4.1) Restarting the VPN connection using LANmonitor:
Select the VPN connection, right-click and select the context-menu option Disconnect.
2.4.2) Restarting the VPN connection via the CLI:
Enter the command to disconnect the VPN connection in the following format:
do Other/Manual-Dialing/Disconnect <Name of the VPN connection>
In this example, the command would appear as follows:
do Other/Manual-Dialing/Disconnect HEADQUARTER
