
Description:
This document describes how to set up a VPN-SSL connection (site-to-site) between two LANCOM R&S®Unified Firewalls (referred to in the following as Unified Firewalls).
Requirements:
- Existing installation on a LANCOM R&S®Unified Firewall with LCOS FX as of version 10.7
- A configured and functional Internet connection on each Unified Firewall
- Web browser for configuring the Unified Firewall
The following browsers are supported:- Google Chrome
- Chromium
- Mozilla Firefox
Scenario:
1) The Unified Firewall is connected directly to the Internet and has a public IPv4 address:
A company wants to use a VPN-SSL connection to connect their Unified Firewall at the headquarters to their Unified Firewall at the branch office.
Headquarter:
- The company headquarters has a Unified Firewall as a gateway. It has an Internet connection with the fixed public IP address 81.81.81.1.
- The local network at the headquarters has the IP address range 192.168.23.0/24.
- The headquarters is configured as a site-to-site server which accepts inbound SSL-VPN connections.
Branch office:
- The branch office has a Unified Firewall as a gateway. It has an Internet connection with the fixed public IP address 82.82.82.2.
- The local network at the branch office has the IP address range 192.168.24.0/24.
- The branch office is configured as a site-to-site client which initiates outbound VPN-SSL connections.

A company wants to use a VPN-SSL connection to connect their Unified Firewall at the headquarters to their Unified Firewall at the branch office.
Headquarter:
- The company headquarters has a Unified Firewall as the gateway and an upstream router for the Internet connection. The router has the fixed public IP address 81.81.81.1.
- The local network at the headquarters has the IP address range 192.168.23.0/24.
- The headquarters is configured as a site-to-site server which accepts inbound VPN-SSL connections.
Branch office:
- The branch office has a Unified Firewall as the gateway and an upstream router for the Internet connection. The router has the fixed public IP address 82.82.82.2.
- The local network at the branch office has the IP address range 192.168.24.0/24.
- The branch office is configured as a site-to-site client which initiates outbound SSL-VPN connections.

Procedure:
The setup for scenarios 1 and 2 are basically the same. Scenario 2 additionally requires port forwarding to be set up on the upstream router (see section 4).
In order for the Unified Firewalls in the headquarter as well as in the branch office to be able to accept VPN SSL dial-in connections, a CA and one certficate have to be created on each Unified Firewall. The VPN SSL certificate is used in the VPN SSL settings and serves to decrypt the connections. The certificate is then exported and imported into the other Unified Firewall. There, the imported certificate is used in the VPN SSL connection and serves to encrypt the connection.
1) Creating certificates and modifying the VPN SSL settings:
1.1) Creating certificates and modifying the VPN SSL settings on the Unified Firewall in the headquarter:
1.1.1) Connect to the Unified Firewall in the headquarter, switch to the menu Certificate Management → Certificates and click on the "Plus" icon to create a new certificate.

1.1.2) Modify the following parameters to create a CA and click Create:
- Certificate Type : Select the option Certificate .
- Template: Select the template Certificate Authority.
- Common Name (CN): Enter a descriptive Common Name (in this example VPN-SSL-CA-Headquarter).
- Private Key Password: Enter a passwor d. This is used for encrypting the Private Key.

1.1.3) Create another certificate by clicking on the "Plus" icon. In step 1.1.4 it is exported and entered in the VPN SSL settings in the headquarter afterwards (see step 1.1.8). For this purpose modify the following parameters and click Create:
- Certificate Type : Select the option Certificate .
- Template: Select the template Certificate.
- Common Name (CN): Enter a descriptive Common Name (in this example VPN-SSL-Headquarter).
- Private Key Password: Enter a passwor d. This is used for encrypting the Private Key.
- Validity: Set the validity to at least 5 years. This is recommended, since this certificate is used for all VPN SSL connections.
- Signing CA: In the dropdown menu select the CA created in step 1.1.2.
- CA Password: Enter the Private Key Password entered in step 1.1.2 .

1.1.4) For the certificate created in step 1.1.3 click on the icon for the certificate export.

1.1.6) Select the format PEM / CRT, activate the option Export Certificate Chain and click Export.

1.1.7) Switch to the menu VPN → VPN SSL → VPN SSL Settings.

1.1.8) Activate the VPN SSL service via the slider, modify the following parameters and click Save:
- Host certificate: In the dropdown menu select the VPN certificate created in step 1.1.3.
- Private Key Password: Enter the Private Key Password entered in step 1.1.3.
- Routes: Enter the networks in CIDR notation (Classless InterDomain Routing), which should be accessible via the VPN connection. In this example, the local network at the headquarter has the IP address range 192.168.23.0/24.
- Encryption Algorithm: On the tab Site-to-Site select the option AES 256.
If necessary, you can change the Protocol and the Port. The Adress Pool is the range of IP addresses that are assigned to the dial-in VPN SSL clients. This address range may not already be in use as an internal network in the Unified Firewall.

1.2) Creating certificates and modifying the VPN SSL settings on the Unified Firewall in the branch office:
1.2.1) Connect to the Unified Firewall in the branch office, switch to the menu Certificate Management → Certificates and ckick on the "Plus" icon to create a new certificate.
1.2.2) Modify the following parameters to create a CA and click Create:
- Certificate Type : Select the option Certificate .
- Template: Select the template Certificate Authority.
- Common Name (CN): Enter a descriptive Common Name (in this example VPN-SSL-CA-Office).
- Private Key Password: Enter a passwor d. This is used for encrypting the Private Key.

1.2.3) Create another certificate by clicking on the "Plus" icon. This is used in the VPN SSL settings in the branch office (see step 1.2.8). For this purpose modify the following parameters and click Create:
- Certificate Type : Select the option Certificate .
- Template: Select the template Certificate.
- Common Name (CN): Enter a descriptive Common Name (in this example VPN-SSL-Office).
- Private Key Password: Enter a passwor d. This is used for encrypting the Private Key.
- Validity: Set the validity to at least 5 years. This is recommended, since this certificate is used for all VPN SSL connections.
- Signing CA: In the dropdown menu select the CA created in step 1.2.2.
- CA Password: Enter the Private Key Password entered in step 1.2.2 .

1.2.4) For the certificate created in step 1.2.3 click on the icon for the certificate export.

1.2.5) Select the format PEM / CRT, activate the option Export Certificate Chain and click Export.

1.2.6) Switch to the menu VPN → VPN SSL → VPN SSL Settings.
1.2.7) Activate the VPN SSL service via the slider, modify the following parameters and click Save:
- Host certificate: In the dropdown menu select the VPN certificate created in step 1.2.3.
- Private Key Password: Enter the Private Key Password entered in step 1.2.3.
- Routes: Enter the networks in CIDR notation (Classless InterDomain Routing), which should be accessible via the VPN connection. In this example, the local network at the branch office has the IP address range 192.168.24.0/24.
- Encryption Algorithm: On the tab Site-to-Site select the option AES 256.

2) Importing the certificates:
2.1) Importing the VPN SSL certificate on the Unified Firewall in the headquarter:
2.1.1) On the Unified Firewall in the headquarter go to the menu Certificate Management → Certificates and click on the button for the certificate import.

2.1.2) Leave the setting on Import Certificate, select the certificate file exported in the branch office in step 1.2.5) and click Import.
Since the Private Key has not been exported no passwords have to be entered.

2.2) Importing the VPN SSL certificate on the Unified Firewall in the branch office:
2.2.1) On the Unified Firewall in the branch office go to the menu Certificate Management → Certificates and click on the button for the certificate import.
2.2.2) Leave the setting on Import Certificate, select the certificate file exported in the headquarter in step 1.1.5) and click Import.
Since the Private Key has not been exported no passwords have to be entered.

3) Setting up the VPN SSL connections and the firewall rules:
3.1) Setting up the VPN SSL connection and the firewall rule on the Unified Firewall in the headquarter:
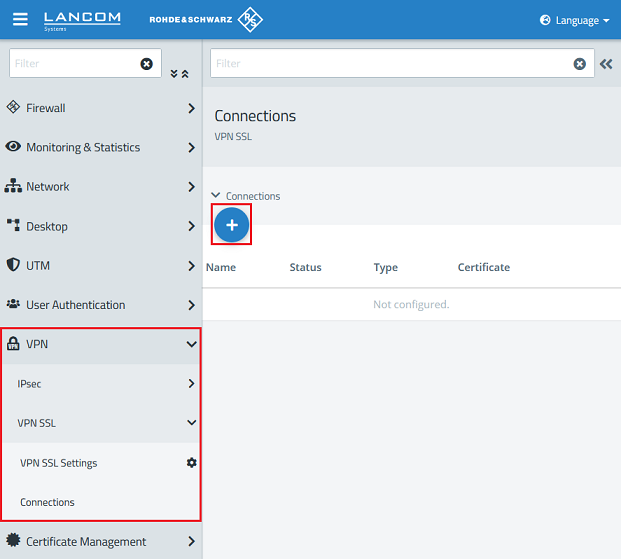
3.1.1) In the headquarter go to the menu VPN → VPN SSL → Connections and click on the "Plus" icon to create a new VPN SSL connection.
3.1.2) Modify the following parameters and click Create:
- Name: Enter a descriptive name (in this example VPN_SSL_Office). Please note, that only letters, numbers and underscores are allowed in the name.
- Certificate: In the dropdown menu select the VPN certificate imported in step 2.1.2.
- Connection type: Select the option Site-To-Site (Server).
- Remote Networks: Enter the local network of the branch office in CIDR notation and add it via the "Plus" icon (in this example 192.168.24.0/24).
If additional networks should be reachable from the Office via the Headquarter (e.g. via a separate VPN connection), these networks have to be entered as Additional Local Networks. The configuration is pushed from the Headquarter (Server) to the Office (Client), which creates routing entries for the transmitted networks.

3.1.3) Click on the button to create a VPN network.

3.1.4) Modify the following parameters and click Create:
- Name : Enter a descriptive name (in this example VPN-SSL-Office).
- Connection Type : Select the option VPN-SSL .
- VPN-SSL Connection : In the dropdown menu select the VPN connection created in step 3.1.2 .

3.1.5) On the desktop click on the VPN network created in step 3.1.4, select the "connection tool" and click on the network object the site-to-site connection should have access to.

3.1.6) Click on the "Plus" icons to assign the necessary protocols to the connection.


3.1.7) Finally, implement the configuration changes by clicking Activate in the Unified Firewall. This concludes the configuration steps on the Unified Firewall in the headquarter.

3.2) Setting up the VPN SSL connection and the firewall rule on the Unified Firewall in the branch office:
3.2.1) In the headquarter go to the menu VPN → VPN SSL → Connections and click on the "Plus" icon to create a new VPN SSL connection.
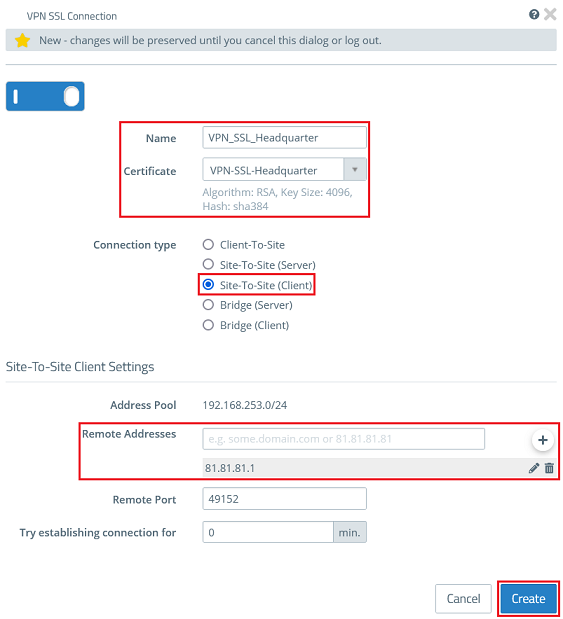
3.2.2) Modify the following parameters and click Create:
- Name: Enter a descriptive name (in this example VPN_SSL_Headquarter). Please note, that only letters, numbers and underscores are allowed in the name.
- Certificate: In the dropdown menu select the VPN certificate imported in step 2.2.2.
- Connection type: Select the option Site-To-Site (Client).
- Remote Addresses: Enter the public IP address or the DNS name of the Unified Firewall or the router in the headquarter and addit via the "Plus" icon.
3.2.3) Click on the button to create a VPN network.
3.2.4) Modify the following parameters and click Create:
- Name : Enter a descriptive name (in this example VPN-SSL-Headquarter).
- Connection Type : Select the option VPN-SSL .
- VPN-SSL Connection : In the dropdown menu select the VPN connection created in step 3.2.2 .

3.2.5) On the desktop click on the VPN network created in step 3.2.4, select the "connection tool" and click on the network object the site-to-site connection should have access to.

3.2.6 Click on the "Plus" icons to assign the necessary protocols to the connection.


3.2.7 Finally, implement the configuration changes by clicking Activate in the Unified Firewall. This concludes the configuration steps on the Unified Firewall in the branch office.
4) Setting up port forwarding on the LANCOM router (scenario 2 only):
Site-to-site VPN SSL uses the UDP port 49152 by default. It must be forwarded to the Unified Firewall.
The port for VPN SSL can be changed in the Unified Firewall.
If you are using a router from another manufacturer, approach them for information about the appropriate procedure.
4.1) Open the configuration of the router in LANconfig and got to the menu IP Router → Masq. → Port forwarding table .

4.2) Modify the following parameters:
- First port : Specify the p ort 49152 .
- Last port : Specify the p ort 49152 .
- Intranet address : Specify the IP address of the Unified Firewall in the transfer network between the Unified Firewall and the LANCOM router.
- Protocol : In the dropdown menu select the option UDP .

4.3) Write the configuration back to the router.