
Description:
This article describes how an ePaper server can be connected to Office 365 using modern authentication in order to show appointments in Office 365 on ePaper displays.
Please note, that LANCOM Systems cannot perform troubleshooting for such a scenario as an analysis of the external systems (Microsoft Azure and Office 365) is not possible.
As of February 2026, the LANCOM Wireless ePaper Server product will reach end-of-life status. LANCOM Systems will then completely discontinue support for this product.
For service requests such as licence releases, registrations or unlock codes for displays, please contact our service team at service@lancom.de.
Thank you for your understanding.
Requirements:
- Access to Office 365
- Access to the Office 365 admin account
- An Office 365 user account must be available that can be entered as a mailbox delegate in all of the required room mailboxes.
- The room mailboxes need to be created as resource mailboxes.
- Installed and functional ePaper scenario
- The ePaper server must be installed on a Windows system
- Windows PowerShell as of version 7.0 must be available on the Windows system where the Python scripts are executed
- Current web browser with Java Script support as the default browser
- Python from version 3.4
Procedure:
1) Preparation in Microsoft Azure:
Access to Office 365 is implemented in the background via Microsoft Azure, so whenever the system uses Office 365, it also needs access to Microsoft Azure. Some settings must be made in Microsoft Azure in order for the ePaper server to connect to Office 365.
1.1) Use the following link to log into Microsoft Azure.
https://portal.azure.com/#blade/Microsoft_AAD_RegisteredApps/ApplicationsListBlade
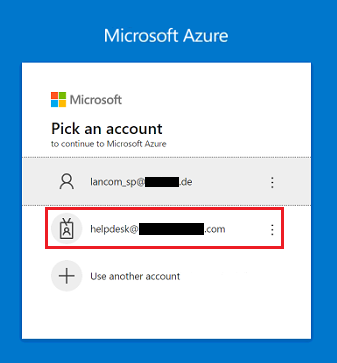
1.2) Select the Office 365 administrator account and log in.
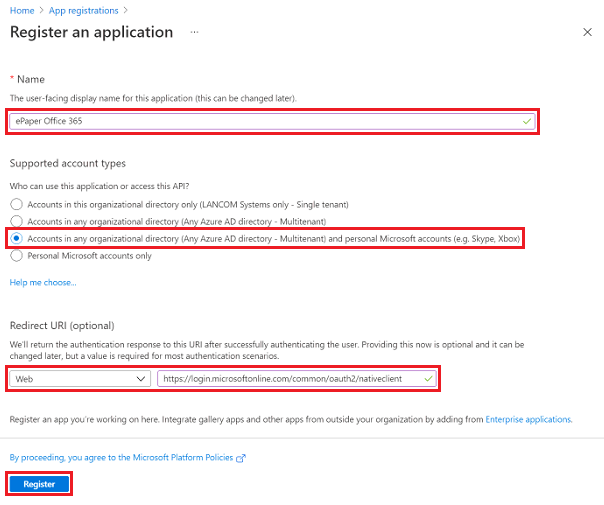
1.3) Under App registrations click on New registration to connect an application to Azure.

1.4) Modify the following parameters and then click Register:
- Name: Enter a descriptive name for the application (in this example ePaper Office 365).
- Supported account types: Select the option Accounts in any organizational directory and personal Microsoft accounts.
- Redirect URI: Make sure that Web is selected and enter the following link:
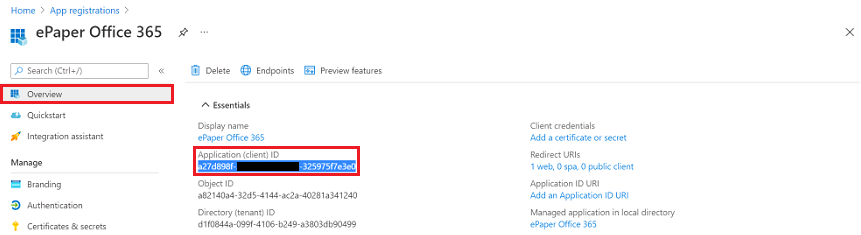
1.5) In the Overview, copy the Application (client) ID and save it in a text file for later use.
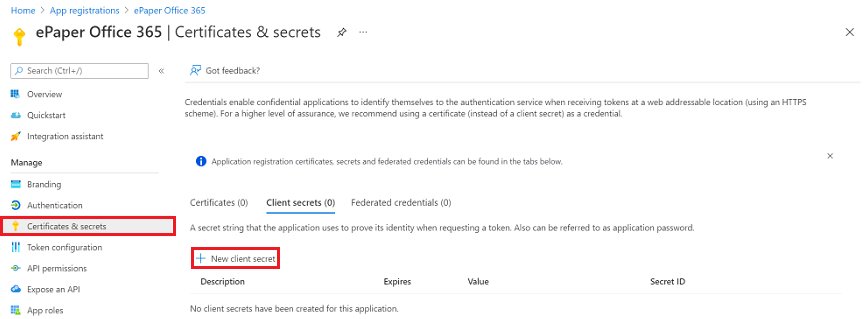
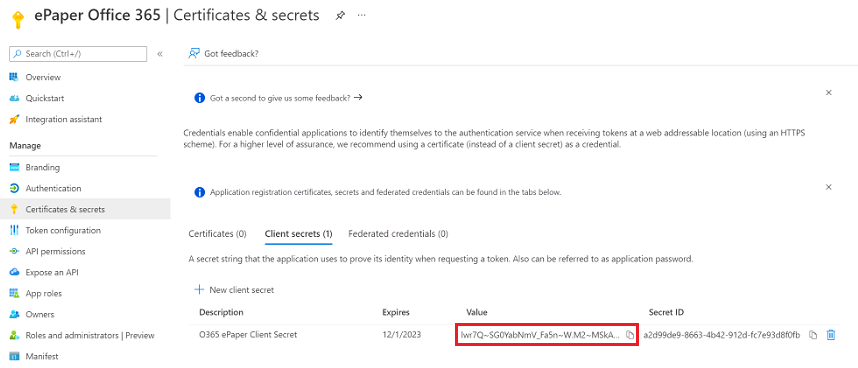
1.6) Switch to the tab Certificates & secrets and click on New client secret to generate a key for communicating with Office 365.
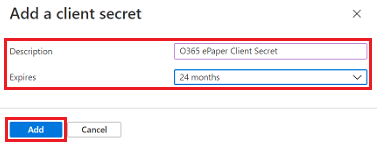
1.7) Modify the following parameters and then click Add:
- Description: Enter a descriptive name for the new key.
- Expires: From the drop-down menu, select a validity period (in this example 24 months).
After the validity expires, a new key must be created and stored in the Python scripts (see steps 2.2 and 2.3).
1.8) Copy the Secret key (value) and save it in a text file for later use.
The secret key must be copied at this time, as this is subsequently no longer possible. In this case the key must be deleted and a new one created.
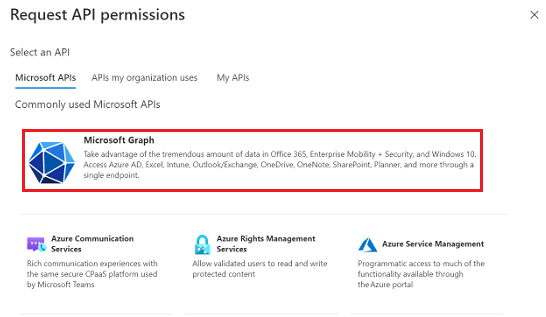
1.9) Change to the API permissions tab and click on Add a permission.

1.10) Click on Microsoft Graph.
1.11) Choose Delegated permissions.
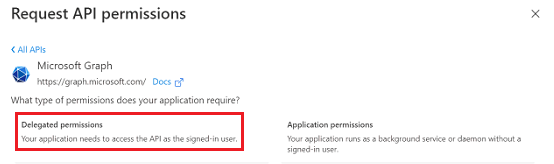
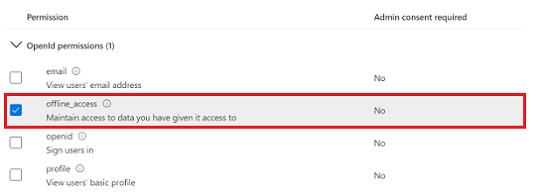
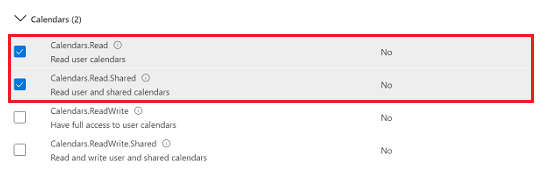
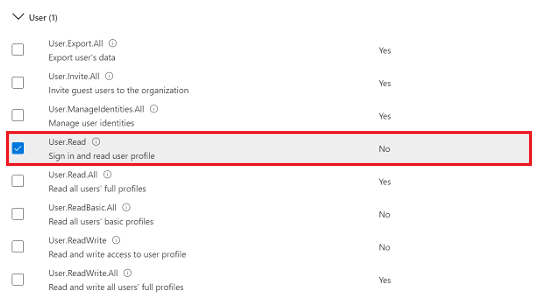
1.12) Select the following permissions and then click Add permissions:
- OpenId permissions:
- offline_access
- Calendars:
- Calendars.Read
- Calendars.Read.Shared
- User:
- User.Read (selected by default)
![]()
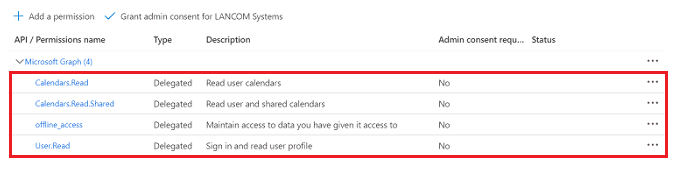
1.13) The permissions should appear as shown below.
1.14) This concludes the preparations in Microsoft Azure.
2) Adapting the supplied script files:
For the connection to work, the login data has to be stored in the Python scripts and information about the ePaper server has to be stored in the configuration file. Furthermore, the ePaper template has to be copied to the installation directory of the ePaper server, unless you use a customized template.
To do this, download the file in the attachment ePaper-Office 365-Scripts.zip and unzip it.

2.1) Copy the ePaper template into the installation directory of the ePaper server:
Skip this step if you are already using a customized template.
Copy the ePaper template lcsconference_landscape.xsl and add this to the installation directory of the ePaper server (Default: C:\Program Files (x86)\LANCOM\WePD-Server ) in the folder data → template.
2.2) Adapting the file “O365_Auth.py”:
Edit the file O365_Auth.py in a text editor and, under credentials, add the Application ID (client) copied in step 1.5 and the Secret key (value) copied in step 1.8.
The login data must be entered in single quotes, as shown in the screenshot.

2.3) Adapting the file “O365_Update_v3.py” or “O365_Update_24h_v3.py”:
Edit the file O365_Update_v3.py or O365_Update_24h_v3.py in a text editor and adjust the following parameters:
- credentials: Enter the Application ID (client) copied in step 1.5 and the Secret key (value) copied in step 1.8.
- tzone: If required, change the time zone.
One of the following scripts is used: O365_Update_v3.py or O365_Update_24h_v3.py.
- O365_Update_v3.py always shows the next appointment, even if it is not until the next day.
- O365_Update_24h_v3.py only shows appointments on the same day.
The login data and the time zone must be entered in single quotes, as shown in the screenshot.

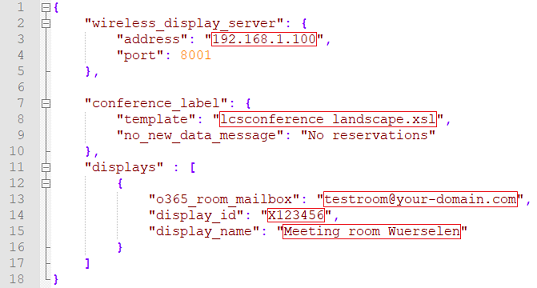
2.4) Adapting the file “config.json”:
2.4.1) Edit the file config.json and modify the following parameters:
- Under wireless_display_server, set the address as the IP address of the ePaper server.
- Under conference_label enter your preferred template, assuming that you use your own template and have given it a different name.
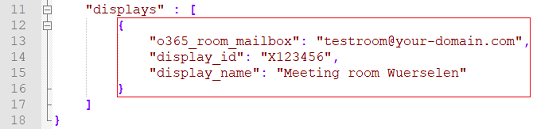
- Modify the following parameters under display:
- o365_room_mailbox: Enter the e-mail address of the required calendar mailbox.
- display_id: Enter the Display ID of an ePaper Display.
- display_name: Enter a descriptive name for the ePaper Display.
The parameters must be entered in closing quotation marks, as shown in the screenshot.
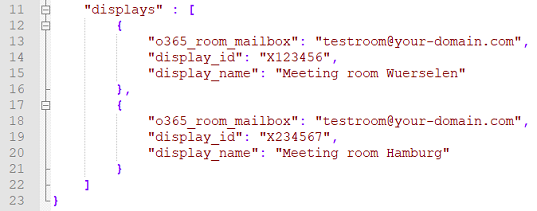
2.4.2) When using multiple ePaper displays, for each display the selected area in the displays section must be copied and pasted immediately below. The section for each ePaper display has to be separated by a comma from the section for the next display below. The parameters for the other displays must be adapted as described in step 2.4.1.
2.4.3) For two ePaper displays, see the displays section appears as follows.
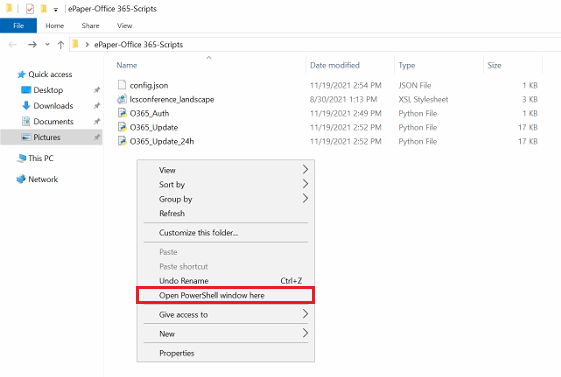
3) Final steps in the Windows Power Shell on the system with the ePaper server:
Open the folder containing the Python scripts, open the context menu by right-clicking while holding down the <shift key>, and select Open PowerShell window here.
As an alternative you can also start a Powershell instance and navigate to the script folder.
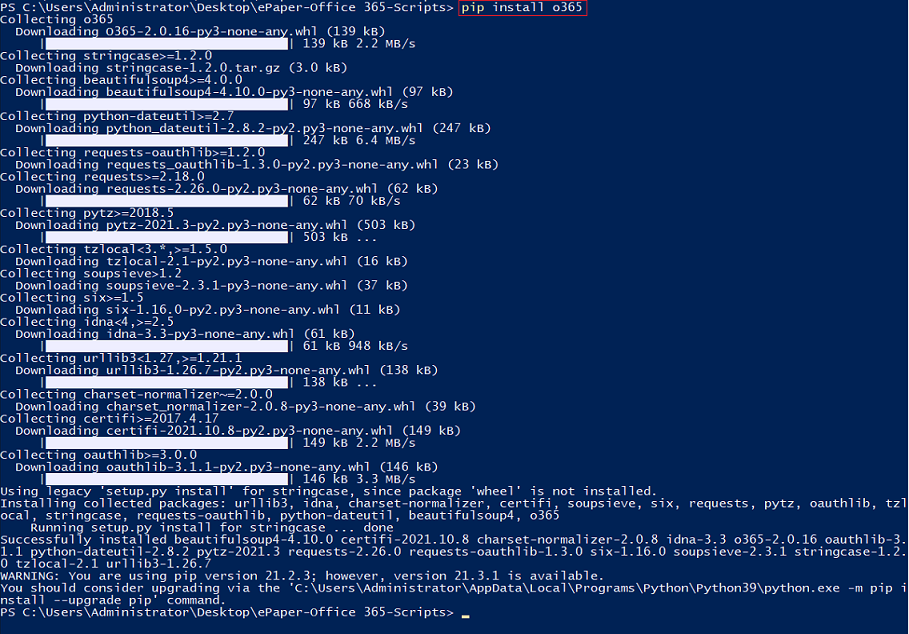
3.1) Installing the Python modules for Office 365:
3.1.1) Enter the following command: pip install o365
3.1.2) Enter the command pip install tzdata to connect the IANA timezone database.

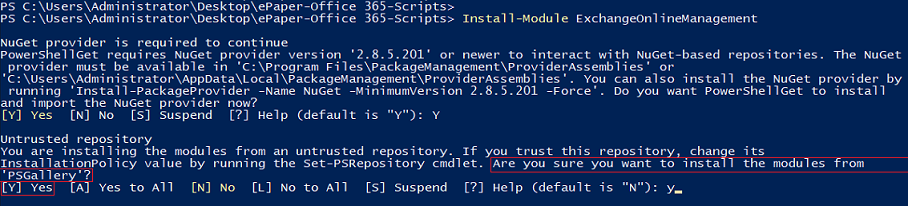
3.2) Installing the ExchangeOnlineManagement module:
3.2.1) Enter the following command: Install-Module ExchangeOnlineManagement
3.2.2) Confirm the query Do you want PowerShellGet to install and import the NuGet provider now? with Y (Yes).

3.2.3) Confirm the prompt Are you sure you want to install the modules from 'PSGallery'? with Y (Yes).
3.3) Importing the ExchangeOnlineManagement module:
To do this, enter the following command: Import-Module ExchangeOnlineManagement

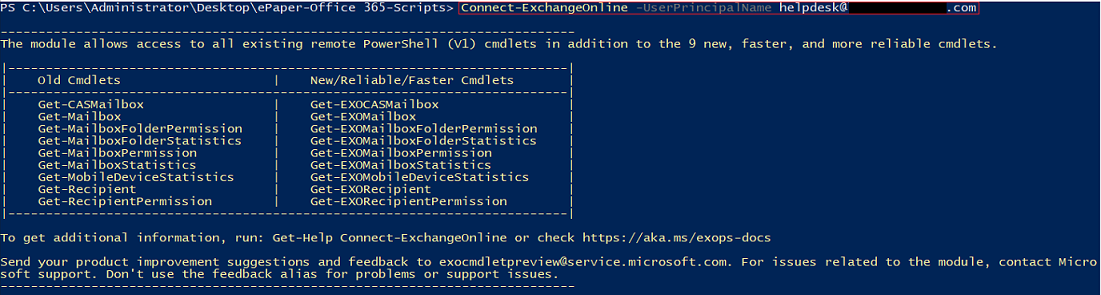
3.4) Registering the Office 365 administrator account on the ExchangeOnline module:
3.4.1) Enter the command for registering in the following format: Connect-ExchangeOnline -UserPrincipalName <admin@your-domain.com>
Set the <admin@your-domain.com> as the e-mail address of the Office 365 administrator account used in step 1.2.
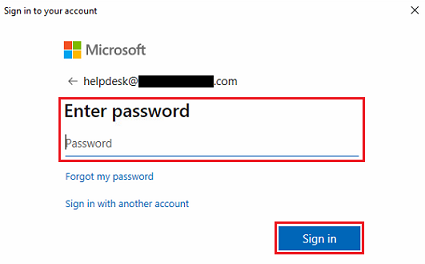
3.4.2) In the web browser pop-up window, log into the Administrator account.
The popup window is only displayed correctly if the web browser supports JavaScript.
3.5) Displaying the organizer and the subject on the ePaper Displays:
To register, enter the command in the following format: Set-CalendarProcessing -Identity <testroom@your-domain.com> -DeleteSubject $False -AddOrganizerToSubject $False
Set the <testroom@your-domain.com> as the e-mail address of the room mailbox.

3.6) Generating a token for authenticating the mailbox proxy:
3.6.1) Enter the following command: python O365_Auth.py
3.6.2) Copy the link under Visit the following url to give consent: and enter it into a web browser.

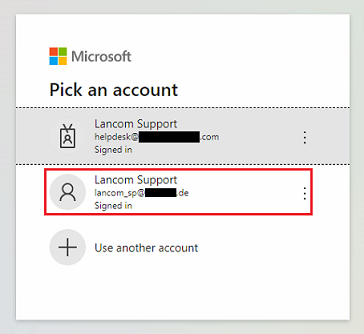
3.6.3) Log in using the account for the mailbox delegate.
3.6.4) After logging in, copy the link from the web browser.

3.6.5) Paste the link into PowerShell. Successful authentication is acknowledged with the message Authenticated!

3.8) Starting the ePaper update script:
Enter one of the following commands (see also step 2.3): python O365_Update_v3.py .\config.json -i 3 -u required or python O365_Update_24h_v3.py .\config.json -i 3 -u required
The parameter -i stands for the update interval in minutes. In this example, the ePaper server searches for updates every 3 minutes. However, an update is only rolled out to the ePaper displays if there is actually a change.
You can use the Windows Task Scheduler to continuously run the update script.
