Description:
This document describes how to use the Active Radio Control 2.0 (ARC 2.0) Wi-Fi optimization solution developed by LANCOM Systems in the LANCOM Management Cloud (LMC).
Requirements:
- Access to the LMC (subject to charge)
- Working project in the LMC
- LCOS from version 10.72 REL (download current version)
- LCOS LX as of version 6.1 (download latest version)
- ARC 2.0-compatible LANCOM access point or Wi-Fi router
When using ARC 2.0, the Indoor Only mode of the access points must be deactivated in the following menus:
- Access points with LCOS: "Wireless-LAN → Physical WLAN Settings → WLAN Interface → Radio ".
- Access points with LCOS LX: "Wireless-LAN → WLAN Networks → Radio Settings → WLAN Interface → Exclude DFS Channels".
Alternatively, you can exclude the channels outside the Indoor Only mode (DFS channels) from the optimisation (see step 3 of this article).
Techpaper on ARC 2.0:
Procedure:
1. Open the ARC 2.0 configuration menu by clicking the relevant site and going to the ARC 2.0 menu.
If an ARC 2-0 optimization has not been carried out at this site, start the necessary network scan by clicking the scan environment button. After a successful scan, the visualization page is displayed.
- In the menu Sites →<Site> → Overview you are required to enter at least the country where the site is located.
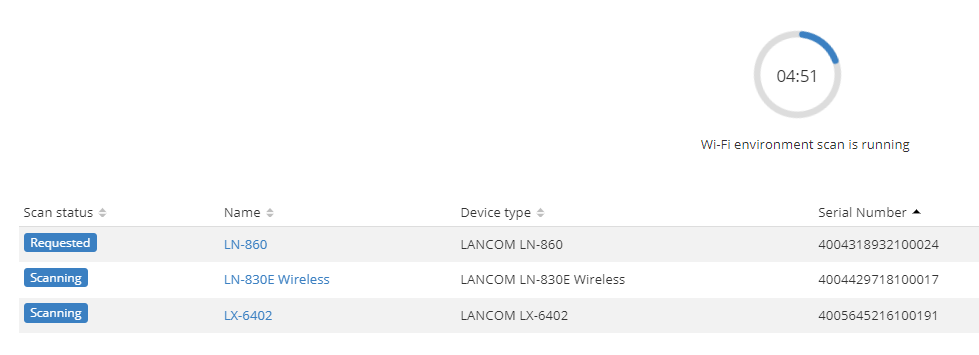
- The Wi-Fi is not available during the network scan.
- The scan can last up to 5 minutes.
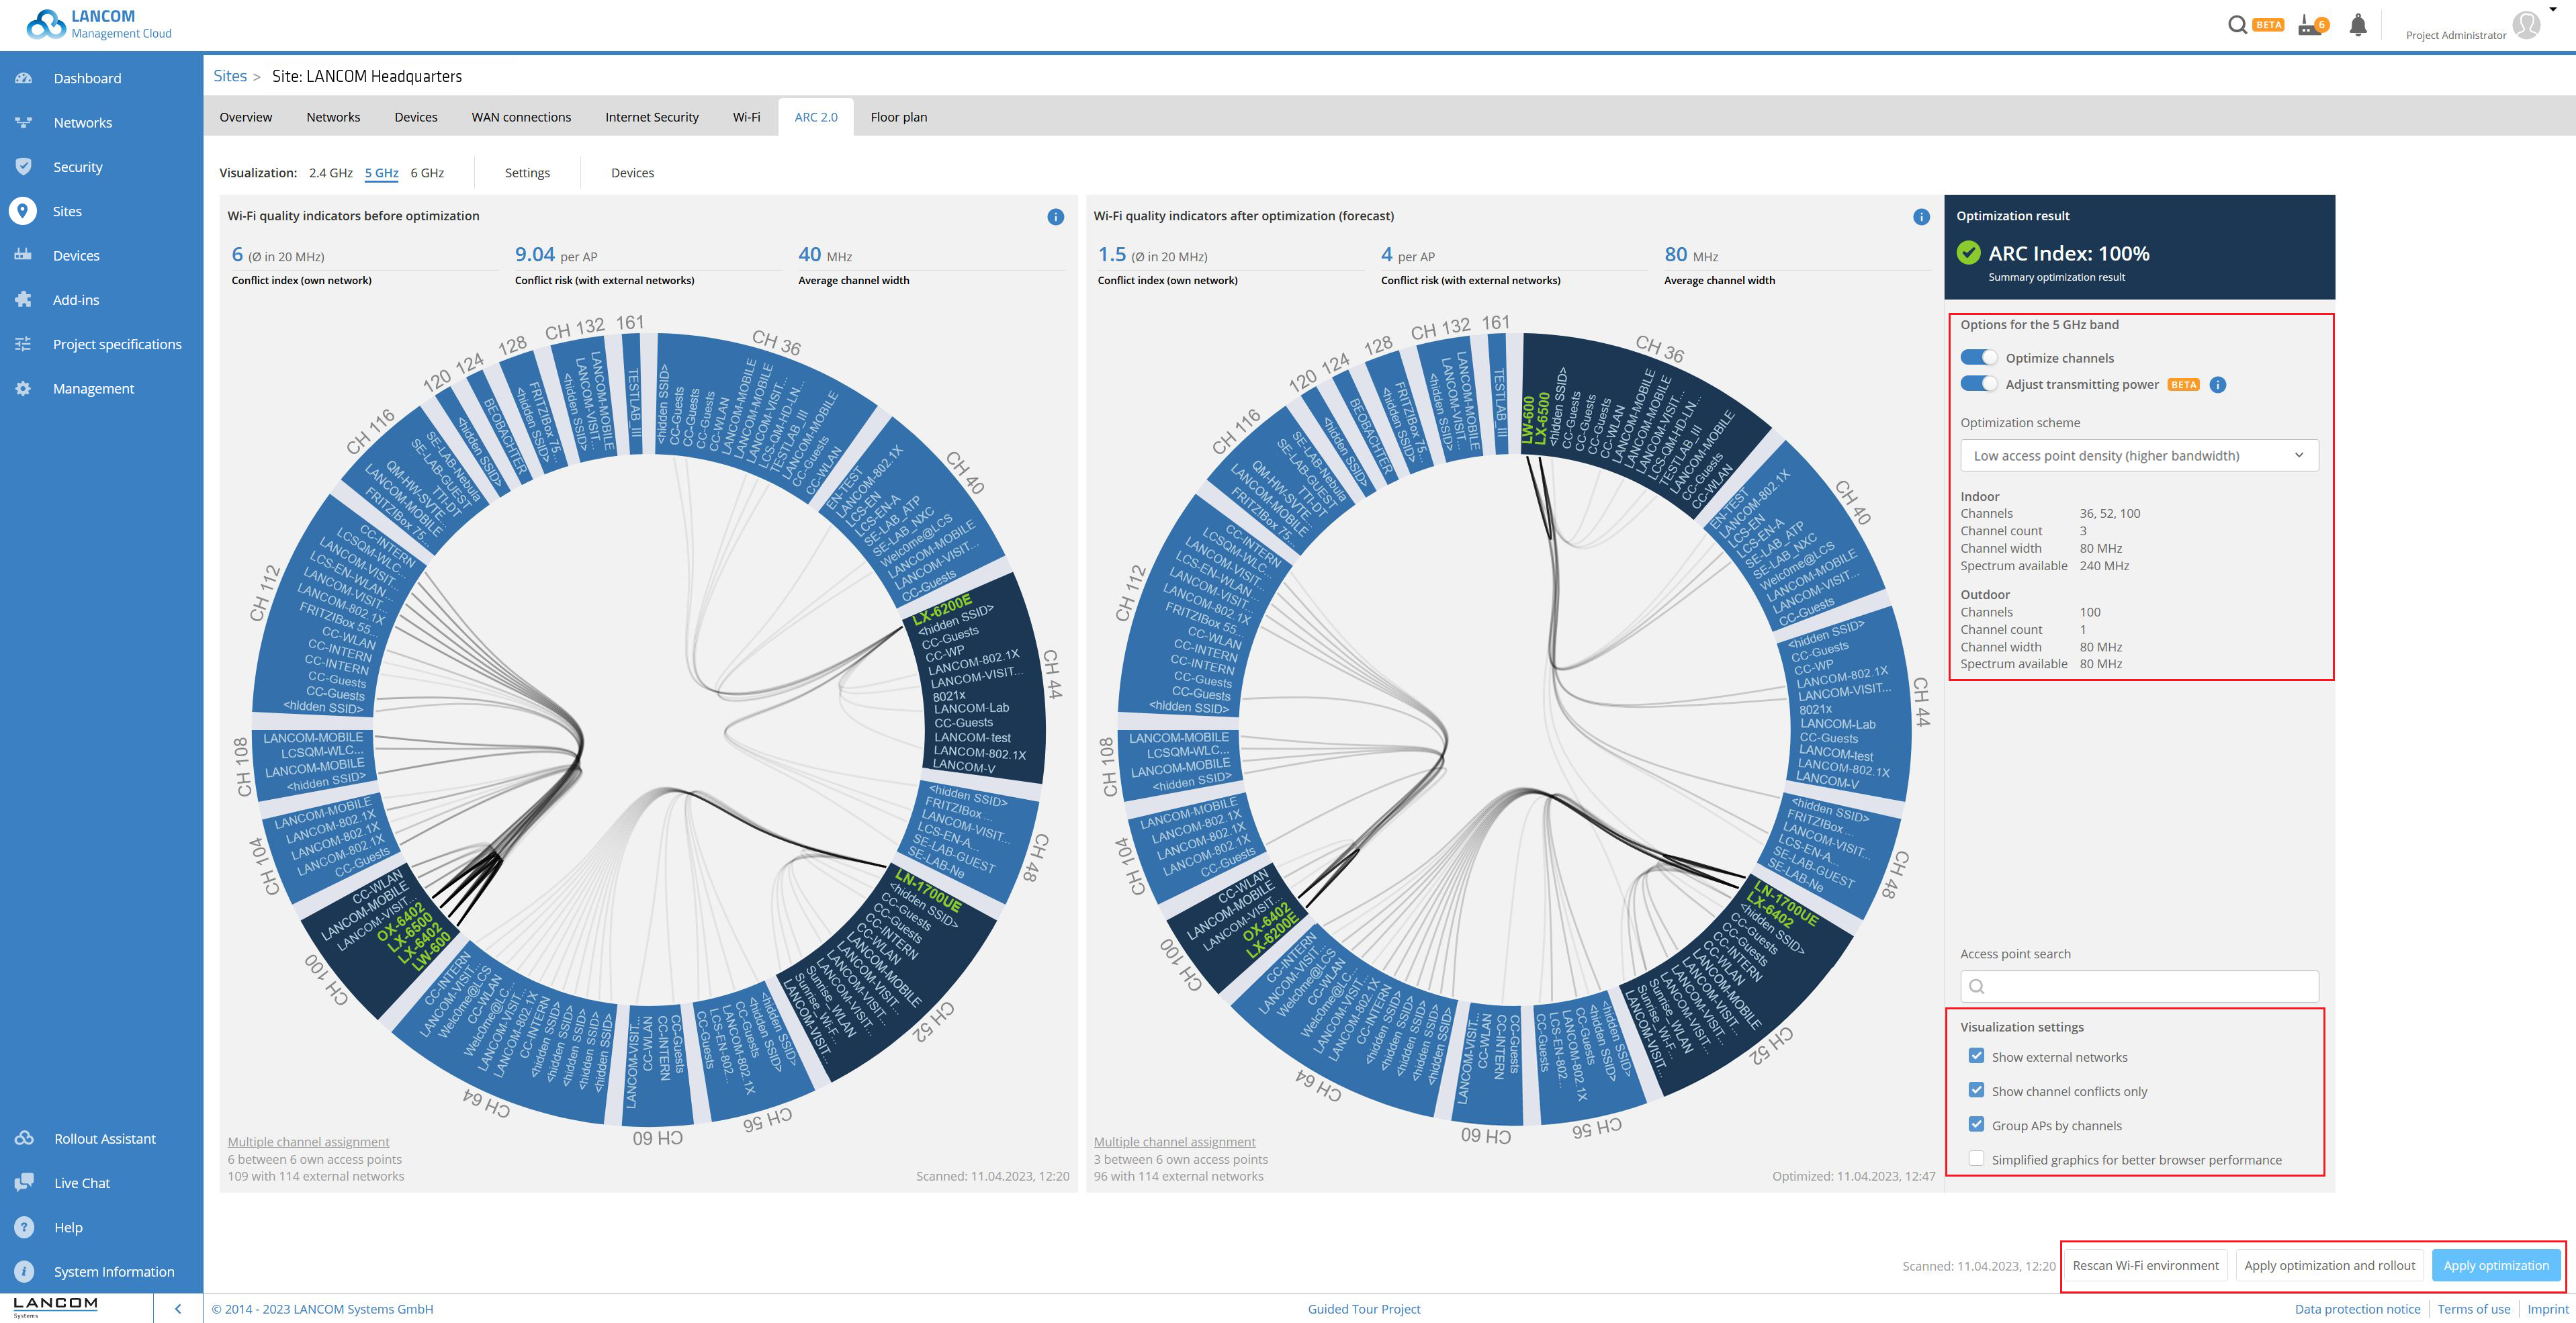
2. You are now on the Visualization page.
This page displays the optimization visualization for each frequency band and lets you configure the optimization settings.
- Optimize channels:
Identification of channels occupied by multiple users, and re-distribution according to real user behavior. External Wi-Fi networks are also reliably detected and accounted for in the optimization. - Adjust transmission power:
Coordination of the transmission power of all participating access points. - Optimization scheme: In addition to the automatic optimization, each frequency band has up to 3 optimization schemes (for all country profiles according to ETSI).
- Automatic: The access point density is determined by the environment scan and the settings are made automatically based on the determined results. This optimization scheme is recommended by LANCOM for most scenarios.
- Normal access point density: The optimization is performed based on the values for the respective frequency band as displayed below the field.
- 4-GHz band: The channel bandwidth is optimized to 20 MHz and the channels 1, 6, 11 are used.
- 5-GHz band: This is optimized to a 40-MHz channel bandwidth.
- 6-GHz band: This is optimized to an 80 MHz channel bandwidth.
- High access point density: The optimization is performed based on the values for the respective frequency band as displayed below the field.
- 4-GHz band: For scenarios that require a high bandwidth or a large number of channels. The channel bandwidth is optimized to 20 MHz and the channels 1, 5, 9, 13 are used.
- 5-GHz band: For scenarios that require a large number of channels. This is optimized to a 20-MHz channel bandwidth.
- 6-GHz band: For scenarios that require a large number of channels. This is optimized to a 40-MHz channel bandwidth.
- Low access point density (5 GHz & 6 GHz only): The optimization is performed based on the values for the respective frequency band as displayed below the field.
- 5-GHz band: For high bandwidth scenarios. This is optimized to an 80-MHz channel bandwidth.
- 6-GHz band: For high bandwidth scenarios. This is optimized to a 160-MHz channel bandwidth.
- Visualization settings:
- Show external networks: Also shows BSSIDs that are not broadcast by your LANCOM access points.
- Show channel conflicts only: Only visualizes channel conflicts that occur between your own access points on the operating channel. Disabling this option visualizes all of your own access points that are within radio range (regardless of which operating channel is set).
- Group APs by Channels: Sorts the access points according to the channels on which these SSIDs are broadcasting.
- Simplified graphics for better browser performance: Improves browser performance by simplifying the graphics.
- Show external networks: Also shows BSSIDs that are not broadcast by your LANCOM access points.
- Automatic: The access point density is determined by the environment scan and the settings are made automatically based on the determined results. This optimization scheme is recommended by LANCOM for most scenarios.
- Apply optimization and rollout: The optimized Wi-Fi configuration is adopted and immediately rolled out to the access points.
- Apply optimization: The optimized Wi-Fi configuration is adopted and only rolled out to the access points when you initiate the process in the Devices menu.
- Rescan Wi-Fi environment: Performs a rescan of your environment.
3. The Settings menu allows you to exclude access points or their frequency bands from the optimization (by clicking in front of the name of an access point). The settings for these access points will not be changed by the ARC 2.0 optimization. It is also possible to exclude individual channels from the optimization.
- With the AP weight you specify whether the relevant access point is treated as normal, important or very important. The automatic setting corresponds to a normal weight.
ARC 2.0 automatically allows for the individual usage behavior of the Wi-Fi clients in your installation. Access points that are subject to high usage are given priority in the channel distribution in such a way that they receive a channel with fewer conflicts. This usually results in a higher throughput for them. This operating mode is preset for each device via the “AP weight: Automatic” setting.
Automatic weight calculation uses learning to process historical device data and map it to an interval between 1.00 (low priority) and 4.00 (high priority). This automatic weighting is recalculated with each scan for the maximum possible accuracy.
An administrator also has the option to prioritize devices manually: Normal (weight 1.00), Important (2.00), Very important (4.00). Channel distribution is then carried out according to the manual specifications.
- You can also specify whether the transmission power for the relevant access point should be adjusted or not.
4. The Devices menu displays the LANCOM Wi-Fi routers or access points which you can optimize with ACR 2.0. Use this menu to start the initial scan when you use ARC 2.0 for the first time, or rescan the environment if necessary.
Devices that have been provided with an offline acknowledgement are still included in this list, but do not provide any data during a scan. The fact that the devices do not provide data must be confirmed during a scan.
- The scan takes up to 5 minutes. During the scan, the progress and scan status are displayed in this menu.
- During the scan, the Wi-Fi modules switch off all configured SSIDs so that the Wi-Fi clients lose their connection to the access point. After the scan, the SSIDs are reactivated.


