
...
| Seiteneigenschaften |
|---|
Description:
In einem WLAN-Controller Szenario kann es sinnvoll sein Access Points a WLAN controller scenario, it may be useful for access points (LCOS LX) mit konfigurierter P2P-Verbindung ebenso durch den WLAN-Controller verwalten zu lassen, damit die dort konfigurierten SSIDs zusätzlich ausgestrahlt werden können. Allerdings gibt es hier einige Fallstricke, welche dazu führen, dass über die P2P-Verbindung keine Daten mehr übertragen werden können oder diese nicht mehr funktioniert.
In diesem Artikel werden Handlungsempfehlungen für den Betrieb von LCOS LX Access Points mit konfigurierter P2P-Verbindung in einem WLAN-Controller Szenario beschrieben.
| Hinweis |
|---|
LANCOM Systems bietet die folgenden Handlungsempfehlungen als Hilfestellung an. Aufgrund der verschiedenen Problemstellungen empfiehlt LANCOM Systems die Access Points mit der P2P-Verbindung im Standalone-Betrieb zu verwenden und leistet daher keinen Support bei der Einrichtung und Analyse eines solchen Szenarios! |
Requirements:
- LCOS LX ab Version 6.10 (download aktuelle Version)
- LCOS ab Version 10.72 auf dem WLAN-Controller (download aktuelle Version)
- LANtools ab Version 10.72 RU1 (download aktuelle Version)
- Bereits eingerichtete und funktionsfähige P2P-Verbindung zwischen zwei Access Points mit LCOS LX
- Bereits eingerichtetes und funktionsfähiges WLAN-Controller Szenario
Procedure:
VLAN-IDs der verwendeten SSIDs manuell in der P2P-Verbindung der Access Points hinterlegen:
| Info |
|---|
Die P2P-Verbindung von Access Points mit LCOS LX kann nicht in einem WLAN-Controller konfiguriert werden. Werden die WLAN-Parameter vom WLAN-Controller auf entsprechende Access Points ausgerollt, führt dies bei jeder Änderung des WLAN-Profils auf dem WLAN-Controller dazu, dass die Verknüpfung zur P2P-Verbindung in dem WLAN-Netzwerk auf dem Access Points gelöscht wird. Dadurch können keine Daten mehr zwischen dem WLAN-Netzwerk und der P2P-Verbindung übertragen werden. Als Workaround können die VLAN-IDs der verwendeten WLAN-Netzwerke manuell in der P2P-Verbindung auf den Access Points hinterlegt werden, damit die Verknüpfung zwischen WLAN-Netzwerk und P2P-Verbindung gegeben ist. |
| Info |
|---|
Führen Sie die folgenden Schritte auf allen Access Points in dem P2P-Verbund aus. |
1. Öffnen Sie die Konfiguration des Access Points in LANconfig und wechseln in das Menü Wireless-LAN → WDS → Links.
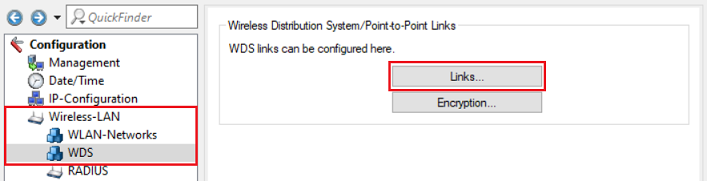
2. Wählen Sie die vorhandene P2P-Verbindung (WDS) aus und klicken auf Edit.
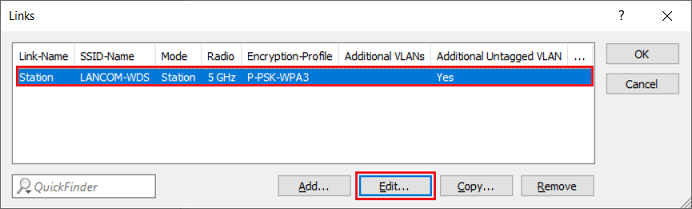
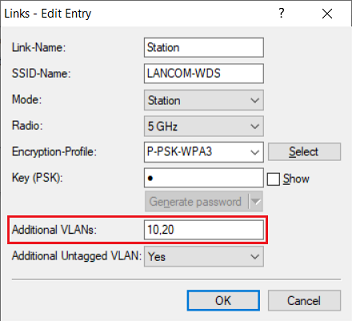
3. Tragen Sie bei zusätzliche VLANs die VLAN-IDs der WLAN-Netzwerke ein, welche über die P2P-Verbindung übertragen werden sollen. Diese müssen als kommaseparierte Liste eingetragen werden (z.B. 10,20).
| Info |
|---|
Soll auch ein vorhandenes "untagged VLAN" über die P2P-Verbindung übertragen werden, muss die Option Additional Untagged VLAN aktiv sein. Diese Option ist in der Standard-Einstellung aktiv, sodass hier im Normalfall keine Änderung erforderlich ist. |
4. Die Konfigurationsschritte auf dem Access Point sind damit abgeschlossen. Schreiben Sie die Konfiguration in das Gerät zurück.
Eigenes WLAN-Profil für Access Points mit der P2P-Verbindung auf dem WLAN-Controller einrichten:
| Info |
|---|
Bei Änderungen an den Radio-Einstellungen über den WLAN-Controller kann es vorkommen, dass die WLAN-Parameter zuerst an den Access Points ausgerollt werden, welcher per LAN angebunden ist. Dieser startet dann sein WLAN neu, sodass der Access Point, welcher nur über die P2P-Verbindung erreichbar ist, die WLAN-Parameter nicht erhält und sein WLAN nicht umkonfiguriert. Sind die WLAN-Parameter zueinander inkompatibel, führt dies dazu, dass die P2P-Verbindung nicht mehr aufgebaut werden kann. Die Reihenfolge, in welcher die Access Points die WLAN-Konfiguration erhalten, lässt sich leider nicht beeinflussen. Da bei jedem Neustart des WLAN-Moduls ein DFS-Scan durchgeführt wird, kommt es nach dem Ausrollen der WLAN-Parameter bei Verwendung des 5 GHz-Bandes für die P2P-Verbindung sowie erlaubten DFS-Kanälen zudem zu einer Unterbrechung der P2P-Verbindung, bis der DFS-Scan abgeschlossen ist. Um dies zu vermeiden, ist es daher sinnvoll ein eigenes WLAN-Profil (mitsamt einem separaten physikalischen Profil) für die betroffenen Access Points zu erstellen, damit bei einer Änderung des normalen physikalischen Profils die P2P-Verbindung nicht abbricht. Eine Änderung des physikalischen Profils für die Access Points im P2P-Verbund sollte hingegen nur selten erforderlich sein. |
that operate a P2P link to be managed by the WLAN controller in order for the SSIDs configured there to be broadcast as well. However, there are potential pitfalls that could stop data can being transmitted over the P2P link, or that it stop working altogether.
This article provides recommendations for operating LCOS LX access points configured with a P2P link in a scenario with a WLAN controller.
| Hinweis |
|---|
LANCOM Systems makes the following recommendations. On specific grounds, LANCOM Systems recommends that access points running a P2P link should operate in standalone mode. As a consequence, LANCOM cannot provide any support in installing and analyzing a scenario of this type. |
Requirements:
- LCOS LX as of version 6.10 (download latest version)
- LCOS as of version 10.72 on the WLAN controller (download latest version)
- LANtools as of version 10.72 RU1 (download latest version)
- Installed and functional P2P link between two access points with LCOS LX
- Installed and functional WLAN controller scenario
Procedure:
1. Manually enter the VLAN ID(s) of the required SSID(s) into the P2P link configured on the access points:
| Info |
|---|
The P2P link of access points based on LCOS LX cannot be configured on a WLAN controller. If the Wi-Fi parameters are rolled out from the WLAN controller to the corresponding access points, any change to the Wi-Fi profile on the WLAN controller will cause the connection to the P2P link on the Wi-Fi network to be deleted on the access points. The result is that data can no longer be transmitted between the Wi-Fi network and the P2P link. As a workaround, the VLAN IDs of the Wi-Fi networks can be stored manually in the P2P link on the access points so that the Wi-Fi network and P2P link remain connected. |
| Info |
|---|
Carry out the following steps on all access points in the P2P pair. |
1.1) Open the configuration for the access point in LANconfig and go to the menu item Wireless-LAN → WDS→ Links.
1.2) Select the P2P link (WDS) and click Edit.
1.3) For the additional VLANs, enter the VLAN IDs of the Wi-Fi networks which are to be transmitted via the P2P link. These are entered as a comma-separated list (e.g 10,20).
| Info |
|---|
If an untagged VLAN is also to be transmitted over the P2P link, enable the option Additional Untagged VLAN. This option is enabled by default, so normally there is no change required here. |
1.4) This concludes the configuration of the access point. You can now write the configuration back to the device.
2. On the WLAN controller, set up a dedicated Wi-Fi profile for access points with the P2P link:
| Info |
|---|
When the WLAN controller changes the radio settings, it can occur that the Wi-Fi parameters are rolled out first to an access point that is connected by LAN. This then restarts its Wi-Fi so that the access point that can only be reached via the P2P link is no longer able to receive the Wi-Fi parameters and cannot reconfigure its Wi-Fi. If the Wi-Fi parameters are now incompatible, the P2P link can no longer be established. Unfortunately, it is not possible to influence the order in which the access points receive their Wi-Fi configuration. If the P2P link operates on the 5-GHz band and the Wi-Fi parameters are rolled out, the Wi-Fi module restarts and the mandatory DFS scan is carried out. The P2P link then remains interrupted until the DFS scan is complete. To avoid this, it makes sense to create a separate Wi-Fi profile (along with a separate physical profile) for the affected access points so that the P2P link is not interrupted when changes are made to the normal physical profile. Changes to the physical profile for the access points in the P2P pair, on the other hand, should rarely be necessary. |
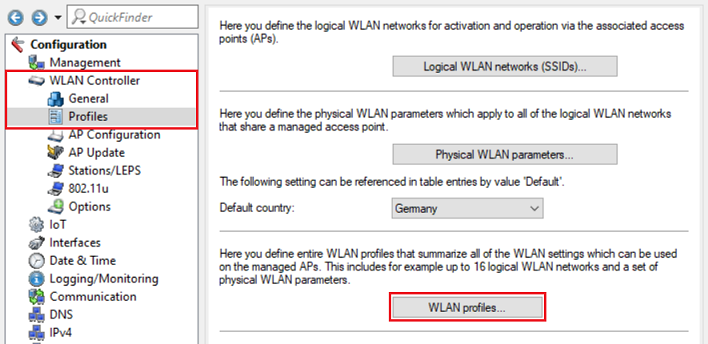
2.1) Using LANconfig, connect to the WLAN controller and navigate to the menu 1. Verbinden Sie sich per LANconfig mit dem WLAN-Controller und wechseln in das Menü WLAN Controller → Profiles → Physical WLAN parameters.
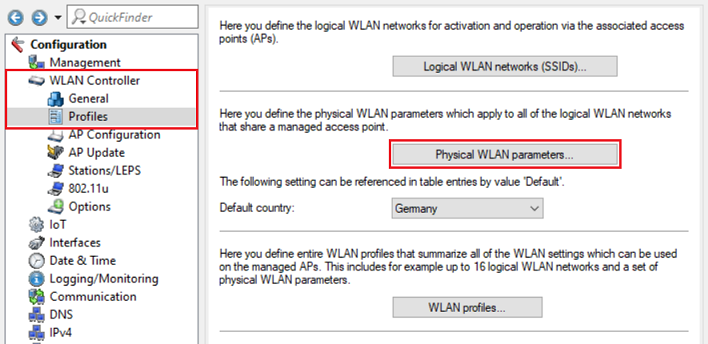
2. Wählen Sie das vorhandene Profil aus und klicken auf Copy, um ein Profil für die Access Points im P2P-Verbund mit den gleichen Parametern zu erstellen2) Select the existing profile and click Copy to create a profile for those access points in the P2P pair that have the same parameters.
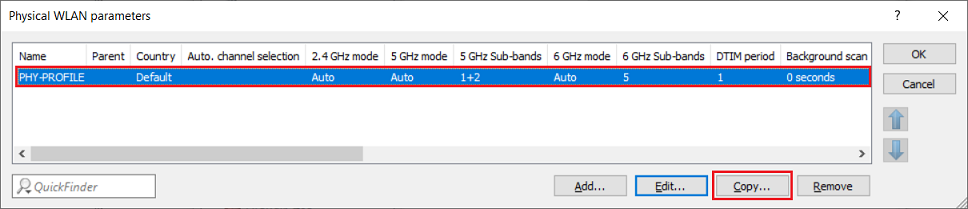
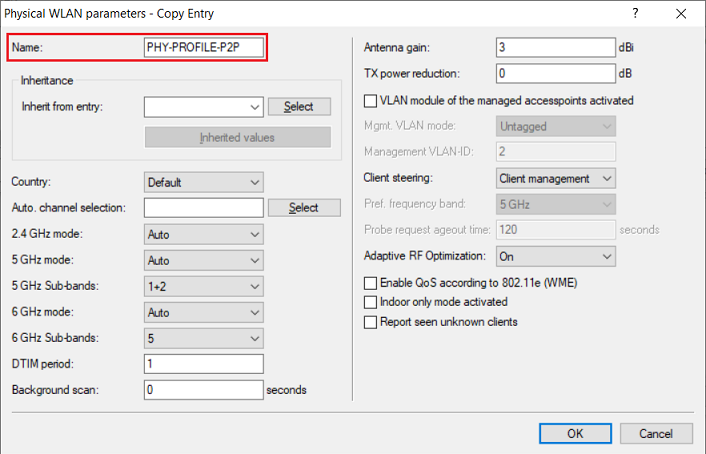
3. Passen Sie den Name des physikalischen Profils an2.3) Adjust the Name of the physical profile.
| Info |
|---|
Bei Bedarf können Sie die physikalischen Parameter anpassenYou can adjust the physical parameters if necessary. |
4. Wechseln Sie in das Menü WLAN Controller 2.4) Navigate to the menu WLAN controller → Profiles → WLAN profiles.
 5. Wählen Sie das vorhandene Profil aus und klicken auf Copy, um ein Profil für die Access Points im P2P-Verbund mit den gleichen Parametern zu erstellen
2.5) Select the existing profile and click Copy to create a profile for those access points in the P2P pair that have the same parameters.
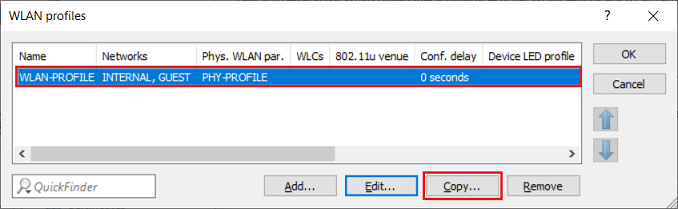
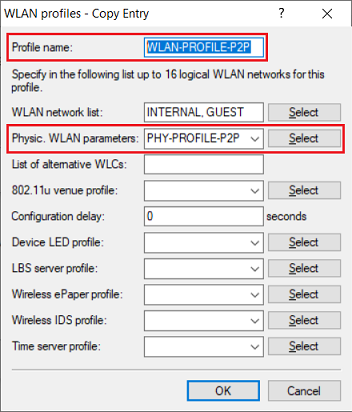
6. Passen Sie den Profile name an und wählen bei 2.6) Adjust the profile name and, under Physic. WLAN parametersdas in Schritt 3. erstellte physikalische Profil aus, select the physical profile created in step 3.
| Info |
|---|
Bei Bedarf können Sie die logischen WLAN-Netzwerke anpassenYou can adjust the logical Wi-Fi parameters if necessary. |
 7
7
. Die Konfigurationsschritte auf dem WLAN-Controller sind damit abgeschlossen. Schreiben Sie die Konfiguration in das Gerät zurück2.7) This concludes the configuration of the WLAN controller. You can now write the configuration back to the device.