| PageIdMakro |
|---|
| Seiteneigenschaften |
|---|
Description:
In diesem Artikel wird beschrieben, wie ein Access Point mit ePaper-Funkmodul (entweder mit integriertem ePaper-Funkmodul oder mit dem Wireless ePaper USB) mit einem ePaper-Server verbunden werden kannThis article describes how an access point with an ePaper radio module (either with an integrated ePaper radio module or with the Wireless ePaper USB) can be connected to an ePaper server.
Requirements:
- Access Point mit point with LCOS LX und einem integrierten ePaper-Funkmodul oder dem and an integrated ePaper radio module or the Wireless ePaper USB
- LCOS LX ab Version as of version 6.10 (download aktuelle Versionlatest version)
- LANtools ab Version from version 10.72 (download aktuelle Version)latest version)
- Any web browser for accessing the access point via Beliebiger Web-Browser für den Zugriff auf den Access Point per WEBconfig
- SSH -Client für den Zugriff auf den Access Point per Konsole (z.Bclient for command-line access to the access point (e.g. PuTTY)
Procedure:
1. Aktivieren von TCP für die ePaper-Kommunikation:
Aktivieren Sie auf dem ePaper-Server TCP für die ePaper-Kommunikation. Dies ist erforderlich, da Access Points mit LCOS LX ausschließlich die Kommunikation per TCP unterstützen.
) Enabling TCP for ePaper communication:
Enable TCP for ePaper communication on the ePaper server. This is necessary because access points with LCOS LX only support communication via TCP.
This is described in the following Knowledge Base articleDie Vorgehensweise ist in dem folgenden Knowledge Base Artikel beschrieben:
LANCOM Wireless ePaper Server: Enabling the TCP-based ePaper communication protocol (ThinAP2.0)
2. Konfigurations-Schritte auf dem Access Point) Configuration steps on the access point:
| Info |
|---|
Die ePaper-Funkmodule von Access Points mit The ePaper radio modules of access points with LCOS LX (entweder mit integriertem ePaper-Funkmodul oder mit dem either with an integrated ePaper radio module or with the Wireless ePaper USB) können nicht von einem WLAN-Controller verwaltet werden, sodass die ePaper-Konfiguration auf jedem Access Point manuell vorgenommen werden musscannot be managed by a WLAN controller, so the ePaper configuration must be done manually on each access point. |
2.1 Konfiguration per ) Configuring with LANconfig:
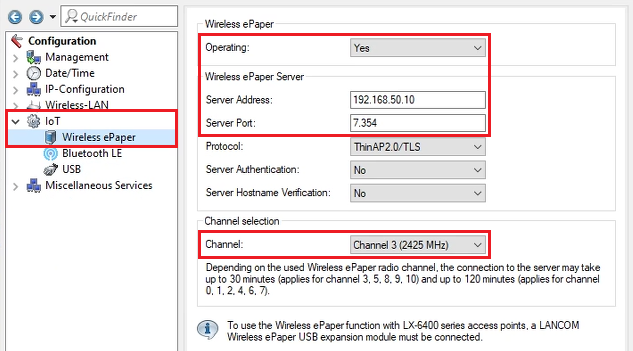
2.1.1 Öffnen Sie die Konfiguration des Access Points in LANconfig und wechseln in das Menü ) Open the access point configuration in LANconfig and go to the menu item IoT → Wireless ePaperePaper.
Passen Sie anschließend die folgenden Parameter anAdapt the following parameters:
- Operating: Wählen Sie im Dropdown-Menü die Option Yes ausFrom the drop-down menu, select the option Yes.
- Server Address: Tragen Sie die IP-Adresse des ePaper-Servers ein (in diesem Beispiel address: Enter the IP address of the ePaper server (in this example 192.168.50.10).
- Server Port: Stellen Sie sicher, dass der Port 7354 hinterlegt istport: Check that the port is set to 7354.
- Channel: Wählen Sie im Dropdown-Menü einen Kanal für das ePaper-Funkmodul aus.From the drop-down menu, select a channel to be used by the ePaper radio module.
| Info |
|---|
When selecting a channel, the channels |
| Info |
Bei der Kanalauswahl sollten die Kanäle 3, 5, 8, 9 und 10 bevorzugt verwendet werden, da mit diesen eine schnellere Verbindung mit den Displays aufgebaut werden kann (siehe Beschreibung unter and 10 should be preferred, as they allow faster connection establishment to the displays (see description under Channel selection). Werden mehrere ePaper Access Points verwendet, ist zu beachten, dass bei benachbarten Access Points unterschiedliche Kanäle verwendet werden, damit diese sich nicht gegenseitig störenIf several ePaper access points are used, note that neighboring access points should use different channels so that they do not interfere with one another. |
2.1.2 Die Konfiguration der ePaper-Parameter auf dem Access Point ist damit abgeschlossen. Schreiben Sie die Konfiguration in das Gerät zurück) This concludes the configuration of the ePaper parameters on the access point. You can now write the configuration back to the device.
2.2 Konfiguration per ) Configuring with WEBconfig:
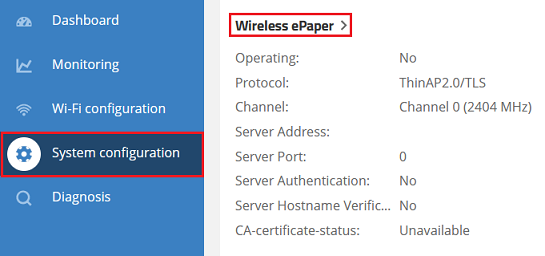
2.2.1 Verbinden Sie sich per WEBconfig mit dem Access Point und wechseln in das Menü ) Use WEBconfig to connect to the access point and go to the menu System configuration → Wireless ePaper.
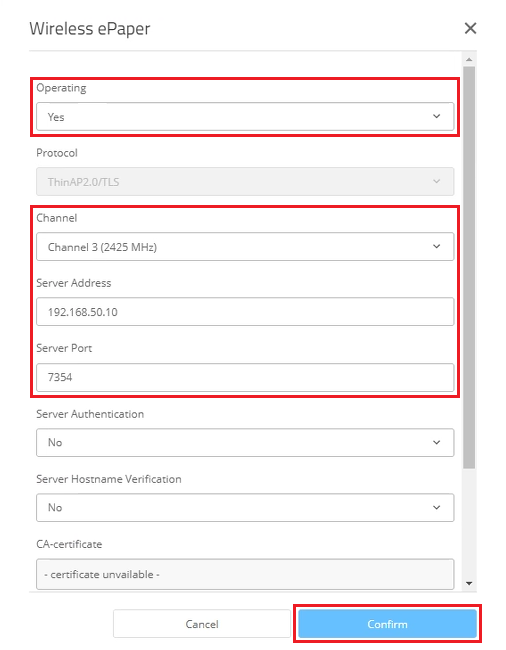
2.2.2 Passen Sie die folgenden Parameter an und klicken auf ) Modify the following parameters and click Confirm:
- Operating: Wählen Sie im Dropdown-Menü die Option Yes ausFrom the drop-down menu, select the option Yes.
- Channel: Wählen Sie im Dropdown-Menü einen Kanal für das ePaper-Funkmodul ausFrom the drop-down menu, select a channel to be used by the ePaper radio module.
- Server Address: Tragen Sie die IP-Adresse des ePaper-Servers ein (in diesem Beispiel 192.address: Enter the IP address of the ePaper server (in this example 168.50.10).
- Server Port: Stellen Sie sicher, dass der Port 7354 hinterlegt istport: Check that the port is set to 7354.
| Info |
|---|
Bei der Kanalauswahl sollten die Kanäle When selecting a channel, the channels 3, 5, 8, 9 und 10 bevorzugt verwendet werden, da mit diesen eine schnellere Verbindung mit den Displays aufgebaut werden kann. Werden mehrere ePaper Access Points verwendet, ist zu beachten, dass bei benachbarten Access Points unterschiedliche Kanäle verwendet werden, damit diese sich nicht gegenseitig störenand 10 should be preferred, as they allow faster connection establishment to the displays. If several ePaper access points are used, note that neighboring access points should use different channels so that they do not interfere with one another. |
2.2.3 Die Konfiguration der ePaper-Parameter auf dem Access Point ist damit abgeschlossen.
3. Verbinden des ePaper Access Points mit dem ePaper-Server:
) This concludes the configuration of the ePaper parameters on the access point.
3) Connecting the ePaper access point to the ePaper server:
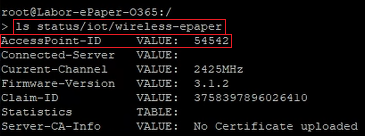
3.1) Use the command line to connect to the ePaper access point by entering the command 3.1 Verbinden Sie sich per Konsole mit dem ePaper Access Point und geben den Befehl Status/IoT/Wireless-ePaper ein. Kopieren Sie die Copy the AccessPoint-ID und speichern diese in einer Textdatei ab and save it in a text file.
| Info |
|---|
Bei dem With the Wireless ePaper USB ist die , the AccessPoint-ID auch auf dem Stick selber vermerkt. is also printed on the stick itself. For access points with LCOS LX and an integrated ePaper radio module, the Bei Access Points mit LCOS LX mit integriertem ePaper-Funkmodul ist die AccessPoint-ID (AP-ID) auf einem separaten Aufkleber auf der Unterseite des Gerätes vermerktis also noted on a print on the bottom of the device. |
3.2 Klicken Sie in LANconfig auf ) In LANconfig click Tools → Start Wireless ePaper management.
| Info |
|---|
Alternativ können Sie den ePaper-Server auch direkt im Web-Browser aufrufenAlternatively, you can also call up the ePaper server directly in the web browser. |

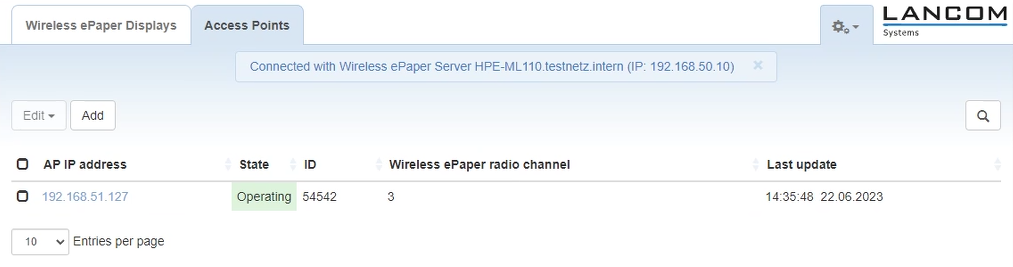
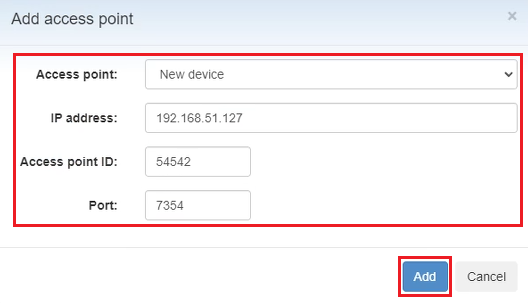
3.3 Wechseln Sie im ePaper-Server in den Reiter Access Points und klicken auf ) On the ePaper server, go to the Access Points tab and click Add.

3.4 Passen Sie die folgenden Parameter an und klicken auf ) Modify the following parameters and then click Add:
- Access Point: Wählen Sie im Dropdownmenü die Option New device auspoint: From the drop-down menu, select the option New device.
- IP address: Tragen Sie die IP-Adresse des ePaper Access Points einEnter the IP address of the ePaper access point.
- Access point ID: Tragen Sie die in Schritt Enter the AccessPoint-ID of the ePaper access point read out in step 3.1 ausgelesene AccessPoint-ID des ePaper Access Points ein.
- Port: Tragen Sie den Port 7354 einEnter port 7354.
3.5 Nach etwa ein bis maximal zwei Minuten taucht der Access Point in der Verwaltung auf und kann anschließend verwendet werden) After about one to two minutes (max.) the access point appears in the administration and can then be used.