
...
| Seiteneigenschaften |
|---|
Description:
Für die Konfiguration und Fehler-Analyse ist ein Zugriff auf den LANCOM Router erforderlich. Steht kein Zugriff über eine Fernwartung zur Verfügung, kann es erforderlich sein über das Internet auf den Router zuzugreifen.
In diesem Artikel wird beschrieben wie der Zugriff für LANconfig / WEBconfig sowie per SSH erlaubt werden kann und welche IP-Adressen eingetragen werden müssen, damit ein Fernzugriff durch den Support von LANCOM Systems ermöglicht wird.
| Info |
|---|
In Szenarien mit einem vorgeschalteten Router (Plain-Ethernet Verbindung) muss für den Zugriff auf den LANCOM Router ein Portforwarding für die verwendeten Ports eingerichtet werden. Im Standard sind dies die TCP-Ports 22 (SSH) und 443 (HTTPS). Ist der Zugriff durch den LANCOM Support nicht mehr erforderlich, empfiehlt LANCOM Systems den Fern-Zugriff zu deaktivieren. |
Requirements:
- LCOS ab Version 9.24 (download aktuelle Version)
- LANtools ab Version 9.24 (download aktuelle Version)
- SSH-Client für den Zugriff auf die Konsole (z.B. PuTTY)
Procedure:
Zugriff auf den LANCOM Router per HTTPS und SSH erlauben:
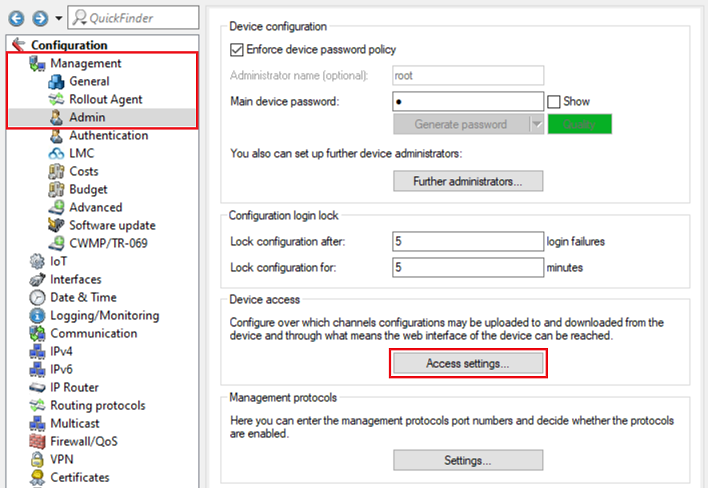
1. Öffnen Sie die Konfiguration des Routers in LANconfig und wechseln in das Menü Management → Admin → Zugriffseinstellungen.
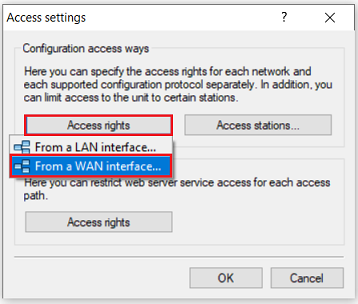
2. Öffnen Sie bei Konfigurations-Zugriffs-Wege das Menü Zugriffs-Rechte → Von einer WAN-Schnittstelle.
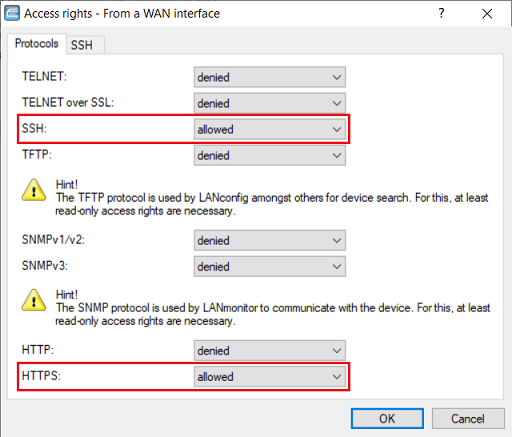
3. Wählen Sie bei den Protokollen SSH und HTTPS im Dropdownmenü jeweils die Option erlaubt aus, um den Zugriff auf den Router zu erlauben.
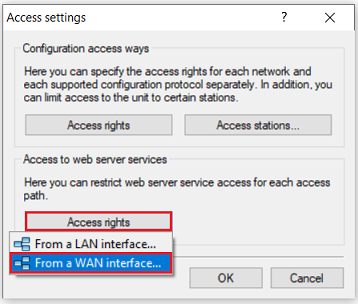
4. Öffnen Sie bei Zugriff auf Web-Server-Dienste das Menü Zugriffs-Rechte → Von einer WAN-Schnittstelle.
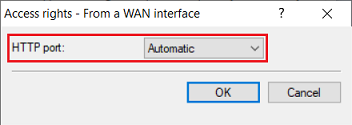
5. Stellen Sie sicher, dass bei HTTP-Port die Option Automatisch ausgewählt ist, damit der Web-Server aktiv ist.
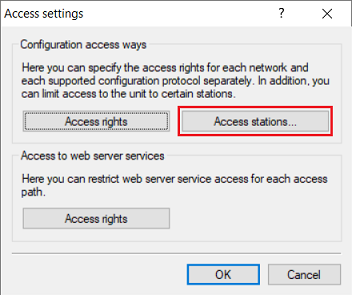
6. Wechseln Sie in das Menü Zugriffs-Stationen.
Es handelt sich bei den Zugriffs-Stationen um eine Whitelist. Der Zugriff ist also nur noch von den dort hinterlegten IP-Adressen bzw. IP-Netzwerken möglich.
| Hinweis |
|---|
In der Tabelle Zugriffs-Stationen müssen alle IP-Netzwerke bzw. IP-Adressen hinterlegt werden, von denen der Zugriff auf den Router möglich sein soll. Hier müssen also zwingend auch die internen Netzwerke hinterlegt werden. Ansonsten ist der Zugriff auf den Router aus dem internen Netzwerk nicht mehr möglich! |
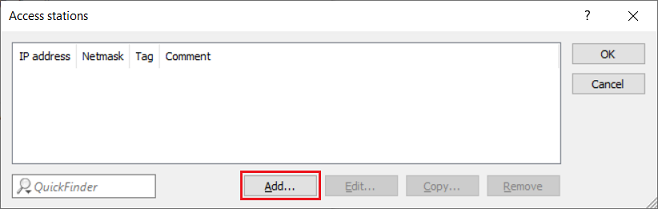
7. Klicken Sie auf Hinzufügen, um einen neuen Eintrag zu erstellen.

8. Tragen Sie zuerst das lokale Netzwerk ein, von dem der Zugriff auf den Router erfolgen soll. Passen Sie dazu folgende Parameter an:
Access to the LANCOM router is required for configuration and error analysis. If there is no remote maintenance available for accessing the device, it may be necessary to connect to the router from the Internet.
This article describes how to enable access by LANconfig / WEBconfig and SSH, and which IP addresses have to be set in order to enable remote access by LANCOM Systems Support.
| Info |
|---|
In scenarios with an upstream router (plain Ethernet connection), port forwarding must be set up for the ports used to access the LANCOM router. By default these are the TCP ports 22 (SSH) and 443 (HTTPS). If access by LANCOM Support is no longer required, LANCOM Systems recommends that you deactivate the remote access. |
Requirements:
- LCOS as of version 9.24 (download latest version)
- LANtools as of version 9.24 (download latest version)
- SSH client for command-line access (e.g. PuTTY)
Procedure:
Allow access to the LANCOM router via HTTPS and SSH:
1) Open the configuration for the router in LANconfig and switch to the menu item Management → Admin → Access settings.
2) Under Configuration access ways open the menu Access rights → From a WAN interface.
3) Under Protocols, use the drop-down menus to set the options SSH and HTTPS to allowed, which enables access to the router.
4) Under Access to web server services, open the menu Access rights → From a WAN interface.
5) Make sure that the HTTP port is set to the option Automatic, which means that the web server is active.
6) Go to the menu Access stations.
The access stations table is a whitelist. Access is only possible from the IP addresses or IP networks stored there.
| Hinweis |
|---|
The table Access stations needs to contain all of the IP networks or IP addresses from which access to the router should be allowed. Consequently, the internal networks must also be stored here. Otherwise access to the router will no longer be possible from the internal network! |
7) Click on the Add button to create a new entry.
8) First enter the local network from which the router is to be accessed. Modify the following parameters:
- IP address: Enter the network address of the local network (in this example IP-Adresse: Tragen Sie die Netz-Adresse des lokalen Netzwerks ein (in diesem Beispiel 192.168.1.0).Netzmaske: Tragen Sie die Subnetzmaske des lokalen Netzwerks ein (in diesem Beispiel
- Netmask: Enter the subnet mask of the local network (in this example 255.255.255.0).
- Routing -Tag: Belassen Sie die Einstellung auf dem Standard-Wert tag: Leave the setting as the default value 0.
- Kommentar: Vergeben Sie optional einen aussagekräftigen KommentarComment: Optionally enter a descriptive comment.
| Info |
|---|
Wiederholen Sie diesen Schritt gegebenenfalls für weitere lokale Netzwerke. |

9. Erstellen Sie einen neuen Eintrag für den Zugriff auf den Router durch den LANCOM Support per SSH und HTTPS. Passen Sie dazu folgende Parameter an:
If necessary, repeat this step for further local networks. |
9) Create a new entry for the LANCOM Support to access to the router via SSH and HTTPS. Modify the following parameters:
- IP address: Enter the IP address IP-Adresse: Tragen Sie die IP-Adresse212.117.89.9 ein.
- Netzmaske: Tragen Sie die Subnetzmaske Netmask: Enter the netmask 255.255.255.255 ein. Diese steht für genau eine IP-Adresse255. This stands for a single IP address.
- Routing -Tag: Belassen Sie die Einstellung auf dem Standard-Wert tag: Leave the setting as the default value 0.
- Kommentar: Vergeben Sie optional einen aussagekräftigen Kommentar.
10. Erstellen Sie einen neuen Eintrag für den Zugriff auf den Router durch den LANCOM Support per SSH und HTTPS. Passen Sie dazu folgende Parameter an:
- Comment: Optionally enter a descriptive comment.
10) Create a new entry for the LANCOM Support to access to the router via SSH and HTTPS. Modify the following parameters:
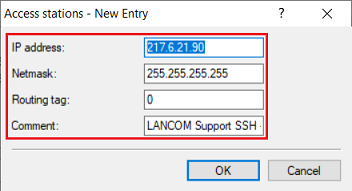
- IP address: Enter the IP address IP-Adresse: Tragen Sie die IP-Adresse217.6.21.90 ein.
- Netzmaske: Tragen Sie die Subnetzmaske Netmask: Enter the netmask 255.255.255.255 ein. Diese steht für genau eine IP-Adresse255. This stands for a single IP address.
- Routing -Tag: Belassen Sie die Einstellung auf dem Standard-Wert tag: Leave the setting as the default value 0.
- Kommentar: Vergeben Sie optional einen aussagekräftigen Kommentar.
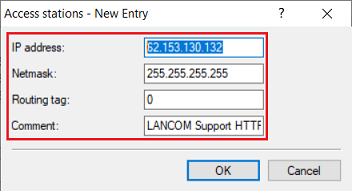
11. Erstellen Sie einen neuen Eintrag für den Zugriff auf den Router durch den LANCOM Support per HTTPS. Passen Sie dazu folgende Parameter an:
- Comment: Optionally enter a descriptive comment.
11) Create a new entry for the LANCOM Support to access to the router via HTTPS. Modify the following parameters:
- IP address: Enter the IP address 62IP-Adresse: Tragen Sie die IP-Adresse 62.153.130.132 ein132.
- Netzmaske: Tragen Sie die Subnetzmaske Netmask: Enter the netmask 255.255.255.255 ein. Diese steht für genau eine IP-Adresse255. This stands for a single IP address.
- Routing -Tag: Belassen Sie die Einstellung auf dem Standard-Wert tag: Leave the setting as the default value 0.
- Kommentar: Vergeben Sie optional einen aussagekräftigen Kommentar.
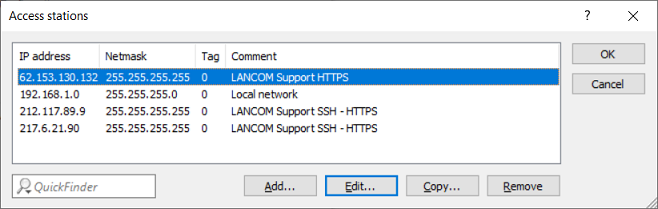
12. Die Tabelle Zugriffs-Stationen muss anschließend wie folgt aussehen.
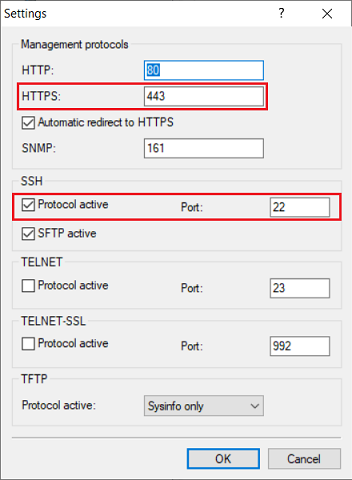
13. Wechseln Sie in das Menü Management → Admin → Einstellungen.
14. Stellen Sie sicher, dass bei SSH der Haken bei Protokoll aktiv gesetzt ist. Prüfen Sie weiterhin, ob bei HTTPS ein vom Port 443 und bei SSH ein von Port 22 abweichender Port verwendet wird. Sollte dies der Fall sein, teilen Sie dies bitte dem LANCOM Support mit.

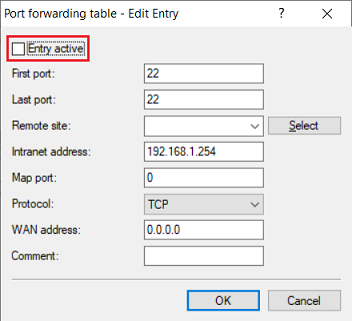
15. Prüfen Sie, ob in dem Menü IP-Router → Maskierung → Port-Forwarding-Tabelle ein Portforwarding für die für SSH und HTTPS verwendeten Ports hinterlegt ist (siehe Schritt 14.).
Sollte dies der Fall sein, deaktivieren Sie den Eintrag für die Dauer des Zugriffs durch den LANCOM Support, sofern möglich.

- Comment: Optionally enter a descriptive comment.
12) The Access stations table should then appear as shown below.
13) Navigate to the menu Management → Admin → Settings.
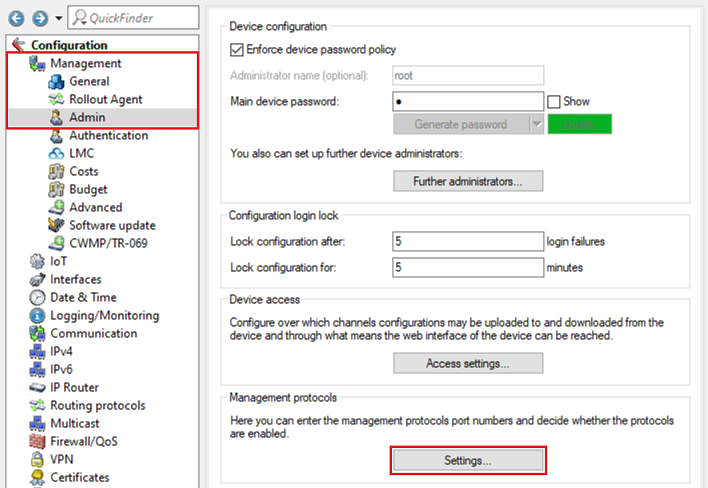
14) Make sure that under SSH there is a checkmark for Protocol active. Also check whether HTTPS uses a different port to 443 and whether SSH uses a different port to 22. If this is the case, please inform LANCOM Support.
15) Under the menu IP router → Masqu. → Port forwarding table, please check whether port forwarding has been set up for the ports used by SSH and HTTPS (see step 14).
If this is the case, please deactivate this entry for the time that LANCOM support requires access, if possible.
16) This concludes the configuration of the remote access. Write the configuration back to the router16. Die Einrichtung des Fernzugriffs ist damit abgeschlossen. Schreiben Sie die Konfiguration in den Router zurück.