
| Seiteneigenschaften |
|---|
Beschreibung:
Description:
This document describes how to configure a cloud-managed hotspot with the Dieses Dokument beschreibt, wie Sie in der LANCOM Management Cloud (LMC) einen Cloud-managed Hotspot konfigurieren können.
...
Requirements:
- LCOS ab Version as of version 10.42 bzw. 42 or LCOS LX ab Version as of version 5.30 (download aktuelle Versioncurrent version)
- Zugang zur Access to the LANCOM Management Cloud (kostenpflichtigsubject to charge)
- Web -Browser
| Info |
|---|
Die im Folgenden beschriebenen Vorgehensweisen bauen auf einem funktionsfähig eingerichteten Netzwerk-Szenario auf, welches durch die LMC verwaltet wird. |
Szenario:
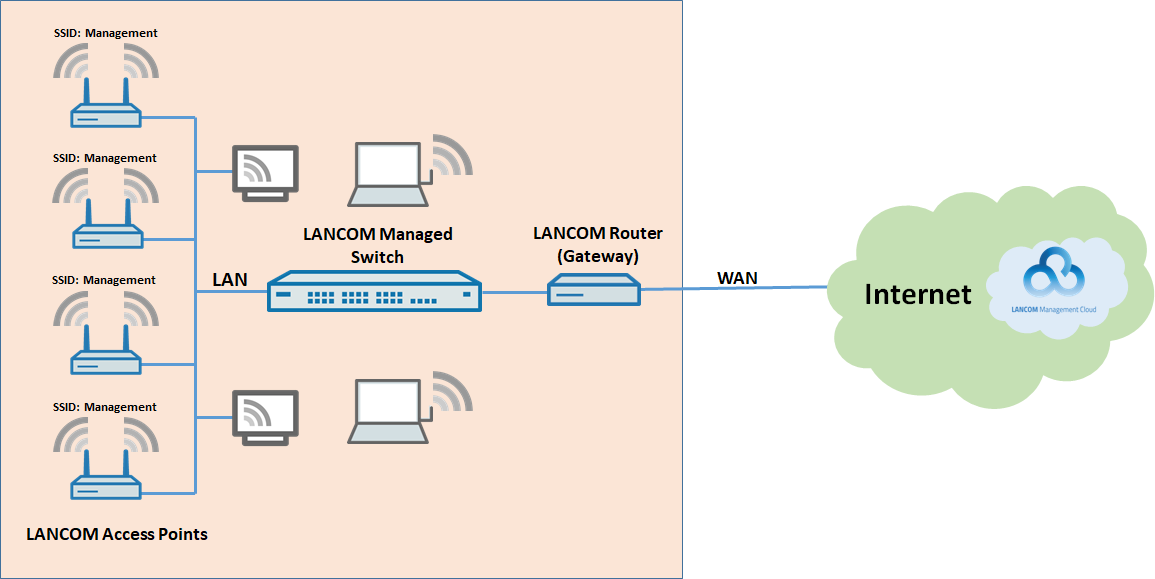
Das lokale Netzwerk einer Firma wird vollständig mit LANCOM Geräten betrieben und von der LANCOM Managment Cloud verwaltet und konfiguriert:
- Ein LANCOM Router wird als Gateway verwendet, welches u.a. auch die Inernetverbindung zur Verfügung stellt.
- Es ist ein lokales Netzwerk konfiguriert, welches allen Mitarbeitern zur Verfügung steht.
- Ein LANCOM Managed Access Switch wird als zentrale Netzwerkkomponente verwendet, an welche alle anderen LANCOM Geräte angeschlossen sind.
- Die vorhandenen LANCOM Access Points strahlen ein WLAN-Netzwerk mit der SSID "Management"aus. Dieses WLAN ist von allen Mitarbeitern der Firma nutzbar.
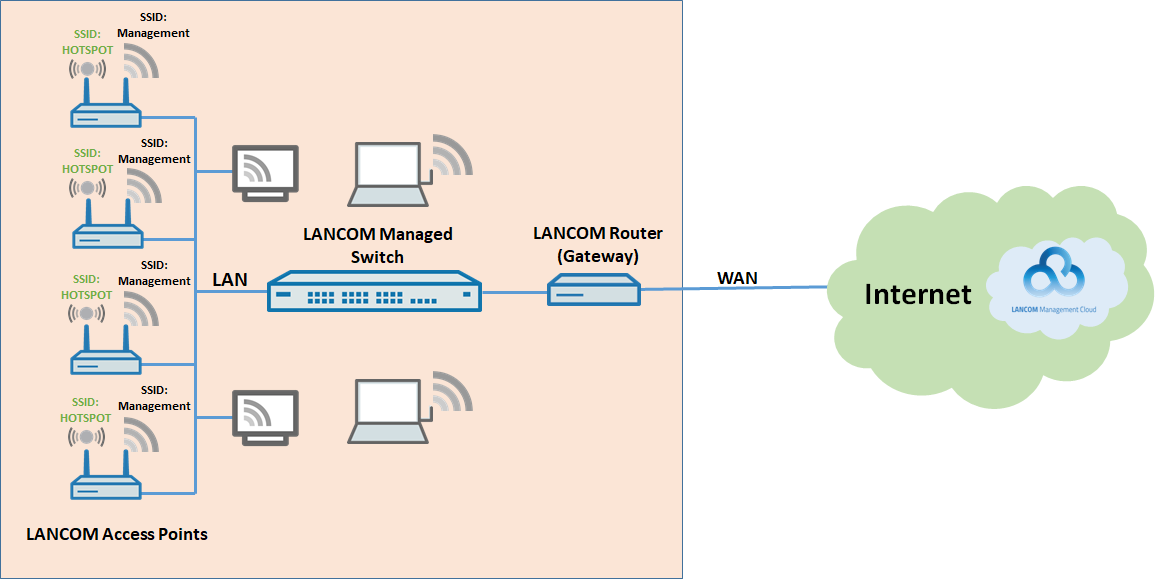
Das bestehende Szenario soll nun um einen WLAN-Zugang für Gaste erweitert werden:
- Es soll eine weitere SSID von allen Access Points ausgestrahlt werden (z.B. "HOTSPOT").
- Das Gast-WLAN soll in einem eigenen lokalen Netzwerk betrieben werden, welches keinen Zugriff auf das Mangagement-Netzwerk der Firma hat und in welchem die Benutzer ausschließlich den Internet-Zugang verwenden können.
- Es soll keine Kommunikation zwischen den im Gast-WLAN angemeldeten WLAN Clients möglich sein.
- Optional soll die zur Verfügung gestellte Bandbreite für die Internetnutzung limitiert werden.
- Für das GAST-WLAN soll optional per Application Management eine Reglementierung der zulässigen Anwendungen und/oder Kommunikations-Protokolle durchgeführt werden.
Vorgehensweise:
1. Öffnen Sie Ihr LMC-Projekt und wechseln Sie in das Menü Netze.
2. Wählen Sie Netz hinzufügen → Hotspot Netz.

3. Im Bereich Netzeinstellungen müssen Sie die grundlegenden technischen Einstellungen für das neue Hotspot Netz festlegen:
- browser
| Info |
|---|
|
| Info |
|---|
How to configure a cloud-managed hotspot where the gateway router is not managed by the LMC is described in this knowledge base article. How to configure a cloud-managed hotspot where only the LANCOM access points are managed by the LMC is described in this knowledge base article. |
Scenario:
The local network of a company is operated entirely with LANCOM devices and managed and configured by the LANCOM Management Cloud.
- A LANCOM router is operated as a gateway, which, among other things, also provides the Internet connection.
- A local network is available to all employees.
- A LANCOM managed access switch is used as the central network component to which all other LANCOM devices are connected.
The existing scenario should be upgraded with Wi-Fi access for guests:
- An additional SSID should be broadcast by all access points (e.g. “HOTSPOT”).
- The guest Wi-Fi should be in its own local network that has no access to the company's management network and that offers only Internet access to users.
- There should be no communication between the Wi-Fi clients in the guest Wi-Fi.
- Optionally there should be a limit on the bandwidth available for Internet access.
Procedure:
1) Open your LMC project and navigate to the menu Networks.
2) Click Add network → Hotspot network.

3) Use the Network settings to adjust the basic technical settings for the new hotspot network:
- SSID name: Enter a name for the broadcast SSID (e.g. HOTSPOT). This can be max. 16 characters long.
- Global IP range: This field specifies the IP address range used by the hotspot network. Enter the IP address range in CIDR notation (e.g
- SSID-Name: Geben Sie einen Namen für die ausgestrahlte SSID ein (z.B. HOTSPOT). Dieser darf maximal 16 Zeichen lang ein.
- Globaler IP-Bereich: In diesem Feld müssen Sie den IP-Adressbereich festlegen, den das Hotspot Netz verwenden soll. Der IP-Adressbereich muss in CIDR-Notation eingegeben werden (z.B. 192.168.67.0/24).
- VLAN - ID: Standardmäßig ist hier die The VLAN - ID is set to 999 vorgegeben. Sie können diese nach Ihren Wünschen ändern (im Bereich von VLAN-ID 2 bis 4094).
- Mein Router wird nicht von der LMC gemanaged und unterstützt VLAN: Wenn ein LANCOM Router verwendet wird, der von der LMC als Gateway gemanaged wird (so wie in diesem Beispiel), darf diese Option NICHT aktiviert werden.
| Info |
|---|
Sie können dieses Szenario auch einrichten, wenn Ihr Gateway-Router kein LANCOM Router ist und nicht von der LMC verwaltet wird. In diesem Fall müssen Sie die Option "Mein Router wird nicht von der LMC gemanaged und unterstützt VLAN" aktivieren. Wenn diese Option aktiv ist, wird der Hotspot-Datenverkehr im konfigurierten VLAN weitergeleitet. Die Geräte von Drittanbietern müssen so konfiguriert werden, dass sie mit dem VLAN umgehen können. |
4. An dieser Stelle können Sie die Einstellungen des Hotspot Netzwerkes bereits speichern.

5. In den weiteren Konfigurationsbereichen können Sie optionale Anpassungen zu Erscheinungsbild und Funktionalität festlegen.
- Wenn Sie z.B. möchten, dass der Zugang zum Hotspot Netz ausschließlich per Passwort-Authentifizierung möglich sein soll. ändern Sie die Funktion im Bereich Authentifizierung auf Passwort und vergeben Sie ein globales Passwort für den Zugang zum Hotspot.
| Info |
|---|
|

6. Speichern Sie Ihre Einstellungen.
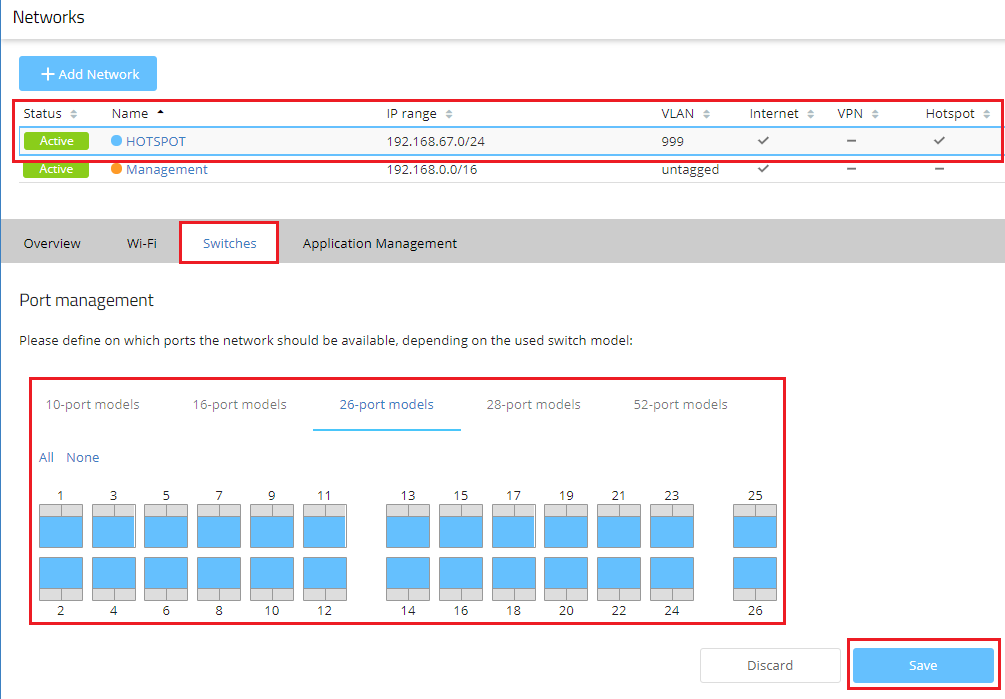
7. Im Bereich Switches müssen Sie nun die Switch-Ports Ihres Switch Modells definieren, auf welchen das neue Hotspot Netz ausgegeben werden soll. Die ausgewählten Ports werden mit der Farbe des Hotspot Netzes ausgefüllt.
8. Klicken Sie dann auf Speichern.
| Info |
|---|
Wenn Sie in Ihrem Netzwerk keinen Switch verwenden und die Access Points direkt per Ethernet-Kabel mit dem LANCOM Router verbunden sind, können Sie diesen Konfigurationschritt auslassen. |
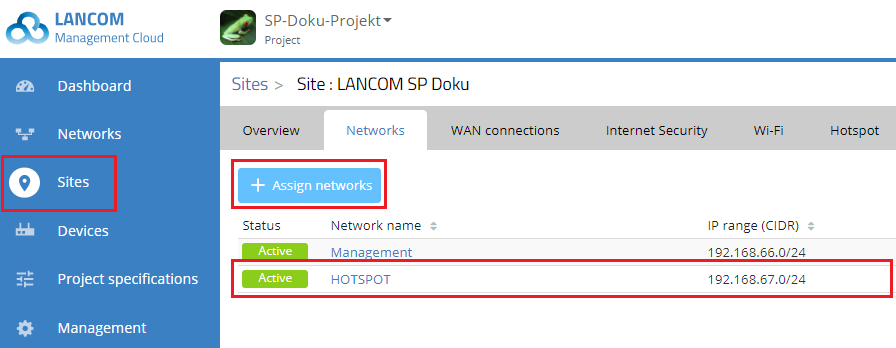
9. Wechseln Sie in das Menü Standorte → Netze und wählen Sie Ihren konfigurierten Standort aus.
10. Klicken Sie auf die Schaltfläche Netze zuweisen und wählen Sie aus der eingeblendeten Liste das Hotspot Netz aus.
11. Im letzten Schritt muss die neue Netzkonfiguration nun an alle Geräte in Ihrem lokalen Netzwerk ausgerollt werden.
- Wechseln Sie in das Menü Geräte und rollen Sie die Konfiguration an alle Geräte aus, deren Konfigurationsstatus nach der Konfiguration des Hotspot als "Nicht aktuell" dargestellt wird. Dies kann je nach Anzahl der beteiligten Geräte etwas Zeit in Anspruch nehmen.

12. Die Konfiguration des Cloud-managed Hotspot ist damit abgeschlossen. Es wird nun eine neue SSID mit dem Namen Ihres Hotspot Netzes ausgestrahlt. Sobald Sie sich mit dieser SSID verbinden, werden Sie aufgefordert, sich am Netzwerk anzumelden.
13. In den Folgenden Schritten können Sie weitere optionale Anpassungen vornehmen.
Optionale Anpassungen des Hotspot Netzes:
Verfügbare Bandbreite im Hotspot limitieren:
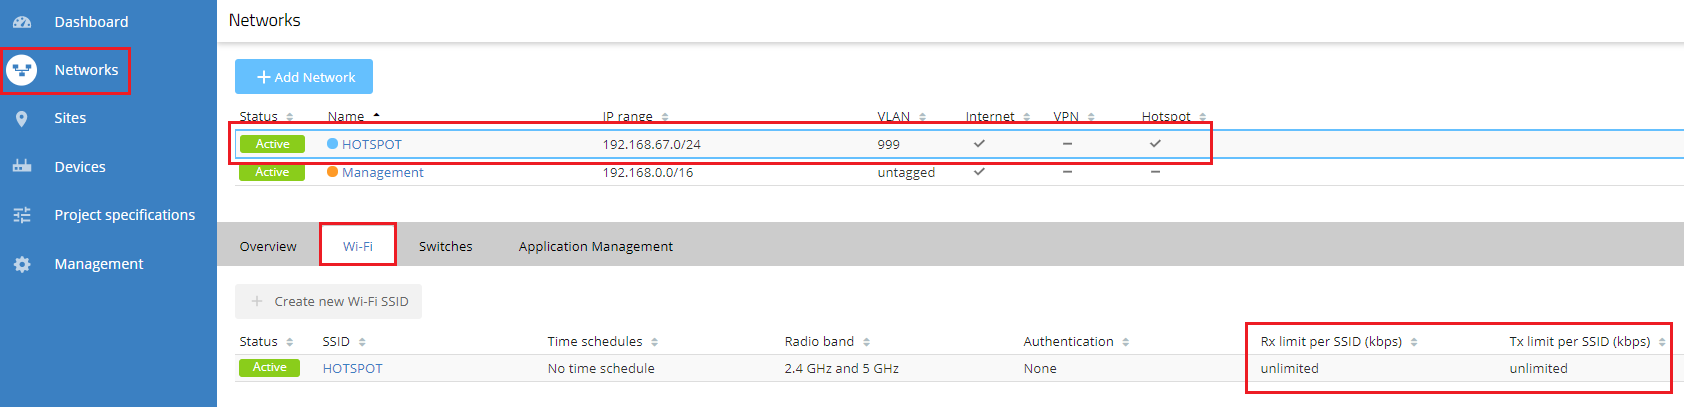
1. Wechseln Sie in das Menü Netze und markieren Sie das Hotspot Netz.
2. Klicken Sie auf die Registerkare WLAN.
3. Wenn Sie auf den SSID-Namen des Netzes klicken, öffnen sich die Einstellungen. Hier können Sie Werte für die maximal zur Verfügung gestellte Bandbreite in Sende- und Empfangsrichtung (jeweils in kBit/s) angeben.
4. Speichern Sie Ihre Einstellungen und rollen Sie die geänderte Konfiguration an Ihre Geräte aus (siehe Schritt 11).
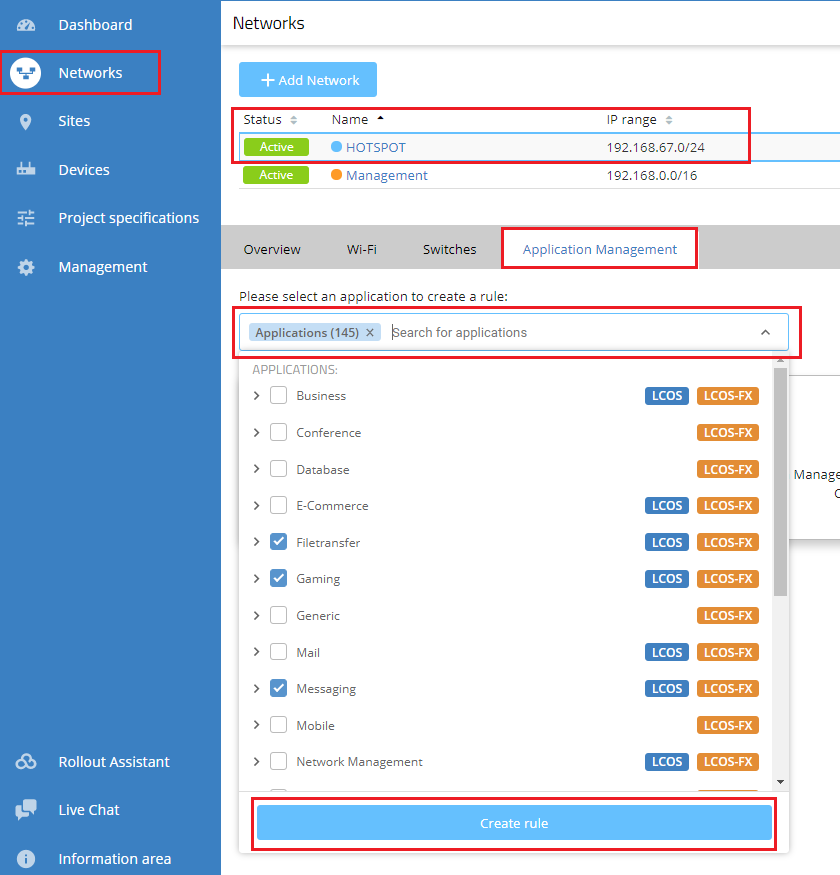
Nutzbare Anwendungen oder Protokolle im Hotspot per Application Management reglementieren:
1. Wechseln Sie in das Menü Netze und markieren Sie das Hotspot Netz.
2. Klicken Sie auf die Registerkare Application Management.
3. Im DopDown Menü können Sie die Anwendungsbereich oder auch einzelne Anwendungen auswählen, welche im Netzwerk gesperrt werden sollen. Je nach verwendetem LCOS Firmwaretyp (LCOS, LCOS LX oder LCOS FX), sind die möglichen Sperrungen unterschiedlich. Es ist auch möglich, die Verwendung einzelner Kommunikations-Protokolle im Netzwerk zu unterbinden (z.B. FTP).
4. Klicken Sie nach der Auswahl auf Erstelle eine neue Regel.
- by default. You can change this as you wish (in the range from VLAN ID 2 to 4094).
| Info |
|---|
You can also set up this scenario if your gateway router is aware of the hotspot network but is not a LANCOM router and is not managed by the LMC. In this case you need to activate the option “For the hotspot network no router (gateway) is managed by the LMC” in the Advanced settings.
|
4) At this point you can save the settings of the hotspot network.

5) The remainder of the configuration areas are for optional adjustments to the appearance and functionality.
- If, for example, you want access to the hotspot network to require password authentication, change the function in the Authentication area to Password and assign a global password for to accessing the hotspot.
- If you want to use voucher authentication, select the option provided. For a description of the configuration, see this Knowledge Base article.
| Info |
|---|
|

6) Save your settings.
7) In the Switches section you specify the switch ports used to carry the new hotspot network. The selected ports are shown in the color of the hotspot network.
8) Then click on Save.
| Info |
|---|
If your network does not use a switch and the access points are directly connected to the LANCOM router by Ethernet cable, you can skip this step of the configuration. |
9) Navigate to the menu Sites → Networks and select the site you are configuring.
10) Click the button Assign networks and select the hotspot network from the displayed list.
11) In the final step, the new network configuration is rolled out to all devices on your local network.
- Switch to the Devices menu and roll out the configuration to all devices with a configuration status shown as “Outdated” since configuring the hotspot. This may take some time depending on the number of devices involved.
12) This concludes the configuration of the cloud-managed hotspot. Your Wi-Fi will now broadcast a new SSID with the name of your hotspot network. As soon as you connect to this SSID, you will be asked to login to the network.
13) The following steps are optional adjustments.
Optional adjustments to the hotspot network:
Set up redirection to a website of your choice:
1) Switch to the Networks menu and click on the name of the hotspot network.
2) Open the Advanced Settings tab.
3) Activate the option Redirect user after login and enter the address to which the user is to be forwarded after successful login in the Redirect URL field.
4) Then click on Save.

5) The change must now be rolled out to all devices in your local network (see step 11).
Limit the bandwidth available to the hotspot:
1) Navigate to the menu Networks and select the hotspot network.
2) Click the Wi-Fi tab.
3) Click on the SSID name of the network to open its settings. You can set the values for the maximum available bandwidth in the transmit and receive directions (in kbps).
4) Save your settings and roll out the new configuration to your devices (see step 11).
Use application management to control the applications and/or protocols allowed on the hotspot:
1) Navigate to the menu Networks and select the hotspot network.
2) Click the Application Management tab.
3) From the drop-down menu you can select the application type or even individual applications that should be blocked on the network. The types of blocking differ depending on the LCOS firmware type used (LCOS, LCOS LX or LCOS FX). It is also possible to prevent the use of individual communication protocols on the network (e.g. FTP).
4) After making your selection, click Create rule.
5) Save your settings and roll out the new configuration to your devices (see step 5. Speichern Sie Ihre Einstellungen und rollen Sie die geänderte Konfiguration an Ihre Geräte aus (siehe Schritt 11).
